What is MetaMask and How Do You Use It?
Metamask is a popular cryptocurrency wallet, surpassing 10 million monthly active users. It is a crypto wallet that you can use while browsing the web to interact with decentralized applications.
It can store multiple private keys and can work on multiple networks, such as the Ethereum network and the Binance Smart Chain network. If you’ve been hearing news about Axie Infinity and other blockchain games, at one point you’ve probably heard of MetaMask too.
It allows you to do transactions between decentralized applications like UniSwap, PancakeSwap, ShibaSwap, and so on, with just a few clicks. You can also use MetaMask to register on NFT marketplaces.
Imagine going to the mall to buy groceries, would you have to memorize your banking credentials to have access to your funds inside it? No, you have your credit/debit card for that. It’s automatic, you will just need to swipe your card, type your PIN (if they require it), and voila! MetaMask works like that, making your life much much easier, but for crypto.
One of the benefits of using MetaMask is that it has super low fees, compared to other platforms that require huge gas fees just for your transaction to go through faster. Needless to say that it is one of the most popular cryptocurrency software wallets out there.
Installing MetaMask
There are a lot of ways to use Metamask, but it is super important to be vigilant when clicking links.
For example, a lot of people install a fake copy of MetaMask, and eventually find out that they just lost all of their cryptos to scammers.
So, when it comes to crypto, and since it’s a hot topic right now, always go to the application’s official website and get your links there.
For your convenience, you can use MetaMask in these platforms:
The links above were taken directly from their respective official websites, but it’s always good to double check before installing anything!
How to Install and Setup MetaMask on Your Phone
If you're into cryptocurrency buying and selling, you've probably already know what MetaMask is, but in case you... Read more
Next is you will see an onboarding sequence which you just need to follow. I’ll post the images below of what you will see using Chrome, but it shouldn’t be too different with other platforms.
1. Welcome Screen

2. New to MetaMask – new installation or import existing wallet
If you have an existing MetaMask and you’d like to import it to a new device, choose the first option. If it’s a fresh installation, choose the second option.

3. Statistics

4. Password setup

5. Wallet Security Video
Please, for the love of everything, do not skip this part without watching the video and reading the additional information on the right.

6. Secret Recovery Phrase
This is perhaps the most important part of your security when it comes to using Cryptocurrencies. For wallets, all applications require a secret recovery phrase – or a Seed Phrase.
This is something that you should never share with anyone. Don’t even copy and paste it somewhere in your computer or other applications.
What I highly recommend is for you to write this down on a piece of paper and hide that paper somewhere safe where no one but you will have access to it.

7. Confirm Security Recovery Phrase
To make sure that you’ve copied your seed phrase somewhere safe, MetaMask will ask you to type it in order.

8. Setup – Done!
Now you’re done with the setup. This is how it looks like on full screen. But it also looks the same on the add-on view which I’ll show you next.
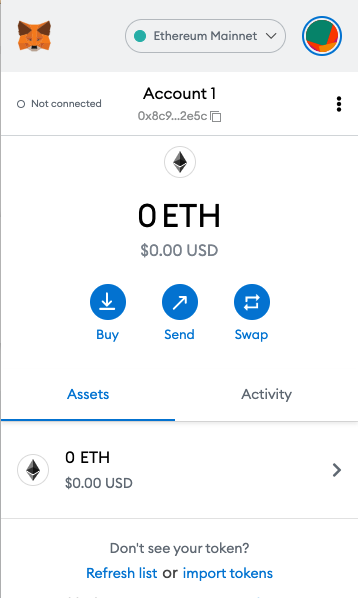
To give you an idea, on the upper right is the network. By default, it’s set to Ethereum Mainnet. Next to it is the account settings, here you can create more wallets.

This is how it normally looks like:
How to transfer existing tokens and Ethereum to MetaMask
You can send tokens and ETH from another wallet to your MetaMask account. Just copy your MetaMask public address and go to your existing wallet to send funds to your new wallet address.
Tokens that are available on MetaMask are ETH and any ETH-based token (erc20, 721, etc).
You may need to manually list some tokens to see them within MetaMask.
At the same time, MetaMask also supports hardware wallets like “Trezor” and “Ledger” on the extension. There is no hardware wallet support on mobile yet.
How to Setup TREZOR Wallet (For First-timers)
If you are serious about the cryptocurrencies in your possession, you should keep them in a hardware wallet... Read more
It’s also important to note that the wallet can only be used to store private keys for Ethereum networks.
Anyway, depositing and withdrawing tokens to and from MetaMask is easy. For this particular example, I installed MetaMask on my Google Chrome browser.
- Click on the MetaMask icon
- Make sure you are on the right Network by clicking the top dropdown option. By default, it will be on the Ethereum Mainnet.
- Once you’ve confirmed that you are on the right network, it’s time to decide what token you’d want to send to MetaMask. You can check the Assets tab to see the available tokens. If the token is not there, head over to CoinGecko and search for your token. On the sidebar, you will see a contract address. Click this and it will guide you on how to add that particular token into MetaMask.
- Then, simply click on your account, in this case the default name is “Account 1”. By clicking this, you will copy your MetaMask address.
- Now, you are ready to transfer your token to MetaMask. So, suppose you bought your token from the biggest cryptocurrency marketplaces like Binance, Crypto.com, KuCoin, Kraken, CoinMama, or others, just log in on their application and look for a way to Withdraw your token. And when you’re asked for an address, enter your MetaMask address that you just copied.
- That’s it. Under your MetaMask app, check the Activities tab after a few minutes to see the transaction.
It’s simple, really, but as always, you need to be careful first.
Try to send a small amount first to see if everything is set up correctly, before sending the full amount. In fact, even Vitalik Buterin, the creator of Ethereum, sends a test amount first before proceeding with the entire transaction.
How to Send, Receive, and Buy Funds
On the mobile app, there is a menu button at the top right. Click Wallet, and then select a token or collectible then click Send or Receive.
You can also buy Ethereum with a debit card or Apple Pay directly within MetaMask. Simply click on “Add funds”.
Note: You can also send or receive funds by sending a payment request showing your QR code to a friend, or by sharing your public address.
MetaMask Swaps
MetaMask users can also swap tokens within their wallets by collecting and comparing data from multiple decentralized exchange platforms to ensure that users get the best price with the lowest network fees.
Using MetaMask Swaps is simple. Just Pick a token that you currently own and a token that you want to exchange it with (i.e. ETH, ERC-20, etc.), then click “Swap”.
And that’s it! It can’t get any easier than that.
Here are some ETH-based tokens you can swap for, and if the token you want isn’t there, just head over to CoinGecko again and copy the contract address (or add the token directly by clicking the contract address link on CoinGecko).
- Ethereum
- Smooth Love Potion
- Ripple
- USDC or USDT
- Shiba,
- and many more.
If you’re having trouble finding a token on MetaMask Swap, it likely means that there isn’t enough liquidity for it. MetaMask works automatically and it aggregates available liquidity from leading DEXs and Professional Market Makers.
This feature of MetaMask is extremely helpful for newbies because it allows them to swap their tokens with ease.
Compared to the traditional method, say, for example, the use of PancakeSwap. Entering the contract address and the token they want to buy, then changing the slippage of the transaction for it to go through, and ensuring that the gas fees are high enough that they get processed reasonably fast.
Now that’s a lot of work for someone who isn’t sure of what they’re doing.
MetaMask does all the complex work for them, it just deducts a tiny portion for transaction fee that ranges between 0.3% – 0.875% that’s automatically factored into each quote, which then supports ongoing development for MetaMask.
Security
With all of the benefits that this software offers, it is also free to download and free to use. Sounds like something that’s too good to be true, right?
So, what’s the catch, is it safe?
Definitely! MetaMask has been audited and studied by smart and curious individuals already. (which can be viewed on several social media platforms like Facebook, YouTube, and so on).
Your private keys and passwords that are stored in MetaMask aren’t sent to their company’s server, it is stored locally, within the device that you are using. It’s like an offline digital wallet that you only turn on whenever you need it, and only you have access to it.
The only way where it would be vulnerable is if you’re using a corrupted device that gives hackers access to your private information, or if you fall victim to a phishing site or app. So, make sure that you’re downloading the original version of MetaMask because there are a lot of copy/lookalike apps out there that are made to get your private information and access your funds.
Keeping your wallet safe
MetaMask has a Secret Recovery Phrase for you to recover your funds in case you lose access to it. It is recommended that you write it down and keep it somewhere safe because if you lose access to your account, without the Secret Recovery Phrase, MetaMask won’t be able to help you recover your wallet.
Also, use Metamask on your personal device because all the important passwords are stored locally. And never share your Secret Recovery Phrase with anyone.
Advantages and Disadvantages
To wrap this up, let’s discuss the pros and cons of using MetaMask.
Advantages:
- Its amazing technological abilities make transactions fast and easy.
- It also has Built-in Token purchasing which allows you to buy the token that you want with just a few clicks.
- And of course, the fact that it’s free!
Disadvantages:
- One of the disadvantages of MetaMask is its safety concerns.
- It is a “hot” wallet/storage, which means that it is vulnerable to online attacks by hackers.
- It doesn’t have hardware wallet support yet.
- MetaMask only supports the Ethereum and ERC20 tokens.
Ending
MetaMask is a crypto wallet that you can use on various devices such as desktops and mobile phones. It is safe and reliable. It makes transactions fast and simple making your life as a trader/investor much easier. That’s why it is one of the most popular cryptocurrency wallets for Ethereum and related tokens.
And I’m going to sound like a broken record here, but NEVER share your seed phrase with anyone, not even official MetaMask support will ask for it!