15 Google Photos Tips for Power Users
On the surface, Google Photos is a simple tool that automatically organizes your photos and videos based on different factors. However, if we take a deeper look, it hides tons of amazing new features that can make photo organizing a breeze.
Read Also: Digitize old photos on your smartphone with Google PhotoScan
Whether you are a professional photographer or looking to safe-keep family memories, Google Photos has everything to please you. To help you make the most out of Google Photos, we are sharing 15 great Google Photos tips and tricks. Let’s check out the following.
1. Editing photos in Google Photos
Google Photos offers a basic photo editing tool to edit your photos on the go. Of course, it is not one of the most comprehensive photo editing tools, like GIMP or Adobe Photoshop, but it offers enough features to make basic edits.
Open up the photo that you want to edit and click on the “Edit” option above (the pen icon).

All the editing options will open up on the right side. You can add and manage dozens of filters from here and also manually adjust light and color balance. Also, there are also options to crop, rotate and manage aspect ratio of the photo.
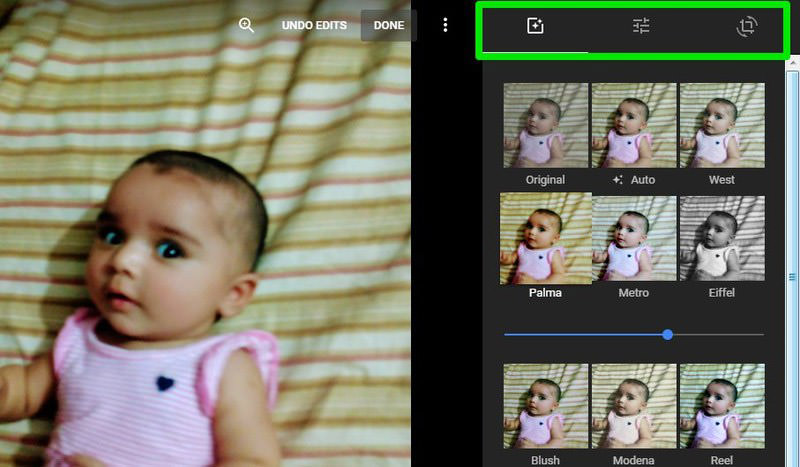
If you’re confused about which options to use, you can apply “Auto” option to automatically fix your photo. Google Photos will apply the best filters and manage the position of the photo as it thinks is best. The auto-adjust results are quite pleasing, I must say.
Although the edits will be applied to the original photo, however, you can also create a copy or undo-edits whenever you like.
2. Enabling unlimited storage
You may already know that Google Photos offers unlimited storage for your photos and videos, however, only if you let it compress their size. In order to be eligible for the unlimited storage, your photos and videos must be compressed to 16 megapixels and 1080p resolution respectively.
This resolution is more than enough for regular users who use their high-end smartphones or regular cameras for photos or videos. It will only be a problem for professional photographers who want their high-resolution photos stored in their original size and quality.
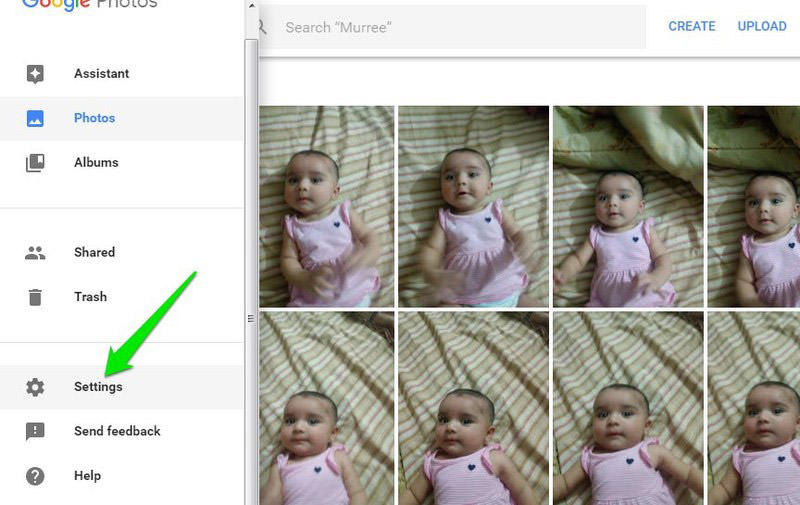
However, this option is not enabled by default. You will have to enable it by clicking on the hamburger menu at the top left corner and select “Settings” from it.
Now select “High quality” option at the top and all your newly added photos and videos will be compressed and will not contribute to your Google Drive storage.

3. Instantly recovering storage space
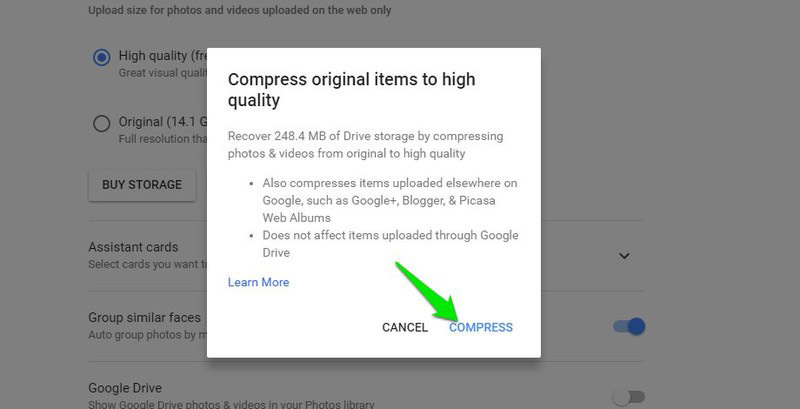
If you are low on maximum storage limit of Google Photos, you may instantly recover some of the storage by compressing photos and videos that are not compressed. Go to “Settings” again from the top left hamburger menu and click on the “Recover Storage” button.
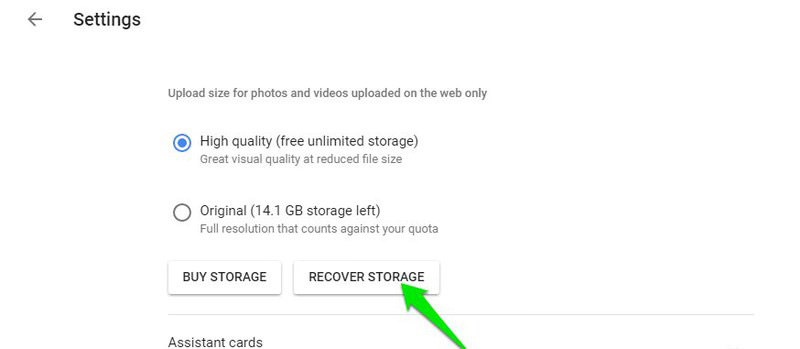
A dialog will pop up showing how much storage you can recover by compressing photos and videos. Click on “Compress” button here to compress the photos. This will compress all photos/videos that are not compressed, including photos/videos in other Google services like Google+ and Blogger, etc (except for Google Drive).
You should also use the “Recover Storage” option right after you enable the unlimited high quality photo/video storage option (see tip #2). Because it will only compress newer photos/videos, older ones will still stay in original resolution and won’t contribute to unlimited storage unless you compress them.
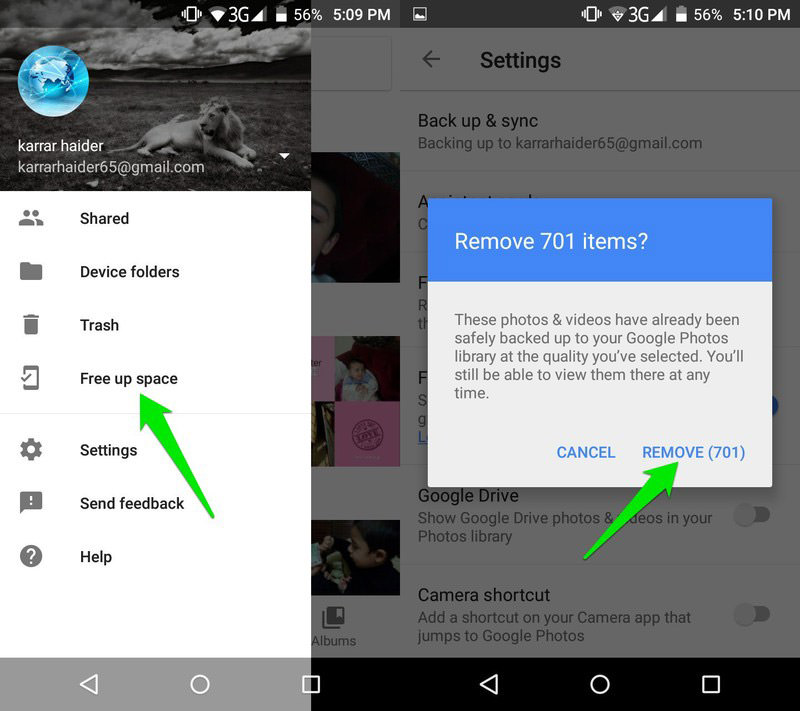
4. Saving space on your smartphone
Google Photos smartphone app also allows you to delete all photos in your phone that have been safely backed up in your Google Photos account. In case you are low on storage in your phone, you can let Google Photos delete all the photos and videos that are already backed up.
In the smartphone app, tap on the main hamburger menu at the top left corner and select “Free up device storage” option. Google Photos will find all the photos and videos and show you how many items are safely backed up and can be deleted. Just tap on the “Remove” button here and the items will be deleted.
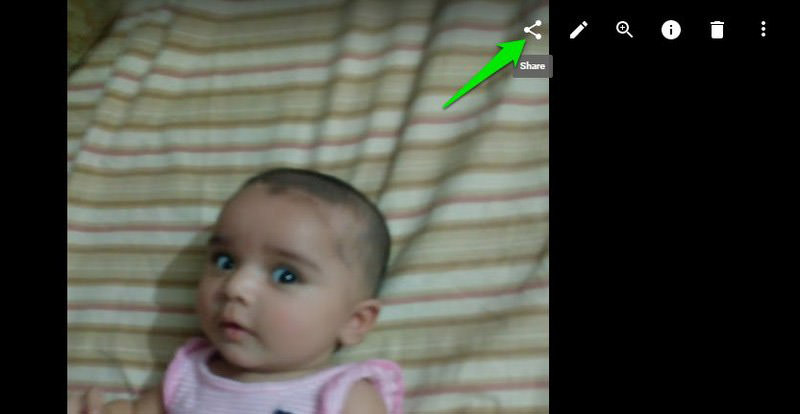
5. Share photos and videos
Google Photos also allow you to quickly share photos/videos and albums with friends or over your social media channels. Open the photo, video, album or art and click on the “Share” button at the top.
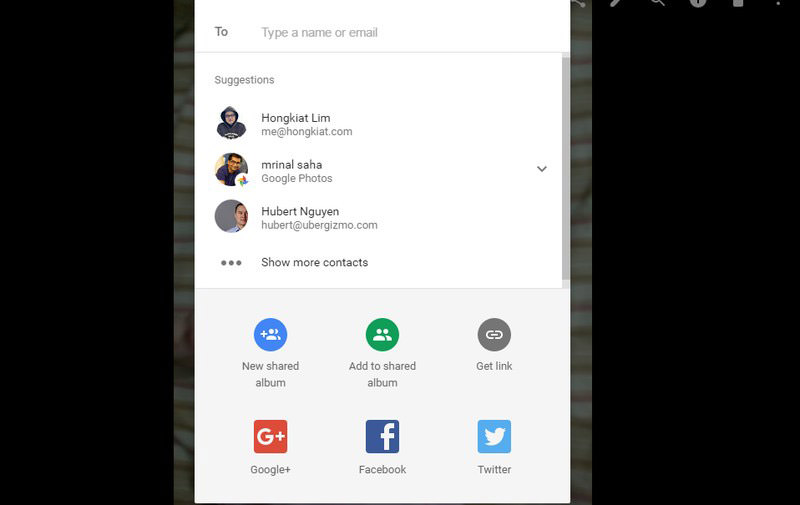
Sharing options will open up along with suggested contacts in the middle. You can share the content via email, add it to album or share over popular social media channels including Google+, Facebook, and Twitter.
Additionally, you can also get a sharable link that you can share anywhere to share the content. The shared content will open in Google Photos interface if not shared over a specific social media network.
6. Removing geolocation from shared content
When you share a photo/video, its Exif data is also shared with it. Anyone can track the exact location of where that photo was taken using this information. You can ask Google Photos to remove Geolocation data from content that is shared using the “Link” option.
Go to “Settings” and enable the option “Remove geo location in items shared by link“. Now whenever you will share content using sharable link, its location data will be removed. Although, do keep in mind that the location will still be shared if you will use other sharing options, like sharing over social media networks or via email.

7. Using Google Photos Smart Search
"Wow", "OMG", "that’s insane", "okay, that’s just creepy" are some of the words that may come to your mind when you will use Google Photos Search feature.
Google Photos Search feature is smart on levels that may make you feel a little uncomfortable. It allows you to literally use any hint regarding your photos to search for exact matches. You can use date/time, objects inside the photo, color, people and literally anything that you can think of.
As soon as you click on the “Search bar” at the top, you will see some parameters catered to your needs to quickly start your search. These include locations, videos, selfies, people, animations and more. If these are not enough for you, you can start adding keywords in the search bar to pinpoint the exact content.

The keyword can be anything that has a connection with the content you are looking for. Are you looking for photos of you son’s last birthday party? Just enter "birthday party". Was there a tree in the background of the photo? Try entering "tree" to search for it. Maybe you remember there is red color in the picture? Enter "red" and it will show all pictures with color red in it. So much so, you can even enter emojis to search for content, for example: enter smile emoji ":)" to search for all photos with people smiling.
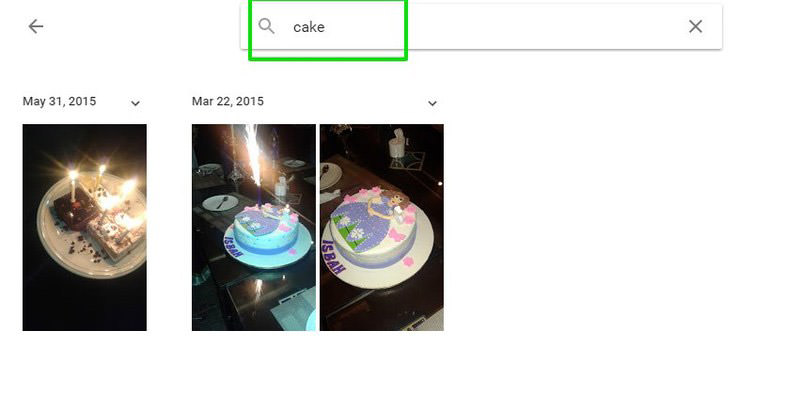
The possibilities are endless, you just need to think of something inside the picture you are looking for and trust Google photos that it will find it. I mean really, it was even able to find the lasagna in the background of my selfie!
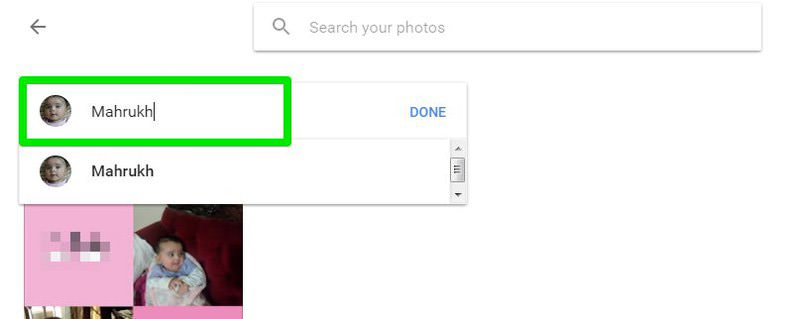
8. Add Private Labels to identify people
Although Google Photos search is smart enough to identify babies, man or women in pictures, but it cannot tell who is actually inside a picture. You can help out with that by telling Google Photos who’s face is this and it will organize all the photos of that particular person in one place.
To search for people to label, click on the search bar and Google Photos will show face photo of all the people that it can identify in your photos. Here click on the face of the person you would like to label and then click on “Who’s this?” on the next page.
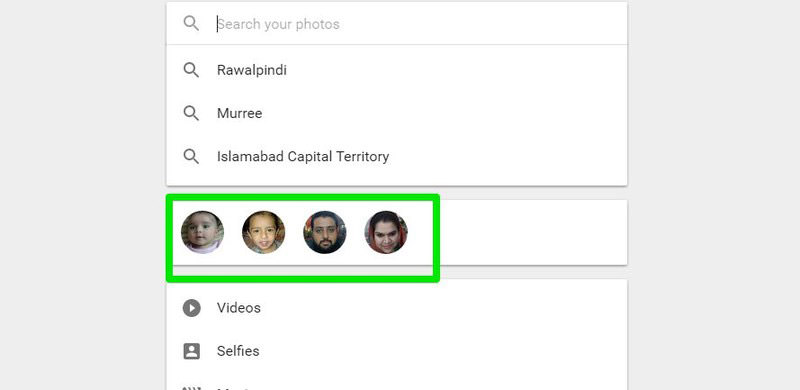

Now enter the name of the person and Google Photos will know who is that person and will organize their photos by their name.
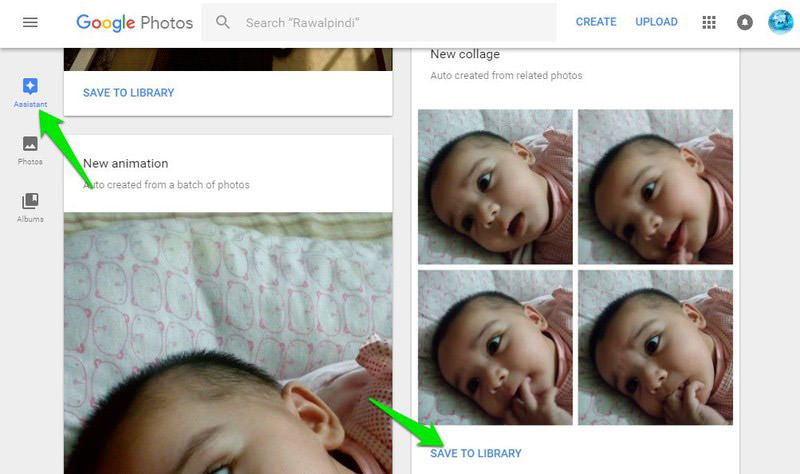
9. Google Photos Assistant
Google Photos has a smart assistant that can automatically create collages, albums, panorama photos, animations, and movies from your photos that actually have some direct connection with each other. The assistant is really smart and creates perfect content that you would surely love.
Go to Google Photos “Settings” and make sure “Assistant cards” option is enabled.

Now move to the “Assistant” tab on the left side of Google Photos interface, and you will see all the cool cards. If you like a particular content, you can click on the “Save to Library” button below to move it to your “Photos library“.
10. Google Drive photos & videos in Google Photos
By default, all the photos/videos you upload to Google Drive using the Google Drive uploader do not appear in Google Photos. If you want these photos/videos to appear in Google Photos as well, you can enable it from the settings. Go to “Settings” and enable the option “Google Drive“.
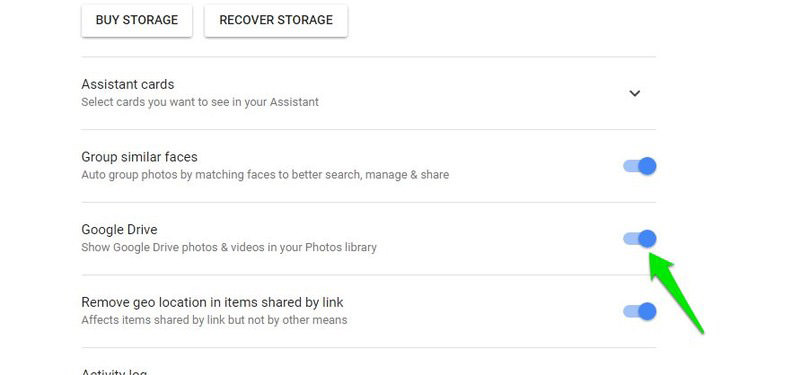
Now the photos/videos stored in Google Drive will appear in Google Photos. However, this doesn’t mean that these photos/videos will be moved to Google Photos. They will still take space in Google Drive and will not be compressed to take advantage of the unlimited storage offered in Google Photos.
11. Using the Desktop Uploader
Google Photos app for smartphones is really good at automatically uploading and syncing photos and videos. However, on the desktop, we manually upload content using the upload button in Google Photos web interface. Google Photos may not have a comprehensive desktop app, but it does offer a basic uploader to automatically upload photos and videos.
Download the Desktop Uploader, and it will automatically start syncing photos and videos stored in your PC. Interestingly, it will also ask you to upload photos/videos from external storage devices like SD cards or camera storage when you will connect it to your PC. So it’s a must have app for people who use their camera for taking photos.
12. Recover deleted photos & videos
You can also recover recently deleted photos and videos using the “Trash” option in Google Photos. Google Photos moves all the deleted content to the “Trash” and keeps it there for 60 days before deleting it permanently. If you accidentally deleted something or changed your mind after deleting something, then you can easily recover it from the “Trash“.
Click on the hamburger menu on the top left corner and select “Trash” from the menu.

In the trash, you can select photos that you would like to recover and click on the “Restore” button at the top right corner to recover them.

13. Move in time using right scroll bar
Google Photos has a special scroll bar right next to the scroll bar of your browser. This scroll bar allows you to move between photos over time. If you need to access photos from a specific time, then simply use this scroll bar to directly move to it, instead of using the browser scrollbar and scrolling endlessly.
Simply move your mouse cursor to the right side of the interface and the scroll bar will automatically become visible. You will be able to see years and months to scroll up or down.
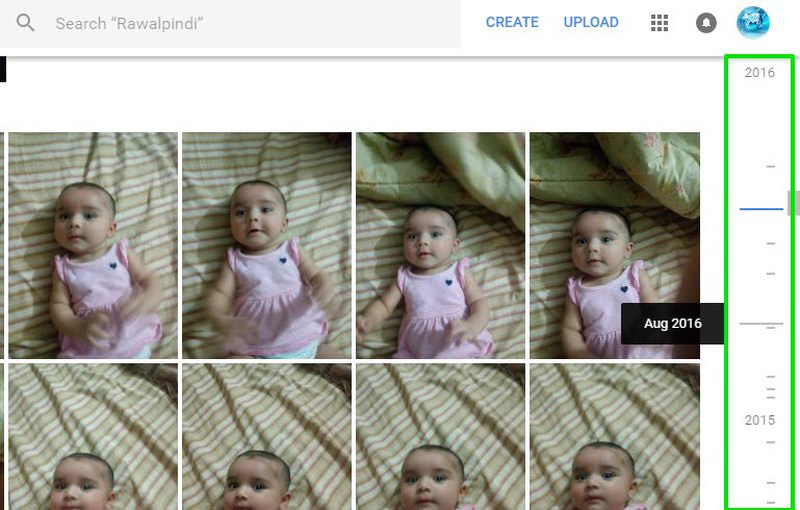
Note: The time period is based on the time when photos were taken, and not when they were uploaded to your Google Photos library.
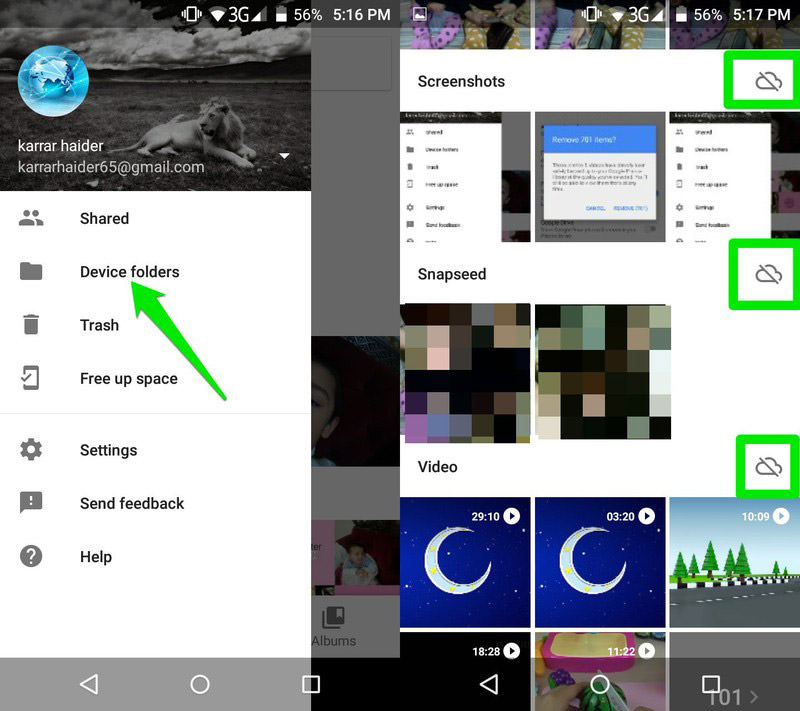
14. Backup and sync photos & videos
Google Photos app for smartphone only backs up photos and videos that are taken by the camera of the phone, i.e. photos stored in the camera roll. However, you can also tell Google Photos to backup photos/videos from folders created by other apps or folders. For example, you can backup media content from folders created by WhatsApp, Messenger, Instagram, any photo editing app or the screenshots folder.
To do so, open the main menu in Google Photos app for smartphones and tap on the “Device folders” option. You will see all the folders in your device with a “Cloud” button next to them. Tap on the “Cloud” button next to each folder that you would like to backup and sync, and it will turn blue, meaning the syncing is on. Now whenever you will add a new photo/video to that specific folder, it will automatically upload in Google Photos.
15. Download all photos & videos
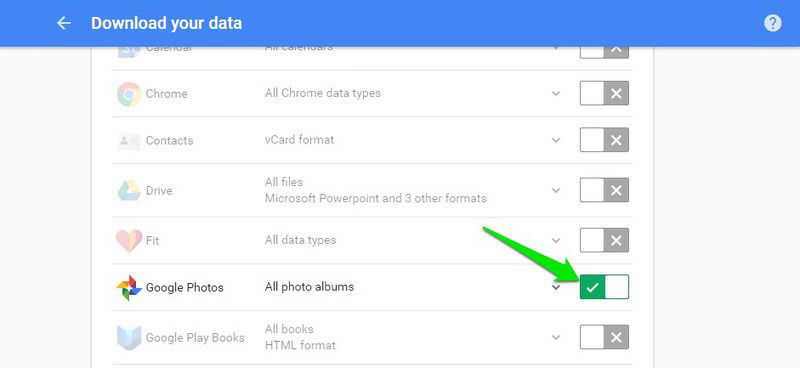
Google Photos allows you to easily download photos and videos in your account, however, it can be quite a tedious task. If you want to download all the photos/videos and albums stored inside your Google Photos account, you can take advantage of the Google Takeout service.
Google Takeout allows you to download archives of all the data stored inside Google services, including Google Photos. Open the Google Takeout page and click “Select none” button to unselect all the Google services.
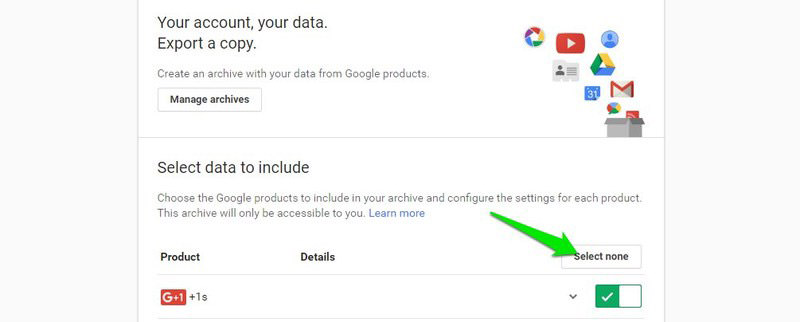
Now scroll down and select “Google Photos” from the list. After that, move to the bottom and click on “Create archive” button to start creating an archive. Once the archive is created, Google will send an email to your Gmail account containing the link to download all the data.

To summarize
These little Google Photos tips and tricks should help you get more out of Google Photos. If you are using 15GB free space offered by Google Drive to store content in Google Photos, you should definitely enable the unlimited storage option. The photos/videos in their original resolution will quickly take over all the space and stop you from using other Google services as well, such as Gmail. Also, do play around with Google Photos search option, you will be surprised by its accuracy.
Know any other cool tips and tricks to enhance Google Photos experience? Share with us in the comments below.
Read Also: 10 Free Photo Management Desktop Apps