How to Speed Up Windows 11 (Tips and Tricks)
Windows 11 is the latest release from the Windows operating system and is available as a free update for existing Windows users. It’s got all the features you know and love about Windows 10, along with some amazing new additions.
However, if you’re running the new Windows 11 on an older laptop, you may feel it to be a bit lagging and that’ll keep you from getting the best out of its features. So, here are some tips to help you speed up Windows 11 and speed up your computer to make it run like the day you bought it. Let’s take a look.
How to Boost Internet Speed with Command Prompt
Slow internet speed is a never-ending issue that plagues internet users every now and then. Sometimes it's an... Read more
1. Free up disk space with Disk Cleanup
No matter which version of Windows you’re using, one of the best ways to speed up your computer is to free up disk space. Over time, your hard drive can fill up with files you no longer need, and this can slow down your computer significantly.
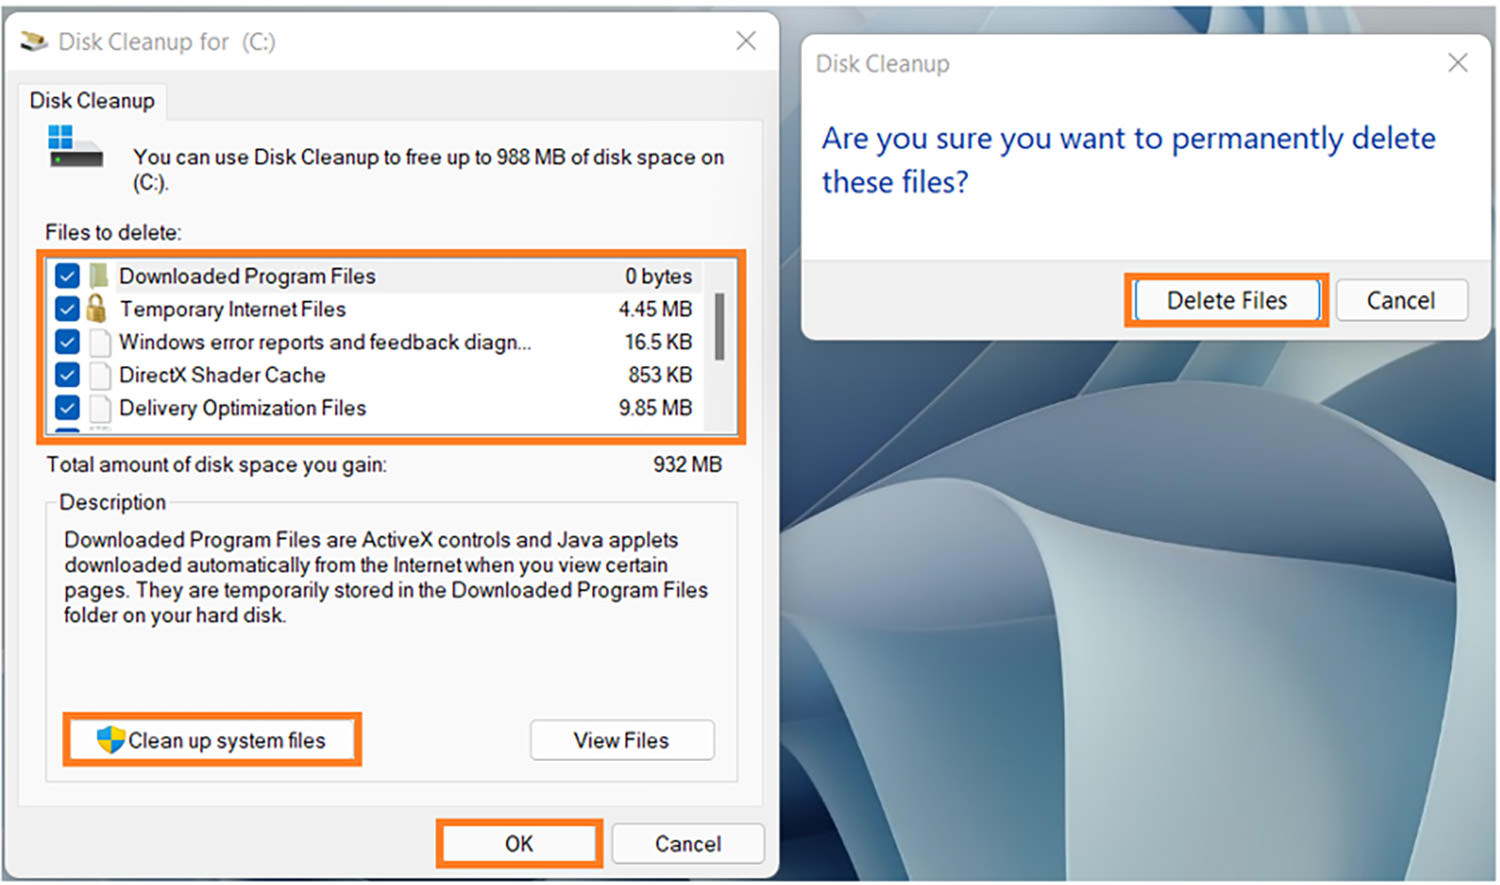
To free up some space you can use Windows built-in Disk Cleanup tool to delete temporary files and system files from your device.
To free up space with Disk Cleanup, follow these steps:
- Open the Start menu and type
Disk Cleanupinto the search bar. - Click on “Disk Cleanup” when it appears in the search results.
- Check the boxes next to the types of files you want to delete and click “OK“.
- Click “Delete Files” when prompted and wait for the process to finish.
Now that you’ve freed up some space on your hard drive, your computer should be running a bit faster.
If you want to get rid of even more files, you can also use the Storage Sense feature in Windows 11. You can learn about it in the following.
2. Turn on Storage Sense
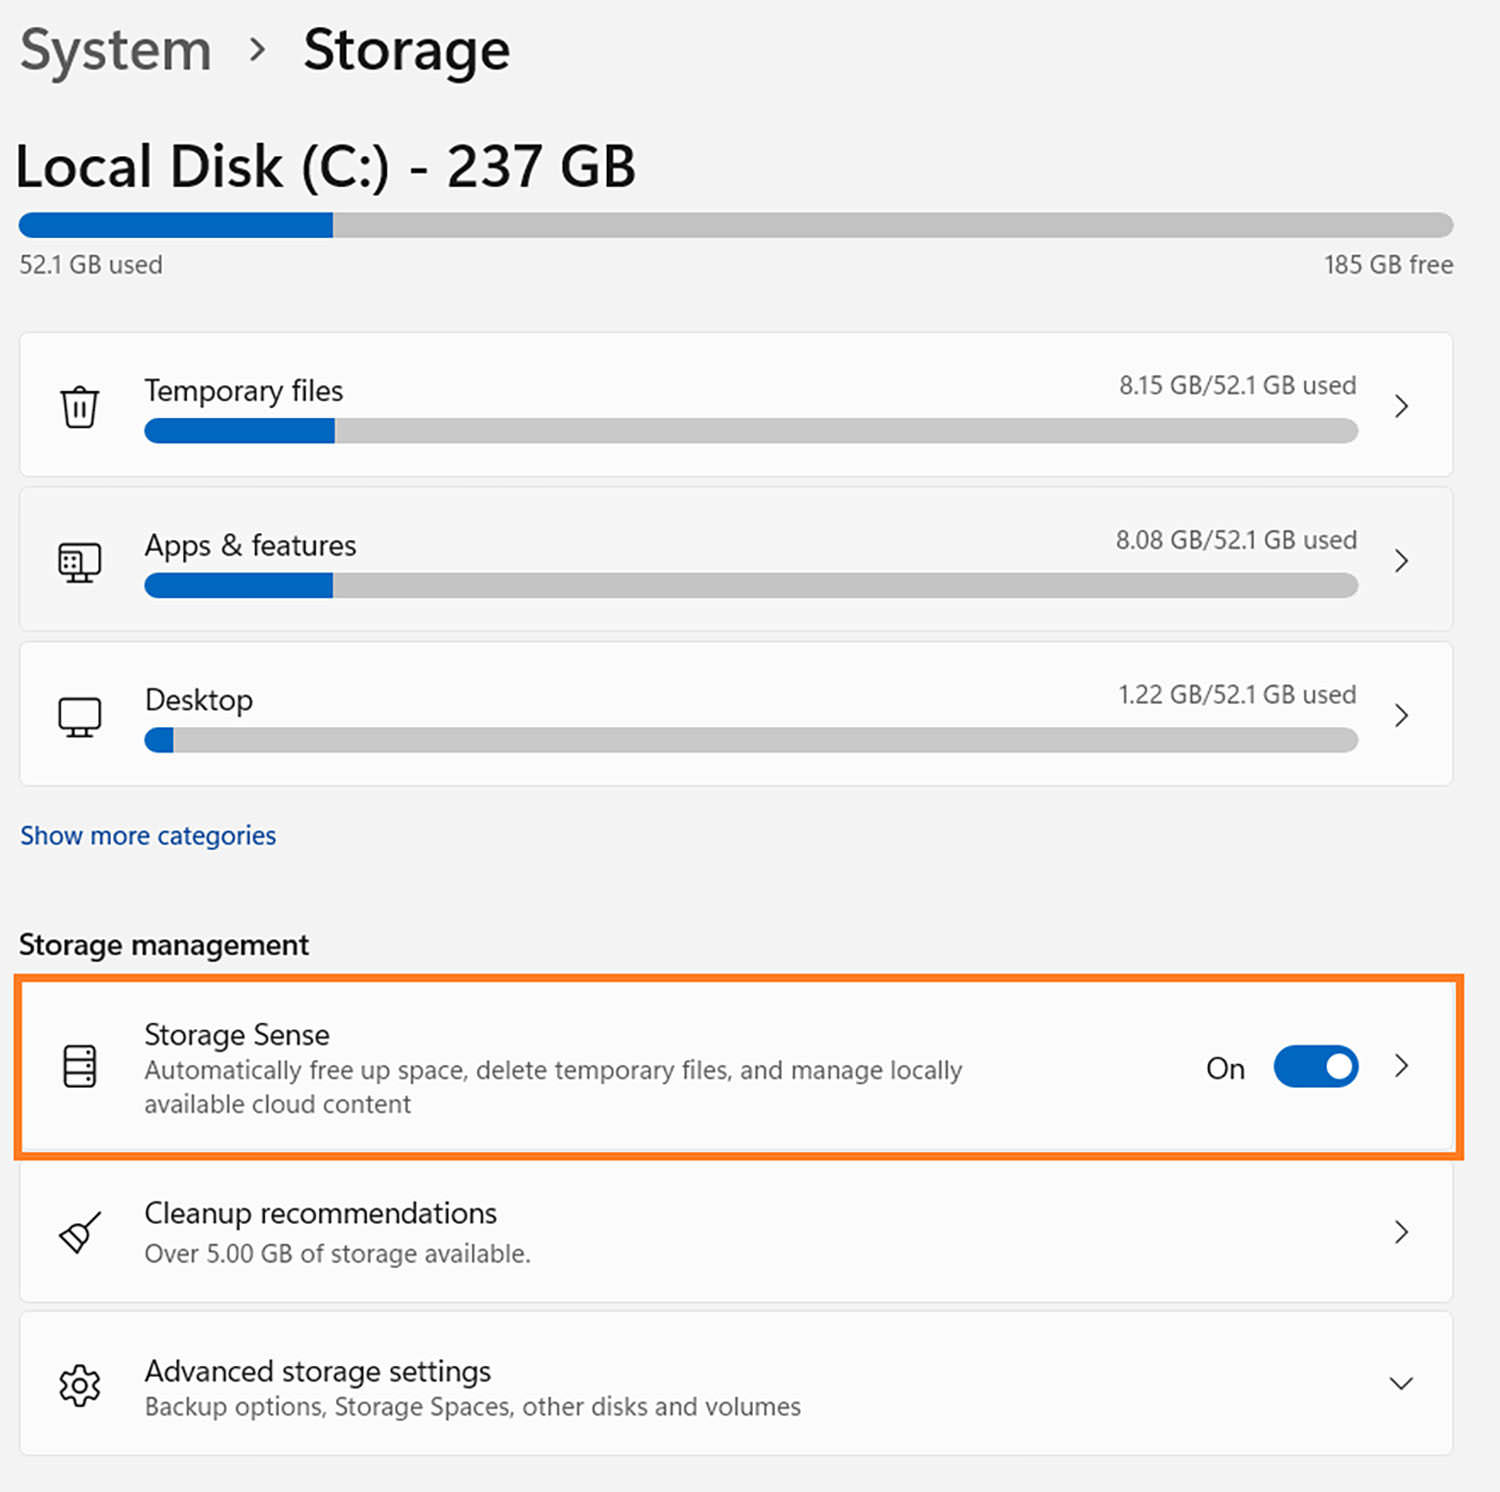
Windows 11 includes a new function called Storage Sense that helps you automatically delete temporary files and other unneeded files to save space. This is a great way to keep your computer running fast without having to do any work.
To turn on Storage Sense, follow these steps:
- Open the Start menu.
- Go to Settings > System.
- Click on “Storage” in the left sidebar.
- After that, you can see the “Storage Sense” section on the screen.
- Turn on “Storage Sense” by clicking the switch next to it.
Now that Storage Sense is turned on, your computer will automatically delete temporary files and other unneeded files to free up space. We recommend setting Storage Sense to run automatically at least once a week.
Next, we’ll show you how to disable some of the features in Windows 11 that you don’t use and don’t need.
3. Disable auto-startup programs and apps
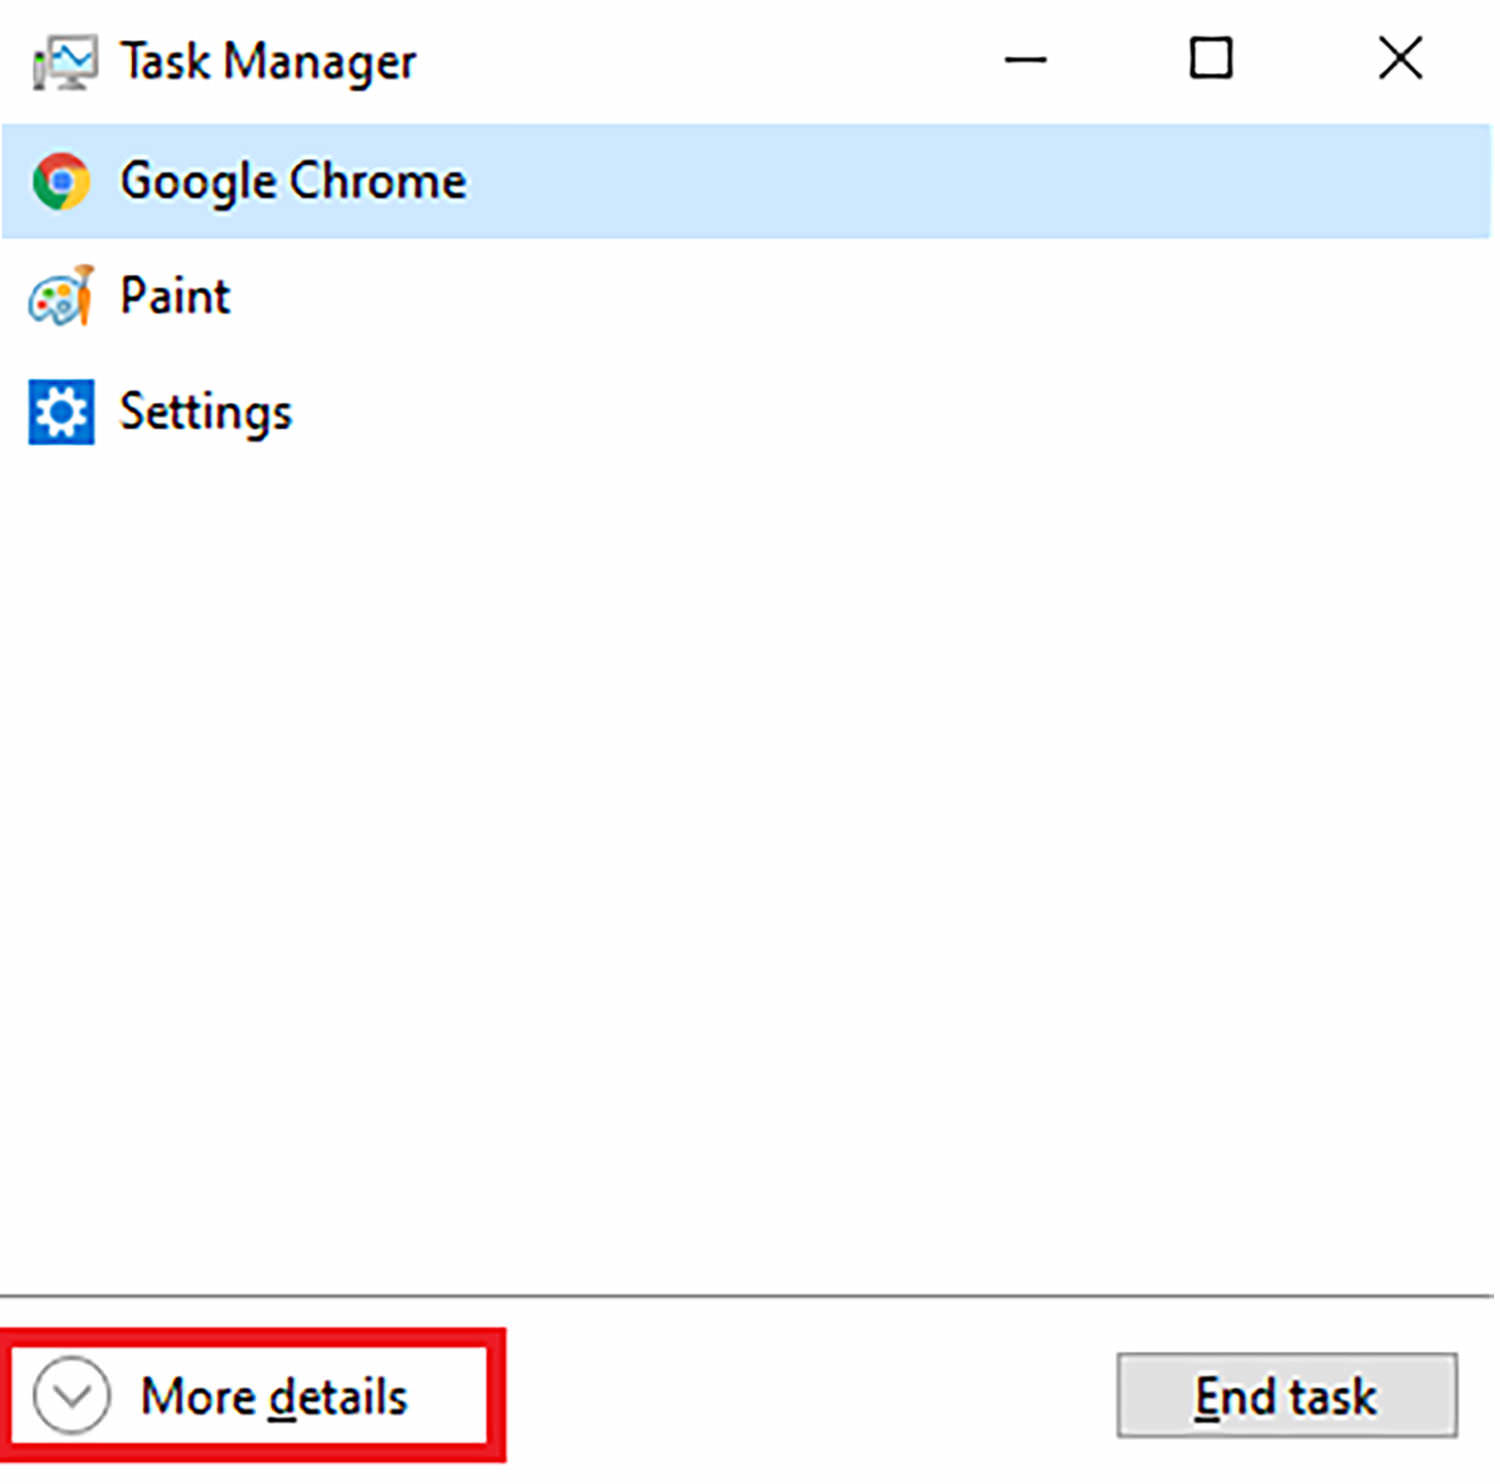
When you turn on your computer, there are a lot of programs and apps that start running in the background. Some of these programs are essential for your computer to function properly, but others are just taking up resources and slowing down your startup time. You can see which programs are set to start automatically by opening the Task Manager.
To open task manager and disable startup programs/apps, follow these steps:
- Press the Ctrl + Shift + Esc keys on your keyboard. Besides, you can also find the Task Manager by right-clicking on the taskbar and selecting “Task Manager” from the menu.
- When the Task Manager menu displays, select More details from the drop-down menu.
- Now go to the Startup tab and look for the apps that can be disabled.
- Right-click on the programme you want to disable and choose Disable.
- Repeat this process for any other programs you want to disable.
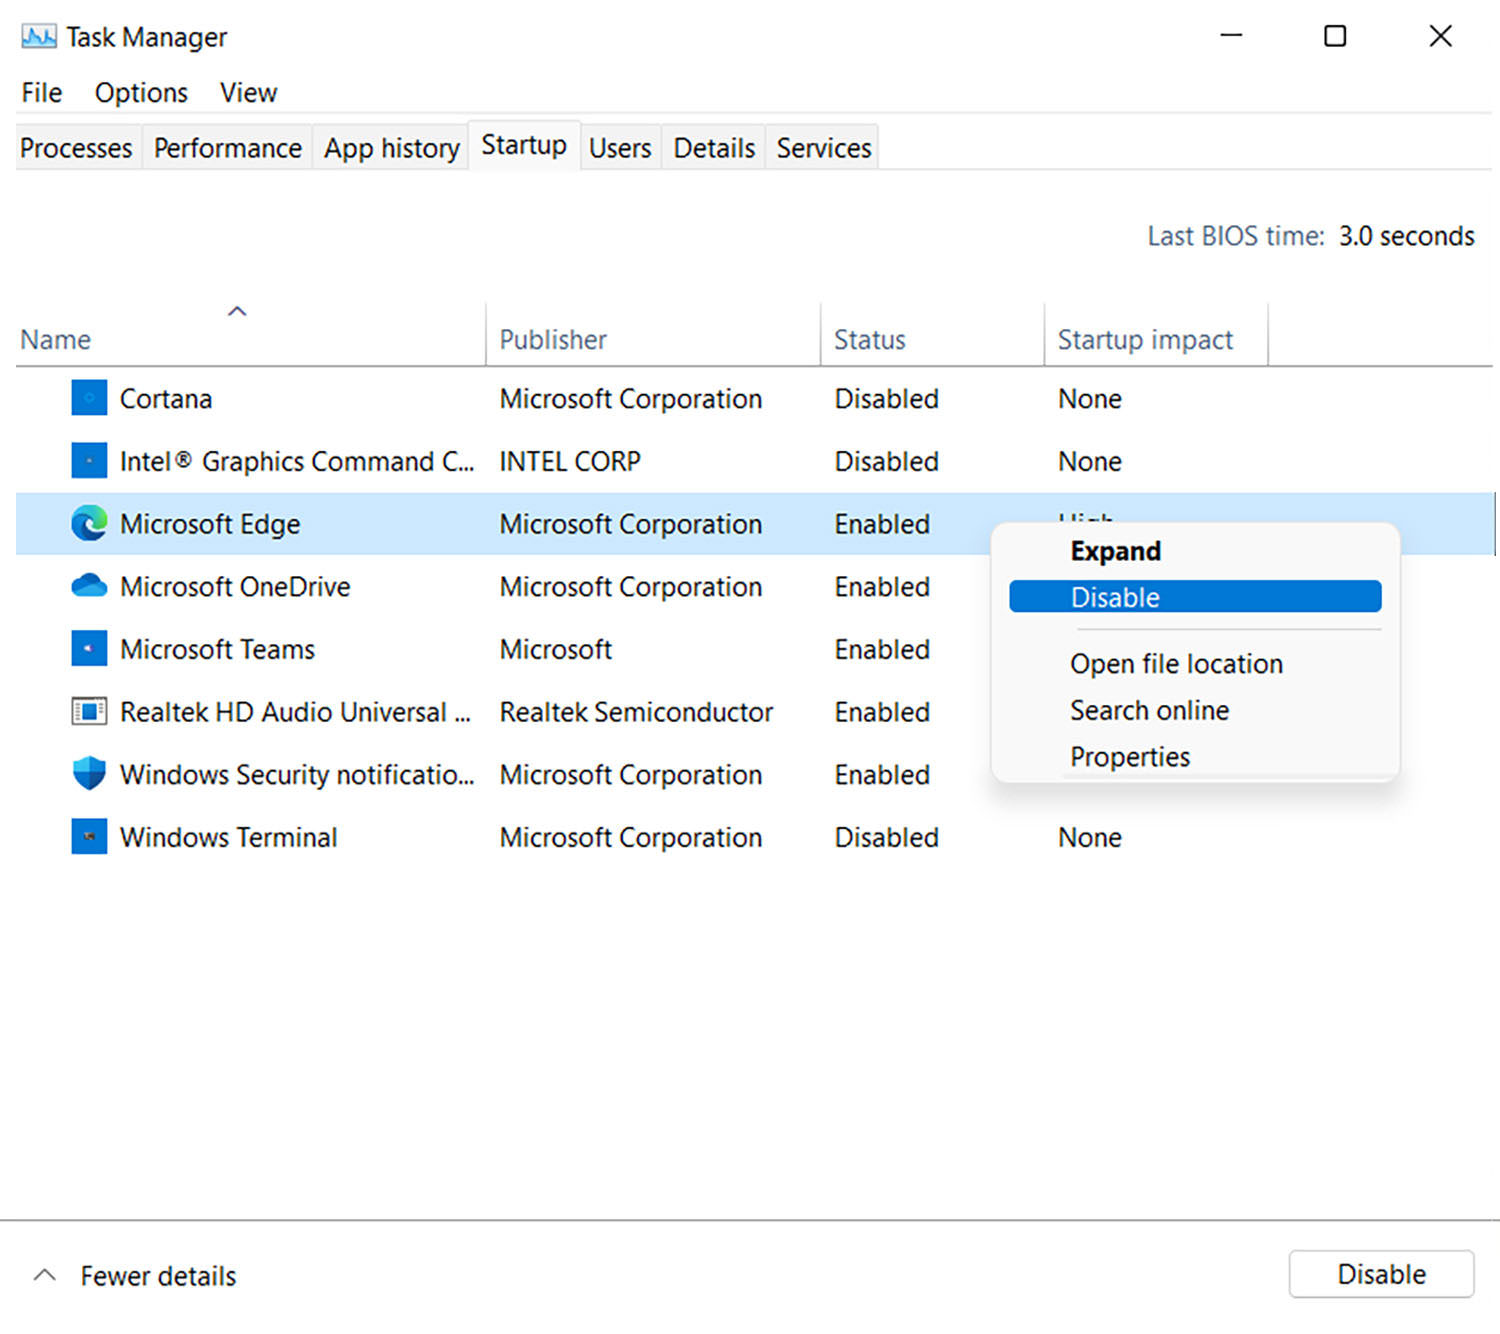
By disabling the programs and apps you don’t need, you can speed up your computer’s startup time and performance.
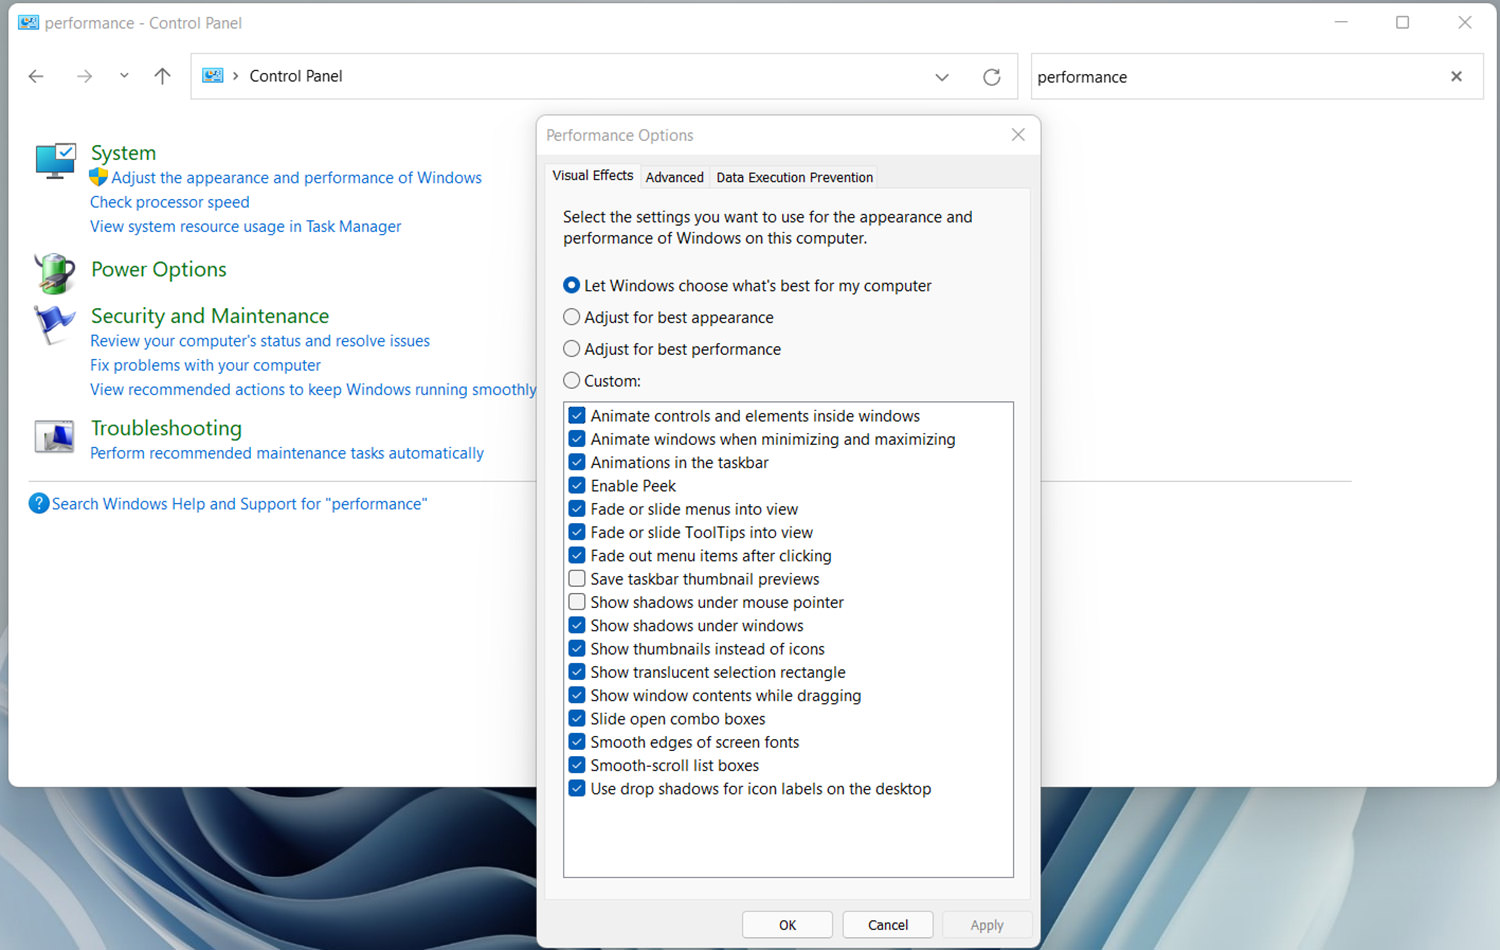
4. Modify Windows 11 Performance settings
If you’re running Windows 11 on a computer that just meets the minimal hardware requirements, there are a few performance settings that are carefully concealed but could make a big impact on the PC’s responsiveness.
To access these settings
- Open the Control Panel and then search for
performanceusing the Search Control Panel bar in the top-right corner of that window. - Click on ‘Adjust the appearance and performance of Windows‘.
- In the window that appears, go to the Visual Effects tab.
- From there, you can either select ‘Adjust for best performance‘, which will disable all visual effects, or click the ‘Custom’ radio button and selectively turn off any visual effect that you don’t want.
- Besides, there are other two options like ‘Let Windows choose what’s best for my computer‘ and ‘Adjust for best appearance.’ The first one is recommended if you don’t know which visual effect to turn off, while the second one should be chosen if your computer meets the minimum hardware requirements.
- After making your changes, click on ‘Apply’ and then ‘OK’.
5. Defragment memory
Another way to speed up your computer is by defragmenting your memory. Since your computer accesses files in different ways, over time, these files can become scattered across your hard drive. When this happens, it takes longer for your computer to access the files it needs.
Defragmenting your memory helps to fix this problem by organizing your files so that they are all in one place. You can defragment your memory by using these steps:
- Open the Start menu, type
Defragment & Optimize Drivesinto the search bar, and select the best match. - Select your primary drive from the list of drives and click the Optimize button.
- Wait for the operation to finish before repeating the preceding steps with the remaining drives.
- After you’ve defragmented the drives, restart your computer to apply the changes.

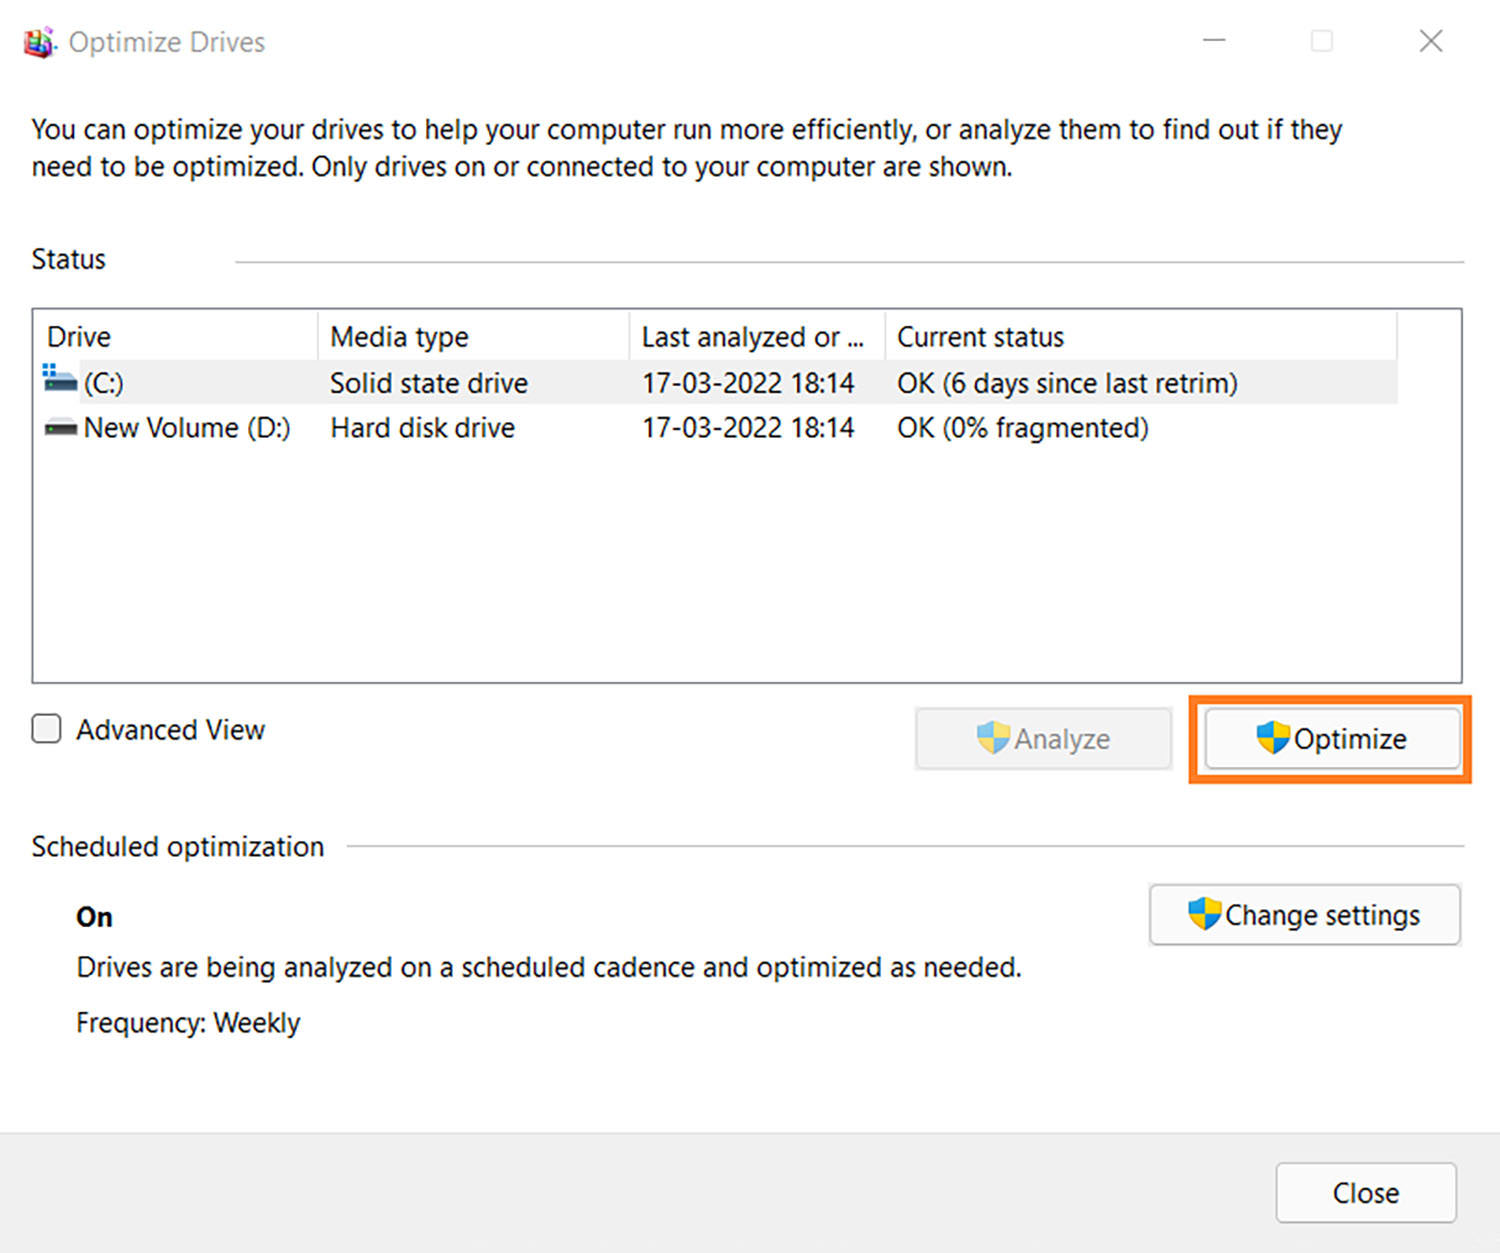
You should defragment your memory at least once a month to keep your computer running smoothly.
6. Disable notifications
You might not know this, but Windows 11 can be quite annoying with the number of notifications it sends. Notifications can pop up for everything from new emails to updates for your apps. While some of these notifications might be useful, most of them are just a distraction.
To disable notifications in Windows 11, follow these steps:
- Open the Settings app by pressing the Windows + I on your keyboard.
- Click on System.
- Click on Notifications & Actions in the left sidebar.
- In the right pane, toggle off the Get notifications from apps and other senders.
- You can also turn off notifications for individual apps by clicking the app name and then toggling off the Show notifications switch.
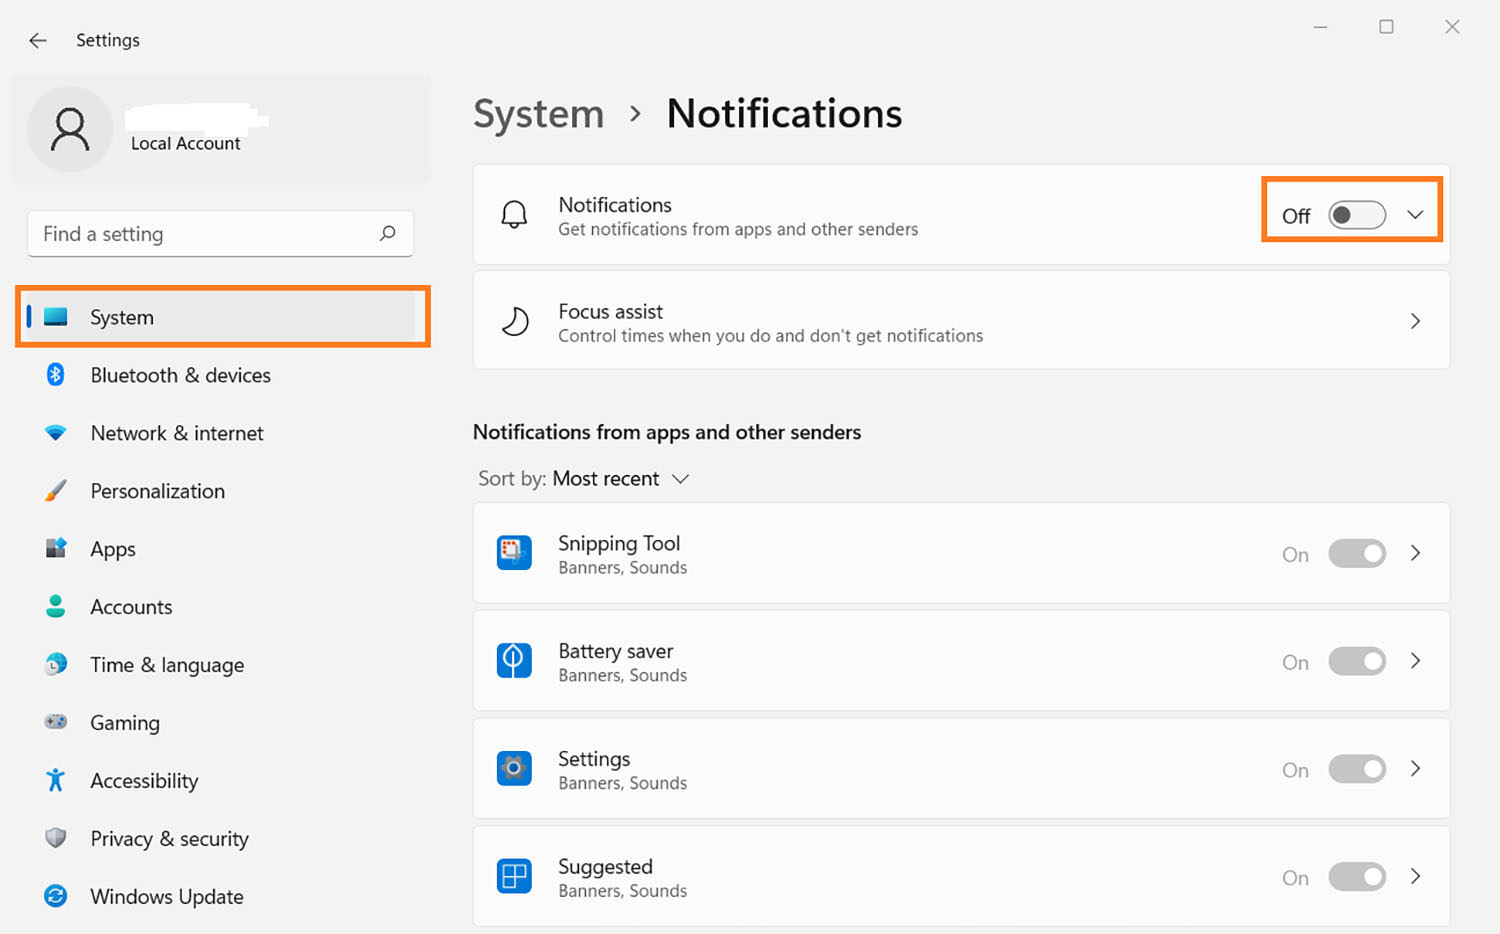
After you’ve disabled notifications, you’ll be able to focus on your work without being interrupted by pop-ups.
7. Disable visual effects
Windows 11 comes with a lot of visual effects that make it look nice. However, all these visual effects come at a cost. They use up system resources, which can slow down your computer.
To disable visual effects in Windows 11, follow these steps:
- Go to Settings and then Personalization.
- Select the Colors option. Deactivate the “Transparency impacts” toggle here.
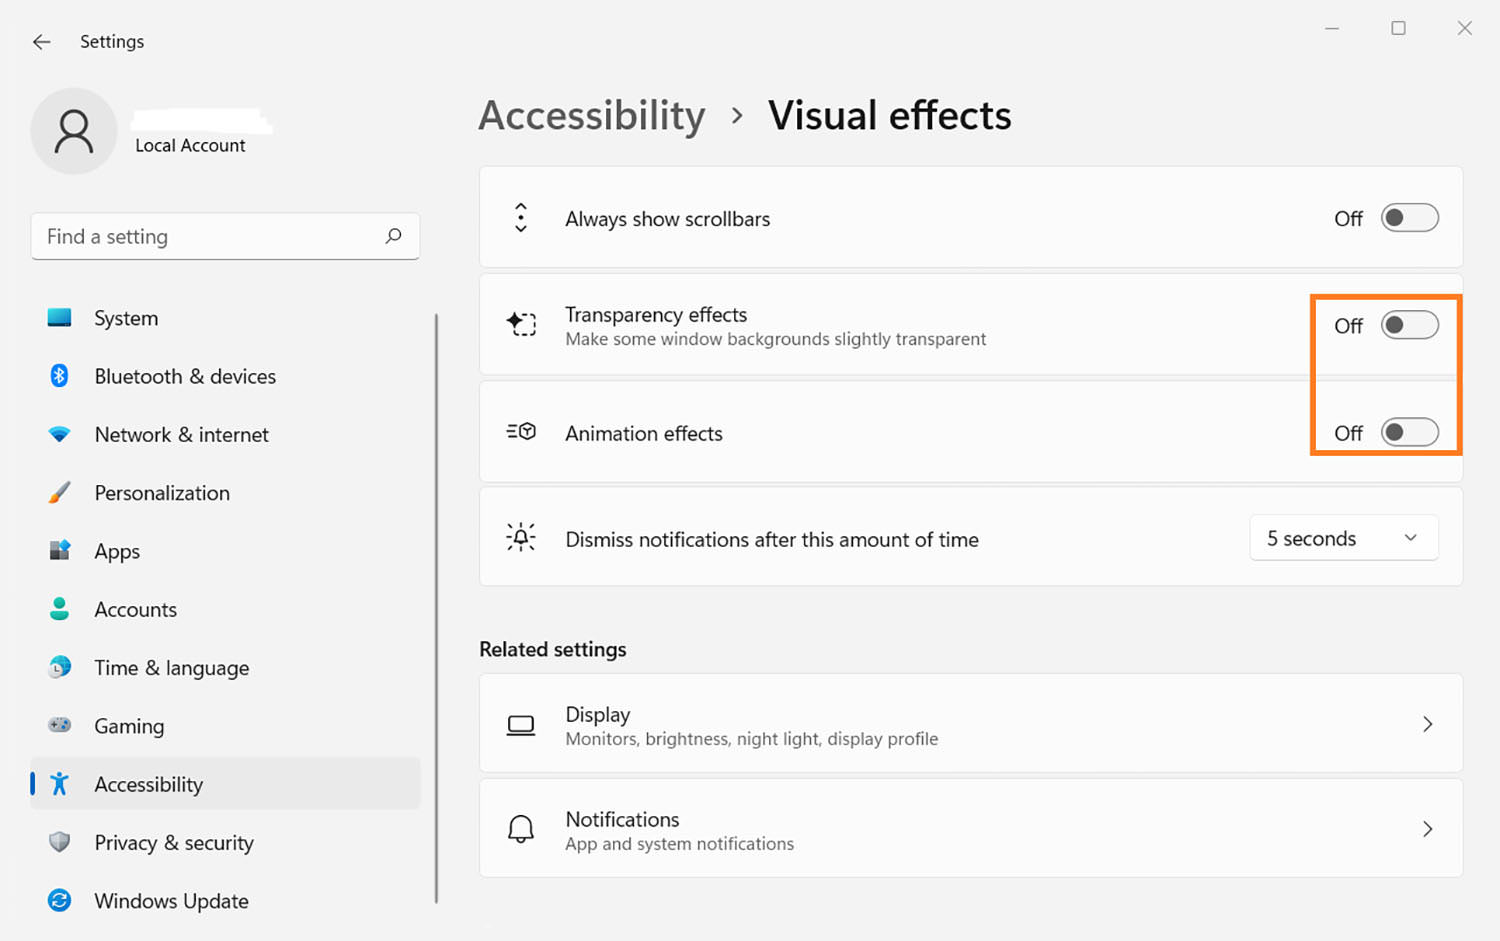
- Then, from the sidebar, navigate to Accessibility.
- Select the Visual effects option and uncheck “Transparency effects” and “Animation effects.”
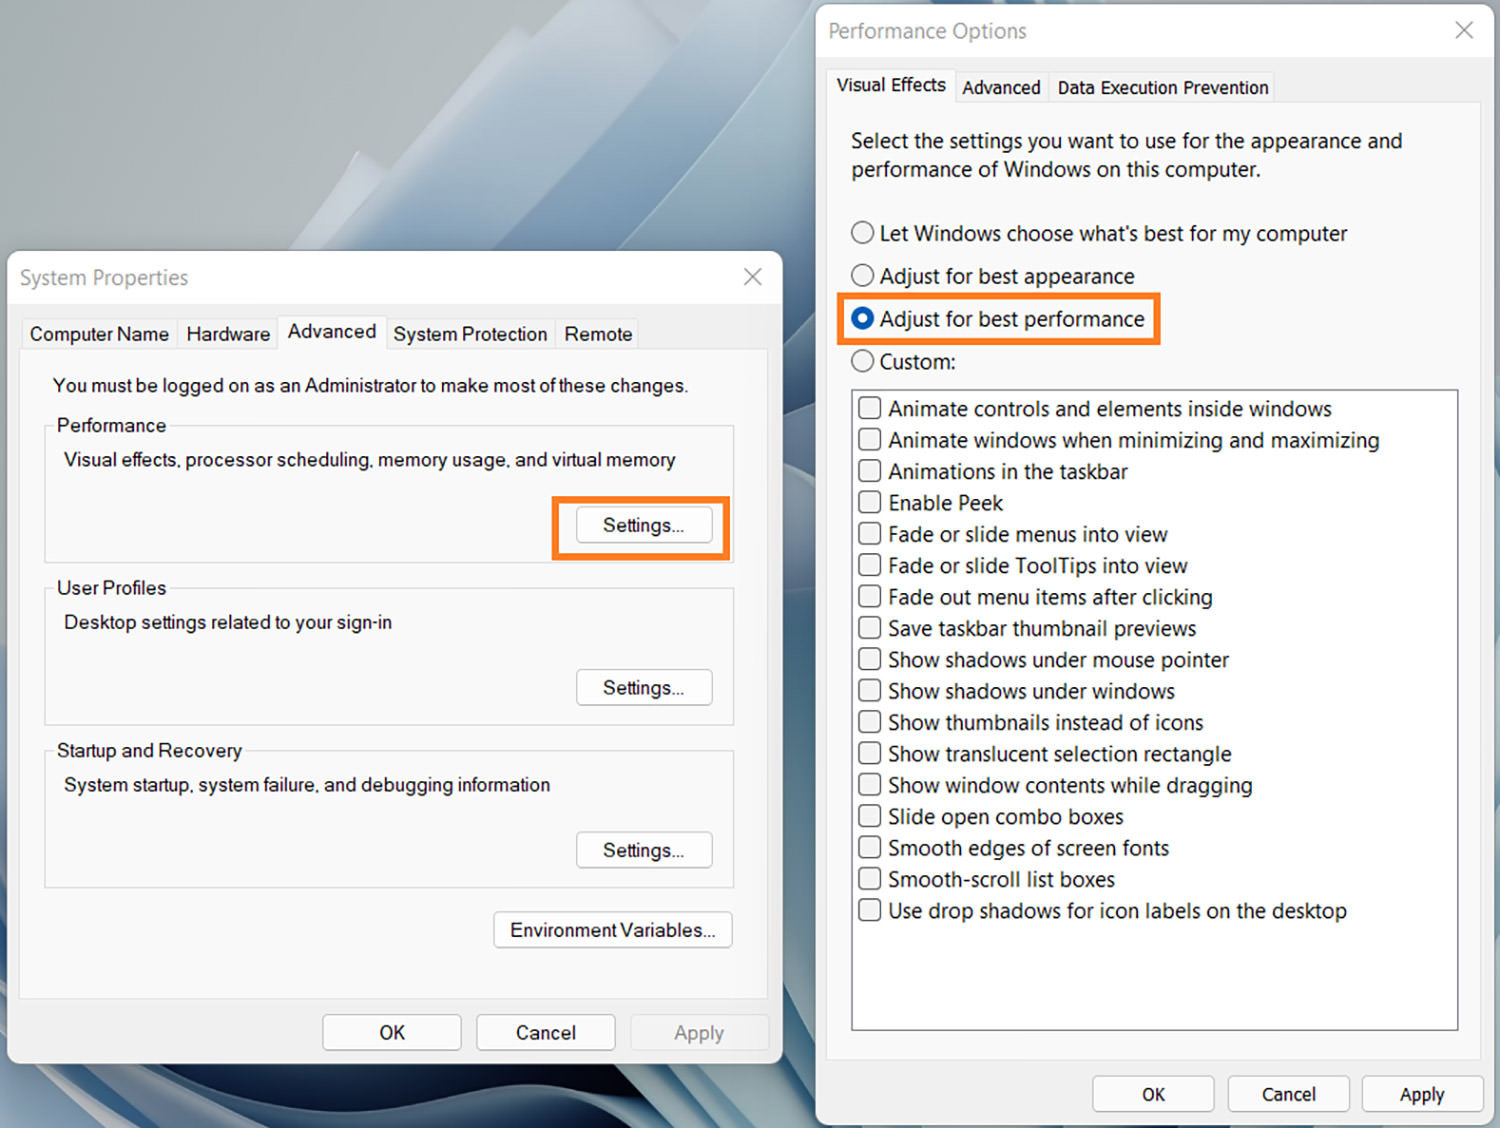
- After that, hit the Windows key once and search for “View advanced system settings.”
- Open it and go to the “Performance” section and select “Settings.” Choose “Adjust for best performance” and click OK, and you’re done.
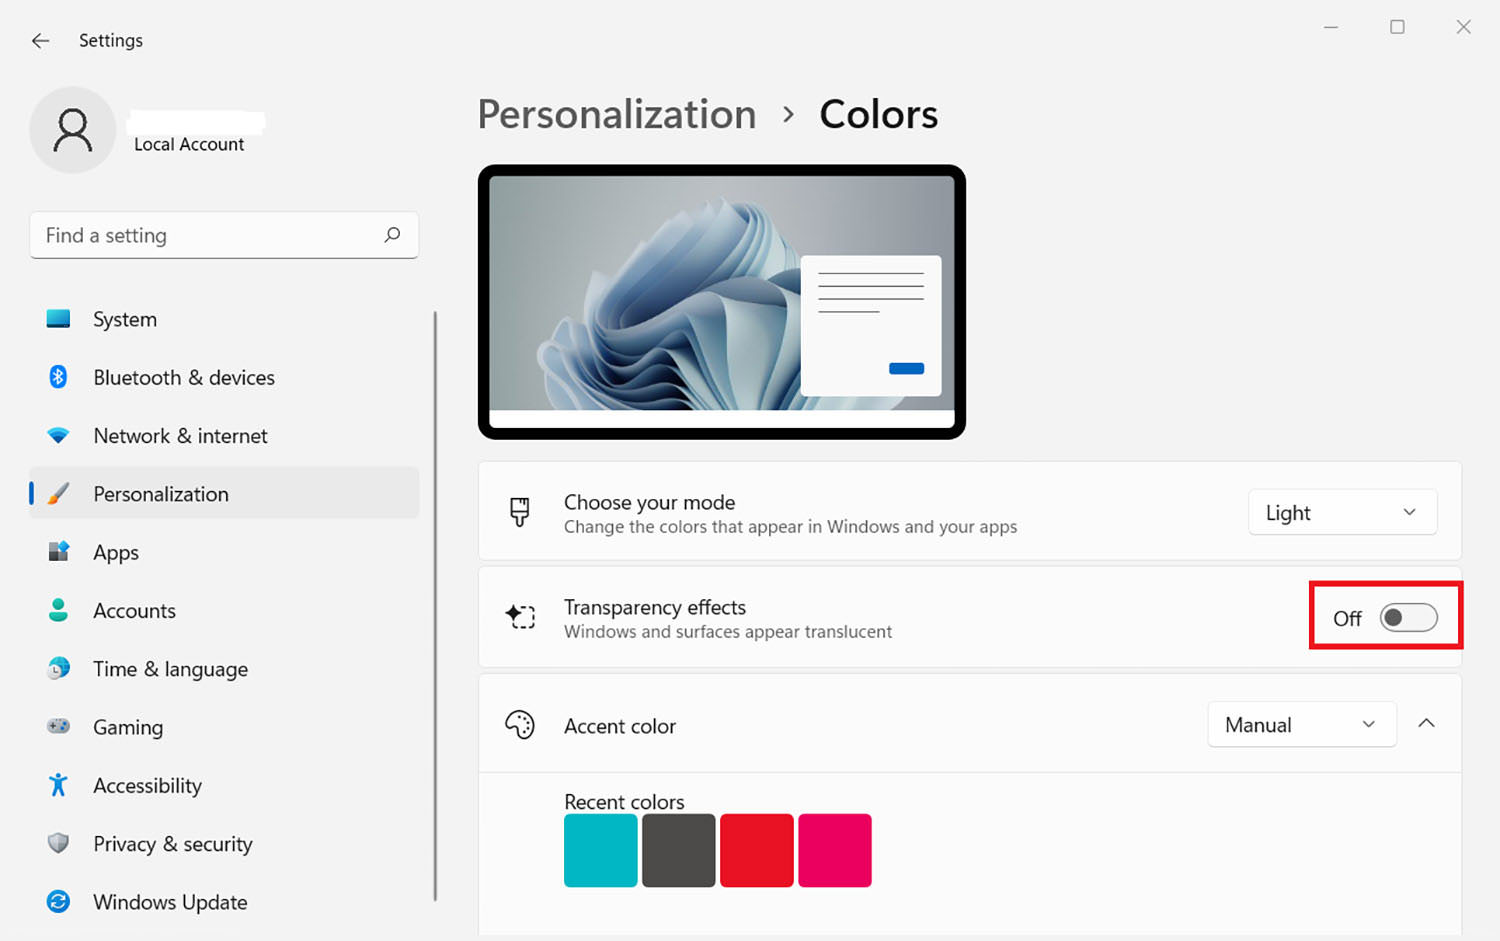
By disabling visual effects, you can free up system resources and speed up your computer.
8. Disable restartable apps
Restartable apps are a new feature in Windows 11 that allows you to pick up where you left off after restarting your computer. While this might sound like a useful feature, it can actually slow down your computer as restartable apps use up system resources, even when they’re not in use.
To disable restartable apps, follow these steps:
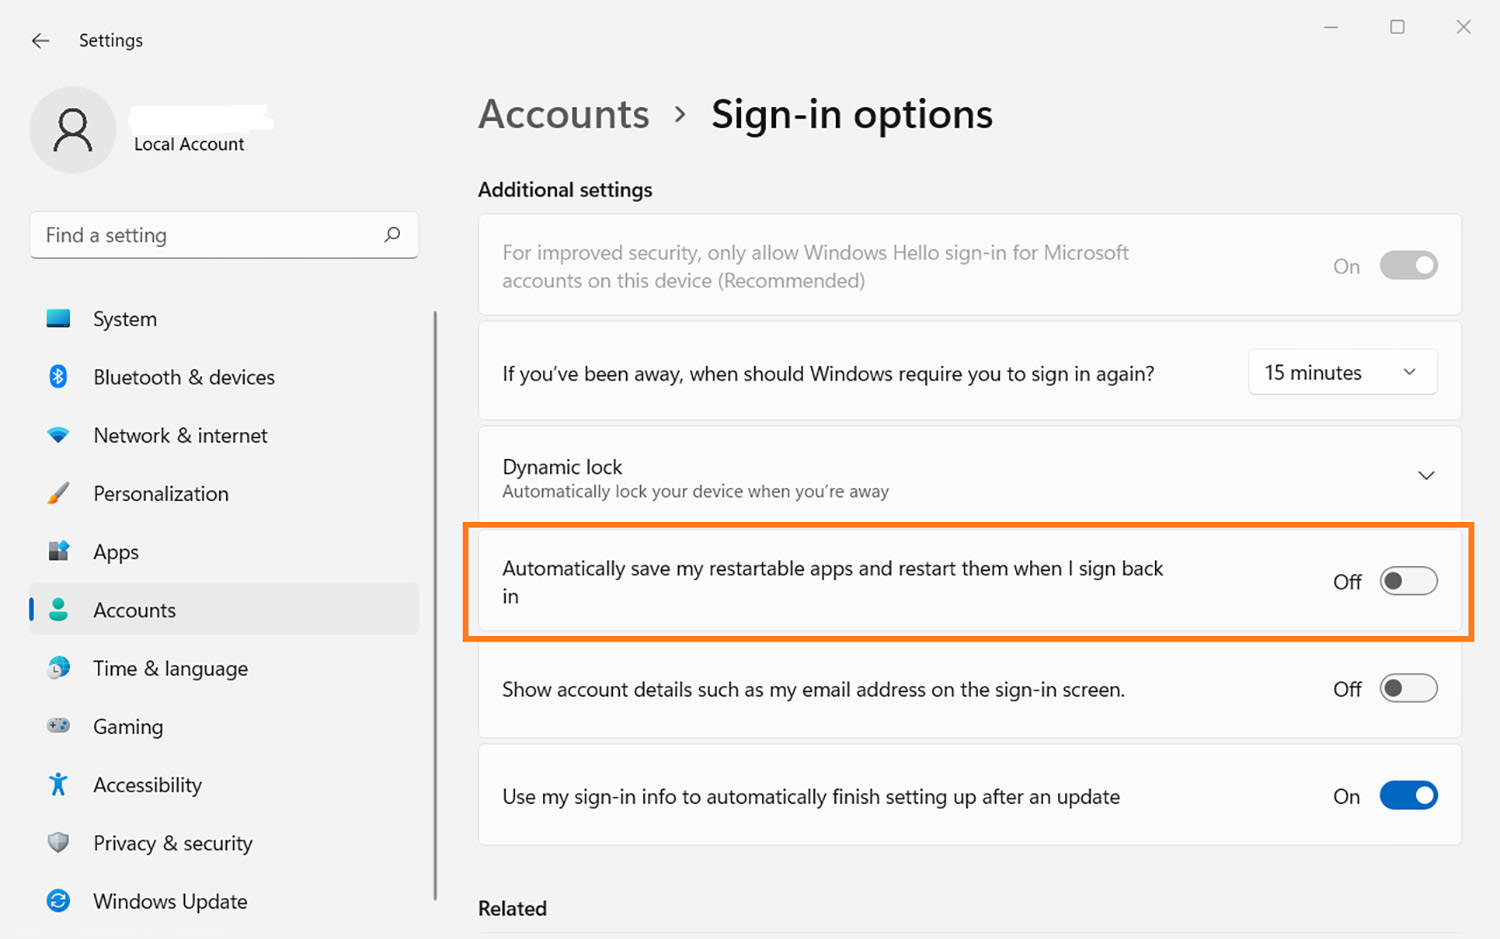
- Navigate to the Accounts section in Settings. Choose one of the Sign-in options.
- Now, uncheck the box next to “Automatically save my restartable apps and restart them when I sign in,” and you’re done.
- After you’ve disabled restartable apps, your computer will start up faster because it won’t have to load these apps.
9: Update Windows
Microsoft releases updates for Windows 11 on a regular basis. These updates usually include performance improvements and security fixes. You should install these updates as soon as they are available to keep your computer running smoothly.
To install updates in Windows 11, follow these steps:
- Open the Settings menu by pressing the Windows + I on your keyboard.
- Click on Update & Security.
- In the left sidebar, select Windows Update.
- Click the Check for updates button to check for new updates.
- If there are any updates available, they will be downloaded and installed automatically.

By keeping your computer up-to-date, you can ensure that it is running at its best.
Conclusion
These are just a few tips and tricks to help you speed up Windows 11. By following these tips, you can get your computer running faster in no time. Do you have any other tips for speeding up Windows 11? Let us know in the comments below.