Best Tools for Bulk Renaming Files in Windows
In our day-to-day work, the ability to perform an action on many files or folders at once can really boost your productivity. For instance, editing multiple images together is a good example. Similarly, there are tools to help you rename multiple files at the same time.
Yes, such apps exist, and in this post, I’m going to show you the best free desktop tools for bulk renaming files in Windows. Let’s dive in.
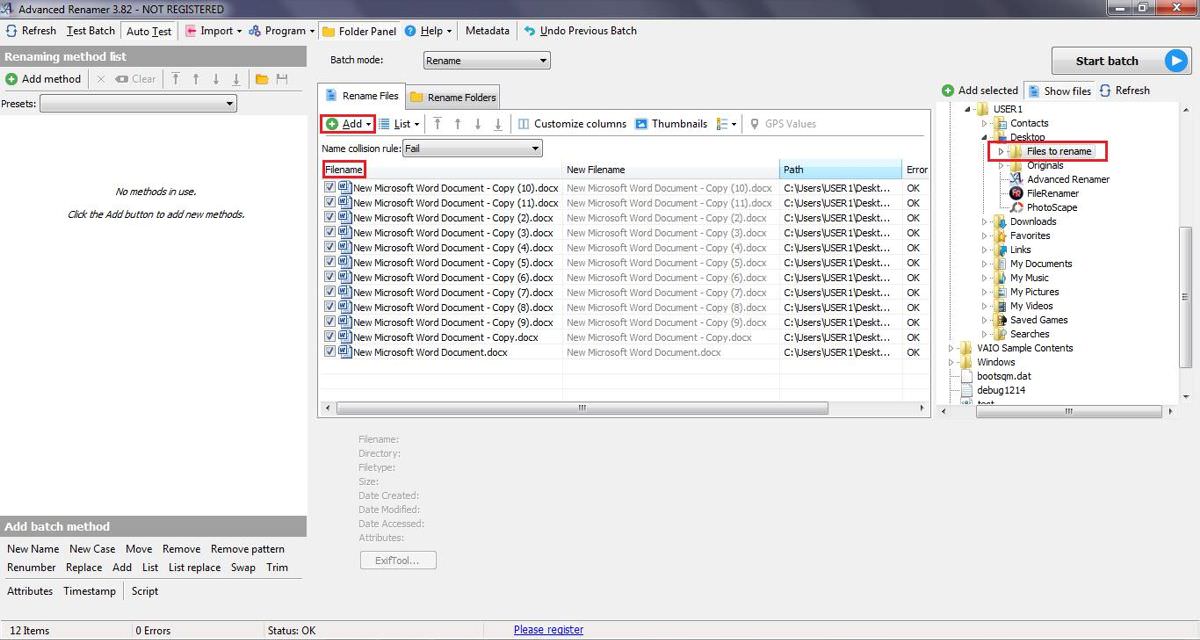
Throughout this post, I’ll demonstrate renaming files in the folder named “Files to rename” on my desktop. This folder contains files named “New Microsoft Word Document – Copy(N).docx”, and I’ll rename them to “V(N).docx“, where N is a number and V can be any name.
Advanced Renamer
If you need more options to rename files and folders compared to File Renamer Basic, Advanced Renamer is a great choice. It’s particularly useful for renaming images, and audio and video files. Plus, it offers over 10 ways to rename, which lets you batch rename a large number of files or folders.
You can add, remove, replace, change the case, or rename files based on location tags. You can also copy, move, or reverse the changes. Let me guide you through the process of renaming files with Advanced Renamer:
- Open Advanced Renamer > click Add under “Rename Files“. Choose the files from the drop-down list, select the ones you want to rename in the dialog box, and then click the Open button.
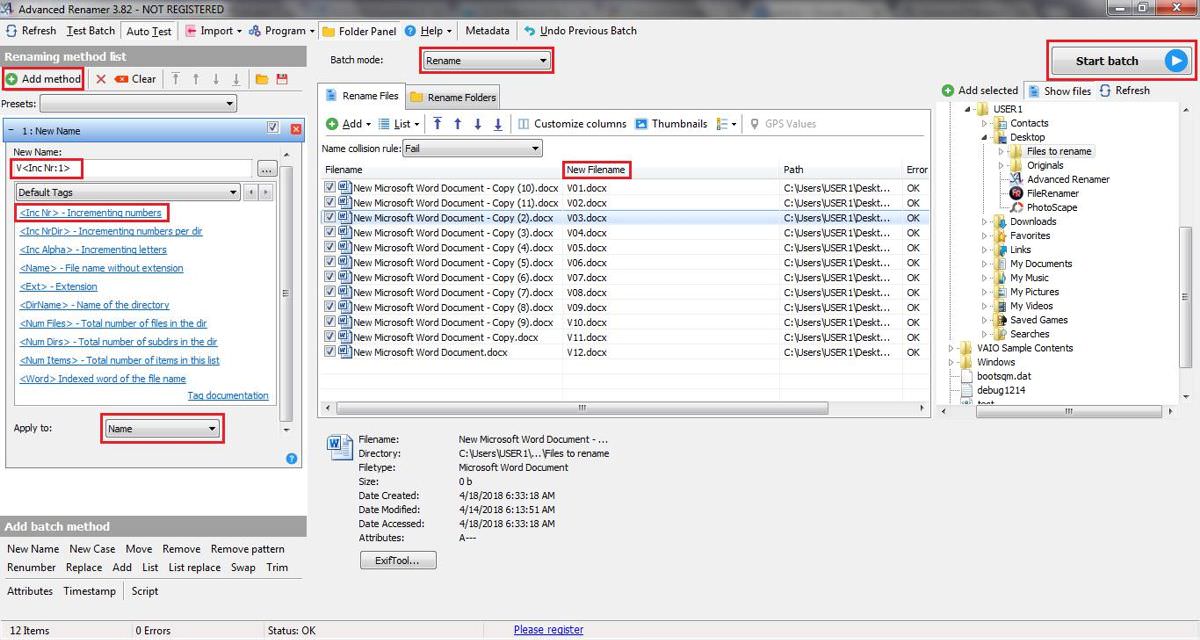
- In the left pane, click the “Add method” button > choose “New Name” and under “New Name“, type “V” (or any other name) > under “Default Tags“, select “<Inc NR> Incrementing numbers” and under “Apply To“, pick Name.
- In the right pane, under the “New Filename” column, you’ll see the new file name. Please ensure the final names are correct as per your requirement.
- Finally, click the “Start Batch” button at the top right of the window > choose the “Batch Mode” as Rename, and then click OK.
ReNamer Lite
Don’t be fooled by the simple look of ReNamer Lite. It’s packed with advanced features, thanks to its support for PascalScript. It covers all standard renaming tasks like adding prefixes and suffixes, replacing text, and changing the case. It also offers advanced features like removing brackets or changing file extensions.
It supports regular expressions, Unicode filenames, and meta tags for various media file types. You can perform renaming actions in the lite version and even more in its pro version, which allows you to create and manage rule sets. You can run, edit, reload, and save a rule set as needed.
Here are simple steps to rename files using ReNamer Lite:
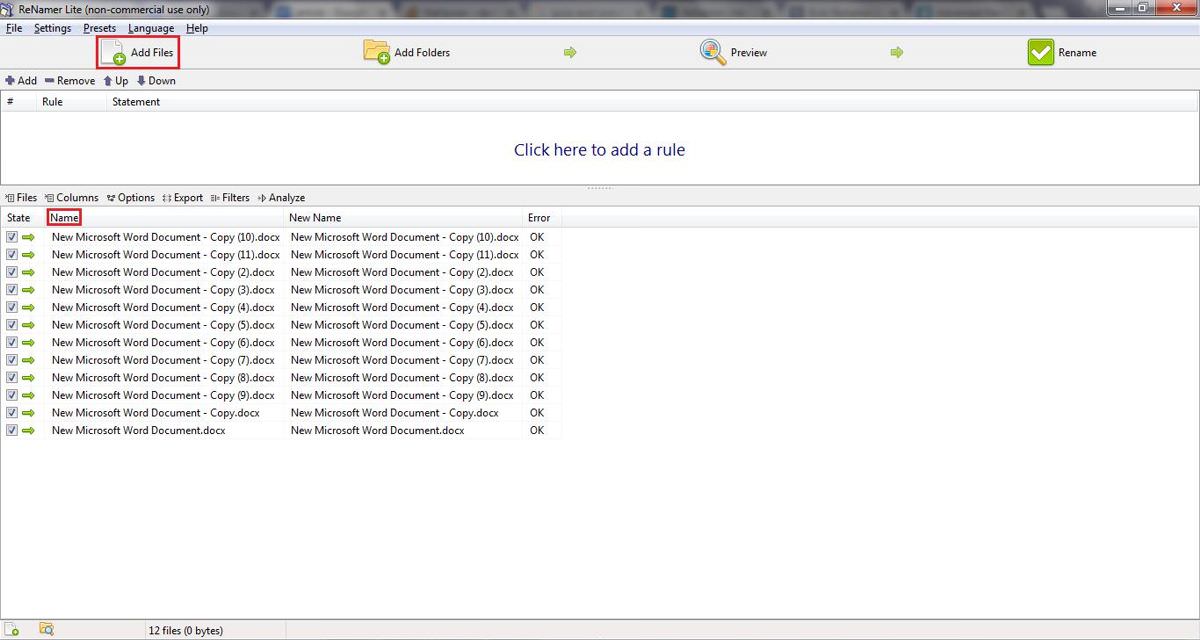
- Open ReNamer Lite > click “Add Files” button to select files you want to rename.
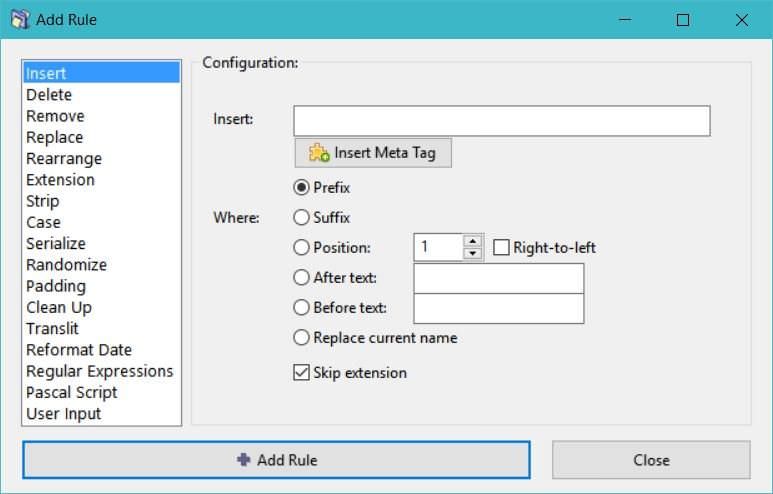
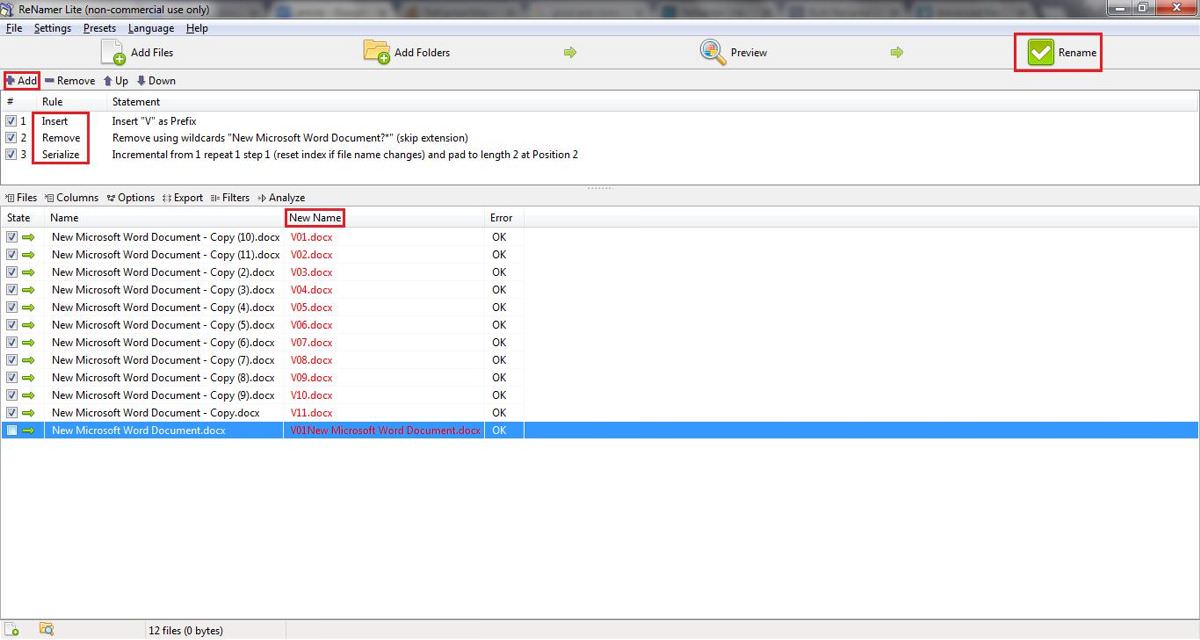
- Click the Add button to open the “Add Rule” window.
- In the “Add Rule” window, select Insert on the left > in the configuration area on the right, set to Insert and type “V” > choose Prefix and make sure to include file extensions by unchecking skip extension.
- Click “Add Rule” button at the bottom to add the rule.
- Select Remove on the left > in the configuration pane, under Remove update the text to “New Microsoft Word Document – Copy (*)” and check the box for “Interpret symbols ‘?,’ ‘*,’ ‘[,’ ‘]’ as wildcards?“.
- Click “Add Rule” button at the bottom to add the rule.
- Select Serialize on the left, and in the right pane, set “Index starts:” as “1” > set Repeat to “1” > set Step: to “1” > set “Reset every:” to “1” > check “Reset if file name changes” > set “Pad with zeros to length:” as “2” and under “Insert where:” choose Position: as “2“.
- Click “Add Rule” button at the bottom to add the rule.
- After adding the necessary rules, click the Preview button at the top > review the expected new filenames in the “New Name” column.
- Finally, click the Rename button to apply the changes.
Bulk Rename Utility
While the interface of Bulk Rename Utility might seem cluttered compared to others, it compensates with its lightweight design and extensive customization options. It allows you to rename, remove or swap extensions, and change timestamps, and even save your most-used settings for quick access.
It’s capable of quickly importing and renaming large batches of images and sounds. The tool supports a variety of file formats, regular expressions, and a selection of tags. Additionally, it enables users to stack commands and run JavaScript, making it a potent tool for advanced users to craft their configurations.
Here’s how to rename files using Bulk Rename Utility:
- Launch Bulk Rename Utility > choose the files you wish to rename.
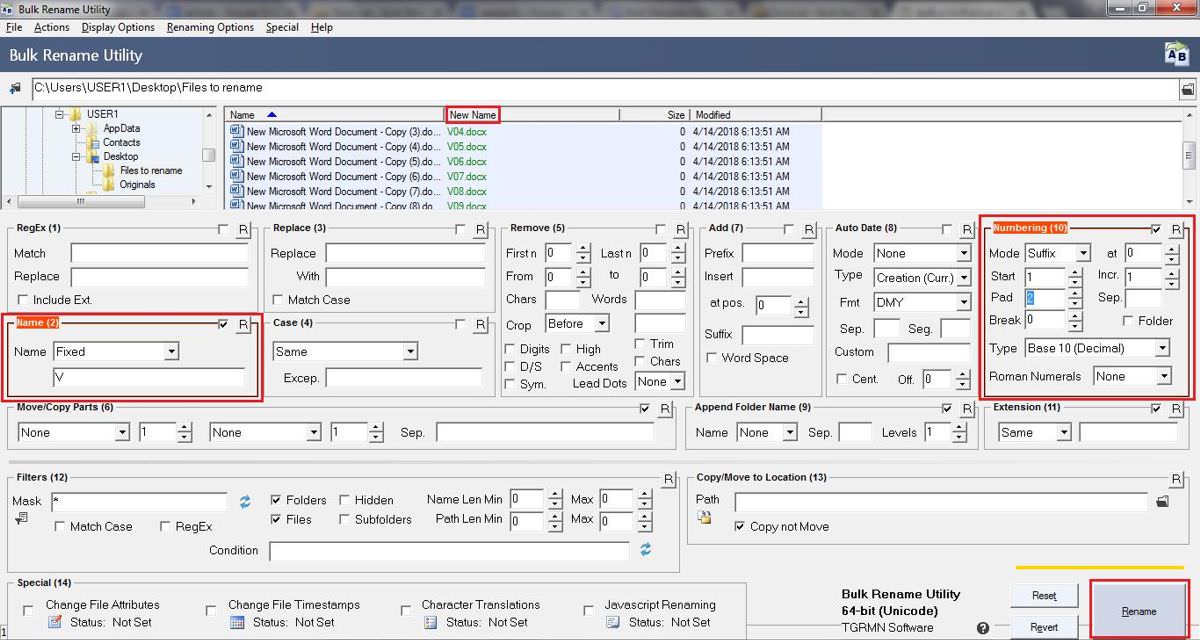
- In the Name section, highlight the files for renaming, then in “Name (2)“, select Fixed and enter “V” (or any preferred name).
- Under “Numbering (10)“, set Mode to Suffix > set Start to 1 > set at to 0 > set Incr. to 1, and also set Pad to 2.
- Review the new file names in the “New Name” column at the top, then click the Rename button to apply changes.
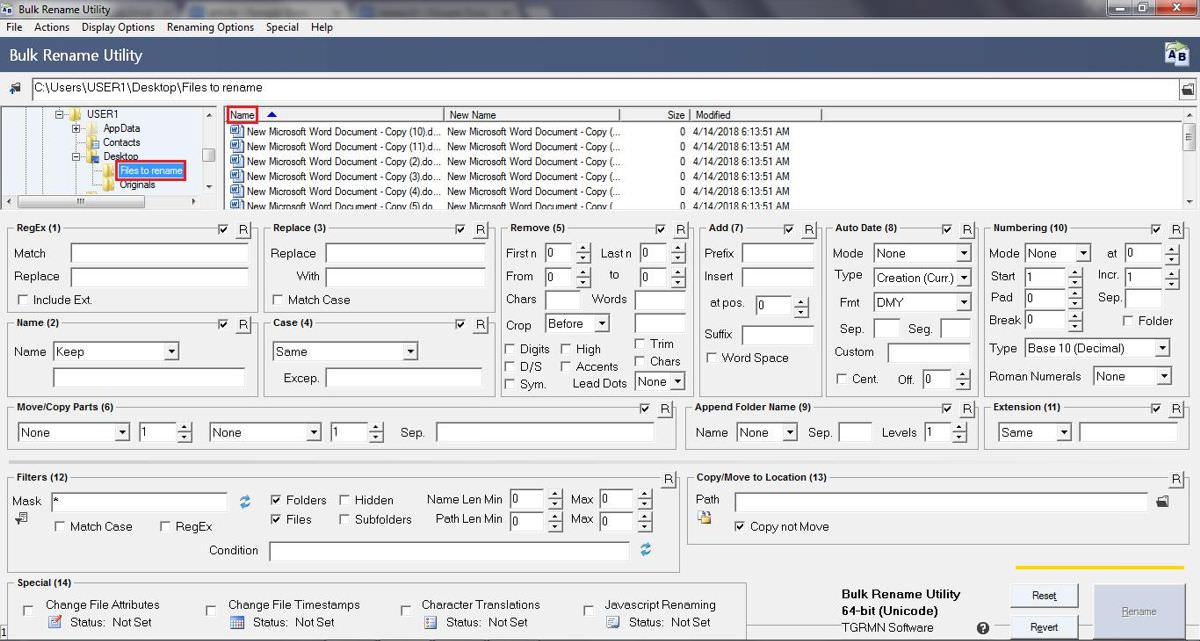
The Rename button will remain disabled until you select or highlight the files to rename in the table at the upper central part of the window.
File Renamer Turbo
File Renamer Turbo impresses with its straightforward interface, especially when compared to Bulk Rename Utility. It boasts over 20 advanced renaming actions, including find and replace text, text insertion and trimming, regular expression usage, numbering, case changing, file moving, and much more.
It’s capable of reading and writing tag information from/to media files and can even fetch additional information from the web based on these tags. This functionality allows you to efficiently organize and manage music, image, and video files. File Renamer Turbo also provides command line support, regex support, and the option to search for albums online.
Let’s explore how to rename files using File Renamer Turbo:
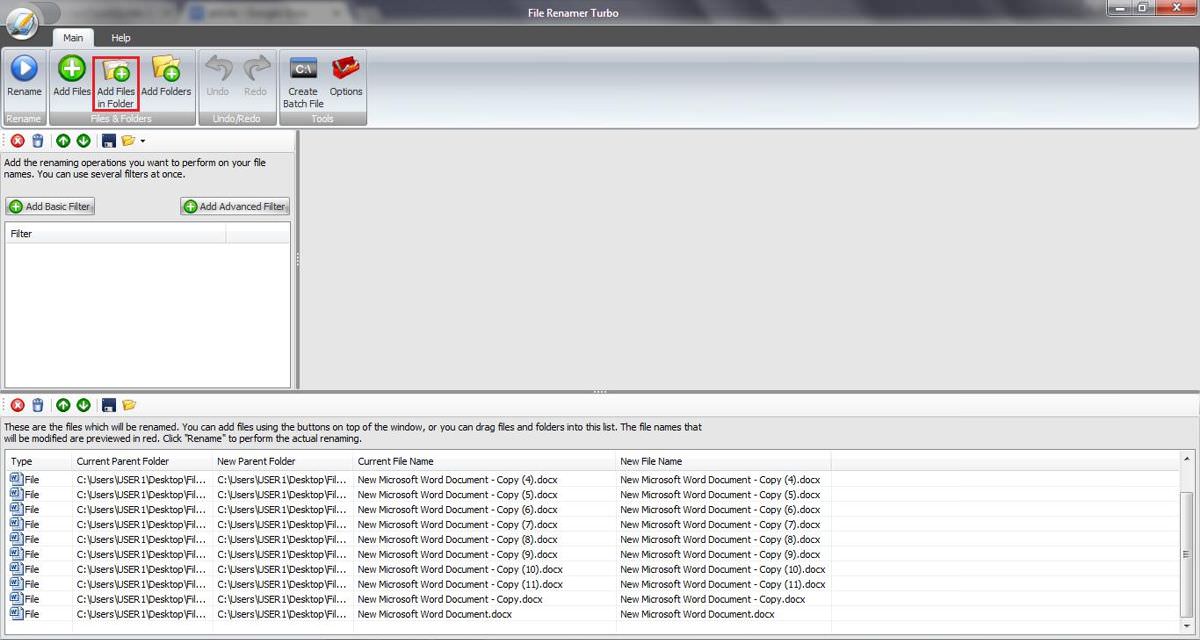
- Launch File Renamer Turbo > click the “Add Files in Folder” button to choose the files you want to rename.
- Hit the “Add Basic Filter” button to select renaming actions > add “Find & Replace“ > in the right pane, type “New Microsoft Word Document” next to Find: and “V” (or any preferred name) next to Replace:.
- Click “Add Basic Filter” again > choose “Trim Between” and in the right pane, set 2 for “Remove characters between position:“ > choose the left side for “from the“ > set 13 for “as position” and again select the left side.
- Press the “Add Basic Filter” button > select Counter > in the right pane, type “<filename>” for Prefix: and leave the Suffix: field empty.
- Review the new filenames under the “New File Name” column at the bottom and click the Rename button to apply the new names.
Bonus: Windows’s Method
Windows itself offers a straightforward method to rename multiple files at once. Here’s how it works: select the files you want to rename, right-click on them, and select Rename from the context menu. Then, type the new name and press Enter. The files will be renamed sequentially. For instance, if you name them “WD”, the new file names will be “WD (1)”, “WD (2)”, and so forth.
I hope these methods prove useful in your file renaming tasks. Which tool did you find most effective for your needs?