How to Create URL Shortener with Your Domain
We see shortened URLs and even use URL shortening services like tinyurl.com or bit.ly all the time. These services are great, but have you thought of creating something similar to your own?
Setting up such a service on your own is fairly easy, and in this post, I’m going to show you how to do just that.
Enter YOURLS, a.k.a Your Own URL Shortener.
This free PHP script allows you to create your own custom domain URL shortener similar to TinyURL and Bit.ly.
We’ve installed and played around with it for a while, and here’s why we think it’s great:
- Easy to install – If you’ve got no problem installing WordPress, then setting YOURLS is a piece of cake.
- Customizable links – You can customize the links (Example: https://short.domain/custom_name) instead of the random characters (https://short.domain/3YghJ6zF) that make no sense.
- Statistics – An admin page that allows you to manage and keep track of details like date of creation, IP, clicks, etc.
- Public/Private links– You control whether this service is available for the public to use or yourself only.
- Bookmarklet – Easy bookmarklet to create your own short URL on the fly.
YOURLS also comes with developer API as well as WordPress plugin. If you like the idea of owning a private URL-shortening service, please read on.
Without further ado, here’s a simple guide on how to setup YOURLS.
Getting started
Here are some things you’ll need before the installation:
1. Domain name
A really short one would be ideal, but it’s hard to get these days. If you are thinking of getting a really short domain name, we suggest you try your luck on country code top-level domains like .at, .lv, .ly, etc.
2. PHP-supported web hosting account
YOURLS runs on PHP, so you will need to make sure the server (dedicated or shared hosting) supports PHP 7.4 and MYSQL 5 and above with mod_rewrite enabled.
Read more about YOURLS requirements.
Creating your own custom URL shortening service
With all the above-mentioned requirements ready, let’s make our own URL shortening service with YOURLS.
- Get a copy of the latest version of YOURLS. Unzip it and fire up your favorite text editor as we are about to do some configurations.
- Look for includes/config-sample.php, rename it to includes/config.php and open it with your favourite code editor.
- Mandatory settings you’ll need to change are:
YOURLS_DB_USER,YOURLS_DB_PASS,YOURLS_DB_NAME,YOURLS_SITE. Last but not least, change your password forusernameandusername2. The rest of the settings are optional. We suggest you go through the entire thing; it’s pretty self-explanatory. Read YOURLS configuration guide if you are unsure of how/what to change. - Create a database with the name you’ve inserted for
YOURLS_DB_NAME. If your web hosting account provides you with cPanel, login and find "MySQL Database" under Databases column. - Upload all files and folders in the same structure to the root folder of your web hosting account. Your root folder name might varies from public_html, www, html, etc.
- Open a brower window, type in your domain name as url, follow by “/admin/install.php” (without the quotes). Example: https://yoursite.com/admin/install.php.
- If everything is set up correctly, you’ll see the following messages with the link to your admin page at the end of the line.
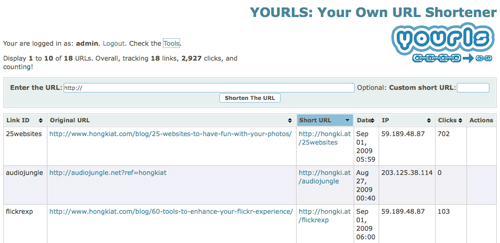
- Login and start creating your very own short URL. Make sure you check out the"Tools" link if you would like to make a bookmarklet. Here’s a sample of how our YOURLS admin page looks like.