How to Install WordPress via Command Line
I assume that many people would do the following to install WordPress in local server: Download the Package from WordPress.org, unpack it, put the files on the local server, open the localhost followed with the wordpress directory in the Browser, and then follow the instruction as shown.
This is the standard way to install WordPress. It works fine, except it requires several layer of steps. And most of the time, I have to manually re-download the package for new installation.
Another way to install WordPress is by using WP-CLI, which I found to be more streamlined. WP-CLI is a set of command lines for operating WordPress stuff. This includes install and update WordPress Core, as well as install and update plugins.
So, if you mainly work on WordPress environment and are comfortable on performing command lines in Terminal, you can follow this tip.
Recommended Reading: Setting Up Local Server With AMPPS
Getting Started
We first need to install WP-CLI, and the easiest way would be via Homebrew. Type the following commands:
brew tap josegonzalez/homebrew-php
brew install wp-cli
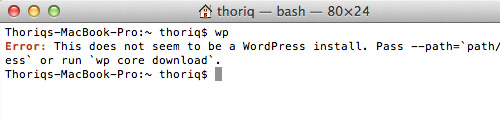
Once installed, you can type wp command to verify the it is applicable. If you got a message like what is shown in the screenshot below, it means “it works”.
Creating Project
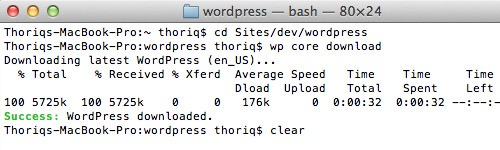
We start installing WordPress through command lines. First let’s create our project directory. In my case, all web projects reside under ~/Sites folder. So, I can type the command below to create a folder named /wordpress in it:
mkdir ~/Sites/dev/wordpress
Then, we navigate to this folder with the following command.
cd ~/Sites/dev/wordpress
Let’s download the WordPress package to this folder.
wp core download
Tip: If you want to download a particular version of WordPress, you can run the command followed with the version number. For example:
wp core download --version=5.1
If the download has completed, we can begin the installation.
Install WordPress
First, run the following command to create wp-config.php file.
wp core config --dbname=wordpress --dbuser=root --dbpass=root
The above command assumes that, you previously have created a database named wordpress. Change the database name with the one that you have created for the WordPress site.
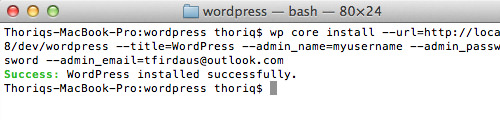
Next, we use wp core install command to install WordPress. This commands the following parameters:
--urlThe website address url, e.g. http://localhost:8888/wordpress/.--titleThe website title, e.g. My Blog.--admin_userThe admin username. It should be all in lowercase, e.g. admin.--admin_password--admin_email
Type the command below. Swap the parameters value as per your own setup.
wp core install --url=http://localhost:8888/dev/wordpress/ --title=WordPress --admin_user=myusername --admin_password=mypassword --admin_email=tfirdaus@outlook.com
The process should run quick. If it has completed, you will see the following message:
Let’s take a look at the database.
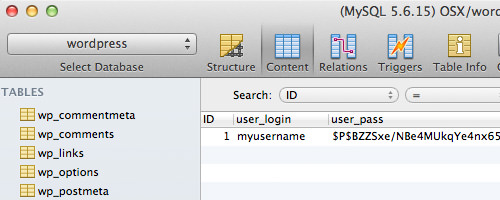
Yes, as you can see above, we have successfully installed WordPress through command lines.
Final Thoughts
I hope you will find WP-CLI as a great alternative to operate WordPress. For more reference, you can head over to WP-CLI.org Commands Doc.