How to Speed Up Your Slow PC (25 Ways)
25 Ways to Speed Up Your Slow PC
Is your computer often slow or unresponsive? Each new version of Windows introduces new features and updates that can demand more from your system. This can lead to higher resource usage, making your computer slow or unresponsive.
Good news! There are plenty of tips and tricks to help reduce unnecessary resource consumption, thereby speeding up your PC. In this article, we’ll share various methods, techniques, and tools for customizing Windows 10. We’ll provide step-by-step guides so you can enjoy a faster, smoother, and more efficient PC performance.
8 Tools to Customize Your Windows 10
Windows 10 offers many customization options, but they are either difficult to access or require tinkering with Windows... Read more
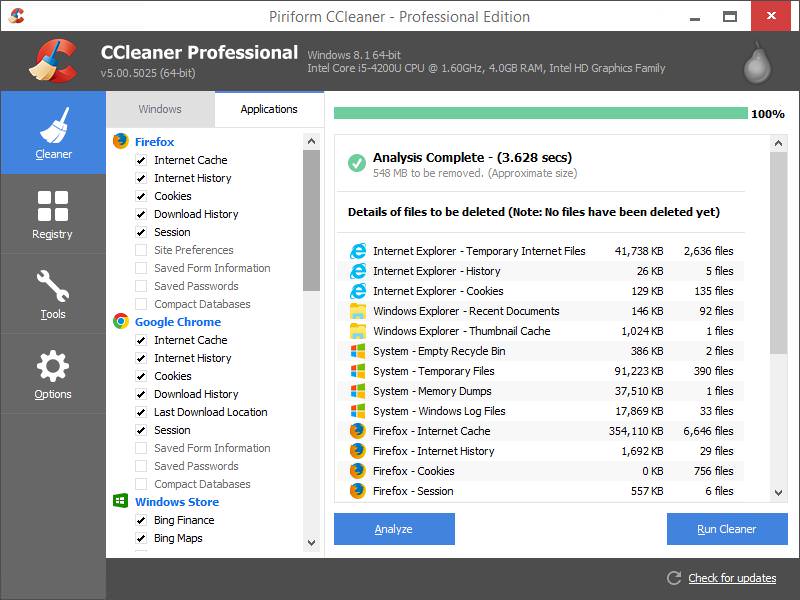
1. Regularly Use CCleaner
Over time, Windows systems accumulate temporary and unnecessary data. This increases file fragmentation and slows down your computer. While the built-in Disk Cleanup tool can help, it doesn’t remove all such data. That’s where CCleaner comes into play.
CCleaner is a disk cleanup utility that removes temporary files, cookies, cache, and other clutter. Regular use of this tool keeps your system running smoothly.
Related: Learn how to thoroughly clean your PC with CCleaner.
Here’s how to locate and remove temporary and unnecessary files using CCleaner:
- Download and install CCleaner from its official website
- Open CCleaner and click on the Cleaner icon
- Select the items you want to clean and click the Run Cleaner button
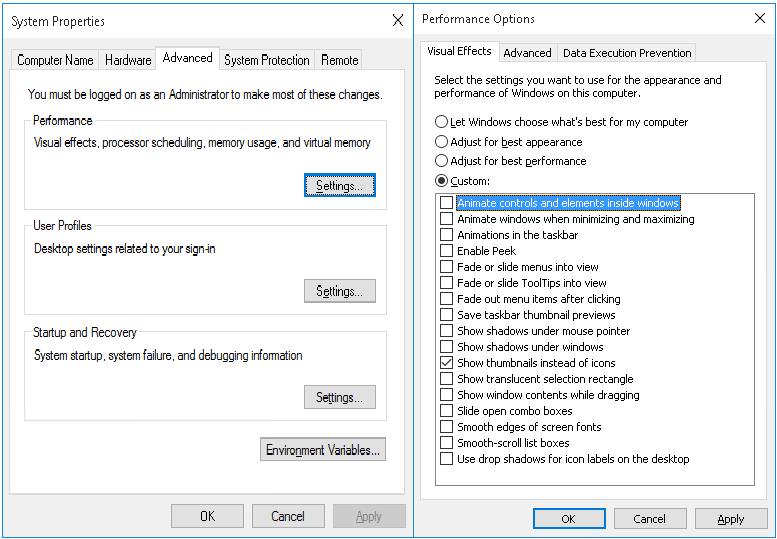
2. Turn Off Effects and Animations
Another factor that can slow down your computer is the use of visual effects and animations. These consume additional system resources. While newer PCs may not be significantly affected, older systems can benefit from disabling these features.
Here’s how to turn off visual effects and animations:
- Right-click on the Start button and select System
- Choose the last option on the left, Advanced system settings
- Go to the Advanced tab and click Settings under Performance
- Under Visual Effects, select Adjust for best performance. Alternatively, you can choose Custom and uncheck all the boxes
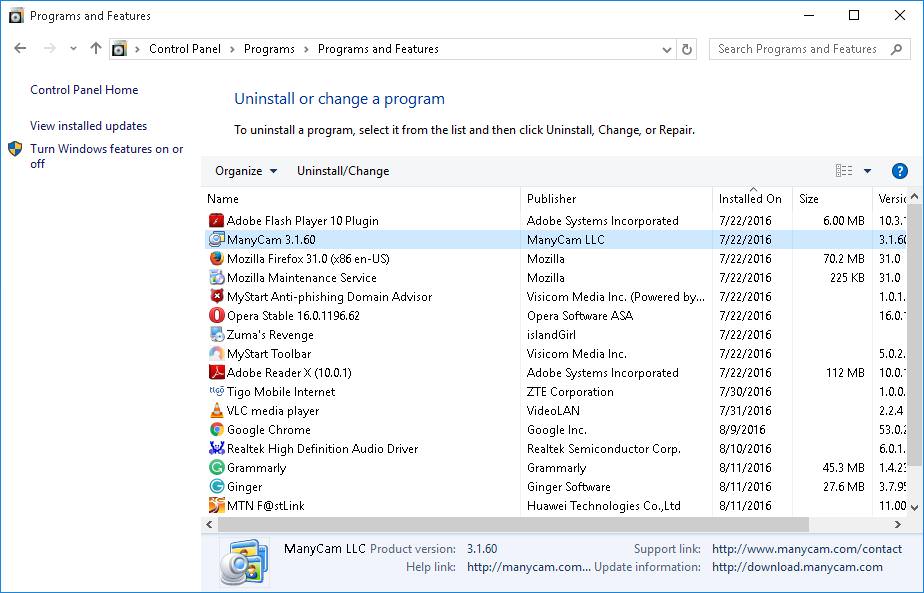
3. Remove Unnecessary Software
One major culprit for system slowdowns is unwanted or rarely-used software. These programs take up disk and memory space, interfering with other applications and reducing overall performance.
For optimal performance, it’s best to remove these unnecessary programs. If you only need to use a program occasionally, consider using portable apps instead of installing it.
Here’s how to remove unwanted or unused software:
- Right-click on the Start button and go to Control Panel
- Select Programs > Programs and Features
- Choose the program you want to remove and click Uninstall/Change
- Follow the on-screen instructions to complete the uninstallation
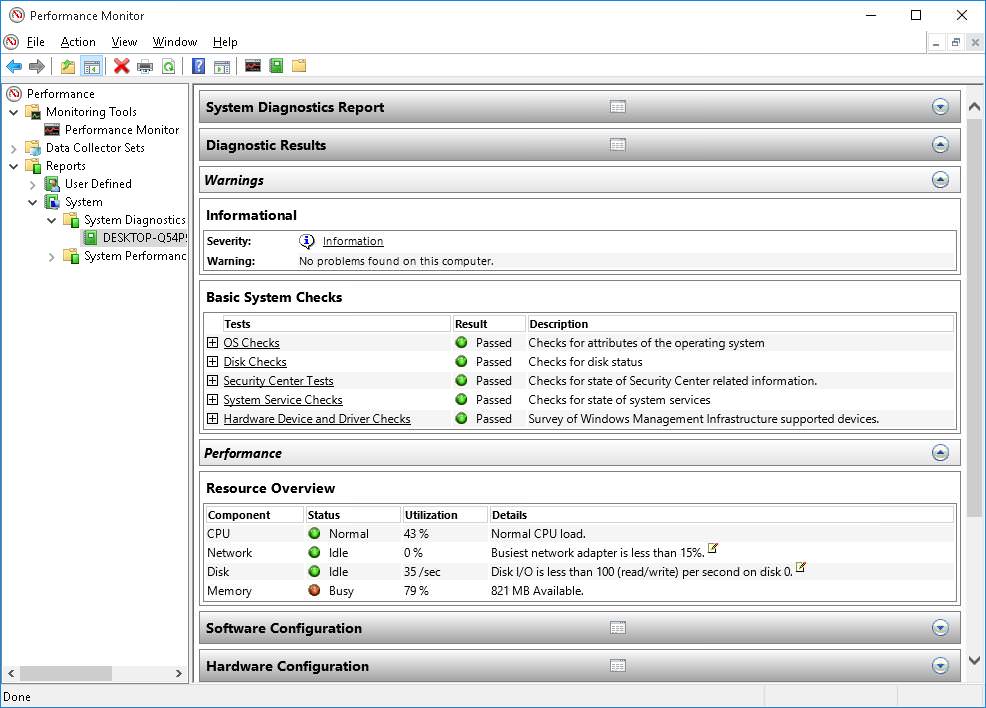
4. Utilize the Performance Monitor
Windows 10 comes with a handy real-time tool called Performance Monitor. This tool provides insights into your system and hardware resources, identifies performance bottlenecks, and offers solutions for the issues it detects.
Here’s how to use the Performance Monitor:
- Type
Performance Monitorinto the Start menu‘s search box and click the first result to open the tool - On the left panel, select Reports > System > System Diagnostics
Once initiated, the tool will compile a comprehensive performance report for your system.
Be sure to check the Warnings section to identify any existing issues with your PC. You can either use Windows 10’s built-in Troubleshooter or search online for solutions.
5. Activate Hibernate Mode
Hibernate mode allows your computer’s current state to be saved on the hard drive when you shut down. When you restart, your system boots up quickly, allowing you to resume your work right where you left off.
To enable Hibernate mode, follow these steps:
- Press WinKey + I to open Settings, then select System
- Go to Power & Sleep > Additional power settings
- Select Choose what the power buttons do from the left panel
- Click on Change settings that are currently unavailable
- Check the Hibernate box and click the Save changes button
You can now choose the Hibernate option from the Start menu whenever you want to hibernate your system.

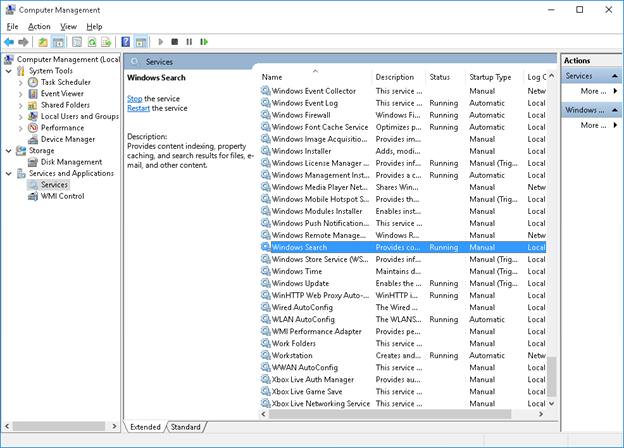
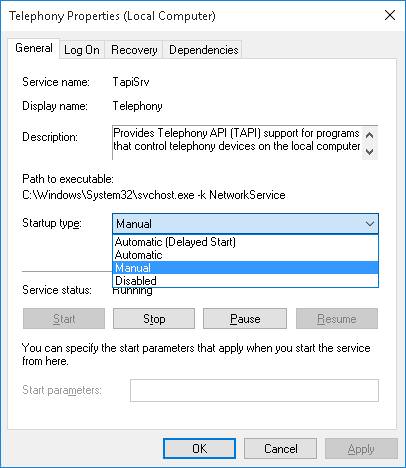
6. Turn Off Search Indexing
While search indexing enhances the speed of the search tool in Windows 10, it can also consume significant system resources. If you don’t search files often, it’s advisable to disable this feature.
Here’s how to disable search indexing:
- Right-click on the Start button and select Computer Management
- Double-click on Services and Applications > Services
- Find Windows Search in the list and double-click it
- Change the Startup type to either Manual or Disabled, and click the OK button
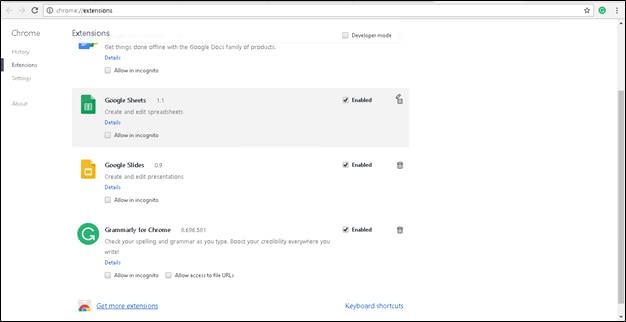
7. Reduce Browser Overhead
Browser extensions and add-ons consume a significant amount of system resources, especially when you have multiple tabs or windows open. To improve your PC’s performance, it’s advisable to disable or uninstall unused extensions and add-ons.
If you’re using Google Chrome, follow these steps to manage extensions:
- Click the ≡ icon in the top-right corner of the browser window
- Select More tools > Extensions
- Uncheck Enabled for extensions you want to disable, or click the trash can icon to remove them completely
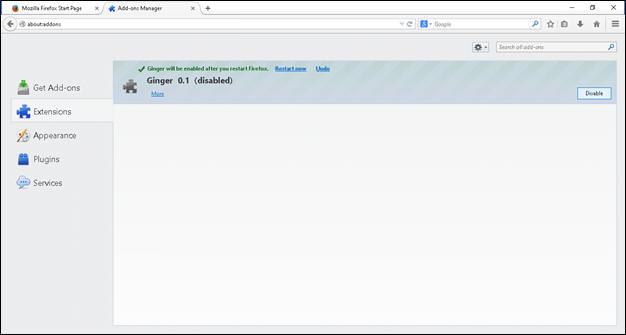
If you’re using Mozilla Firefox, follow these steps to manage add-ons:
- Click the ≡ icon in the top-right corner of the browser window
- Select Add-ons to open the Add-ons Manager
- Choose Extensions from the left sidebar
- Click Disable for add-ons you wish to disable, or click Remove to uninstall them
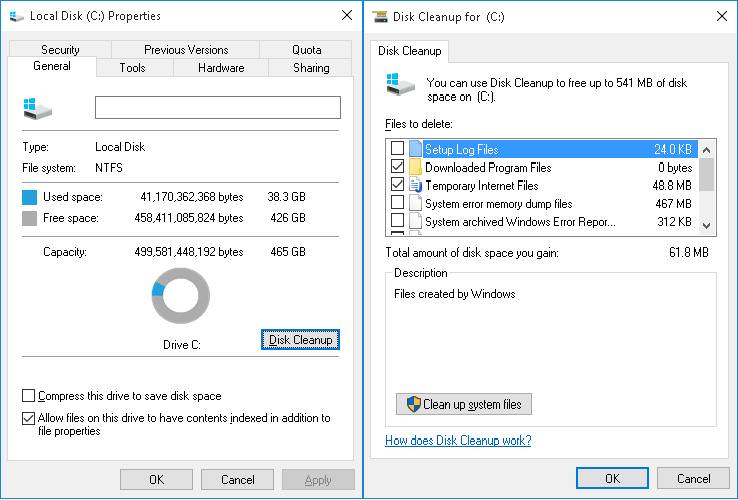
8. Perform Disk Cleanup
Over time, your computer accumulates unnecessary files that take up valuable disk space and slow down read/write operations. Using the built-in Disk Cleanup tool can help you reclaim this space and improve performance.
Here’s how to run Disk Cleanup:
- Click Start > File Explorer > This PC
- Under Devices and Drives, right-click on Local Disk (C:) and select Properties
- Go to the General tab and click the Disk Cleanup button under Capacity
- Once the tool finishes scanning, select the types of files you want to remove and click OK
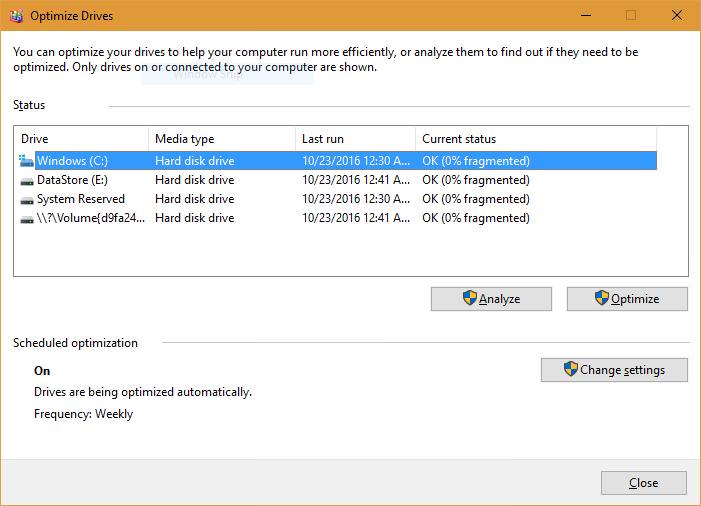
9. Optimize Disk Drives
Over time, disk fragmentation can slow down your computer by scattering file chunks across the hard drive. This not only reduces system performance but also increases the risk of disk failure.
Defragmenting your hard drive consolidates these fragments, making data access faster and extending the lifespan of your system.
Here’s how to defragment your hard drive:
- Click Start > File Explorer
- Right-click on Local Disk (C:) and choose Properties
- Go to the Tools tab and click Optimize under Optimize and defragment drive
- Select each drive and click the Optimize button to start the defragmentation process
10. Enable Quick Boot
The Fast Startup feature reduces your computer’s boot time by storing essential system files in a cache. Note that this feature does not affect the restart process.
Here’s how to enable Fast Startup:
- Right-click Start and select Control Panel
- Click Hardware and Sound, then Power Options
- Select Change what the power buttons do
- Click Change settings that are currently unavailable
- Check Turn on fast startup (recommended) and click Save changes

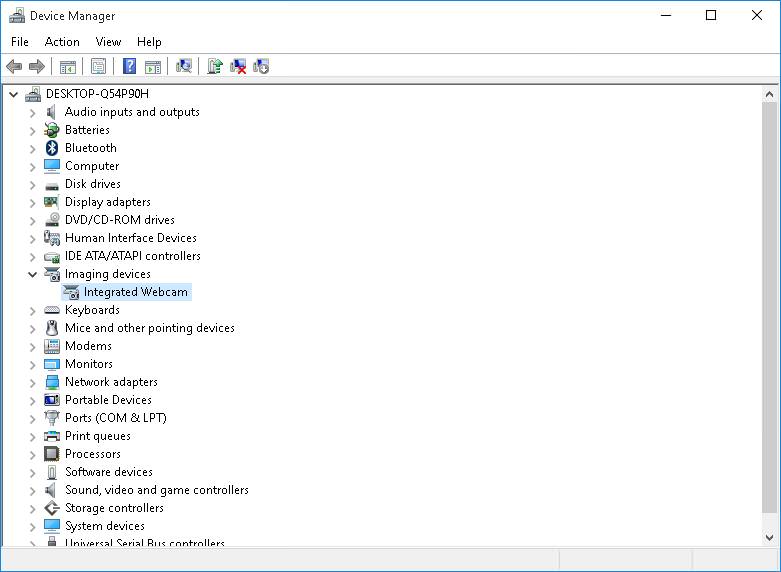
11. Remove Unnecessary Fonts and Drivers
Unused fonts and hardware drivers can slow down your system by consuming resources. Removing them can improve performance.
For uninstalling drivers, refer to the Uninstall Bloatware section above. If drivers are not listed there, follow these steps:
- Right-click Start and select Device Manager
- Find the hardware you want to uninstall, right-click, and choose Uninstall
- Check Delete the driver software for this device and click OK
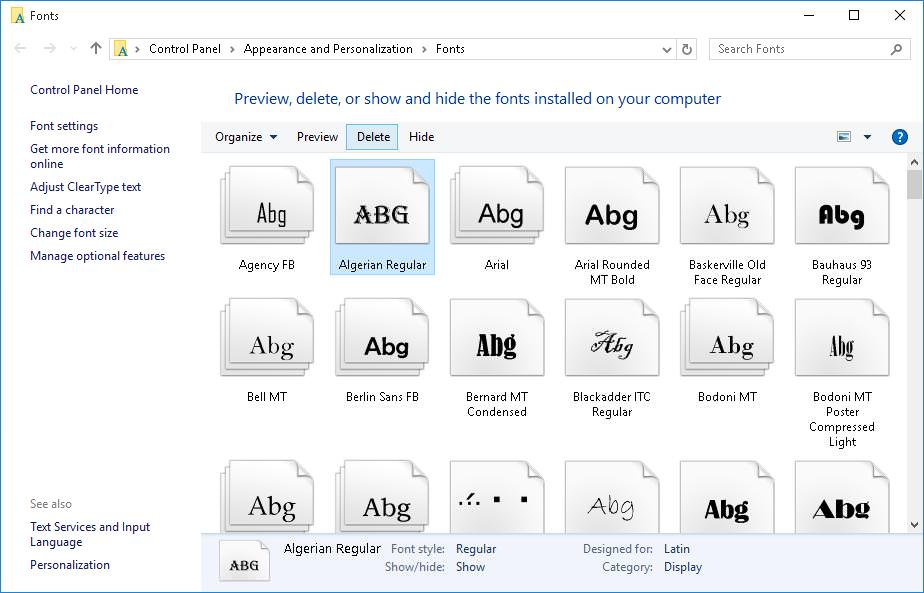
For removing fonts, follow these steps:
- Right-click Start and choose Control Panel
- Change the view to Category and select Fonts
- Select the fonts you don’t use and click Delete
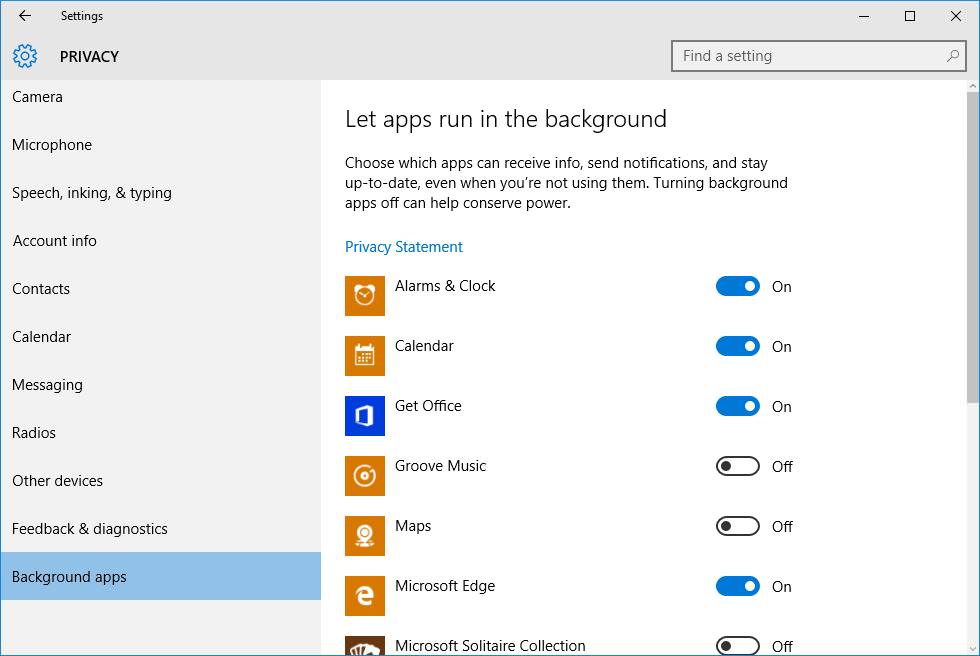
12. Manage Background Applications
Background applications consume system resources, leading to reduced performance and increased heat. Disabling these apps can improve your system’s speed.
Here’s how to disable background apps:
- Click the Start button and go to Settings
- Select Privacy, then go to the last option on the left panel: Background apps
- Turn off the toggles for apps you don’t need running in the background
13. Fine-Tune Virtual Memory
If your system has low RAM, multitasking becomes challenging. One solution is to allocate more virtual memory, which acts as an extension of your physical RAM.
Here’s how to optimize virtual memory:
- Right-click Start and select Control Panel, then choose System and Security
- Click System, then select Advanced system settings from the left pane
- Click the Advanced tab, then Settings under Performance
- Go to the Advanced tab and click Change under Virtual Memory
- Uncheck Automatically manage paging file size for all drives
- Select the C: drive and set a Custom size
- Set the Initial size (MB) and Maximum size (MB) based on your RAM size
- Click Set and OK, then restart your system

14. Disable System Tips
Windows 10 tips are useful for beginners but may be unnecessary for experienced users. Disabling them can boost system performance.
Here’s how to turn off Windows tips:
- Click the Start button and go to Settings
- Select System, then Notifications & actions from the left pane
- Toggle off Show me tips about Windows

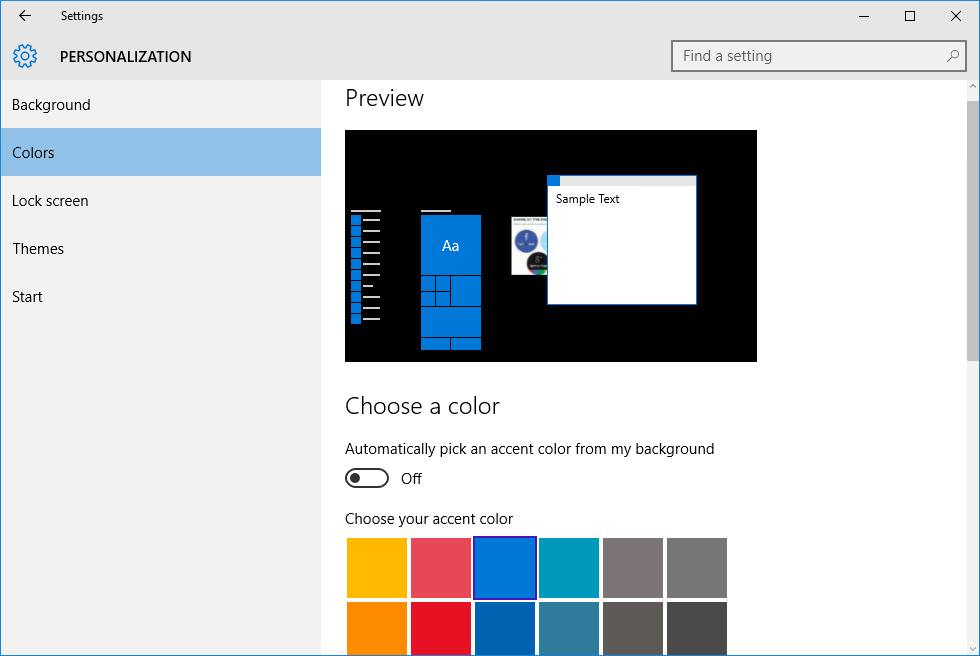
15. Deactivate Dynamic Color Adaptation
Windows 10’s dynamic color adaptation feature alters the user interface’s color scheme based on your desktop wallpaper. While visually appealing, this feature consumes additional system resources, affecting performance.
Here’s how to disable dynamic color adaptation:
- Click the Start button and select Settings
- Choose Personalization from the left sidebar, then click on Colors
- Toggle off the option for Automatically pick an accent color from my background
16. Manage Background Services
Windows 10 runs multiple background services, many of which are rarely or never used. Disabling these services can free up system resources and improve performance.
Here’s how to manage background services:
- Type
services.mscin the Start menu’s search field and open the Services tool - Double-click on the services you wish to manage and set their Startup type to Disabled or Manual, as needed
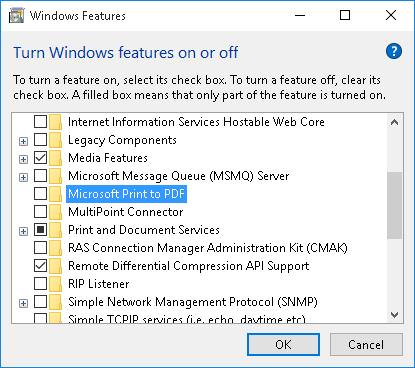
17. Control Windows Features
Windows 10 includes various optional features like .NET, PowerShell, and Telnet. These features consume memory and disk space, and if you don’t use them, it’s best to disable them.
Here’s how to manage Windows features:
- Press WinKey + X and select Programs and Features
- Click on Turn Windows features on or off in the right-side pane
- Uncheck the features you don’t use and click OK
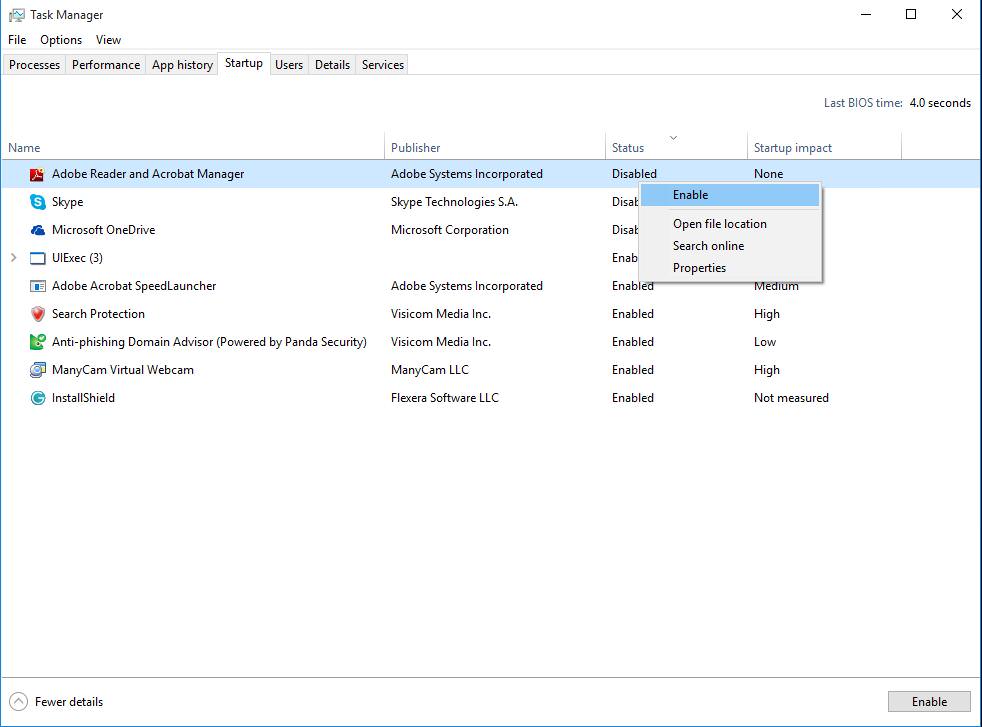
18. Manage Startup Applications
Startup programs can significantly slow down your computer’s boot-up process and impact overall performance. Disabling unnecessary startup applications can improve system responsiveness.
For a quick way to locate and manage startup applications, follow these steps:
- Press Ctrl + Shift + Esc to open the Task Manager
- Go to the Startup tab to view the list of startup programs
- Right-click on the programs you rarely use and select Disable
19. Address Registry Issues
The Windows Registry accumulates unnecessary or missing entries over time, leading to a slowdown in system performance. Regular cleaning with a tool like CCleaner can help.
To address registry issues using CCleaner, follow these steps:
- Download and install CCleaner from its official website
- Open CCleaner and click on the Registry icon
- Select the issues to address and click Scan for Issues
- After the scan, click Fix Selected Issues

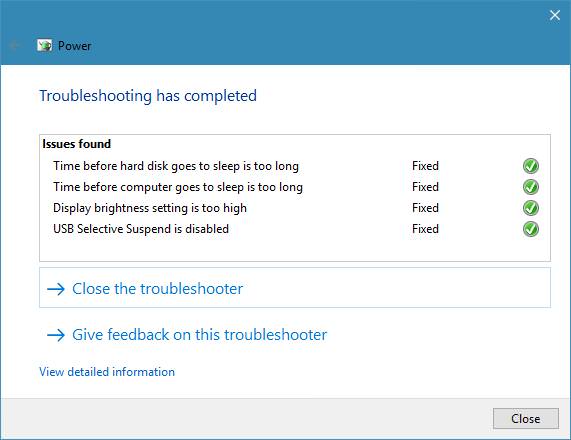
20. Utilize the Troubleshooting Tool
Windows 10 features a built-in troubleshooting tool that automatically identifies and resolves issues. This tool is particularly useful when you’re unsure about the cause of your system’s poor performance.
To use the troubleshooting tool, follow these steps:
- Right-click on the Start button and choose Control Panel
- Select System and Security, then under Security and Maintenance, click Troubleshoot Computer Problems
- In the new window, under System and Security, follow the on-screen instructions for each option
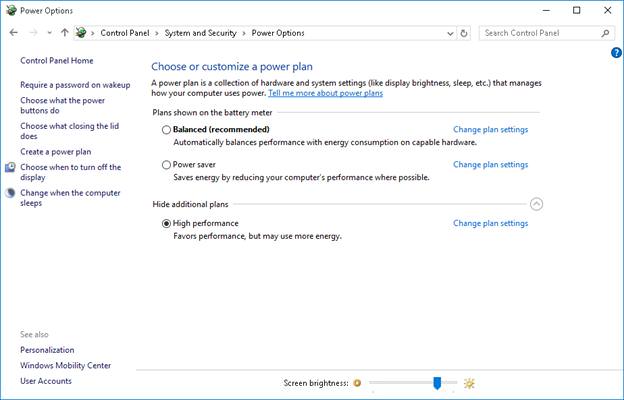
21. Choose High Performance Mode
Opting for power-saving mode can limit your PC’s resource utilization, affecting its performance. To enhance performance, use High Performance mode when connected to a power source.
To switch to High Performance mode, follow these steps:
- Right-click on the Start button, select Control Panel, then click on System and Security
- Choose Power Options and select High Performance (if not visible, look under Hide Additional Plans)
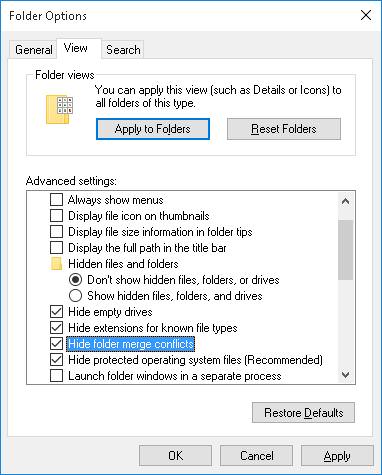
22. Configure File Explorer Settings
Windows 10’s File Explorer offers various options that can impact system performance. Disabling unnecessary options can improve your experience.
To configure File Explorer settings, follow these steps:
- Click Start, open File Explorer, and select the View tab
- Click Options and select Change Folder and Search Options
- In the Folder Options dialog, go to the View tab and configure the Advanced Settings as needed
- Click OK to save changes
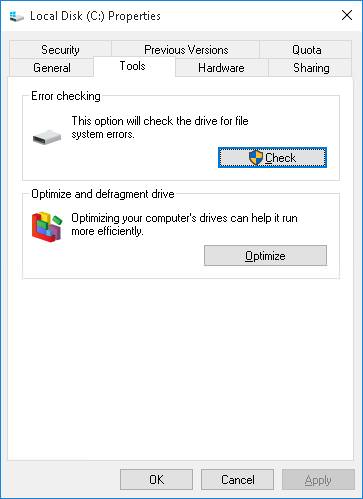
23. Perform Disk Error Checking
Over time, your computer’s disks may become corrupted or damaged, leading to slower performance and system hangups. Regular disk error checking can help mitigate these issues.
To perform disk error checking, follow these steps:
- Open File Explorer, navigate to This PC, and select a drive
- Right-click the drive and choose Properties
- Go to the Tools tab and click Check under Error Checking
- Follow the on-screen instructions to complete the check
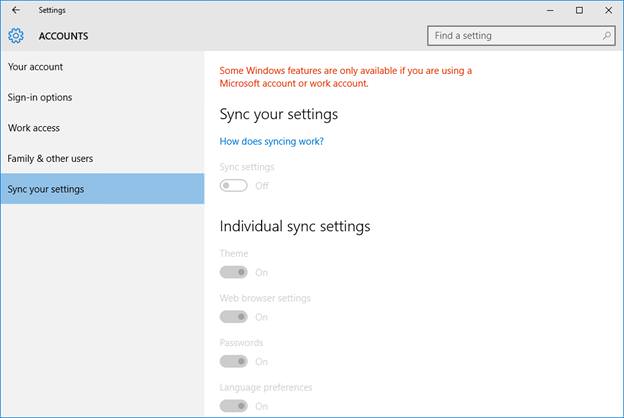
24. Turn Off Sync Feature
Windows 10’s sync feature can consume system resources and internet bandwidth. If you don’t require this feature, disabling it can enhance your system’s performance.
To disable the Sync feature, follow these steps:
- Click on Start > Settings > Accounts
- In the left pane, select Sync Your Settings
- Toggle off the Sync Settings option
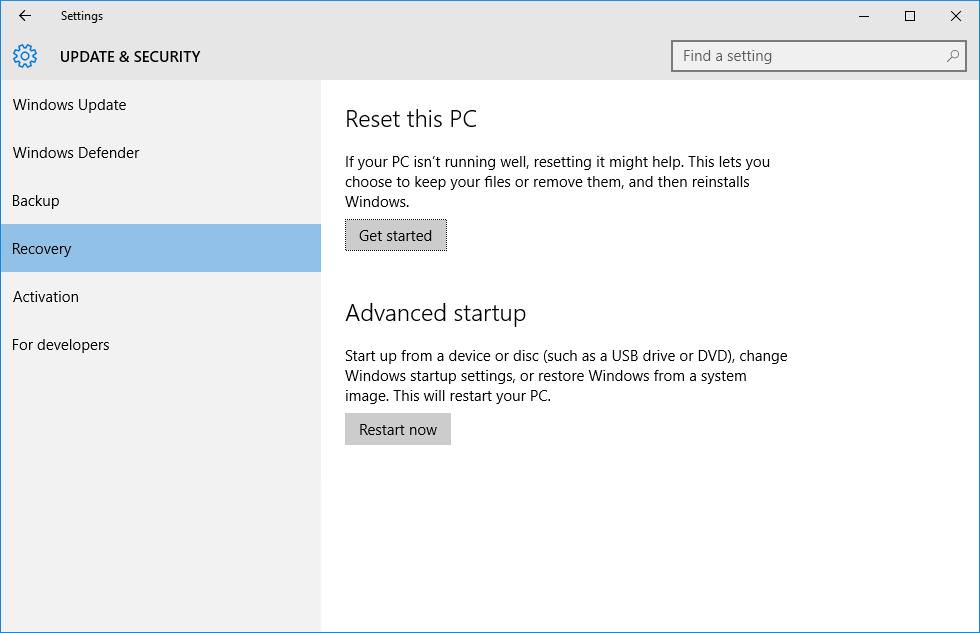
25. Reset Your PC
If other solutions don’t improve your system’s performance, consider resetting your PC. This will give you a freshly installed system but note that you’ll lose your old software and configurations.
To reset your PC, follow these steps:
- Open Start menu > Settings > Update & Security
- Select Recovery in the left pane
- Click the Get Started button under Reset This PC
Conclusion
We’ve covered numerous tips and tricks to optimize your Windows 10 system. Let us know which tips were most effective for you in the comments section. If you have additional tips, we’d love to hear them.