How to Send Customized Messages to Slack From your App
Slack is a popular messaging app used by many teams. It comes with a lot of services and an API for developers to integrate it with their applications. In today’s post we’ll see how to use one of its services called Incoming Webhooks, to send data to slack from an external application.
This way we can easily send messages to Slack from any application we already have; we can send reports, updates, news, notifications and more. For this post, I’ve used JavaScript in the example. To begin, sign into your team’s Slack account.
10 Useful Slack Tools For Better Productivity
Since its launch in 2013, Slack has grown to become a top team communication tool to generate conversations,... Read more
1. Set up the Integration
You’ll first have to set up an incoming webhook integration. Go to yourteam.slack.com/apps/build/custom-integration and click on Incoming Webhooks, then select a channel or user you want to post your messages to (this selection can be overridden later in code).
Once done, you’ll see your incoming webhook integration’s configuration page.
Scroll down and there’ll be a Webhook URL in the format https://hooks.slack.com/services/TXXXXXXXX/BXXXXXXXX/token. Save that URL somewhere, we’ll need it later. You can further change the icon and name of the integration in this page itself, but we’ll do that in code.
2. Create the Message
Let’s imagine you’ve already created a web app that seeks out Valentine’s Day sales in popular sites as well as the offer codes for use during the sale, and for some reason, you want to share this result with your Slack team members.
All we have to do now is to use the webhook URL created in the previous step and post a request to it from your application with JSON data, which will concoct the sale offer message.
Let’s first put together the JSON string that’ll be turned into the Slack message. The parameter carrying the JSON data is called payload, hence the JSON string should look like this:
var myJSONStr = 'payload= {"username": "SALE BOT", "icon_url": "example.com/img/icon.jpg", "channel": "#general"}'
icon_url is the URL to the image that’ll show up as the profile picture, you can also use icon_emoji to display an emoji as the profile picture instead, for example "icon_emoji": ":gift:". "channel" specifies the channel or username who’ll see your message. For username use the syntax "@username", for channel "#channelname".
Now for the actual message; you can either add the "text" property and write your message as its value and be done with it, or use the property called "attachment" to add richly formatted text, which is what we’ll be doing now.
The "attachment" property of payload goes like this:
"attachments": [{
"fallback": "The attachement isn't supported.",
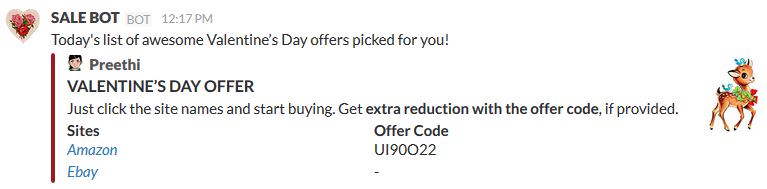
"title": "VALENTINE'S DAY OFFER",
"color": "#9C1A22",
"pretext": "Today's list of awesome offers picked for you",
"author_name": "Preethi",
"author_link": "https://www.hongkiat.com/blog/author/preethi/",
"author_icon": "https://assets.hongkiat.com/uploads/author/preethi.jpg",
"mrkdwn_in": ["text","fields"],
"text": "Just click the site names and start buying. Get *extra reduction with the offer code*, if provided.",
"thumb_url": "http://example.com/thumbnail.jpg"
}]
"fallback" is the alternative text to be shown when the Slack message is viewed in an application that doesn’t support message attachment (like in mobile notifications).
"color" is the left border color of the message.
"pretext" is the text that’s shown before the main content.
"author_link" is the URL hyperlinked in author’s name (if provided).
"mrkdwn_in" is an array of property names whose values are shown formatted in the message — based on markdown syntax like (*) for bold and (_) for italics. The three possible values for "mrkdwn_in" are "text", "pretext" and "fields"
"thumb_url" is the thumbnail image’s URL.
Here’s how the message will look like so far.

Now let’s add the fields to the attachment array, which will display the sites and offer codes in two columns.
"fields": [{
    "title": "Sites",
    "value": "_<https://www.amazon.com/|Amazon>_\n_<http://www.ebay.com|Ebay>_",
    "short": true
}, {
    "title": "Offer Code",
    "value": "UI90O22\n-",
    "short": true
}],
Use \n to add line break and the syntax <link|link name> to add hyperlinks.
Underscore is used to format text in italics.
short is set to true if the values are to be displayed side by side (like if it’s short). Put together, the JSONString will look like this (keep the string in a single line in actual working code)
var myJSONStr = 'payload= {
    "username": "SALE BOT",
    "icon_url": "example.com/img/icon.jpg",
    "attachments": [{
        "fallback": "This attachement isn't supported.",
        "title": "VALENTINE'S DAY OFFER",
        "color": "#9C1A22",
        "pretext": "Today's list of awesome offers picked for you",
        "author_name": "Preethi",
        "author_link": "https://www.hongkiat.com/blog/author/preethi/",
        "author_icon": "https://assets.hongkiat.com/uploads/author/preethi.jpg",
        "fields": [{
            "title": "Sites",
            "value": "_<https://www.amazon.com/|Amazon>_\n_<http://www.ebay.com|Ebay>_",
            "short": true
        }, {
            "title": "Offer Code",
            "value": "UI90O22\n-",
            "short": true
        }],
        "mrkdwn_in": ["text", "fields"],
        "text": "Just click the site names and start buying. Get *extra reduction with the offer code*, if provided.",
        "thumb_url": "http://example.com/thumbnail.jpg"
    }]
}';
3. Post the Request
Now to make the post request in JavaScript, use the function below:
function postMessageToSlack(){
    var xmlhttp = new XMLHttpRequest(),
        webhook_url = url-you-saved-from-before,
        myJSONStr= json-string-from-above;
    xmlhttp.open('POST', webhook_url, false);
    xmlhttp.setRequestHeader('Content-Type', 'application/x-www-form-urlencoded');
    xmlhttp.send(myJSONStr);
}
Add this function to a button click or page load to see it working.
The final output will look something like this: