Setting Up Parental Controls in Windows 10
If you’re preparing your child to start using a home computer, or if you’re considering buying their first one, it’s essential to begin with Microsoft Family on Windows 10. This feature provides robust parental controls, allowing you to monitor your child’s digital activities, manage the apps and websites they access, and establish time limits to curb excessive computer use.
Microsoft Family is integrated with your Microsoft accounts and includes an “activity reporting” feature that sends you weekly updates on your child’s computer usage directly to your inbox. Sounds incredibly helpful, doesn’t it?
Now, let’s go through the steps to activate Microsoft Family and implement parental controls on Windows 10.
5 Free Android Apps to Monitor Your Kids’ Smartphones Activities
Google Play Store may not have tougher restrictions than those found on Apple's AppStore so if your kids... Read more
Sign Into Microsoft Family
Microsoft Family is a service designed to keep family members connected and provide children with a secure environment across Windows 10 and Xbox One, as well as Android devices equipped with Microsoft Launcher. You can also organize your family calendar, and set up group chats on Skype.
Here’s how to get started with Microsoft Family:
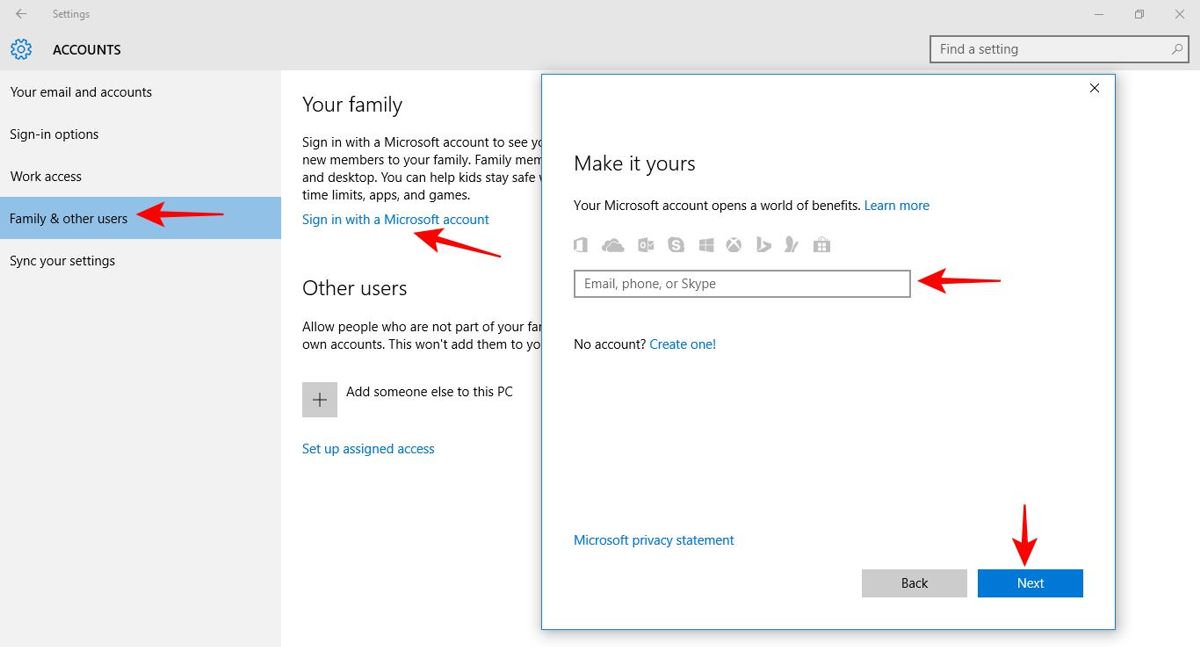
- Open the Start menu and select the Settings icon.
- Navigate to Accounts and then select “Family & other people” on the left panel.
- Choose “Sign in with a Microsoft account” under “Your family”, and log in using your Microsoft account (or create one if you don’t already have one).
Create Family Member Accounts
Add unique user accounts for each family member in Windows 10, granting them the necessary permissions. Afterward, link these accounts to your Microsoft Family to manage them centrally.
Setting Up an Adult Account
Add an adult account to oversee activities, handle requests, and manage family settings, including modifying children’s account settings.
Follow these steps to add an adult account:
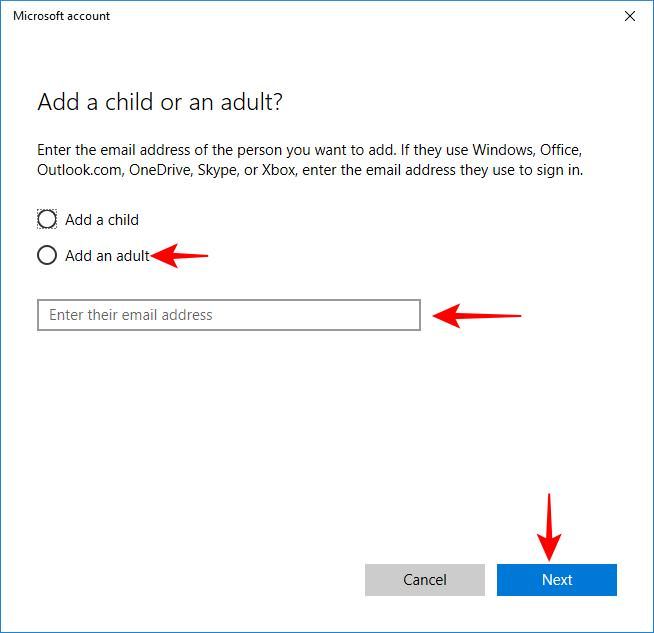
- Select “Add a Family Member” under “Your family”.
- Choose “Add an adult” in the dialog window asking “Add a child or an adult?”.
- Enter the email address of the adult’s Microsoft account, then click Next. If they do not have a Microsoft account, they will need to create one before proceeding.
Creating a Child Account
Set up a child account to apply the parental controls you configure within Microsoft Family. This helps ensure your child’s safety and manage their computer usage effectively. Additionally, you can monitor their online activities through weekly reports.
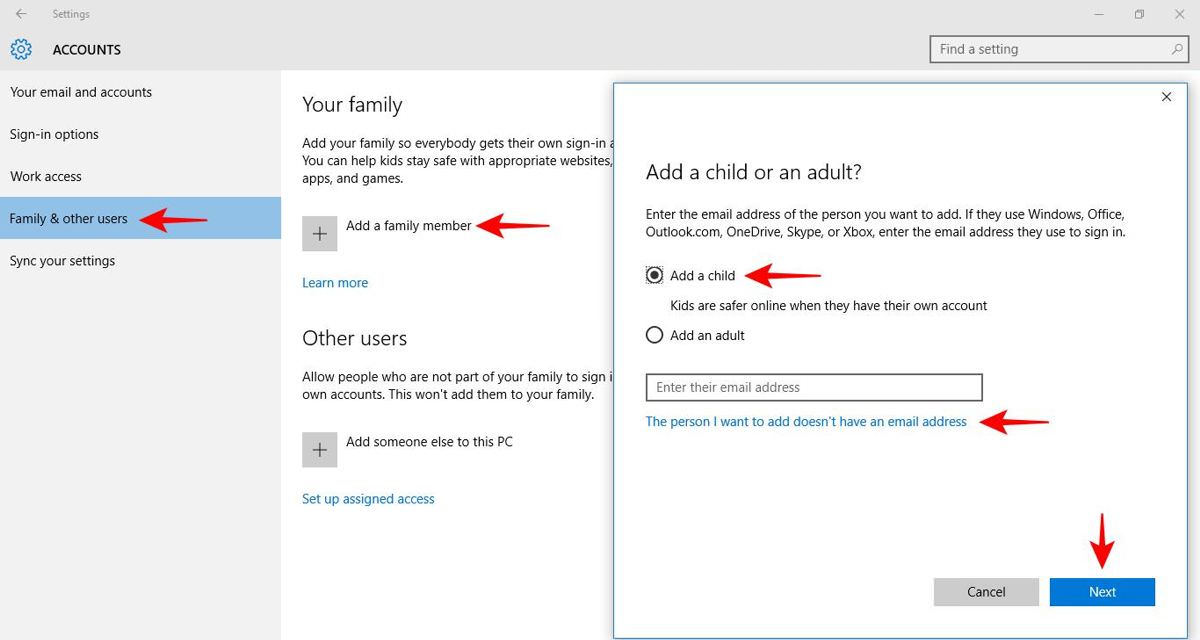
- Select “Add a Family Member” under “Your Family”.
- Click on “Add a child” in the dialog that appears.
- If your child has an email address, enter it; otherwise, click on “The person I want to add doesn’t have an email address” to create one. Then, click Next.
- Confirm the details such as name and email address if prompted.
Note: Your child will need to log in to their email and accept the invitation to join your Microsoft Family for the controls to take effect.
Configure Parental Controls
After setting up accounts for your children, you can manage them through the “Family & other people” section in the Settings. Let’s walk through managing parental controls on your Windows 10 PC:
- Open Settings, select Accounts, then go to “Family & other people” on the left.
- Click “Manage family settings online” under “Family & other people” to access the Microsoft Family settings page.
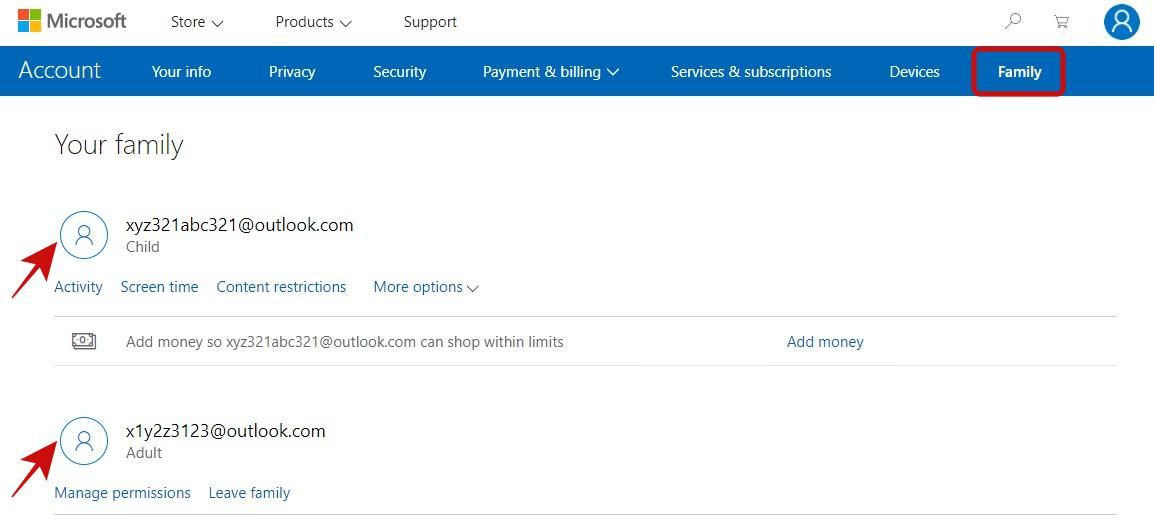
- On the Microsoft Family website, you’ll find all your family members listed under “Your family“, along with options to manage their settings.
- For each child’s account, you will find options like Activity, Screen time, Content restrictions, and more, including setting time limits.

Monitoring Activities
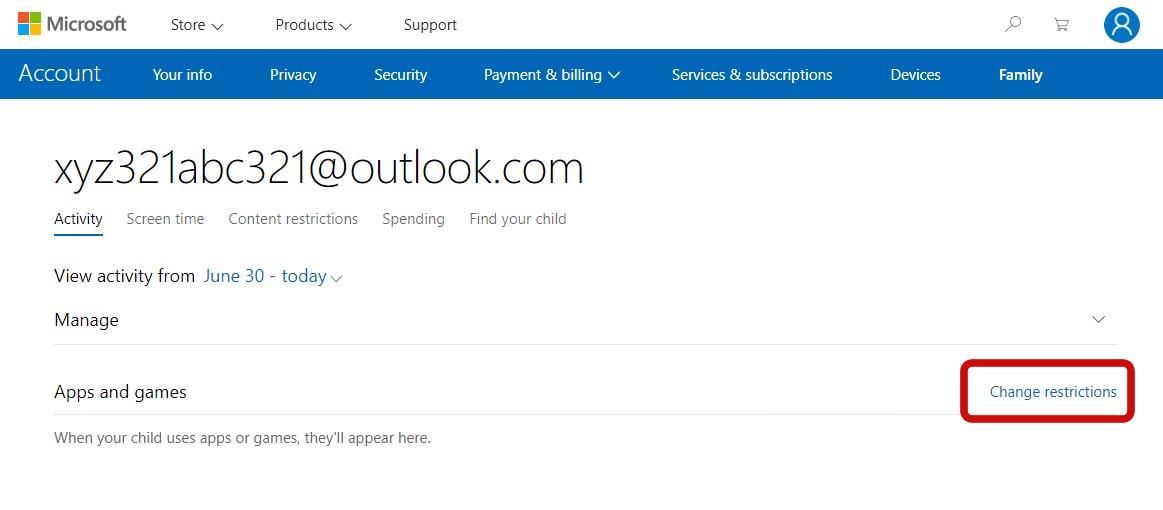
In the Activity tab of your Microsoft Family settings, you can monitor your child’s use of apps, games, web searches, and more. The activities are neatly organized under headings for easy review.

You can also modify restrictions on apps, games, or websites. To change these settings, click “Change restrictions” at the top-right of a section.
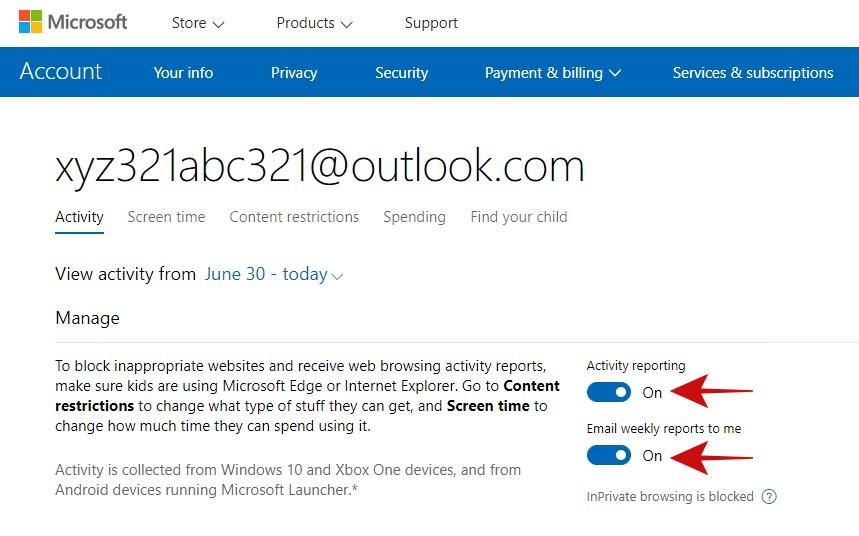
Additionally, you can opt to receive a weekly report of your child’s activities directly in your inbox. Here’s how to set this up:
- Log into your Microsoft account and click Family at the top right, then select your child’s profile from the list of family members.
- Under Activity, choose Manage.
- Enable “Activity reporting” to start tracking your child’s activities.
- Activate “Email weekly reports to me” to begin receiving these reports via email.

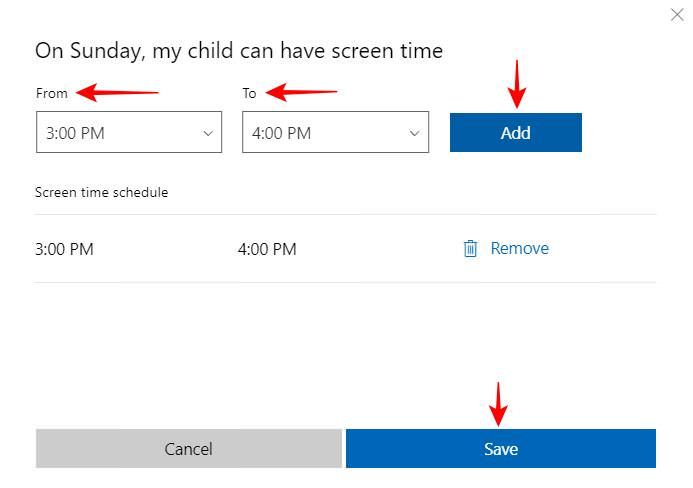
Managing Screen Time
Control your child’s computer access through the “Screen time” settings. If your child attempts to use the computer outside the predefined hours, they will be unable to log in, effectively restricting access.
Here’s how to set up your child’s screen time:
- Go to the “Screen time” tab, adjacent to the Activity tab.
- In the “Screen time that’s simple” section, activate “Use one screen time schedule” to apply a uniform schedule across all devices.
- Adjust the permitted hours for each day using the “Hours allowed” dropdown under “Screen time schedule for all devices”. Select “Blocked” to completely deny access on specific days.
- For more specific control, click on any day’s timetable to customize access periods for that day.

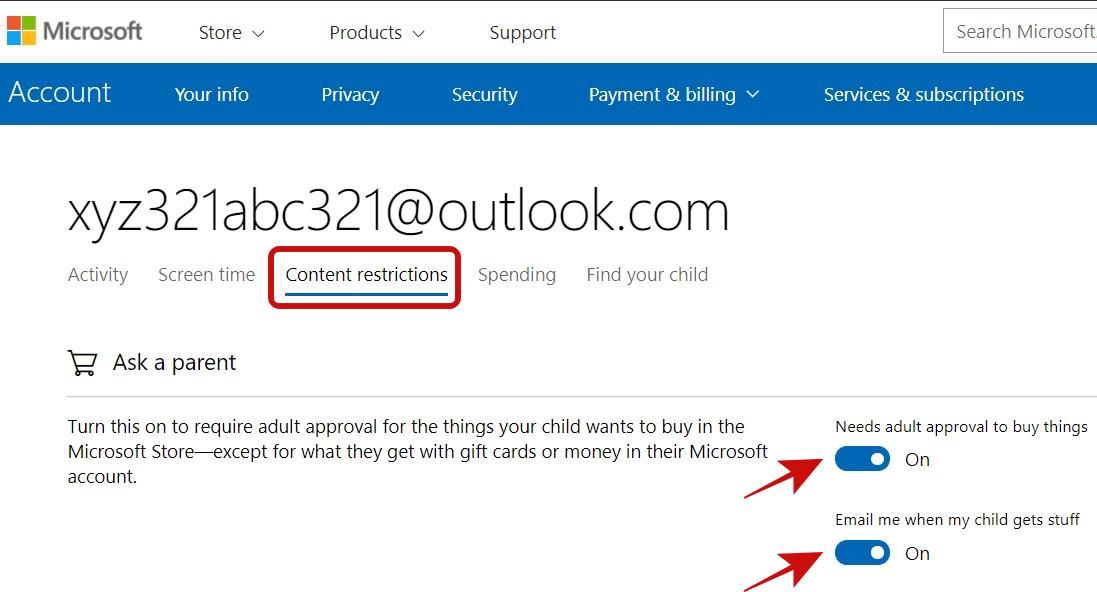
Setting Content Restrictions
Limit access to specific websites, apps, games, and media, and manage online purchases through the Microsoft Store.
To enable content restrictions, follow these steps:
- Open the “Content restrictions” tab.
- Enable “Needs adult approval to buy things” under “Ask a parent” to prevent unauthorized purchases on the Microsoft Store.
- Also under “Ask a parent“, activate “Email me when my child gets stuff” to receive notifications for your child’s purchases.
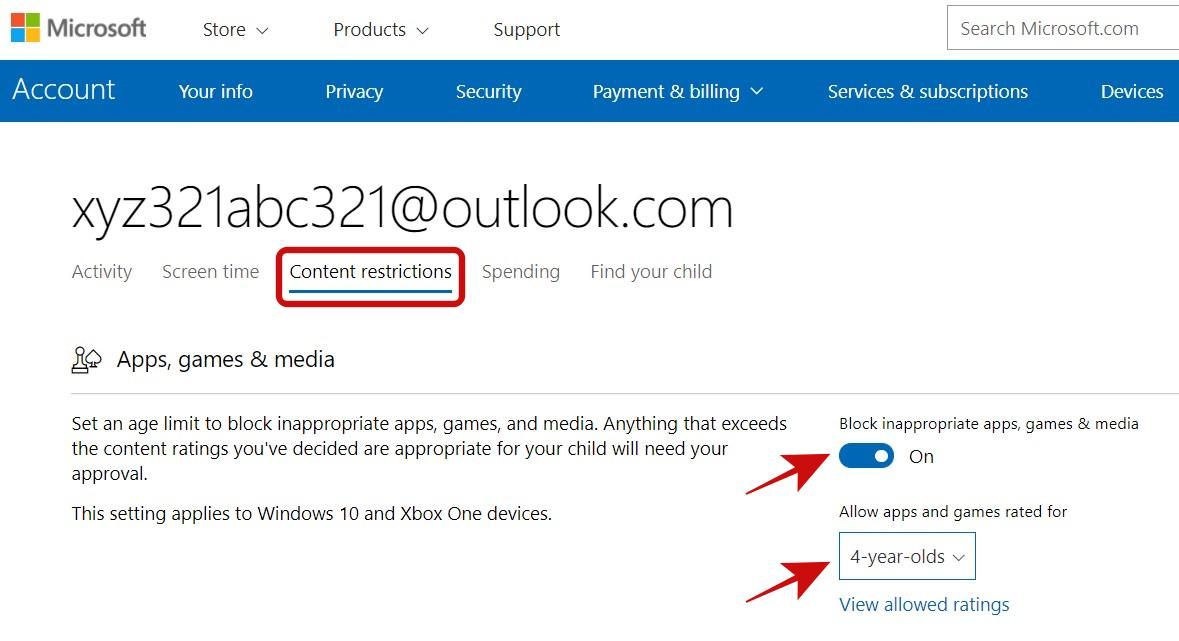
- Under “Apps, games and media“, turn on “Block inappropriate apps, games & media” to filter out unsuitable content.
- Set content ratings for apps and games by selecting an appropriate option from the dropdown “Allow apps and games rated for“.
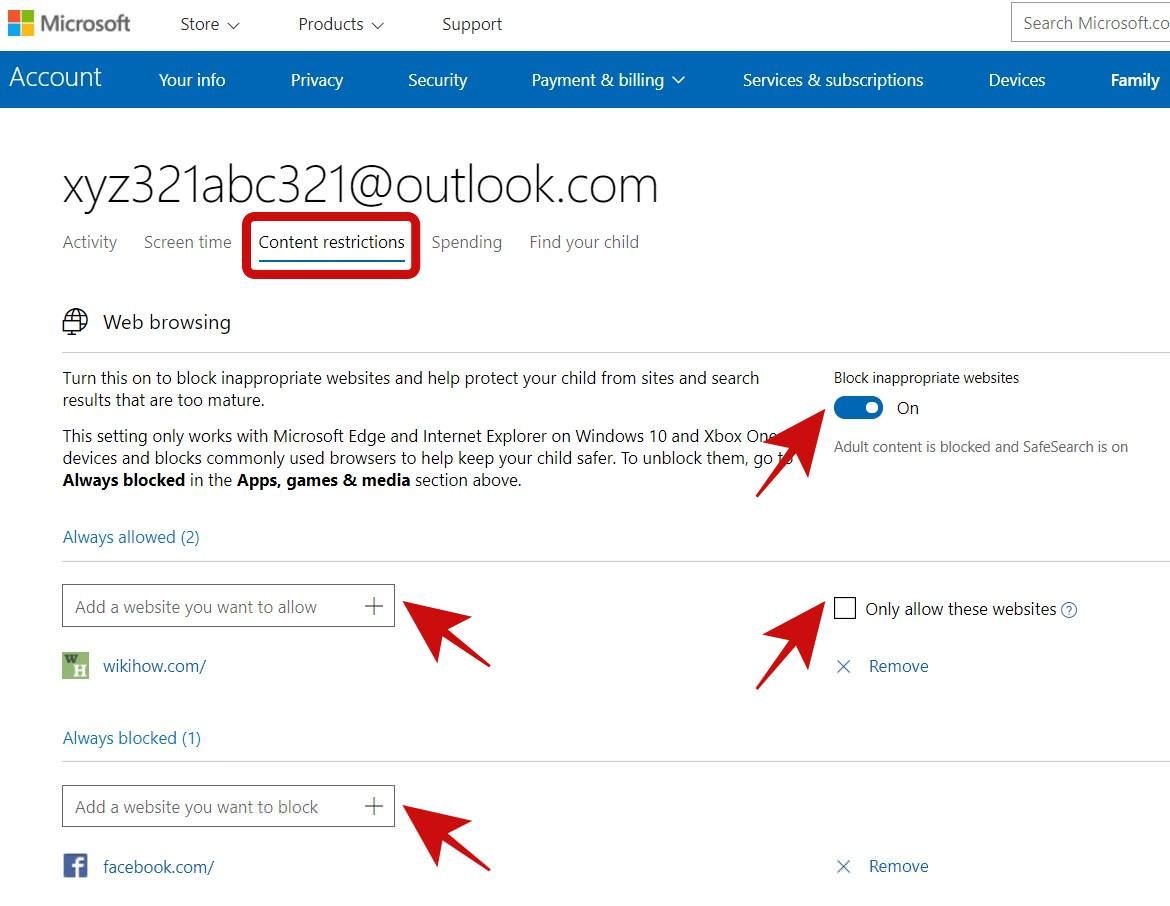
- In the “Web browsing” section, click “Block inappropriate websites” to enable SafeSearch and block adult content. Add websites you want to allow or block as needed under the respective sections.
- To restrict web access to only allowed sites, check “Only allow these websites“.
In Summary
Microsoft Family stands out as a top-tier, cost-free parental control solution, particularly beneficial for those using Windows 10 PCs. While it primarily supports Microsoft apps, its features make it a worthwhile tool for safeguarding your child’s digital experience.