Photo Manipulation Tutorial: 75 Steps to Making a Car Fly
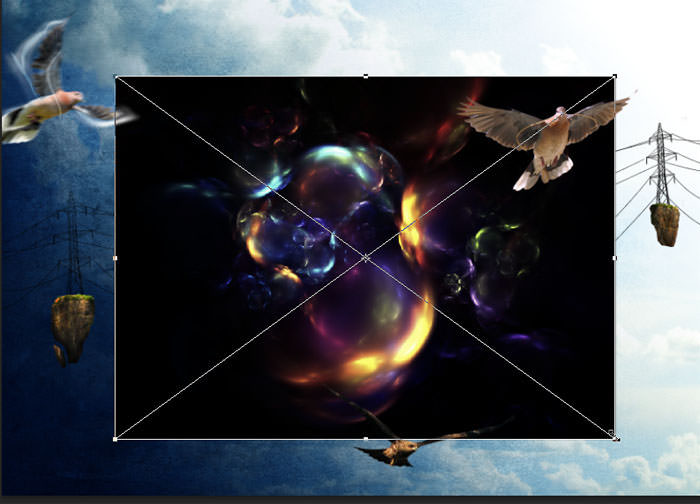
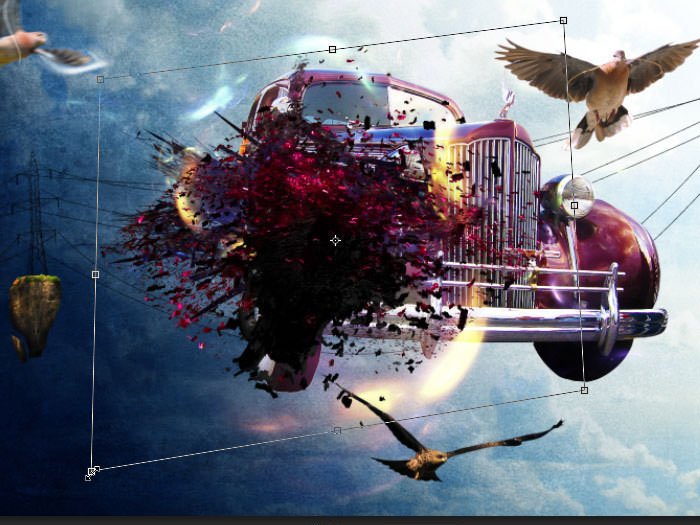
In this tutorial, we’ll use Adobe Photoshop to create an abstract “Flying Car Illustration”. This is what we will be creating with this Photoshop tutorial.
We’ll start with a selection exercise with the old car, then we’ll add flying rocks with tower and wires. Then, we will add in three birds, including one that is in mid-motion. We will also be utilizing some free 3D render and fractal packs to enhance the abstract aspect of the illustration. It’s going to be a fun exercise – all 75 steps of it!
More Photoshop Tutorials
- How To Create Stunning Flaming Text Effect
- How to Draw a Balinese Barong Mask
- How to Create a Painting Effect
Resources
Before we start though, grab these resources we will be needing:
- Old Car
- Sky
- Grunge Texture
- Eagle
- Dove 1
- Dove 2
- Tower
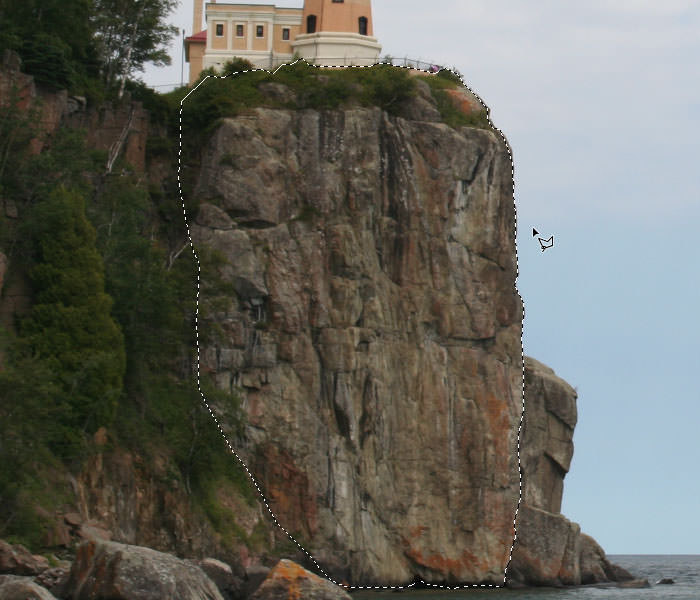
- Cliff
- Fractal Pack [specifically 4.1.png and 4.10.png]
- SciFi Render Pack [specifically 8.png and 15.png]
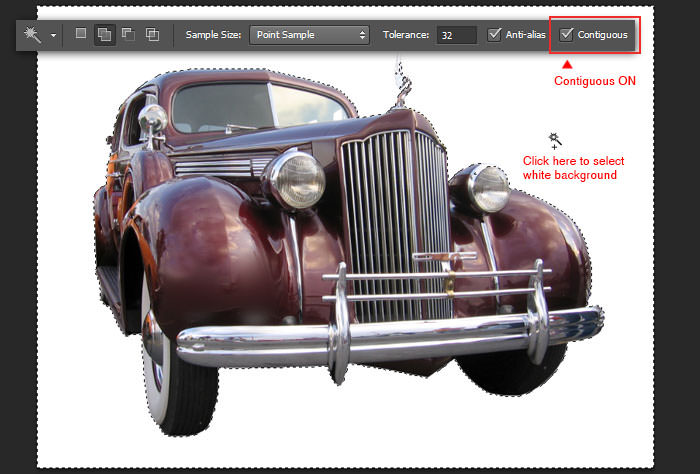
Step 1: Selecting the Car
Inside Photoshop, open the old car photo. Check that the Contiguous option is ticked. Click on the white background using the Magic Wand tool to select the background.
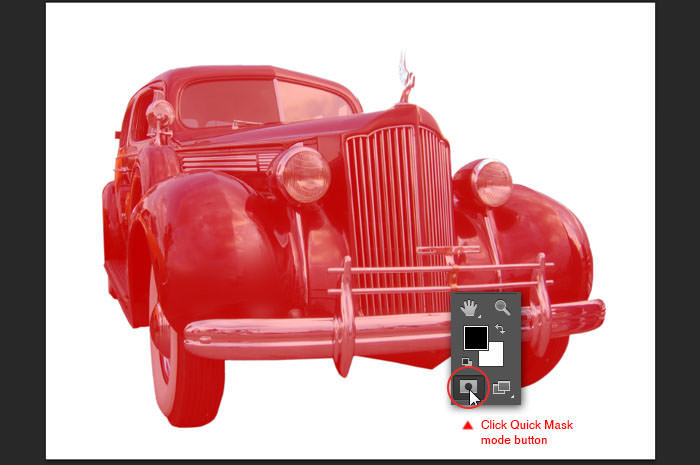
Step 2
You will notice that in some areas the selection edge is leaking because of the color range’s similarity. We need to use the Quick Mask Mode to smooth out these selection edges.
Change to Quick Mask mode by clicking the button in the toolbar. The unselected areas are now shown in transparent red.
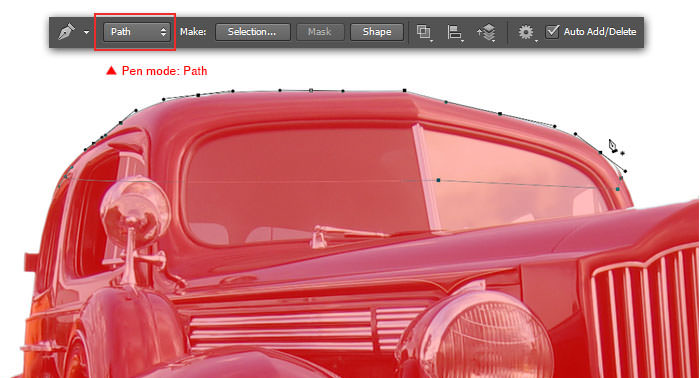
Step 3
To fix this selection manually, we will draw the selection path using the Pen tool. Set Pen mode to Path, then start adding selection points covering the car’s roof.
Step 4
Add another selection path covering the car’s emblem.
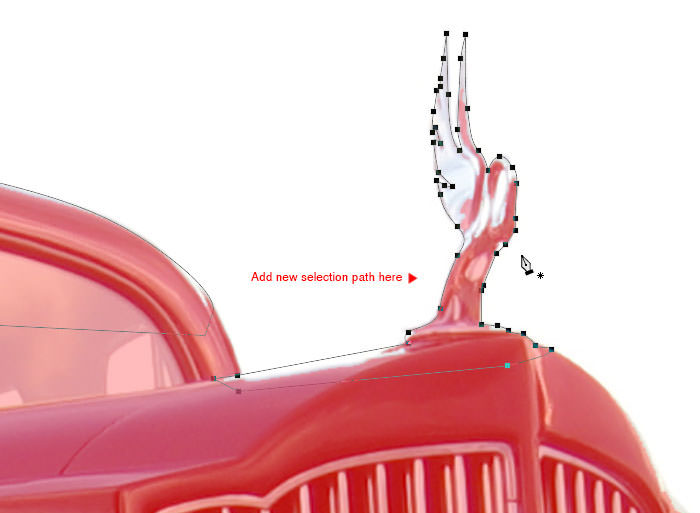
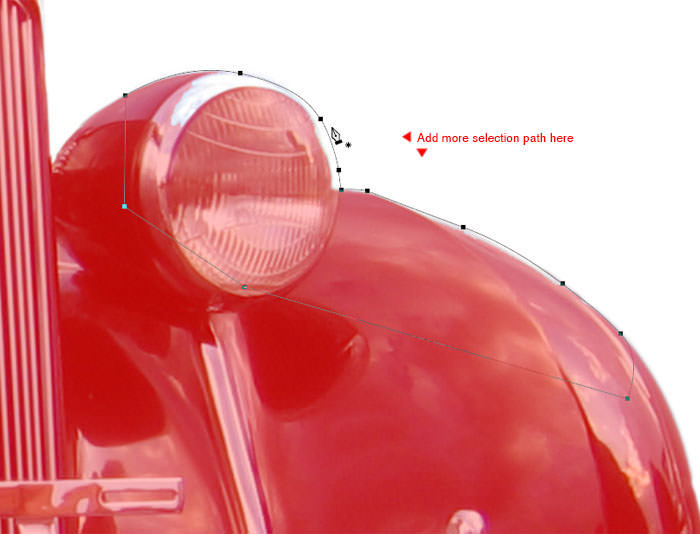
Step 5
Next, add selection paths covering the right headlight and its surroundings.
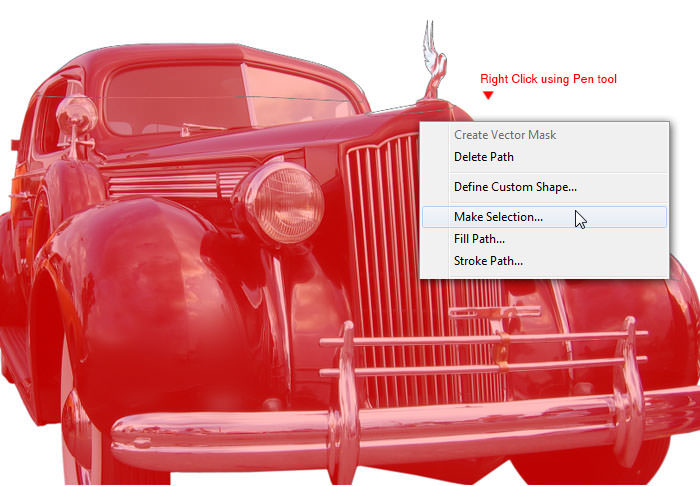
Step 6
Right click on one of the paths and select Make Selection from the pop-up menu.
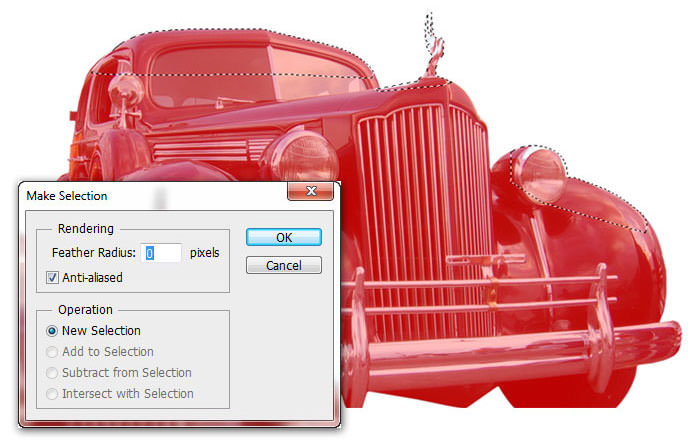
Step 7
Click OK when the Make Selection dialog appears. This will convert our paths into selection marquee.
Step 8
Fill selected areas with Black. Do this by going to Edit> Fill menu, select Use: Black. Click OK.
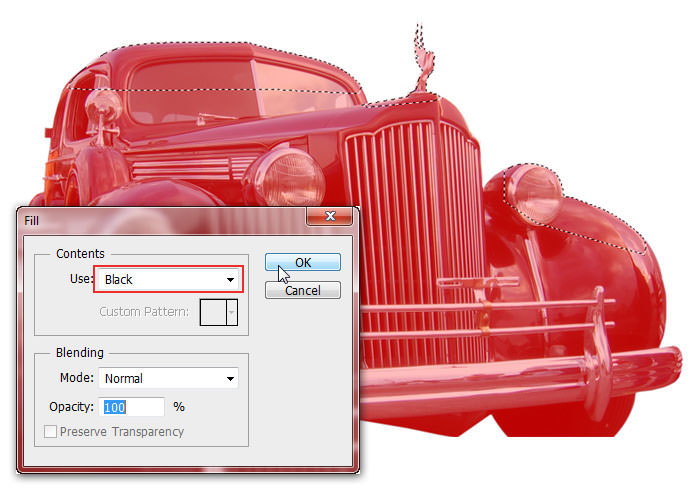
Step 9
Press Ctrl+D to deselect. Go back to Standard Mode in the toolbar.

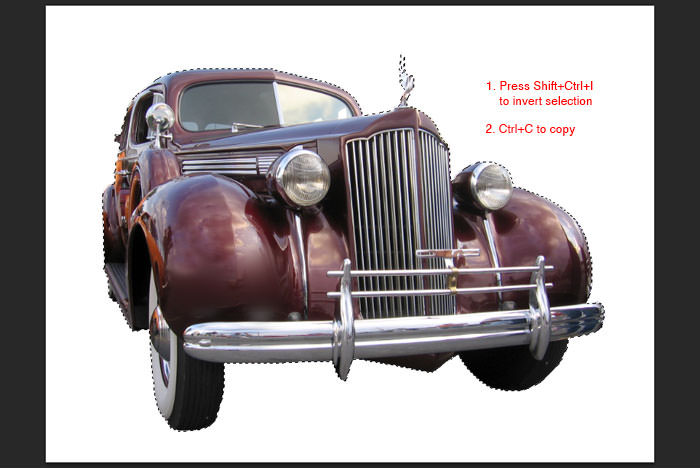
Step 10
Go to Selection> Inverse menu to invert selection area or use the Shift+Ctrl+I. Now the car is selected, press Ctrl+C to copy it.
Step 11
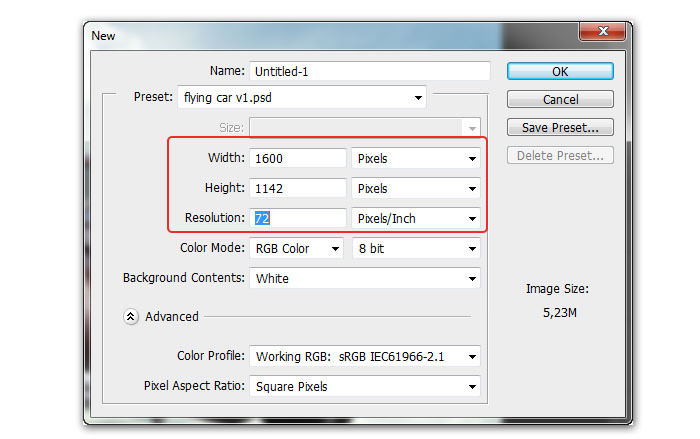
Press Ctrl+N to create new file, set the Width: 1600 pixels and Height: 1142 pixels. Click OK.
Step 12
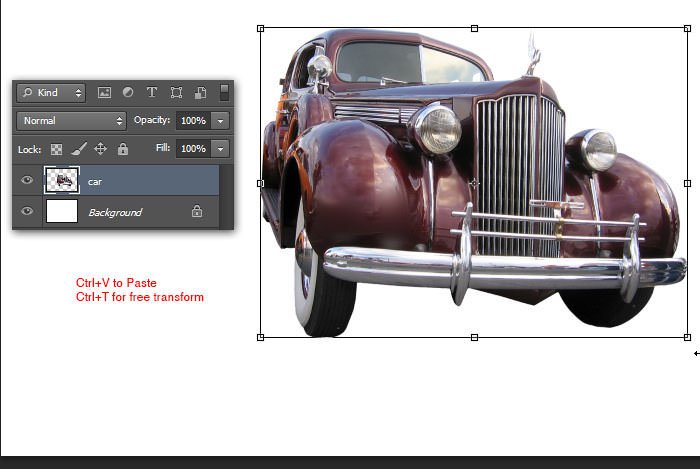
Press Ctrl+V to paste the old car we copied previously. Use the free transform command to adjust the car size and position.
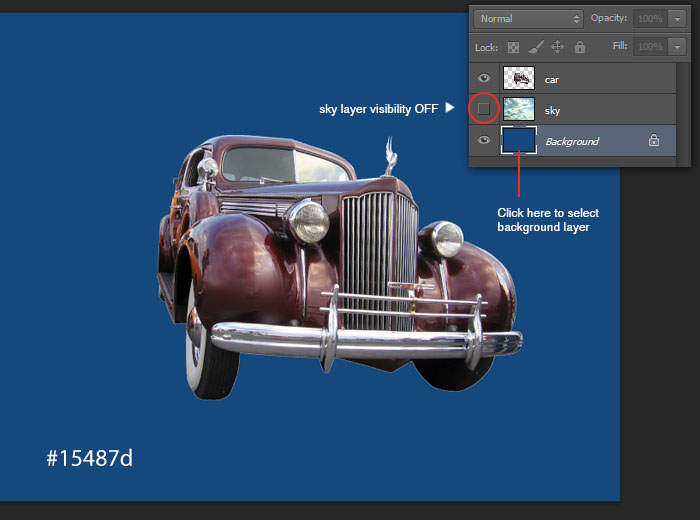
Step 13: Adding the Background
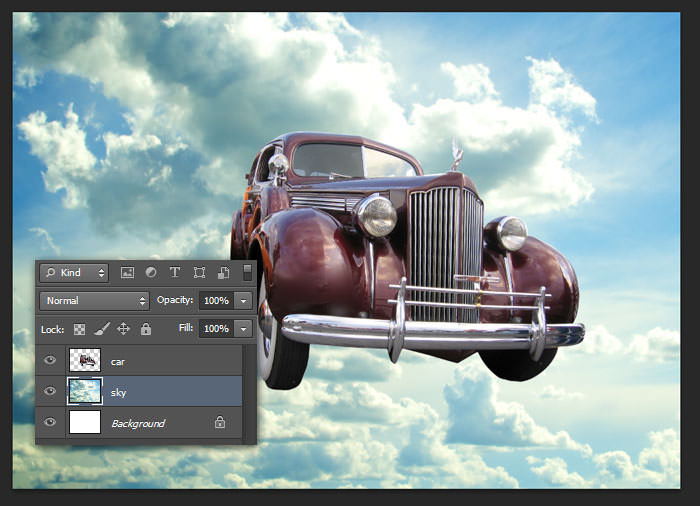
Open sky photo. Copy and paste it into our document. Place sky layer below car layer.
Step 14
Fill the background layer with blue (#15487d).
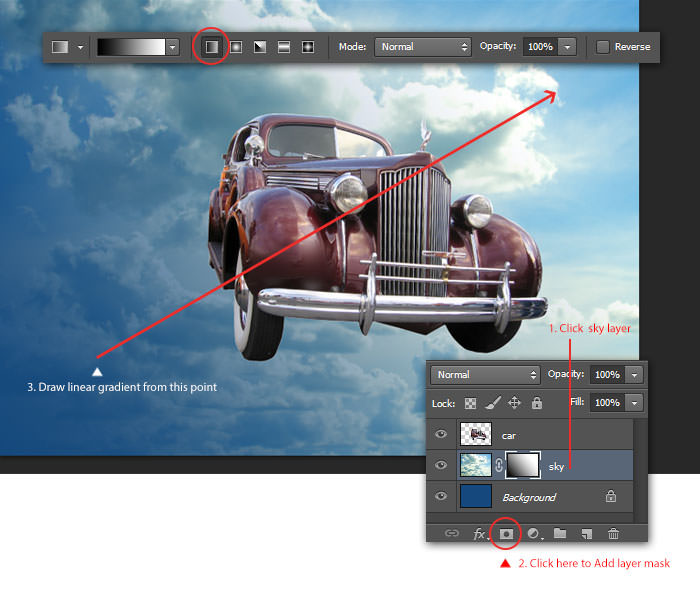
Step 15
Add a layer mask for the sky layer. Use the linear gradient tool to draw a diagonal gradient (black to white) from bottom left to top right.
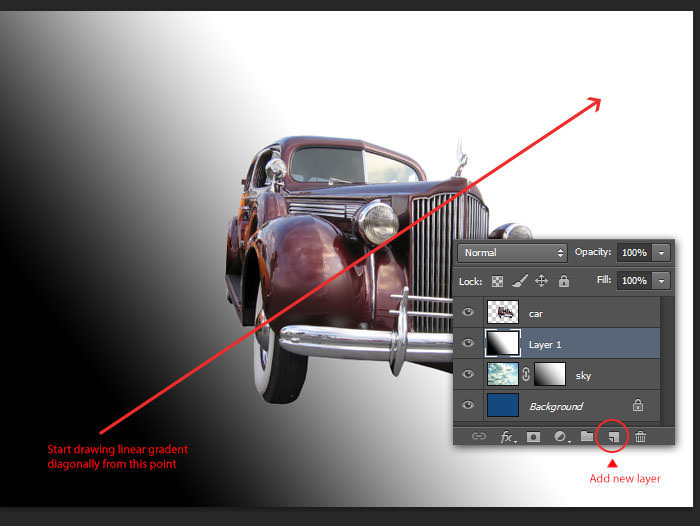
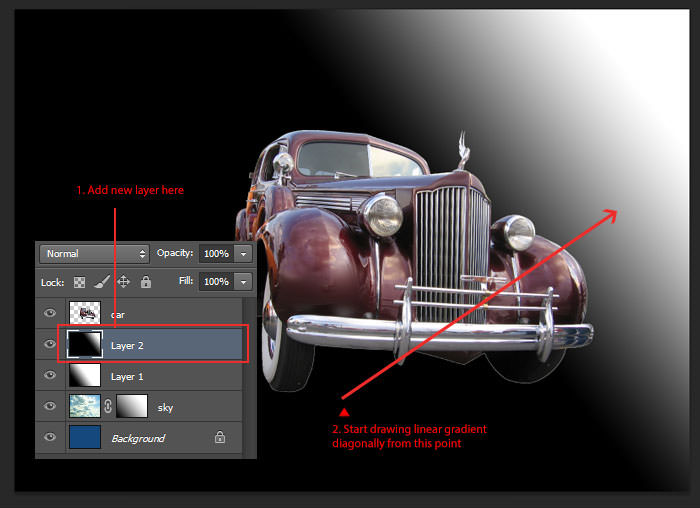
Step 16
Add a new layer. Use the linear gradient tool to draw a linear gradient diagonally similar to the previous step.
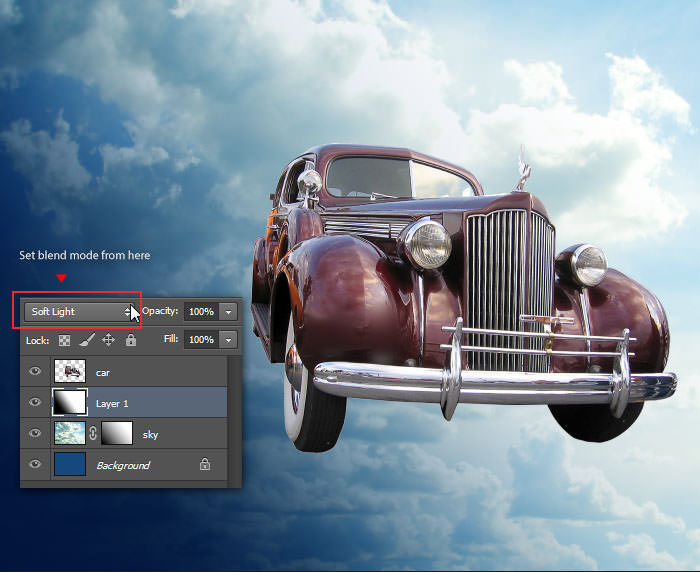
Step 17
Change the current layer blend mode to Soft Light. This will darken the color of the sky a bit.
Step 18
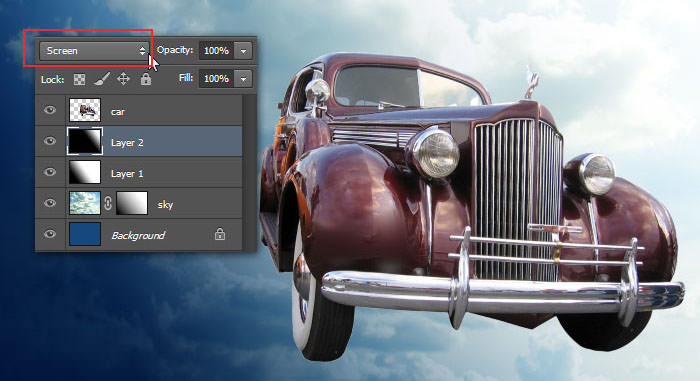
Add one more new layer, fill it with a linear gradient diagonally like the previous step but this time, make the black colored portion bigger.
Step 19
Set the current layer blend mode to Screen. The sky’s top right corner is now brighter.
Step 20
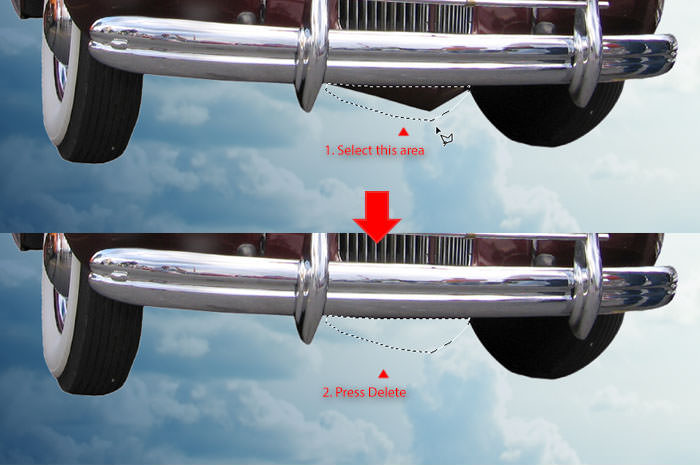
Go back to the car layer to remove unecessary objects below the old car. First, select it using the Polygonal Lasso tool, press Delete to clear the selected area. Press Ctrl+D to deselect.
Step 21
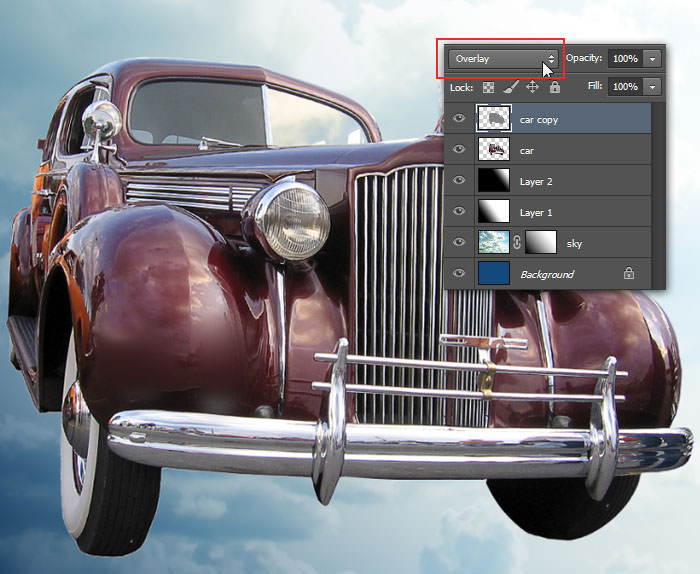
Press Ctrl+J to duplicate the car layer. Go to Filter> Other> High Pass. Set the Radius value around 1.0 Pixels. Click OK.
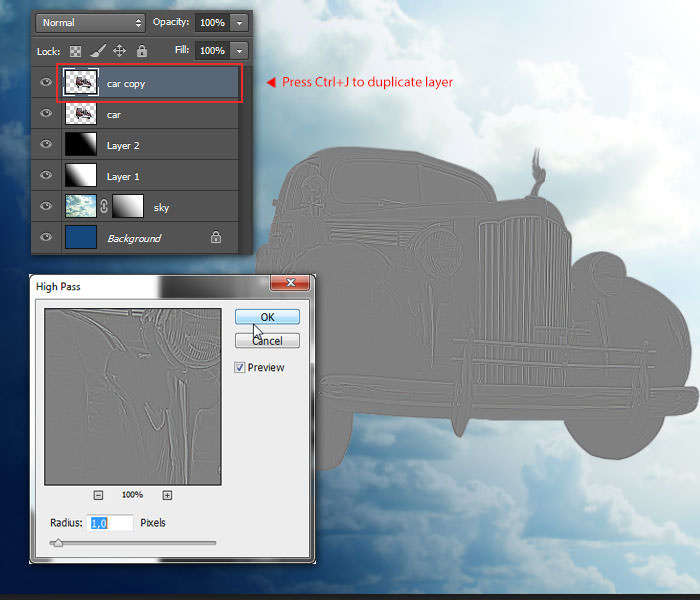
Step 22
Change the current layer blend mode to Overlay. This will increase the car detail and make it look sharper.
Step 23
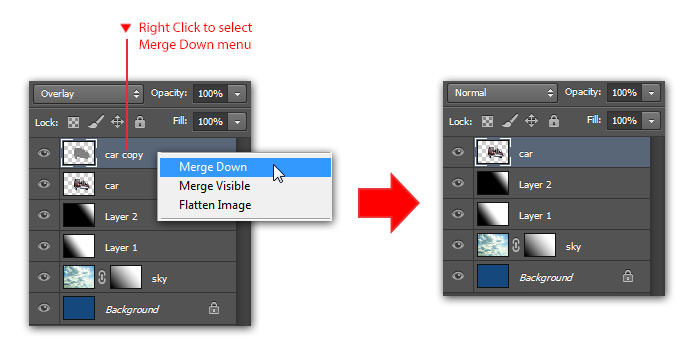
Within the Layer panel, right click the current layer and select Merge Down. This will merge both car and car copy layer.
Step 24
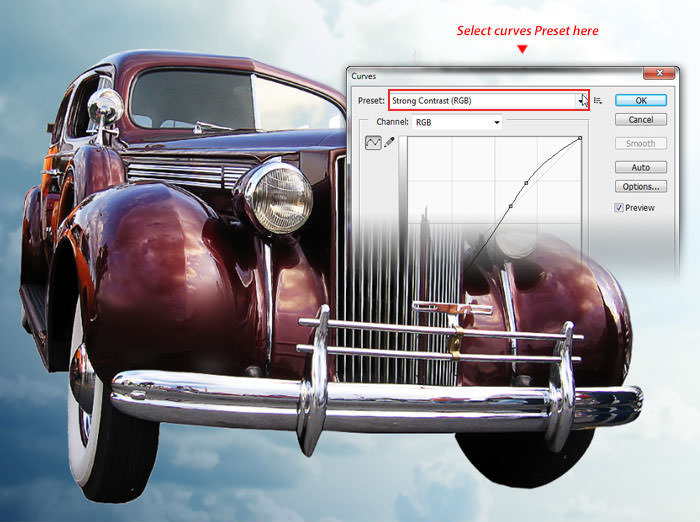
Press Ctrl+M to call the Curves command. Select Preset: Strong Contrast, click OK to apply.
Step 25
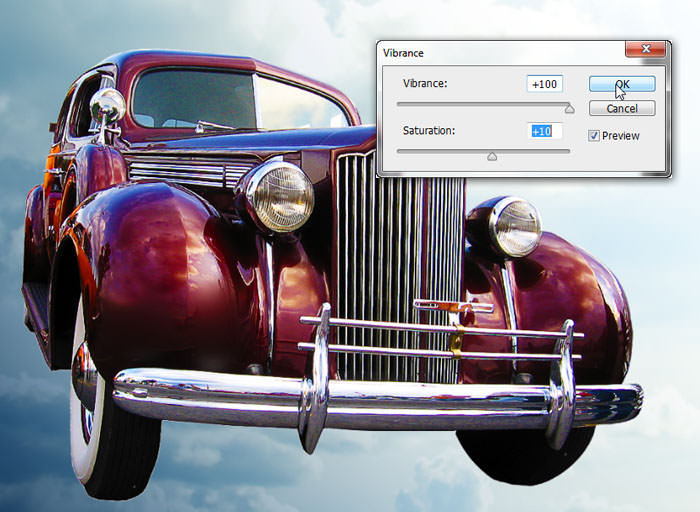
Go to Image > Adjustment > Vibrance. Increase Vibrance value to +100 and Saturation: +10. Click OK to apply Vibrance command. The Car now looks more colorful and shiny.
Step 26: Adding the Flying Rocks
Open the cliff image; we’re going to use it as our flying rock island. First, select the area you want with the Polygonal Lasso tool. Press Ctrl+C to copy the selected area.
Step 27
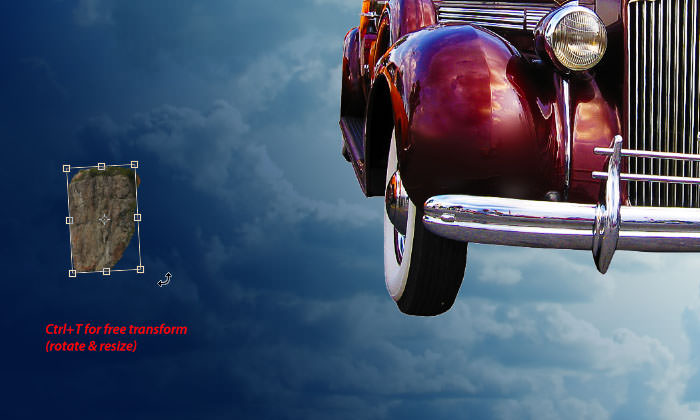
Go back to our document, press Ctrl+V to paste. Make the rock smaller, press Ctrl+T to resize, and move its position to the car’s left side. Hit Enter.
Step 28
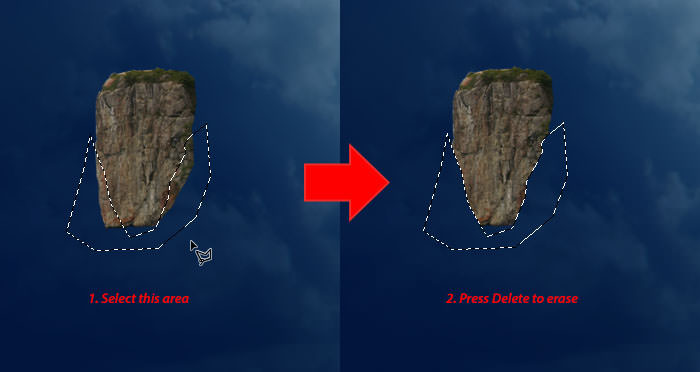
Make the bottom side of the rock smaller. Do this by drawing a selection with the Polygonal Lasso tool, then press Delete to erase. Deselect with Ctrl+D.
Step 29
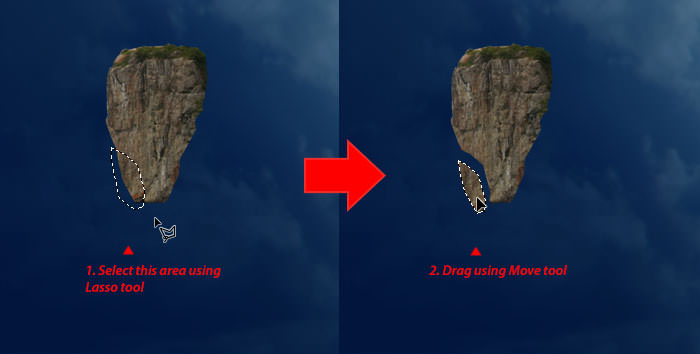
Create a new selection on the bottom left area with the Polygonal Lasso tool. Simply drag the selected area with the Move tool to move it.
Step 30
Next, we want to make the rock look 3D. Use the Burn tool to darken the rock’s edge.

Step 31
Then, use the Dodge tool to brighten the rock’s top edge.
Step 32
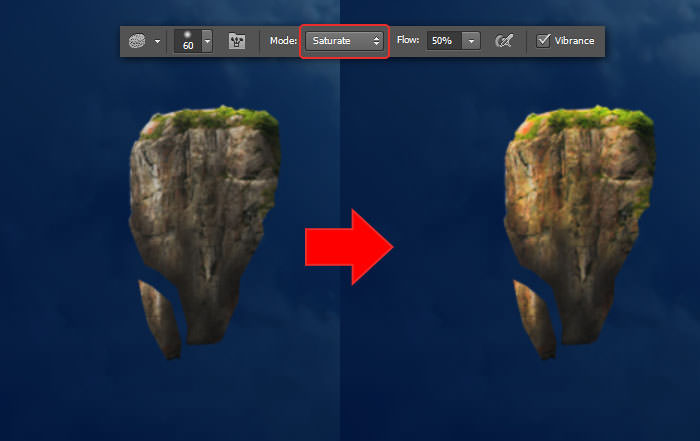
Grab the Sponge tool, set the mode to Saturate. Use the sponge tool to saturate the rock’s color.
Step 33
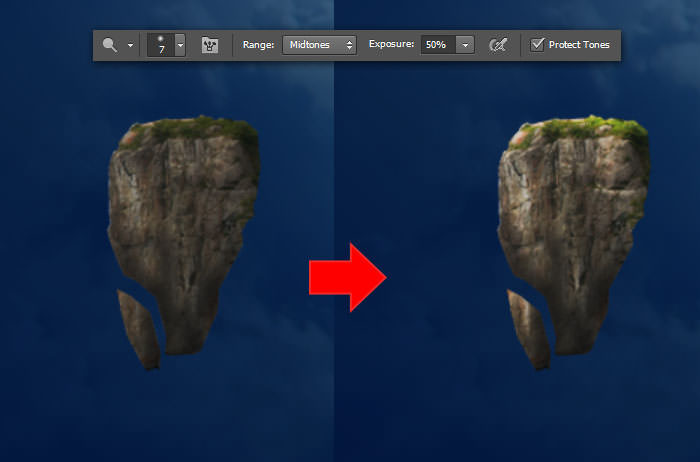
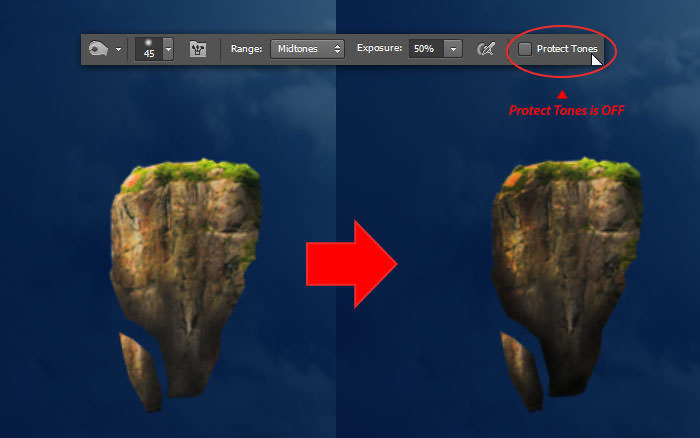
Go back to the Burn tool, but this time turn off the Protect Tones option. Use the Burn tool to darken the rock’s edges once more until they turn black.
Step 34: Adding the Tower
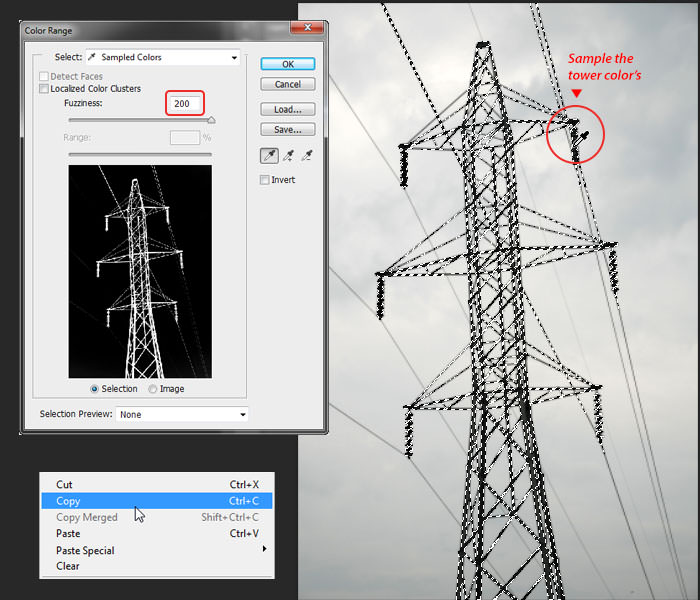
Open the tower picture. Go to Select> Color Range menu. Click on any part of the tower to sample its color. Increase the Fuzziness value until the overall tower shape is selected. Click OK to apply selection. Copy selected tower with Ctrl+C.
Step 35
Paste the tower by pressing Ctrl+V. Place the tower layer behind the flying rock layer. Press Ctrl+T for free transform and make the tower smaller, so it can ‘stand’ on top of the flying rock.
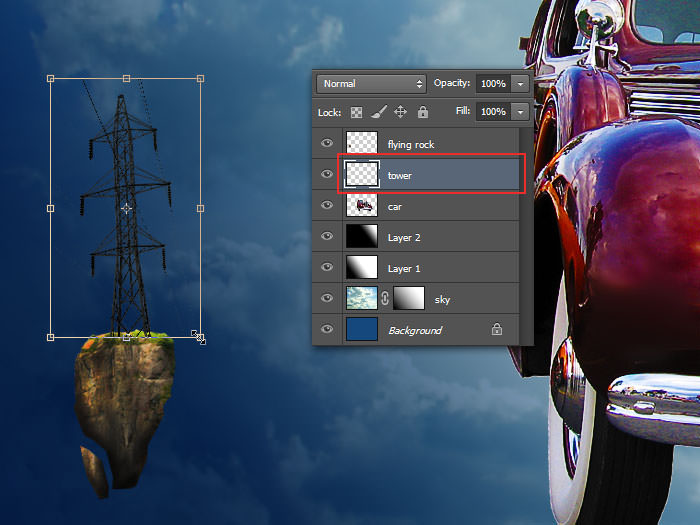
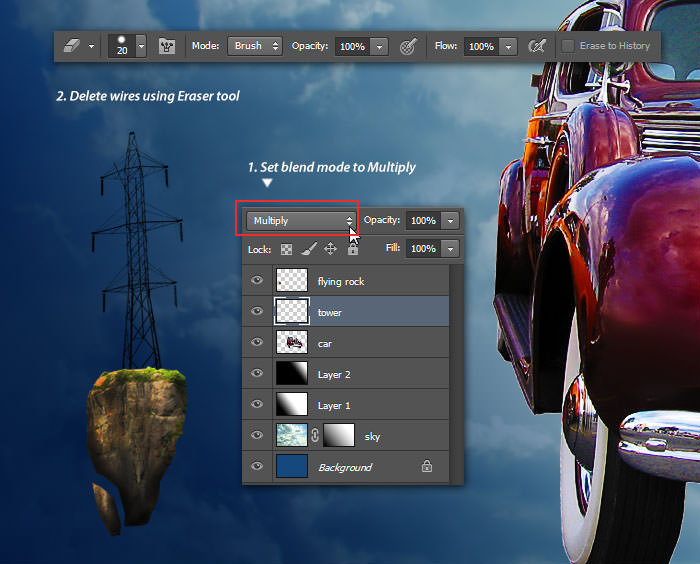
Step 36
Delete the unecessary tower cable wires using the hard round Eraser tool. Change tower layer blend mode to Multiply. We have ourselves our first flying rock.
Step 37
Now we need another flying rock with its own tower on the bright side (right side) of the car. You can repeat steps 26 to 36 to add the second flying rock and tower to the right side of the document or you can duplicate both the flying rock and tower layers by selecting the layers and pressing Ctrl+J.
Make the second rock-tower smaller, and move it to the right.

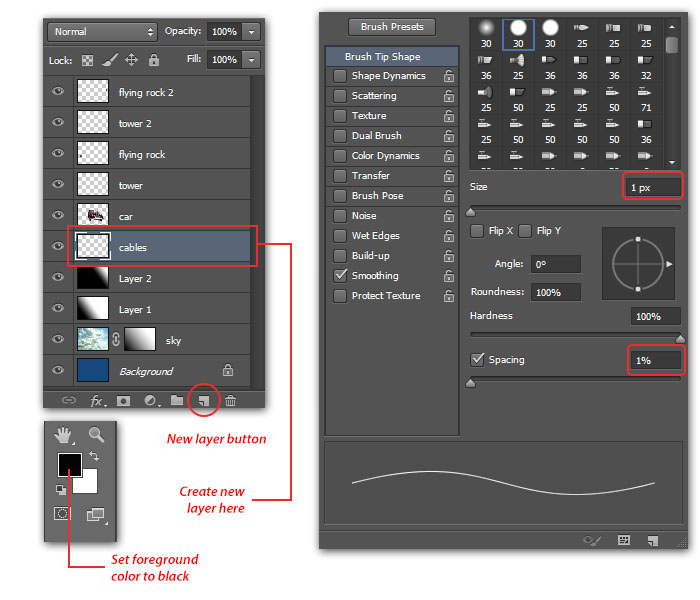
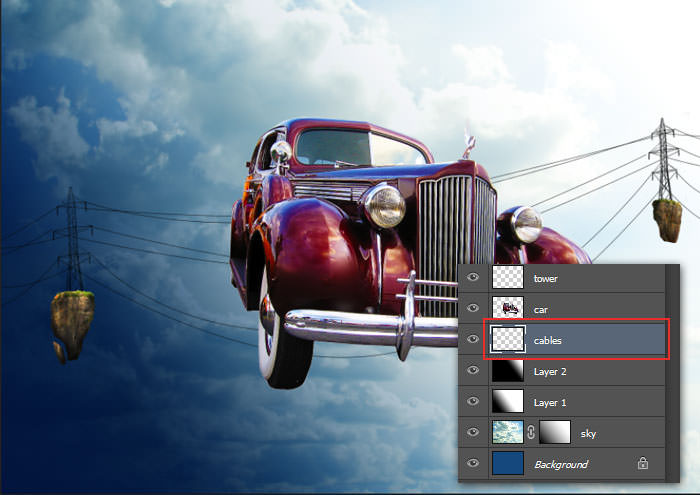
Step 38: Drawing the Cables
Add a new layer, name it ‘cables’. Set the foreground color to Black, and then press F5 to show the Brush Panel. Set the brush Size: 1 px, Hardness 100% and Spacing: 1%. We will use this brush to draw new cable wires between the two towers.
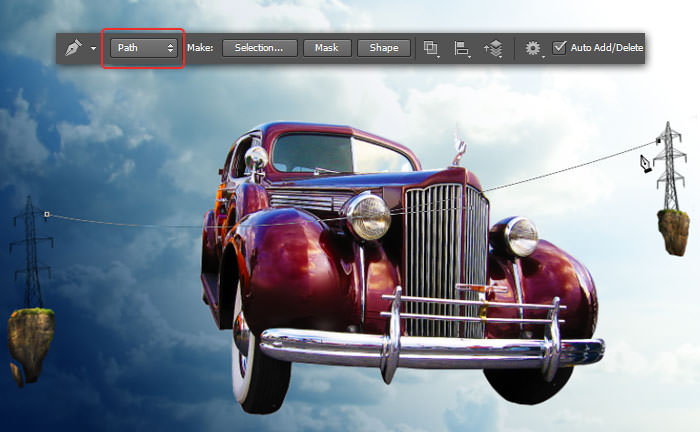
Step 39
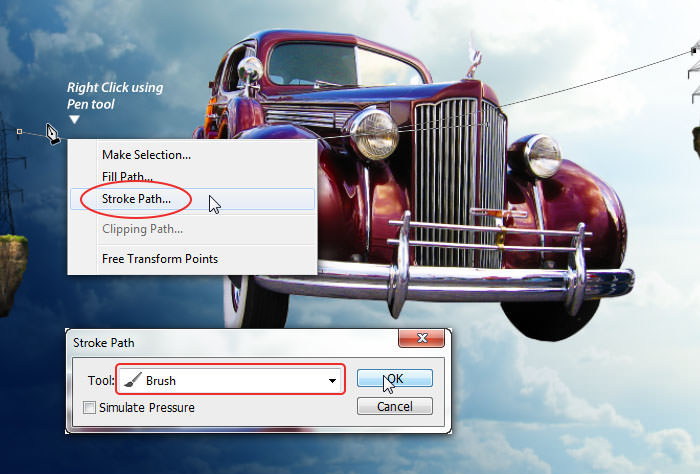
Shift to the Pen tool, set the Pen mode to path, then draw a curve path connecting both left and right towers.
Step 40
Right click the path using the Pen tool, select Stroke Path menu. Inside Stroke Path dialog, select Tool: Brush and click OK. This step will let Photoshop draw a curve line with the brush tool automatically, following the path we have created.
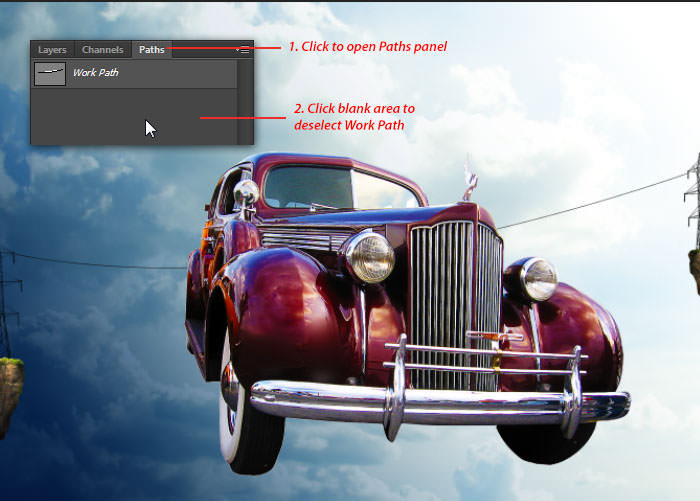
Step 41
Deselect the path, open the Paths panel and click on the panel’s blank area or simply hit Esc on the keyboard.
Step 42
Repeat steps 39 to 41 to add more wires (see below).
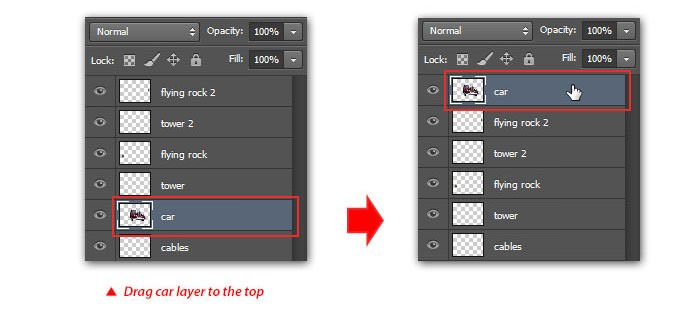
Step 43: Adding the birds
Within the layer panel, rearrange the car layer to the top.
Step 44
Go to File> Place menu, search and import the grunge texture. Adjust its size to cover the background, and then move its layer below the car layer.
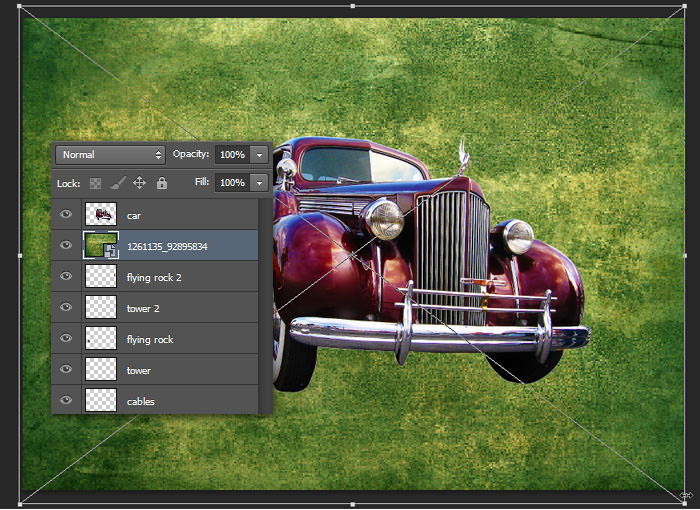
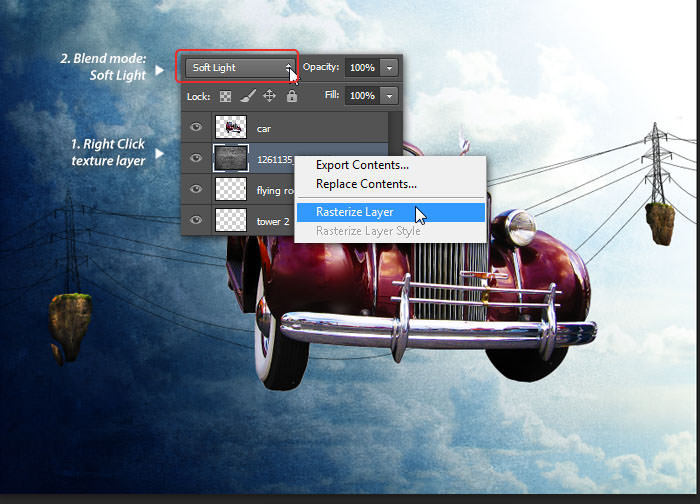
Step 45
Set the grunge layer blend mode to Soft Light. Right click on the grunge layer, select Rasterize menu to change it from smart object into regular image layer. Now we can go to Image> Adjustment> Desaturate menu or simply press Shift+Ctrl+U.
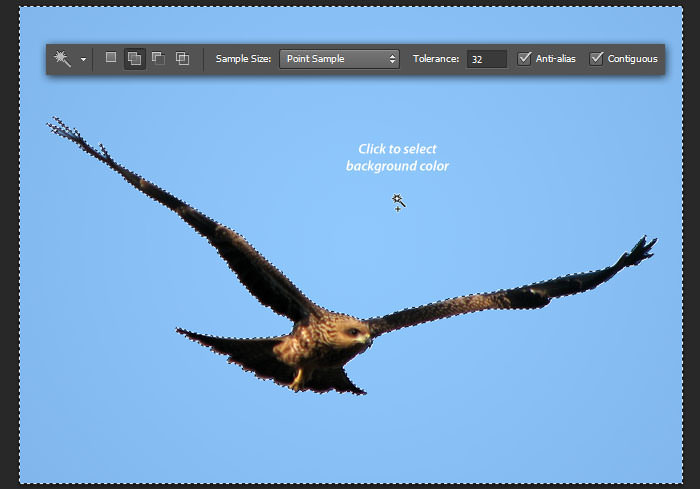
Step 46
Open the eagle image. Select the background with the Magic Wand tool.
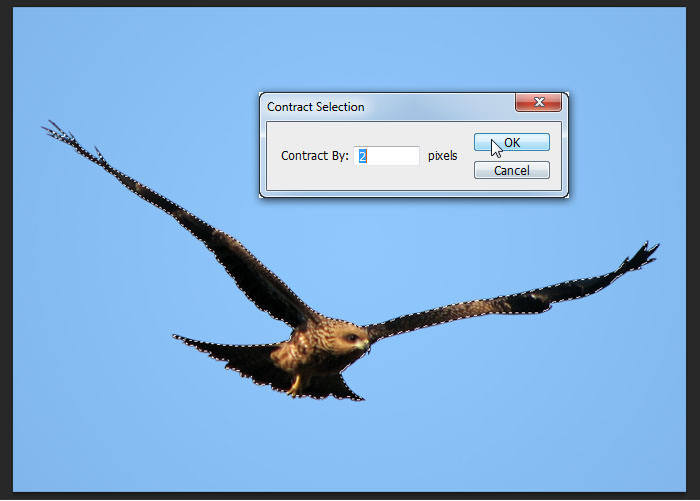
Step 47
Invert selection by using Select> Inverse. Decrease selection areas by using Select> Modify> Contract. Within the Contract Selection dialog, set Contract By: 2 pixels and click OK to apply.
Step 48
Copy and Paste the selected eagle, adjust its size and place it under the car.
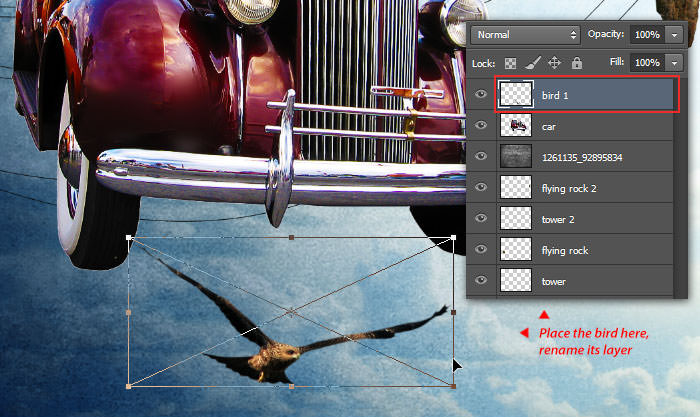
Step 49
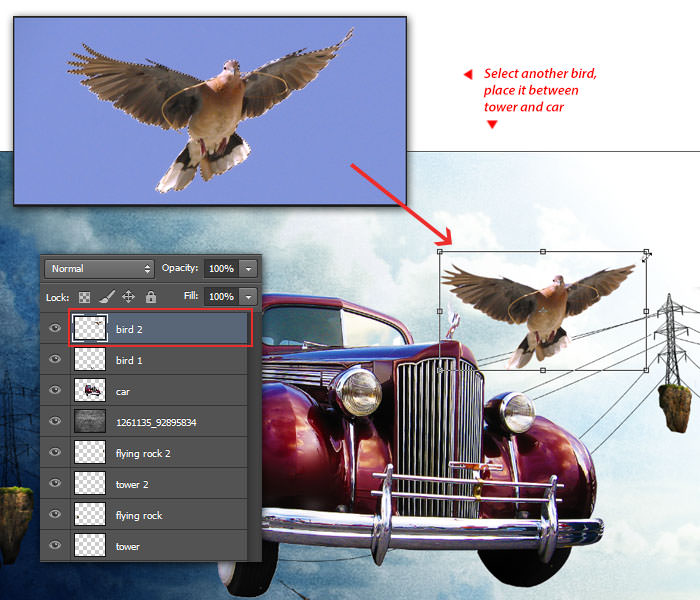
Open the dove image. Repeat the same process to select the dove. Place the bird on the car’s right side.
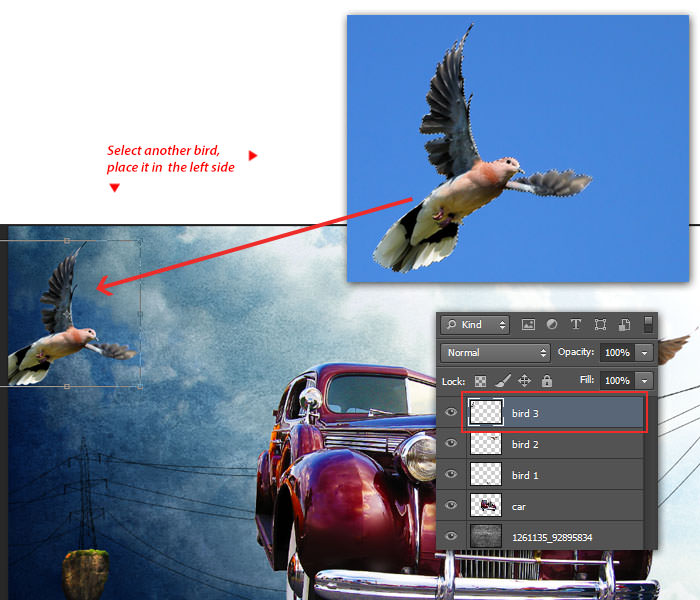
Step 50
Open the second dove image. Repeat the same process and insert it to the left side of the car.
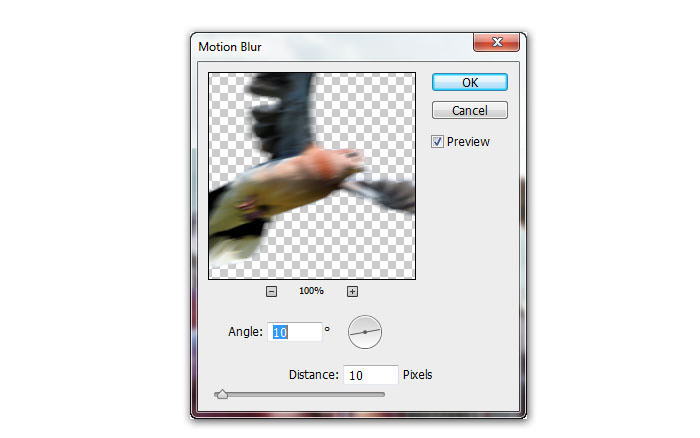
Step 51
Go to Filter> Blur> Motion Blur. Set the Angle: 10 and Distance: 10 pixels. Click OK to apply.
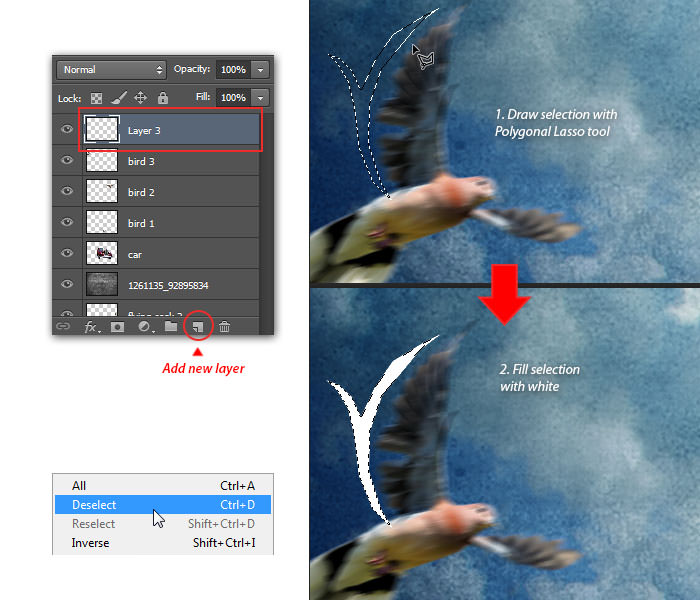
Step 52: Creating Movement
We’re going to add an illusion to this fast-flying dove. Add a new layer above the second dove layer. With the Polygonal Lasso tool, draw the selection as you see in the image below. Fill the selection areas with white. Press Ctrl+D to deselect.
Step 53
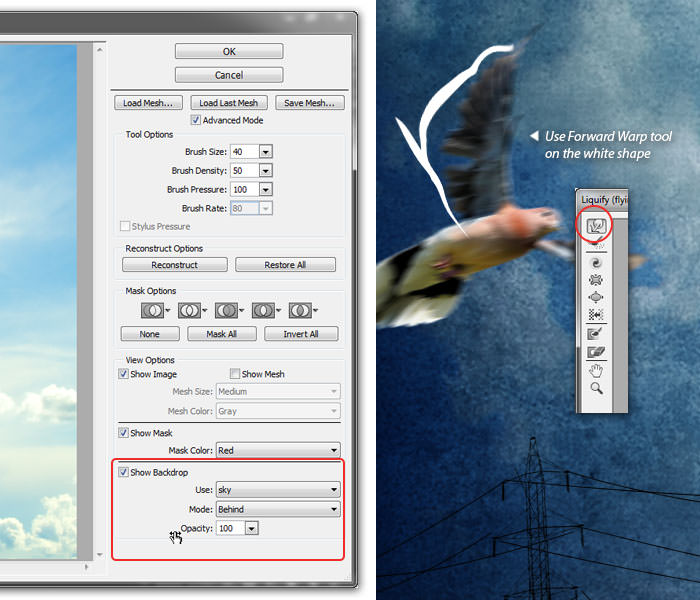
On the same layer, go to Filter> Liquify menu, use sky layer as the backdrop and use the Forward Warp tool to warp and liquify the abstract shape. Click OK to apply.
Step 54
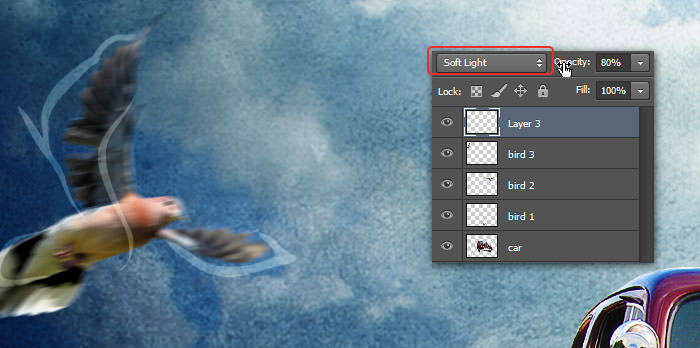
Repeat Steps 52 and Step 53 to add more abstract shapes around the second dove. Here’s a sample.

Step 55
Change the current layer blend mode to Soft Light, reduce Opacity: 80%. This will make the abstract shape become transparent.
Step 56
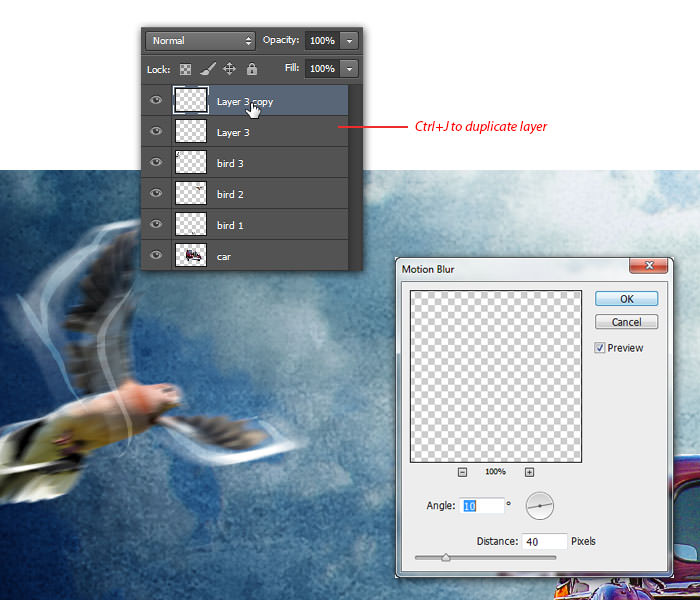
Press Ctrl+J to duplicate current layer. Go to Filter> Blur> Motion Blur, set Angle: 10 and Distance: 40 pixels. Click OK to apply.
Step 57
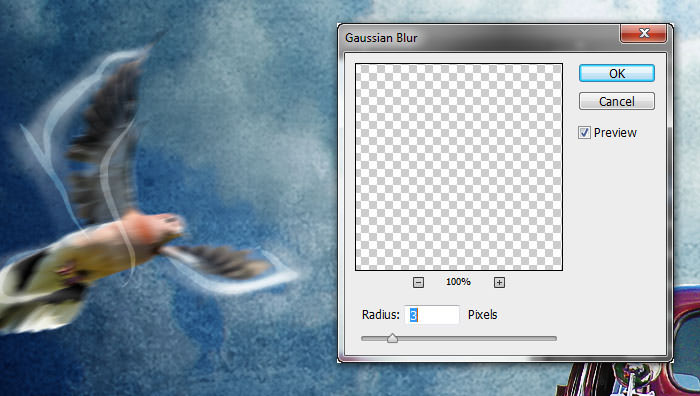
Lastly, go to Filter> Blur> Gaussian Blur menu. Set Radius: 3 pixels. Click OK.
Step 58: Adding Special Effects to the Car
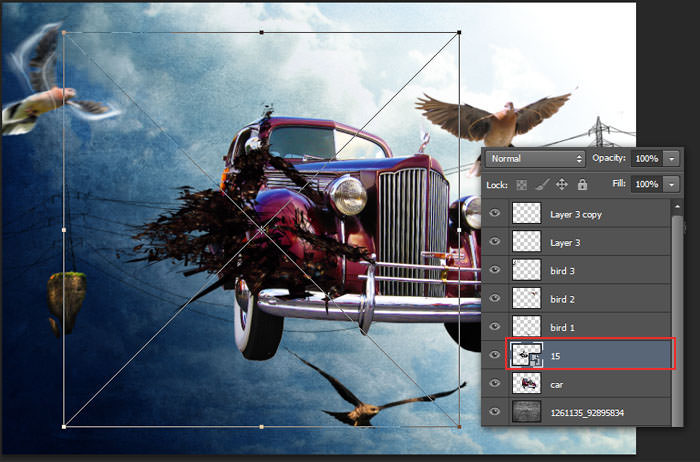
Download and extract SciFi Render Pack. Go to File> Place menu, find and select render pack image number “15.png”. Place it on the car’s left door like so.
Step 59
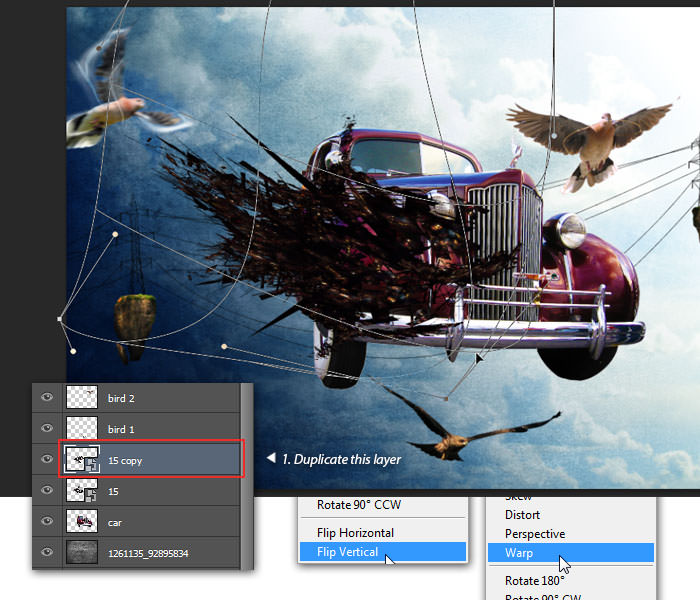
Press Ctrl+J to duplicate layer ’15’. Go to Edit> Transform> Flip Vertical. Next, distort its shape by using Edit> Transform> Warp like the image below. Hit Enter.
Step 60
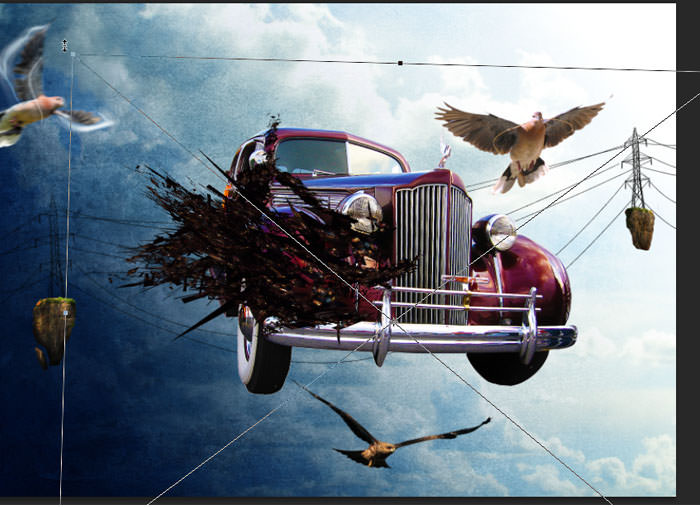
Readjust its size using the free transform command.
Step 61
Download and extract fractal pack image. Go to File> Place menu, search then insert fractal pack number “4-1.png“. Place it above the current layer, covering the car.
Step 62
Change the blend mode to Screen. This will hide all black colors within layer 4-1.
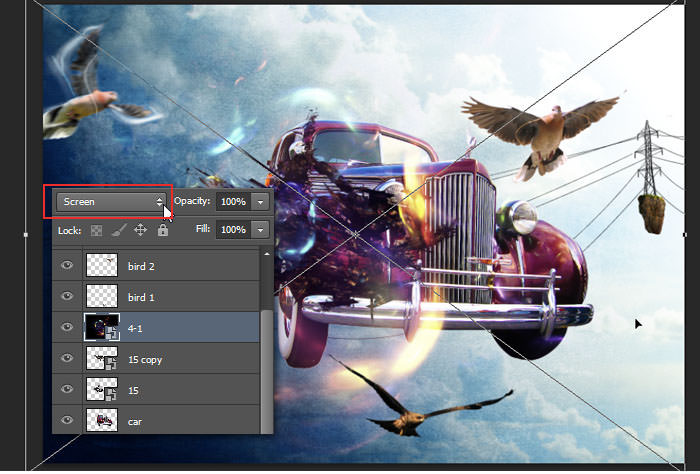
Step 63
Insert “8.png” from the SciFi render pack. Adjust its size, covering the previous fractal pack.
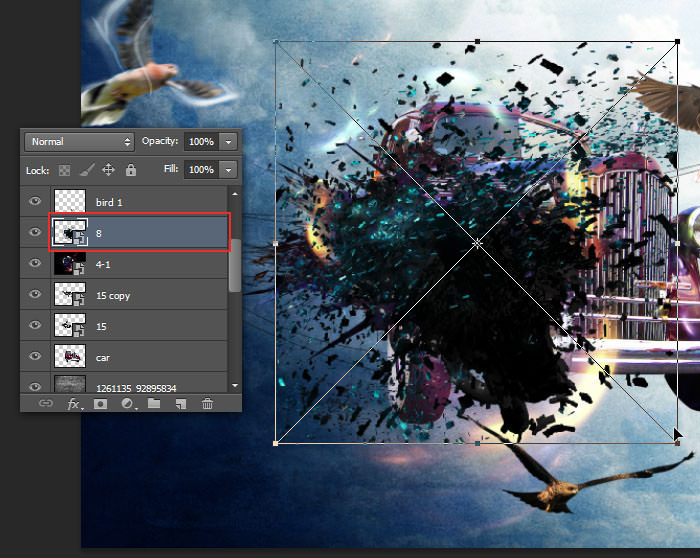
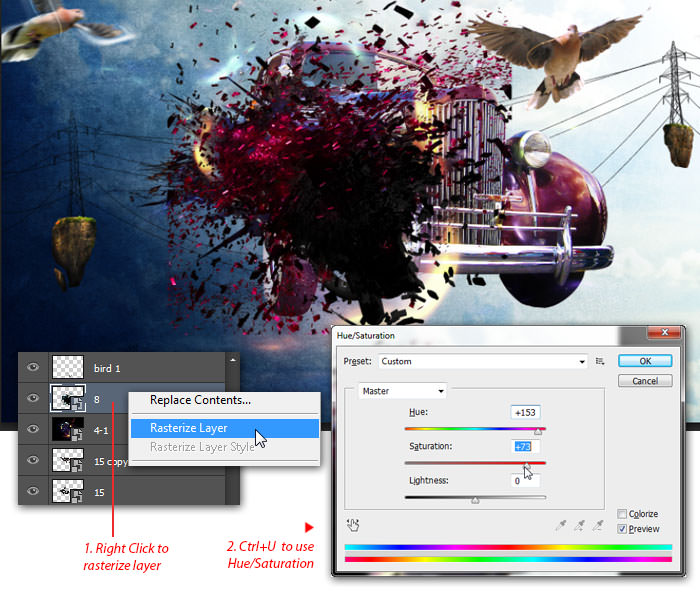
Step 64
Right click the current layer, select Rasterize menu. Next, go to Image> Adjustment> Hue/Saturation. Within the Hue/Saturation dialog, increase Hue: +153 and Saturation: +73 to change the 3D render color to magenta/purple.
Step 65
Go to Edit > Transform > Distort menu to apply more distortion effect to the scifi render layer.
Step 66
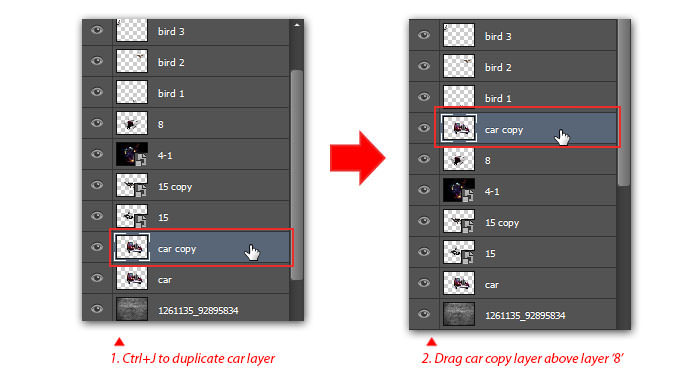
Click the layer car copy then press Ctrl+J to duplicate it. Drag the car copy layer on top of layer 8 (from the SciFi render pack).
Step 67
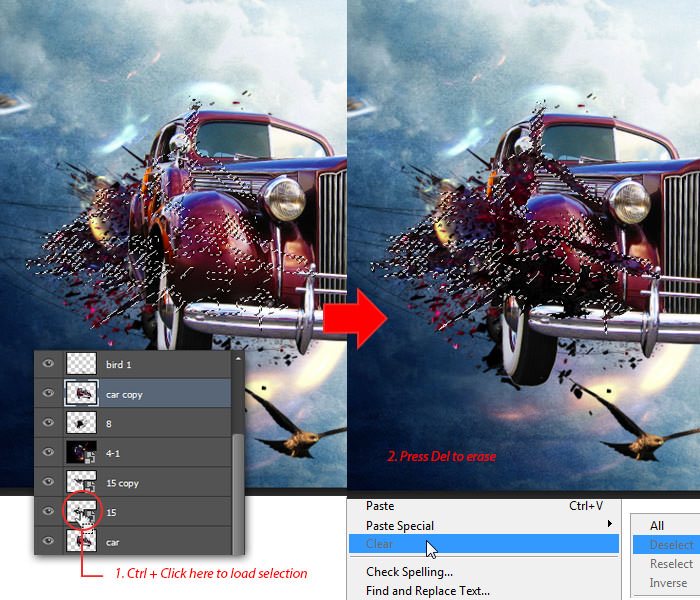
Still in the car copy layer, load selection by Ctrl + clicking the layer 15 thumbnail. Erase selected areas by pressing Delete. Don’t forget to deselect with Ctrl+D.
Step 68
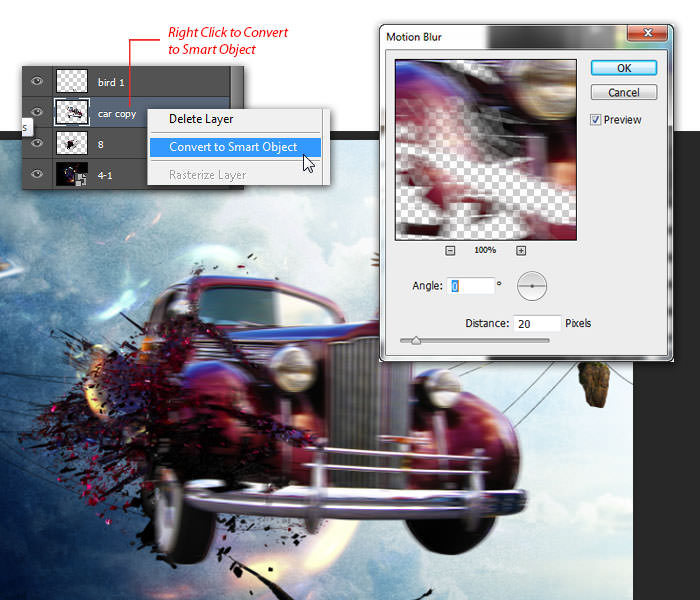
Right click car copy layer, select Convert to Smart Object menu. Now go to Filter > Blur > Motion Blur, set the Angle: 0, Distance: 20 Pixels. Click OK to Apply motion blur filter.
Step 69
In case you didn’t know, applying filters to a smart object will convert them into Smart Filters. Click the smart filters thumbnail to select it, then use the Gradient tool to draw a linear gradient diagonally from the bottom left to top right corner.
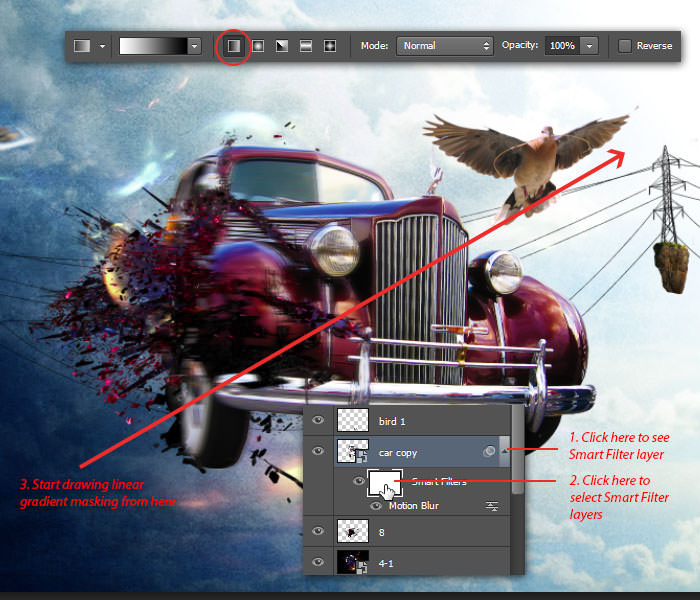
Step 70
Insert another fractal image: 4-10.png. Place it above all layers. Move the fractal image below the car, and tilt it a bit to the right.
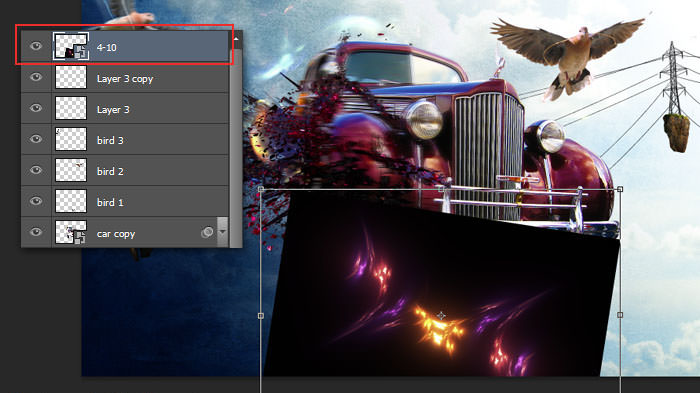
Step 71
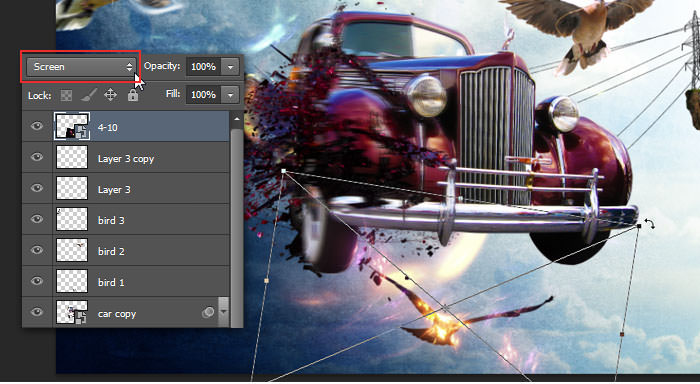
Change the blend mode to Screen, this will hide all black colors within the fractal image layer.
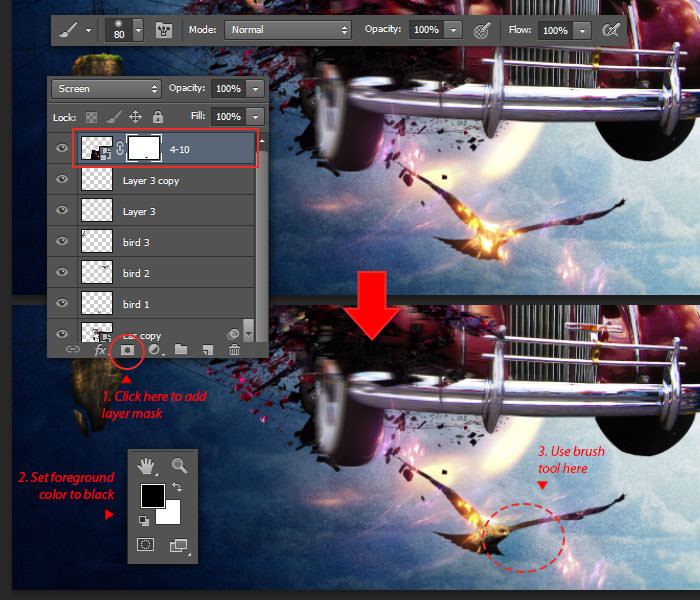
Step 72
Add a layer mask to the current fractal image layer. Set the foreground color to Black. Use soft round Brush tool to hide unwanted fractal areas that are covering the bird’s head. See image below for reference.
Step 73
Create a new layer on top. Use the soft round Brush tool to draw a flipped rainbow arc, but with a color combination of only red, orange and yellow.
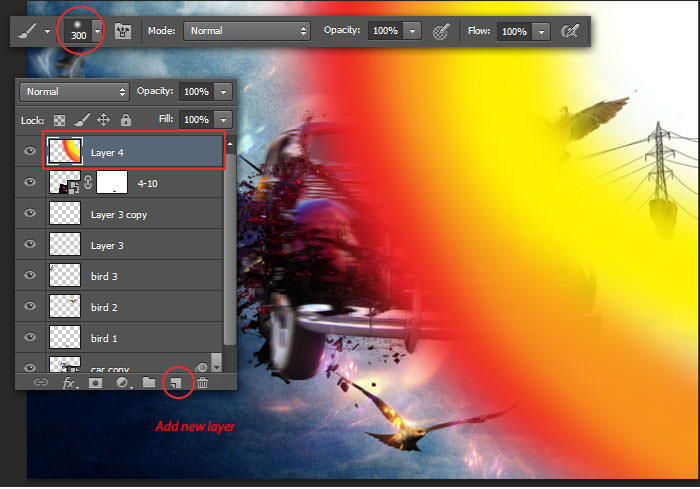
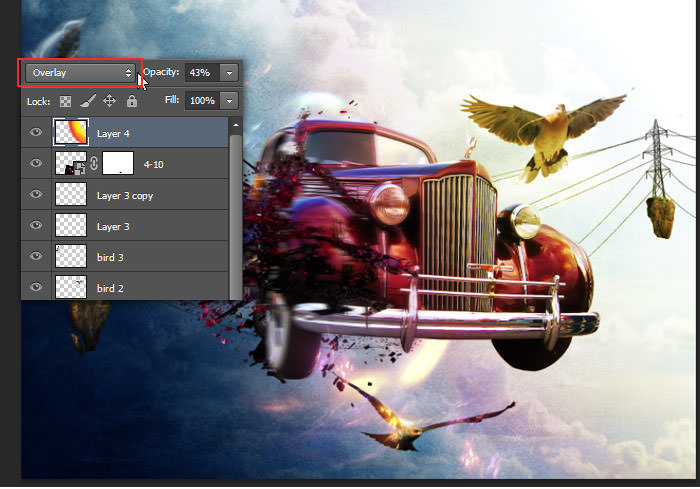
Step 74
Change the blend mode to Overlay, to create a subtle red highlight around the car, bird and clouds behind it.
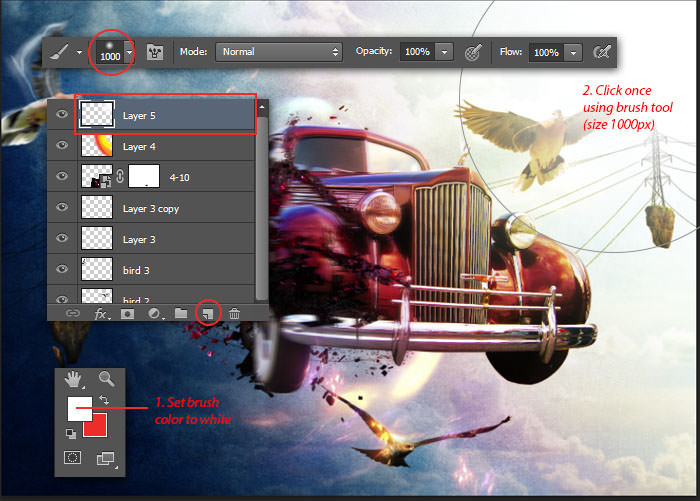
Step 75
Lastly, we will create ray of white light effect. Set the foreground color to White. Increase the Brush tool size to 1000 pixels. Add a new layer on top, then click once on the top right corner using the Brush tool. See image below for reference.
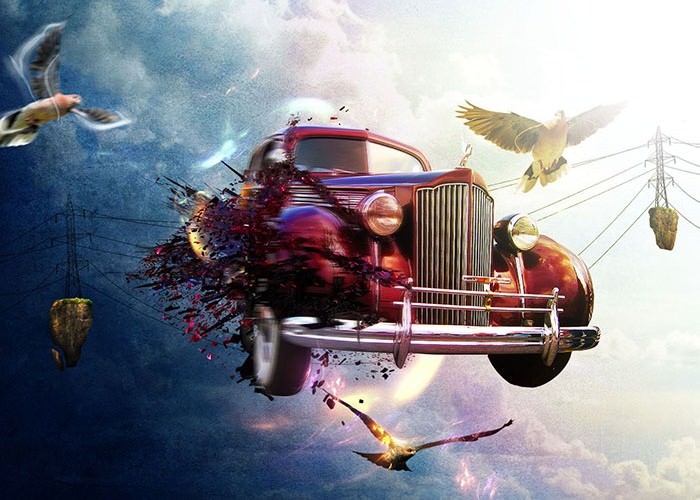
Final Result
Congrats! You have reached the end of this tutorial. Check out what you’ve made!
Download
If you want to download the PSD click on the button below to grab the files.