How to Encrypt Files and Documents in Windows 11
Your computer holds different documents and files, many of which are of private or sensitive nature. Even if you’re the only one who uses the computer, it is important to keep your documents secure – just to be safe.
The solution is to encrypt or password-protect your documents and folders to keep them from unauthorized access. And this is what we’re going to discuss today.
In this post, we will walk you through different methods of encrypting your documents and folders on a Windows 11 computer. These methods include using Windows 11 native tools, through cloud storage, or using third-party apps. Let’s get started.
Removing Junk Files in Windows 11
There can be many reasons for slowing down your Windows computers, and one such reason is junk files.... Read more
1. Encrypt with a native tool
This is perhaps one of the easiest methods to encrypt files in Windows 11. First, go to the location of your file or folder you want to protect, then follow these steps below:
- Right-click on the file/folder, go to Properties and then select Advanced
- Place a tick mark on the option, Encrypt contents to secure data, and click OK.
- If you try password-protecting a data file, you will view an encryption caution. We suggest choosing the radio button marked Encrypt the file and its parent folder and click OK.
Now, whoever tries to open them from a separate account will face a “You do not have permission to open this file” error.
If you use this feature for the first time, you will get a prompt to back up the encryption key.
- Go to Back up Now and follow the prompts you will see on the screen.
- Place a mark on the Password box available in Certificate Export Wizard.
- Type in a unique and strong password, then confirm it.
- Pick the encryption type, or go with the default one, then click Next.
- Lastly, put a certificate name. You need to use this certificate along with the password to retrieve the file or folder in the future.
2. Encrypt with 7-Zip app
You must have used 7-Zip before or at least heard of it. It is one of the top tools to encrypt your files in Windows 11.
It supports the latest AES-256 bit encryption to safeguard the files and folders in Windows 11, so breaking the password and accessing files becomes almost impossible.
However, all the encrypted files are visible, meaning anyone can delete them. Here’s how to encrypt files with 7-Zip.
- Download the 7-Zip app.
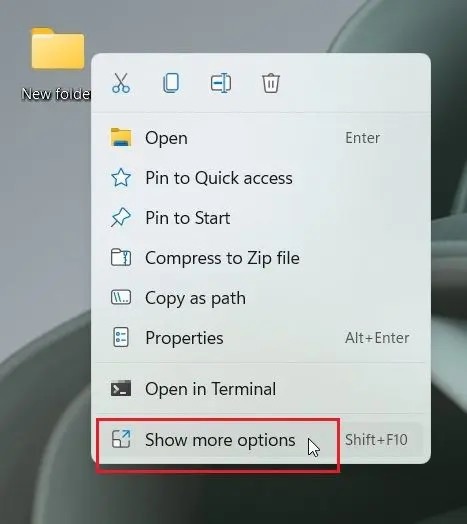
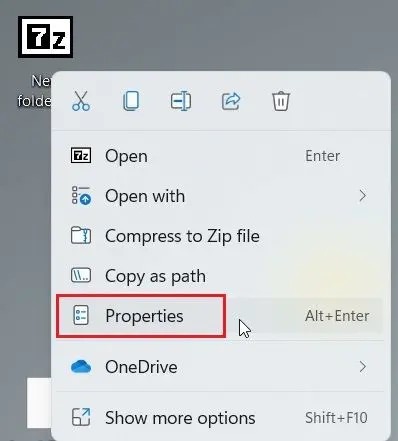
- To password-protect a file/folder, right-click on it and choose Show more options from the context menu.
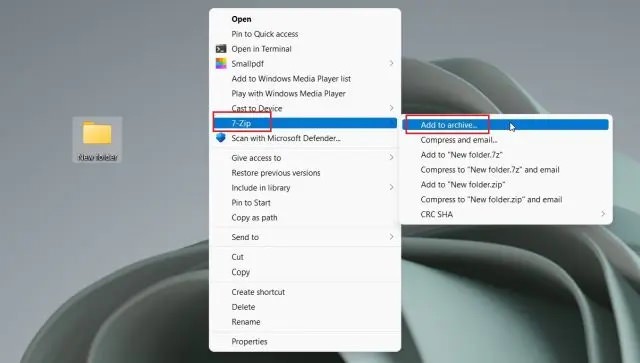
- Go to 7-Zip and click on Add to archive.
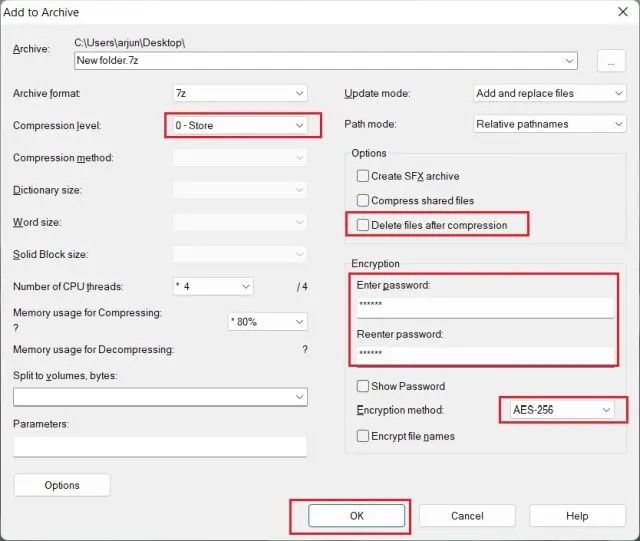
- In the new window choose Compression level from the drop-down menu and pick Store. Under the Encryption section, put the password to protect the file/folder. It is possible to enable Delete files after compression if you wish to delete the common file after encryption. Now, click OK.
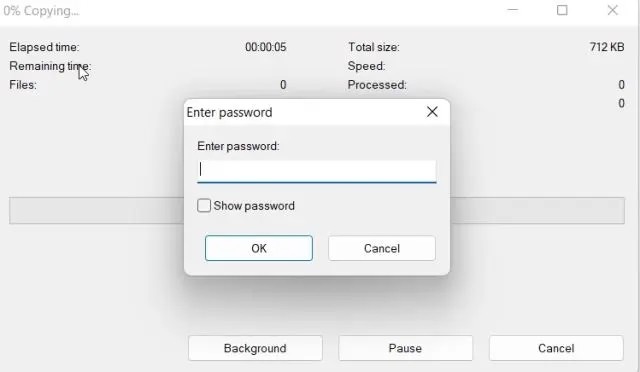
- A file with a .7z extension will be created in a similar folder, which will be password-protected, meaning you cannot access the file without entering the password.
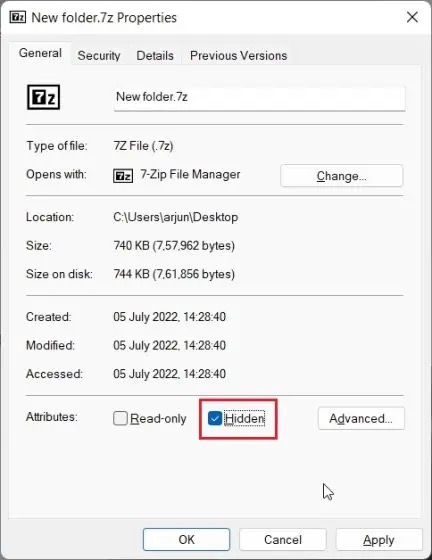
- You can also hide it with a right-click on the file, and selecting Properties.
- Enable the Hidden checkbox.
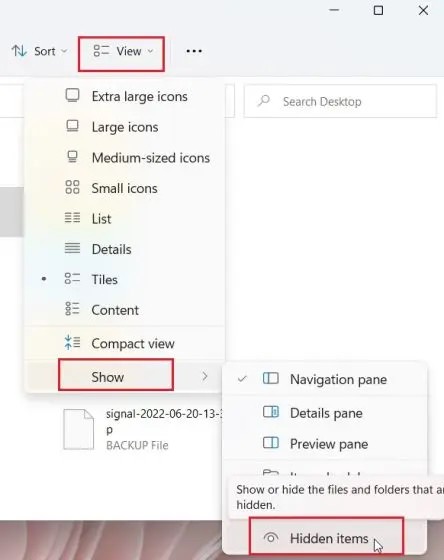
- To display hidden files in Windows 11, tap on View Show > Hidden items. That’s it, your files will be hidden from anyone without authentication.
3. Encrypt with OneDrive
If you want to encrypt your files/folders locally as well as on the cloud, then OneDrive may be the best candidate. It supports a helpful feature called the Personal Vault, to store your essential files, folders, and documents.
What’s unique about OneDrive’s Personal Vault is that when you attempt to open it, you will require a 2FA code sent to your email account.
After entering the code, you can open the files within Personal Vault. Following the instructions below to encrypt files via OneDrive.
- OneDrive should be, by default, installed in Windows 11. Otherwise. you can download it here.
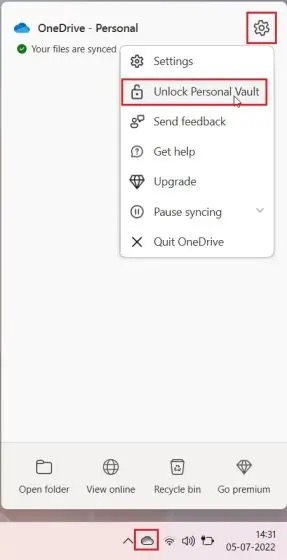
- Go to the Taskbar and access OneDrive from the system tray. Here, click on the settings and pick Unlock Personal Vault.
- Click on Next, followed by setting up Personal Vault in your OneDrive folder.
- Open OneDrive, scroll down to Personal Vault and open it.
- Enter the two-factor authentication code sent to your mail ID, and you will be able to access the Vault.
- Here you can store all your sensitive files, folders, and documents.
- After 20 minutes of idleness, the Vault will be locked automatically.


4. Password-protect MS Office Docs in Windows 11
If you want to password-protect your Office Word documents, Excel sheets, and PowerPoint presentations in Windows 11, you can take advantage of the security feature of MS office.
- To begin with, open the MS Office document and click on File.
- Now, go to Info and then on Protect Document.
- Choose Encrypt with Password.
- Once you do that, enter the password, followed by a click on OK.
Note: It would be impossible to access the file without its password, so write it down somewhere.
5. Encrypt Drives in Windows 11 with BitLocker Encryption
Microsoft provides Bitlocker encryption exclusively for drives on some versions, including Windows 11 Pro, Enterprise, and Education.’
This security feature helps stop data theft via recovery if your hard drive or laptop gets stolen.
Here are some simple steps to password-protect drives with BitLocker encryption:
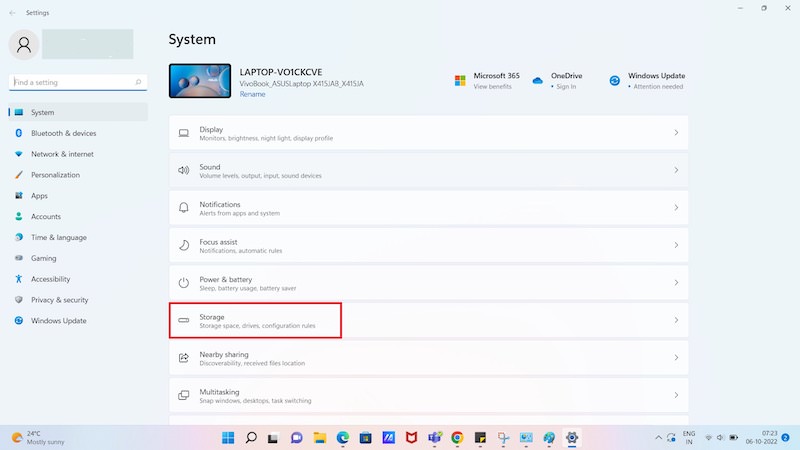
- Go to Start and click on Settings
- Here, choose System, then click on Storage.
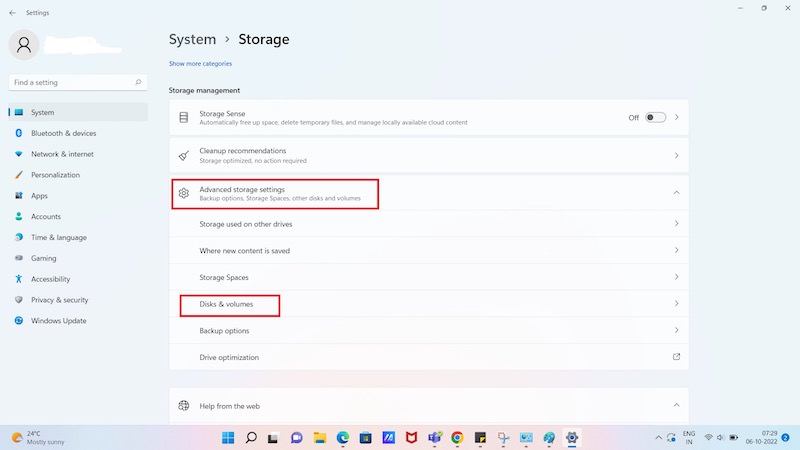
- Under Storage, go to Advanced Storage Settings, which you can see in the Storage Management section, then choose Disks & volumes.
- Pick the drive you want to encrypt with BitLocker, then click on Properties.
- Turn on BitLocker under the BitLocker section.
- Click on Turn on BitLocker next to your chosen drive to encrypt with BitLocker.
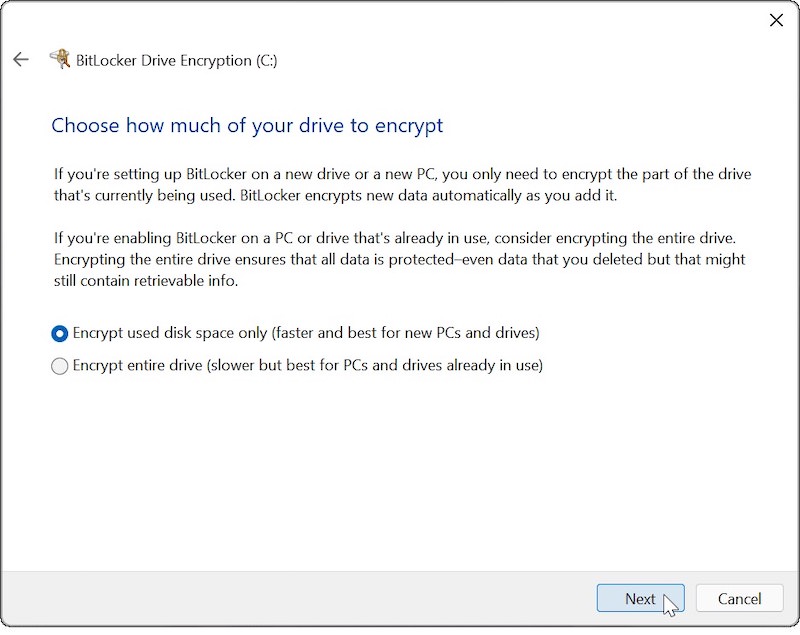
- After a few system checks, choose how you wish to back up the recovery key. You can store it with the option to save it to a file, save it to your MS account, or print the recovery key.


Note: The recovery key is crucial for recovering your data even if you don’t have the password. You can’t access your files if you forget or lose your password and don’t know the recovery key.
- Once your recovery key is stored, click on Next.
- Select Encrypt used space only and click on Next.
- You’ll need to define your encryption mode. For the most suitable security, choose the New encryption mode as the proposed one, then click Next.
- Now, check Run BitLocker system check, and click Continue.
- To finish the check and BitLocker encryption procedure, restart Windows 11.
- After your PC restarts, sign in and let BitLocker encrypt your PC.


6. Encrypt with WinRAR
WinRAR, yet another famous file archiver tool, can also be used to password-protect a folder. For this, first, download and install WinRAR and then follow these steps:
- Go to your file/folder location and right-click on it.
- Choose WinRAR and click on Add to archive…
- On the General tab, check the mark Delete files after archiving.
- Click on Set password.
- Put a password under the Enter password, box. Plus, type in the same similar password in Re Enter password for verification.
- Click OK two times. That’s all.


7. Encrypt with Easy File Locker
Easy File Locker by XOSLab is another well-known freeware program to password-protect any file and/or folder you wish.
After downloading and installing the tool, follow these steps:
- Launch Easy File Locker and click on System > Set password > Confirm the password.
- Click on Files & Folder > Add Folder.
- Unmark Accessible and check Visible.
- Here, click on three dots and go to the Folder you wish to protect with the password.
- Choose the Folder, followed by clicking on OK.
- It will become inaccessible now.


To delete files or folders from Easy File Locker’s protection:
- Choose respective file or folder.
- Click on Files & Folder > Remove.
- Finally, click Yes.
