Exploring the Google Experience Launcher on Android
Note: This post was first published on the Nov 14, 2013.
Android KitKat 4.4 introduces several new features, some currently exclusive to the Google Nexus 5. Among these, the Google Experience Launcher stands out, featuring Google Now integration and a revamped app drawer that separates apps from widgets, primarily available on Nexus 5 for now.
However, enthusiasts quickly extracted the launcher's .APKs from the Nexus 5 factory image, making it accessible for others to try on their devices. Interested in giving it a spin? Continue reading.
5 Best Android Launchers to Download
A collection of 2018's best and free launcher apps for Android that help you create beautiful yet intuitive... Read more
Installing the Google Experience Launcher
Before diving into the installation process, a few prerequisites need attention.
First, the Google Experience Launcher is compatible only with devices running Android Jelly Bean. Additionally, you must enable Allow installation of apps from unknown sources in your device settings. And, it's wise to create a backup of your device as a precaution.
Installation Steps
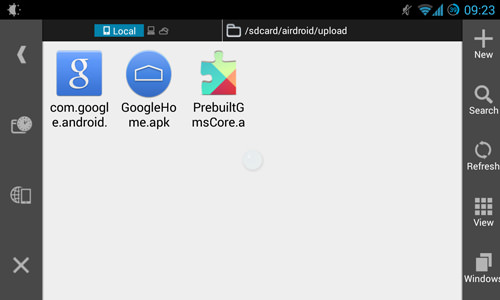
To equip your device with the Google Experience Launcher, you'll need to download three crucial .APK files:
- PreBuiltGmsCore.apk – Update 4.0 for Google Play Services.
- GoogleHome.apk – The launcher itself, bundled in a .zip file available here.
- The Google Search apk update, essential for full functionality.
Note: The .zip also contains velvet.apk, which is no longer necessary due to the updated Google Search link provided.
After downloading the .APKs to your desktop, transfer them to your phone via PushBullet or a direct USB connection. Use your phone's file manager to locate the files.
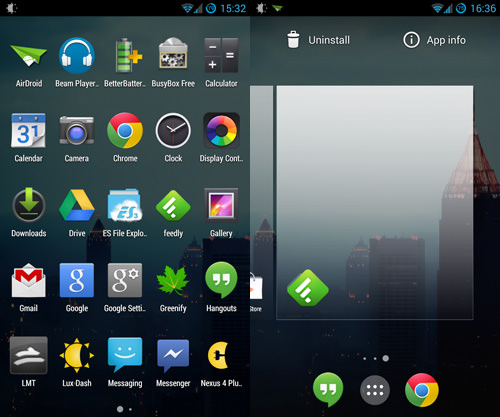
Install the files individually, in any order, ensuring all three are fully installed. Hit your phone's Home Button to switch to the Google Launcher and begin your enhanced Android experience.

Remember, the Google Experience Launcher won't provide transparent navigation bars without Android 4.4. Additionally, previous issues with Google Search crashes from velvet.apk are resolved with the updated Google Search APK linked here.
Customizing Home Screen Panels
The Google Experience Launcher introduces a fresh approach to managing home screen panels and widgets, allowing for unlimited panel additions. However, the process to add home screen panels deviates from the norm found in many custom launchers.
To add a panel, start in the app drawer. Press and hold an app icon and then drag it to the extreme right of your screens. A new panel will be automatically created for the icon. Removing a panel is just as straightforward: clear it of all widgets and icons. Remember, new panels can only be added to the right as the leftmost panel is reserved for Google Now.
Integrating Widgets
Widget integration within the Google Experience Launcher also diverges from conventional methods, lacking a dedicated Widgets section in the app drawer.
Instead, press and hold on an empty space within a home screen panel and select Widgets from the menu that appears. You can then select and position widgets as desired, even using them to create additional home screen panels.

While the Google Experience Launcher may not feature the extensive customization options of launchers like Nova, its streamlined and efficient interface is sure to attract users seeking simplicity and effectiveness. Try it out and share your thoughts in the comments below.