9 Common Windows 11 Problems (and How to Fix Them)
Windows 11 is the newest operating system from Microsoft. With its latest feature upgrade dubbed “Windows 1122H2“, it has received more bug fixes and features than ever before. However, Windows 11 is still far from the ideal desktop operating system due to the number of issues affecting its users.
Fortunately, Microsoft has been readily fixing bugs and introducing features to bridge the gap between Windows OS and its users’ requirements. Additionally, there are various third-party developers creating solutions to fix some issues.
In this post, I am going to collate them to help you enjoy a better experience.
1. Unable to update from Windows 10 to 11
The most obvious method for upgrading Windows 10 to Windows 11 is using Windows Update. And Windows 11 only installs on computers meeting its hardware requirements.
However, Windows Update can falsely report the minimum requirements, blocking the upgrade. If you encounter this problem, here’s an easy fix:
- Go to https://www.microsoft.com/software-download/windows11.
- Under Windows 11 Installation Assistant, click Download Now.
- Open the downloaded tool (you must be an administrator here).
- Windows 11 Installation Assistant will check your system for hardware requirements, then you need to click the Accept and Install button.
- Once it’s ready, click Restart Now to continue upgrading to Windows 11.

2. Windows 11 is buggy and slower than 10
Windows 11 can be a shiny new operating system, but it does not come without the issues found in Windows OSs. That’s why Windows 11 is starting to get popular for some wrong reason – bugs and defects.
Also, unfortunately, there is more possibility of issues if you have natively upgraded to Windows 11 from Windows 10.
Perhaps Windows 11 is running slow after the upgrade, or maybe apps are getting stuck, i.e., Windows 11 keeps freezing or showing Blue Screen of Death (BSoD).
In any case, there is a solution to it.
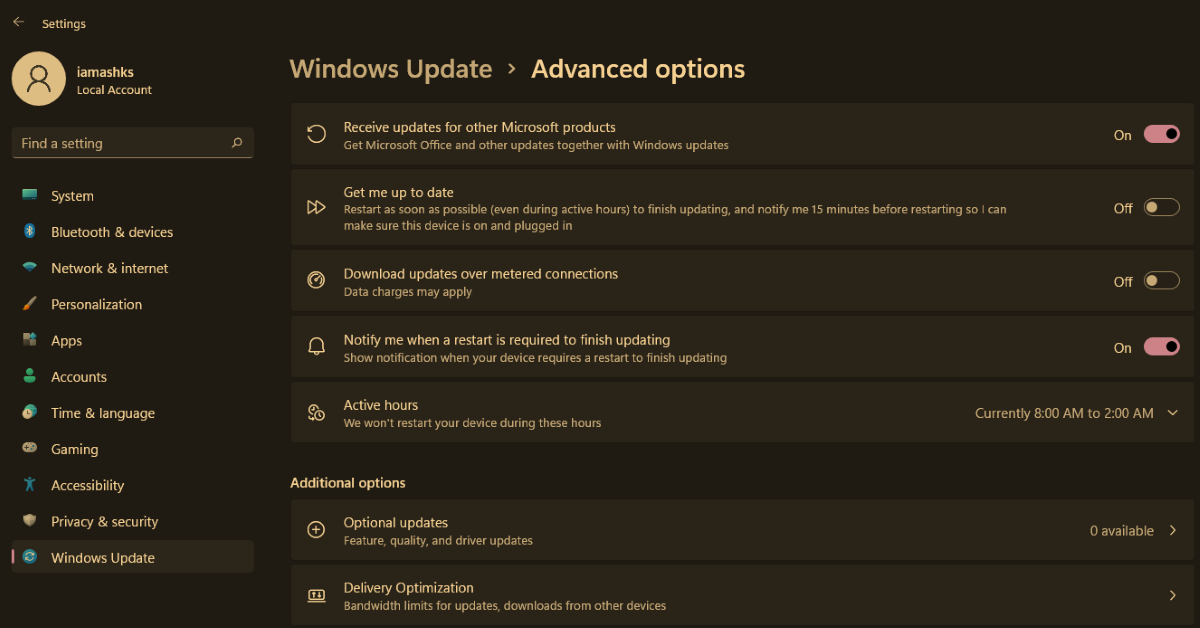
- Open Settings, go to Windows Update > Advanced options > Optional updates. Install all optional updates to update troublesome drives.
- If it does not work, you can reset the system to get rid of old software slowing your PC. In Settings, go to Windows Update > Advanced options > Recovery. Click Reset PC and follow on-screen instructions.
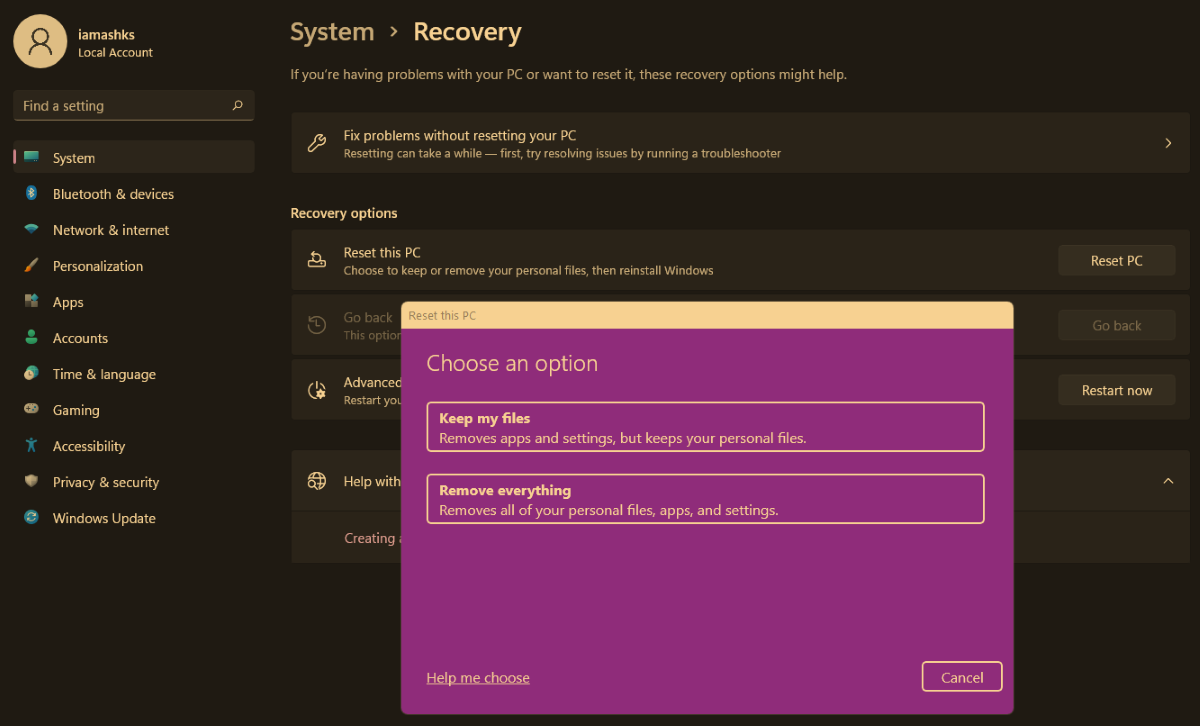
Note: Select Keep my files else your personal data will get deleted.
3. Start Menu in Windows 11 is not responsive
If the Start menu is no longer working or unresponsive to your actions, maybe one of the system files got corrupted during the upgrade to Windows 11. You can try restarting the system to check if this fixes the problem.
But if it doesn’t fix the problem, try the following solution.
Since you can not open the Start menu, use these steps to restart Windows:
- Press Win + D to directly show the desktop.
- Press Alt + F4 to open the Shut Down Windows dialog.
- Choose Restart from the options and press Enter to restart it.
If the restart does not fix the Start menu, follow the below steps to fix it:
- Press Win + R to open the Run tool. Type
cmdand press Ctrl + Shift + Enter to open the Command Prompt with administrator privileges. - Type
DISM /Online /Cleanup-Image /RestoreHealthand press Enter. This command will clean up corrupt files in Windows 11. - Type
sfc /scannowand press Enter. This will check all system files. If the Start menu does not work, restart the system and try again.

4. Unable to type / search in Windows 11’s Start Menu
Many people — including me — reported this unusual bug in Windows 11. It looks something like this – the Start menu does not register keys when you type something to search for in the Start menu. You can not type in the Start menu, and if you can, then the Start menu does not show you search results, hampering your workflow.
Thankfully, Microsoft suggested a simple workaround. You can use the Run app to fix the Start menu not registering keys.
However, you are unable to search for in the Start menu too, so you need to press Win + R to open the Run dialog. You can open and close the Run dialog to make the Start menu work as expected.

If you do not like it, here’s another solution – especially if you are only looking for searching for apps and files through the Start menu.
You can get Windows PowerToys and set up and use PowerToys Run in place of the start menu. You can search in PowerToys Run as in the Start menu (see the screenshot below).
5. Unable to find files via Search or File Explorer
The improved Start menu and Taskbar introduced a unified search experience in Windows 11. You can click on the Search icon on the Taskbar or press Win + S to bring up the search interface and search for files and folders, configuration options in Windows Settings, apps in Windows Store, and the web too.

However, the Search feature in Windows 11 may not work after the upgrade for unusual reasons.
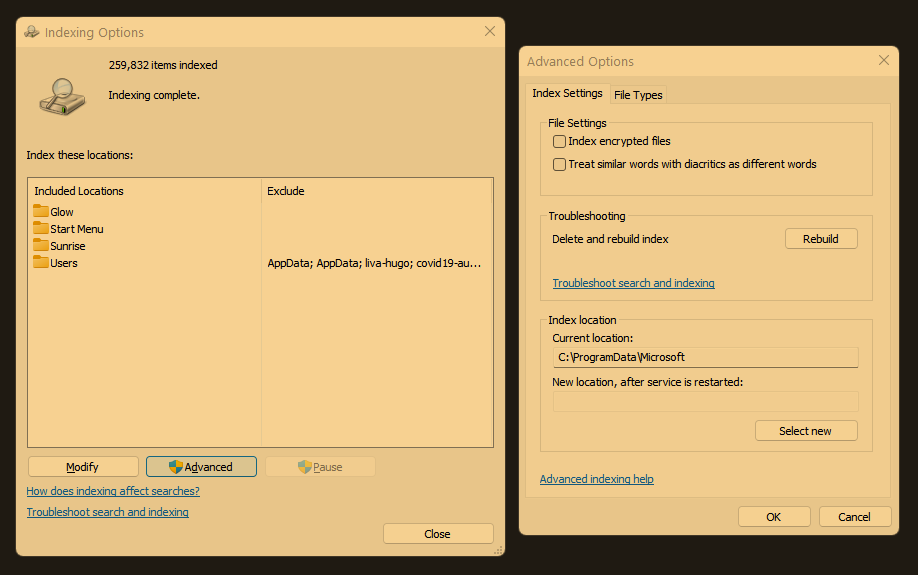
In this case, you can re-build the search index, and here’s how:
- Open the Start menu, search for
index, and click Indexing Options. - Click Advanced and click Rebuild to re-create the search index.
6. Unable to uninstall system apps (aka bloatware)
This is one of the most common complaints for all Windows OSs that I’ve noticed – it ships a bunch of pre-installed bloatware apps that nobody uses, and nobody wants, and Windows 11 is no different from its predecessors.
Thankfully, some, if not all, bloatware apps in Windows 11 can be removed using free tools.
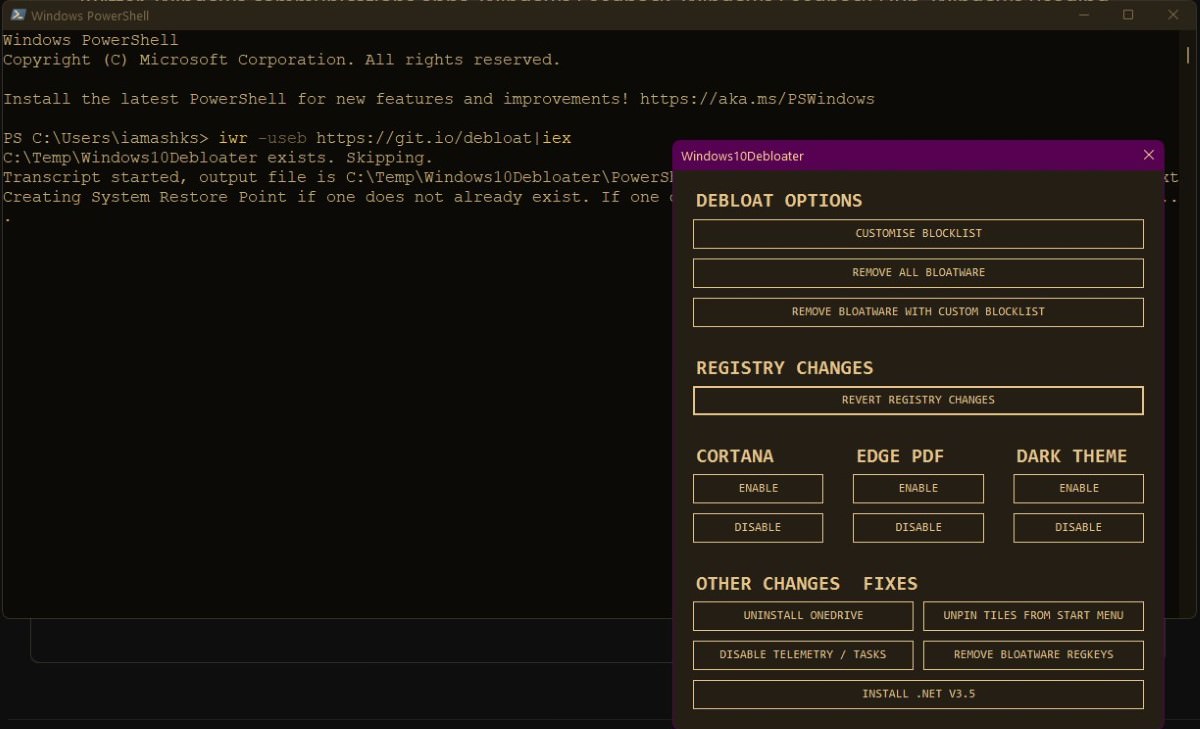
Enter Windows 10 Debloater. This app helps remove bloatware apps, stop telemetry functions, disable Cortana, and much more. Here’s how you can utilize it:
- Open the Start menu and search for
powershell. - Right-click Windows PowerShell and select Run as administrator.
- Type
iwr -useb https://git.io/debloat|iexand press Enter. - Click Remove all bloatware to remove all preinstalled applications.
7. Unable to find and use Snipping Tool in Windows 11
Windows 10 has a handy screenshot tool to grab screenshots and perform basic editing on the captured screenshots. It got inherited from Windows 11, but I have found it broken after upgrading from Windows 10.
Microsoft suggest using the Print Screen button, and paste the image into Paint for taking screenshots.
However, I find it an archaic method in the 21st century. There are modern solutions that work better in the place of the Snipping Tool.
Allow me to share a fairly good alternative tool called the ShareX, which offers a lot of customization and editing features:
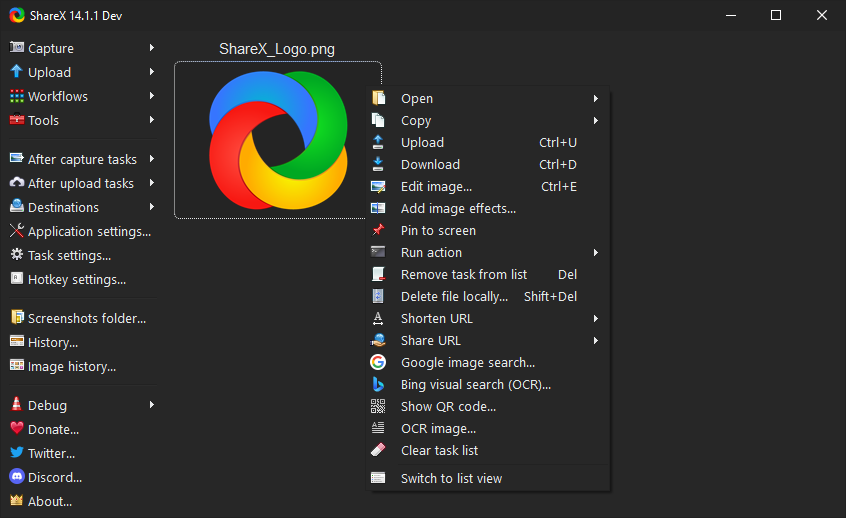
- Get and install ShareX from Microsoft Store.
- Press Ctrl + Print Screen to capture area.
- Press Print Screen to capture the entire screen.
- Press Alt + Print Screen to capture the active window.
Note: You may need to restart your system for these shortcuts to work.
8. Windows 11 has a memory leak issue
There are reports that Windows 11 is having memory leak issues, which causes File Explorer to use more memory than it should.
This can extend to high memory usage, which can slow down the operating system in time. Fortunately, there is a quick but temporary workaround:
- Press Ctrl + Alt + Del and click Task Manager.
- Scroll down to see Windows Explorer, right-click it and click Restart.
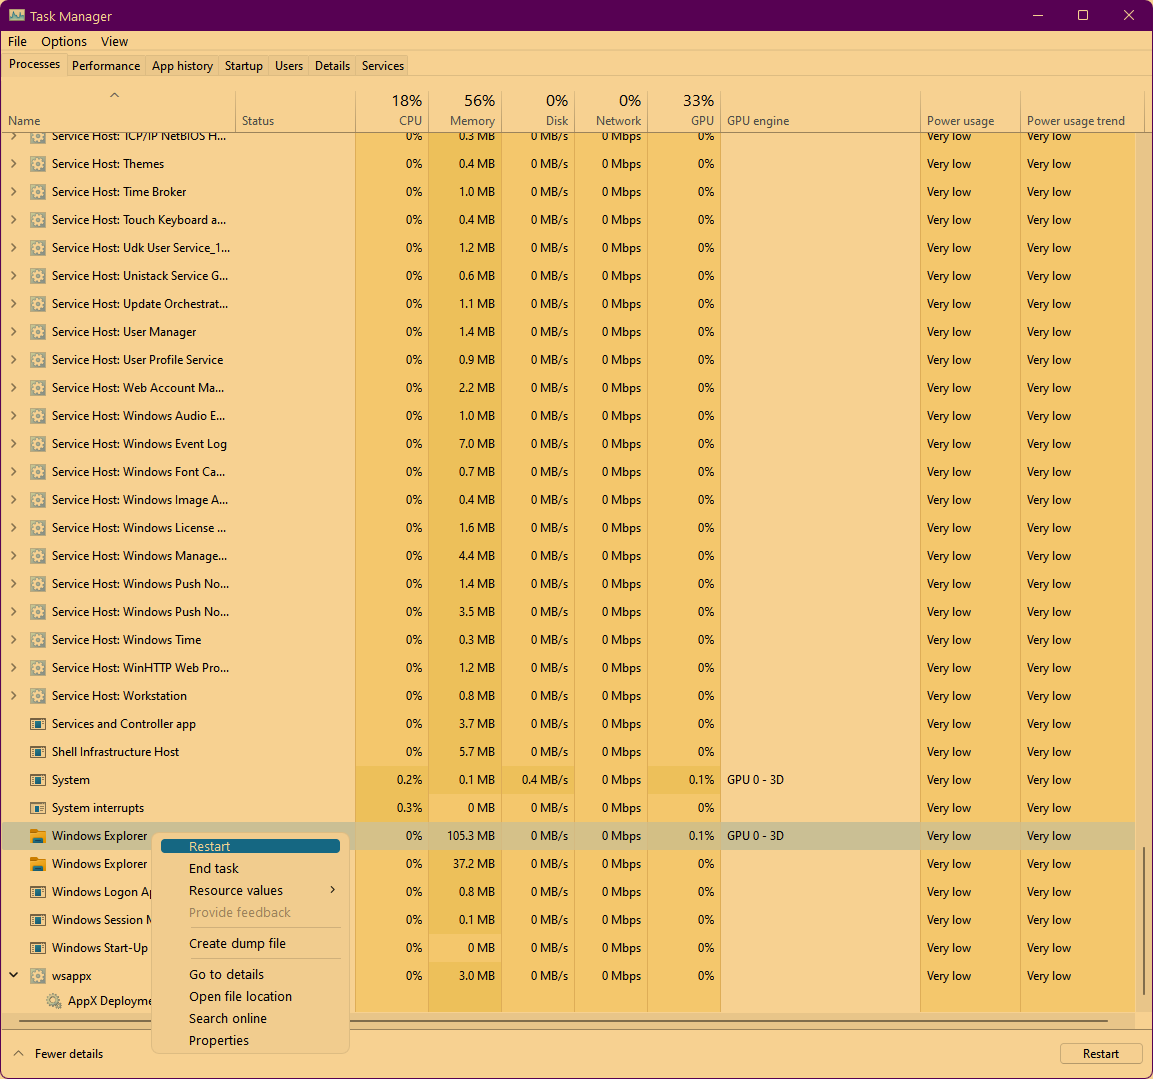
I said it is a temporary workaround because Microsoft has not acknowledged this issue yet. So, it may take some time before we see a permanent fix from them.
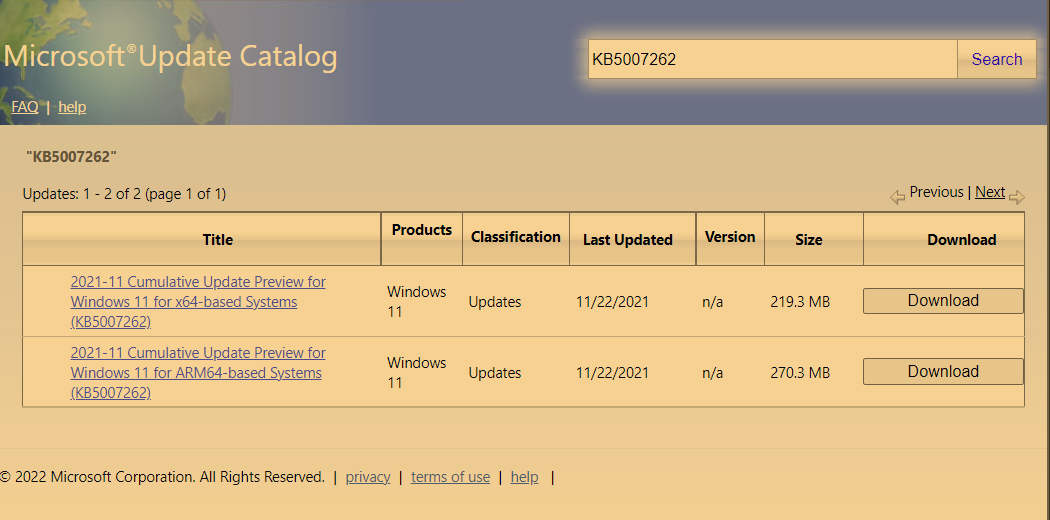
9. Windows 11 runs slow due to low-performance SDD
There are reports that Windows 11 has slowed down Solid State Drives (SDDs), which eventually slows the overall user experience as well.
BetaNews reported that SDD performance has dropped by up to 50%. Thankfully, Microsoft has released a patch to fix the issue, but it must be installed manually.
- Open Microsoft Update Catalog for the KB5007262 patch in a web browser.
- Click the Download button based on your platform (ARM64 or x64).
- On this page, click the download link to download the patch. Finally, open the downloaded file and follow the on-screen instructions.
That’s all about the common problems reported in Windows 11 and their solutions. I hope this post helped you have a better experience with Windows 11 and/or upgrading from Windows 10.