10 Ways to Extend Android Phone’s Battery Life
If you are unsatisfied with your smartphone’s battery life, your phone may not be at fault. A device’s battery life depends on a lot of factors including the battery size and the equipment’s features and platform.
Android, in this case, is an expensive platform in terms of battery juice; however, it avails features as well as options to optimize the battery use, among which some of them are quite less-known options.
Come on then, let us check the best battery-saving tips and tricks for Android. You may find some of these options hard-to-find on your smartphone, so I am listing the detailed steps for finding and switching these settings.
Surviving a Dying Battery on Android, Part I
Short battery life is one of the biggest downfalls of Android phones, and there are times when you... Read more
Enable the dark theme
It is no secret that a device’s screen consumes the most energy, thus a phone’s screen drains the most battery — especially if its brightness level is high. Moreover, Android apps are designed in primary colors, which makes them more power-hungry.
That is why you must switch to the dark theme to conserve battery juice on your phone — principally if your screen is AMOLED or OLED. In the dark theme, the background remains dark and the black aka dark area’s pixels are actually powered off.
Hence, it consumes less power and improves the battery life. That is why Android Pie features an inbuilt dark theme. Moreover, Google recommends the apps’ developers to create a dark theme, thus standardizing the dark theme feature. That being said, it is easy to enable the dark theme in Android Pie: just follow the below steps:
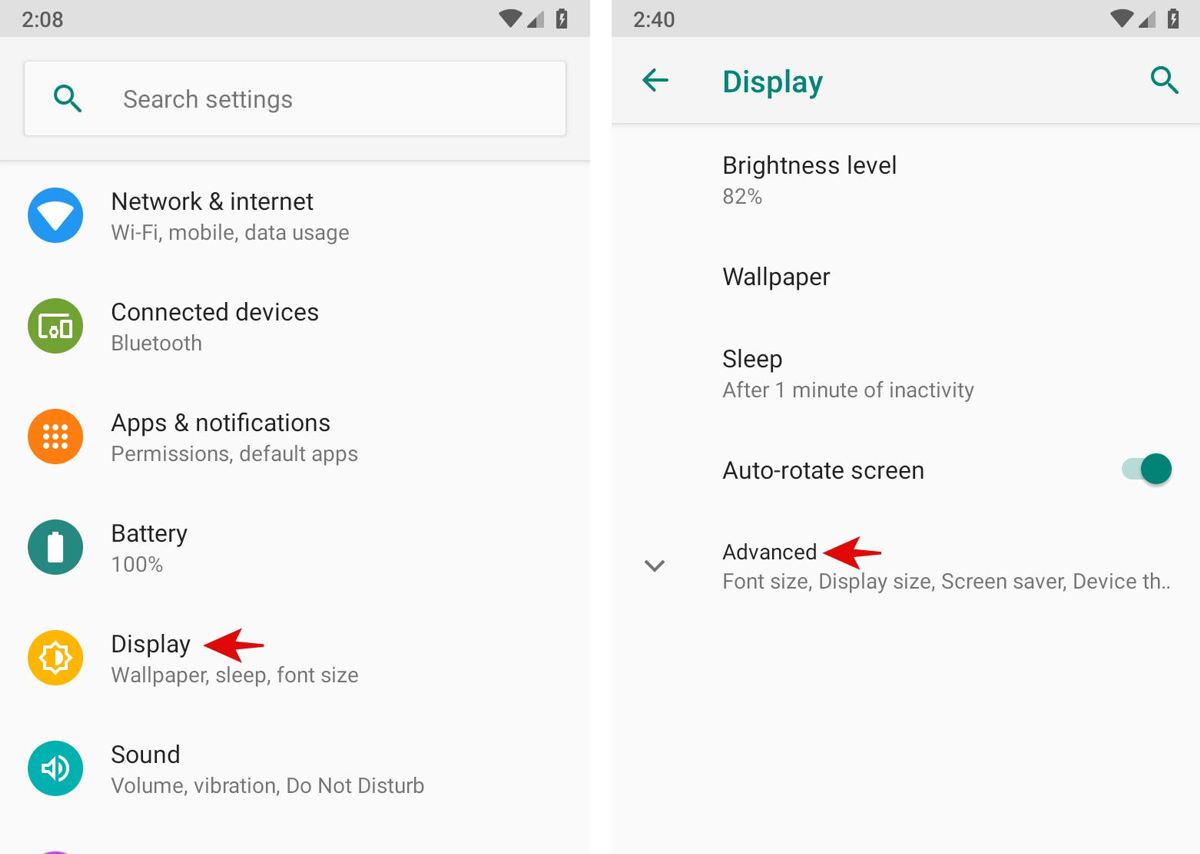
- Open Settings > select Display > click Advanced.
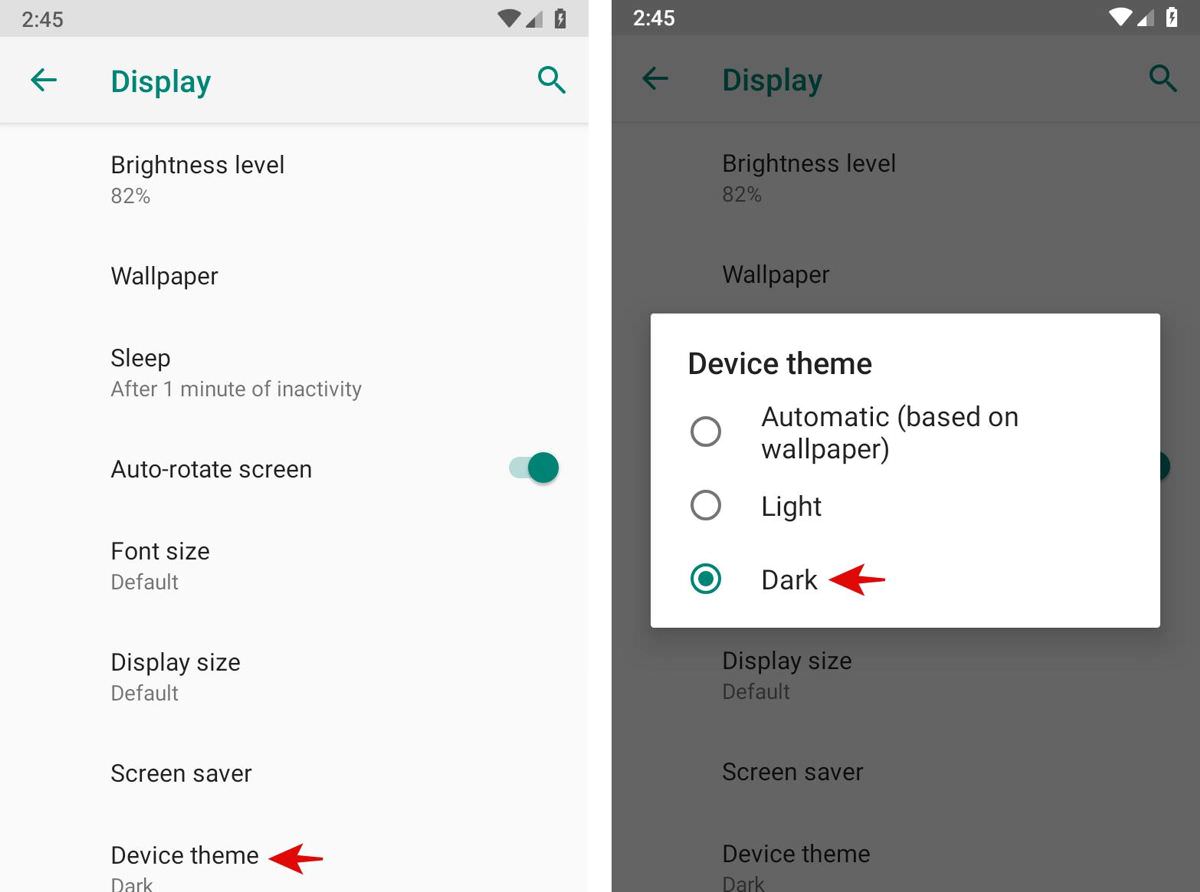
- Click Device theme and select Dark among the options.
Disable ambient display
Does your phone’s screen turn on when you pick it up? This feature is known as “Ambient Display”, which turns on the display when it detects motion. However, this feature consumes your phone’s battery. Its always-on feature can show notifications and time all the time, thus consuming even more battery juice.
You can turn off this feature (“Ambient Display”) — to save the battery juice and increase the standby time on your device — by following these steps in Android:
- Open Settings on your phone.
- Click on Display, then Advanced.
- Click on Ambient Display > turn off Always On.
Note: Android ecosystem — being too fragmented — has varied settings on different devices. Thus, in case you do not find these options per the above guide, you can search in the Settings for Ambient Display. If all else fails, google it for your device.
Check the signal strength
Maybe it will surprise you, but low signal strength drains your phone’s battery. When you are in an area with poor cellular coverage, your phone searches for a better signal and use juice in the process. The device will also try to maintain a data connection by increasing the power to the nearest antenna. This drains the phone’s battery.
That is why I often switch the network type based on the signal strength — even if it means switching to low-speed data. Also, Airplane mode is also an option when you do not need an active network. Here is how you can change the network type:
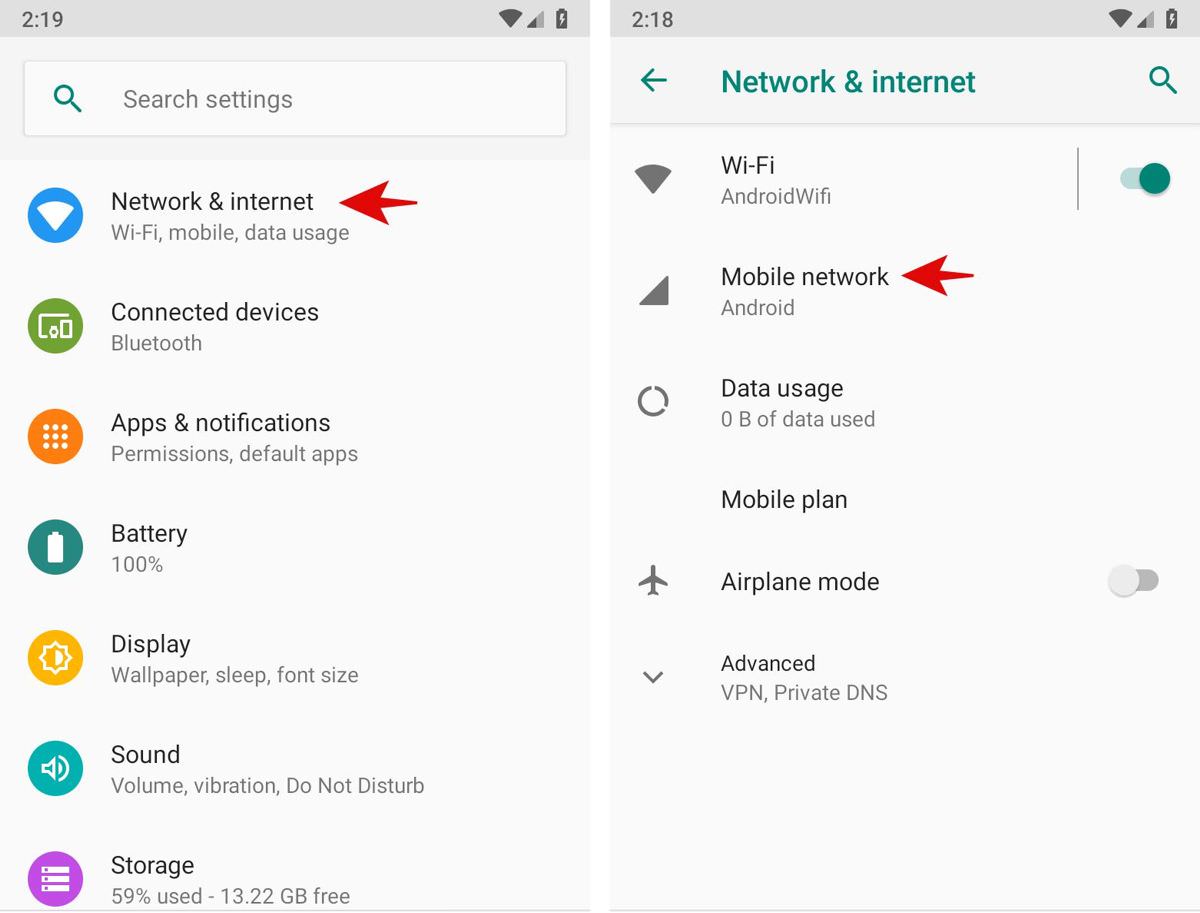
- Open Settings > Network & internet, then click Mobile network.
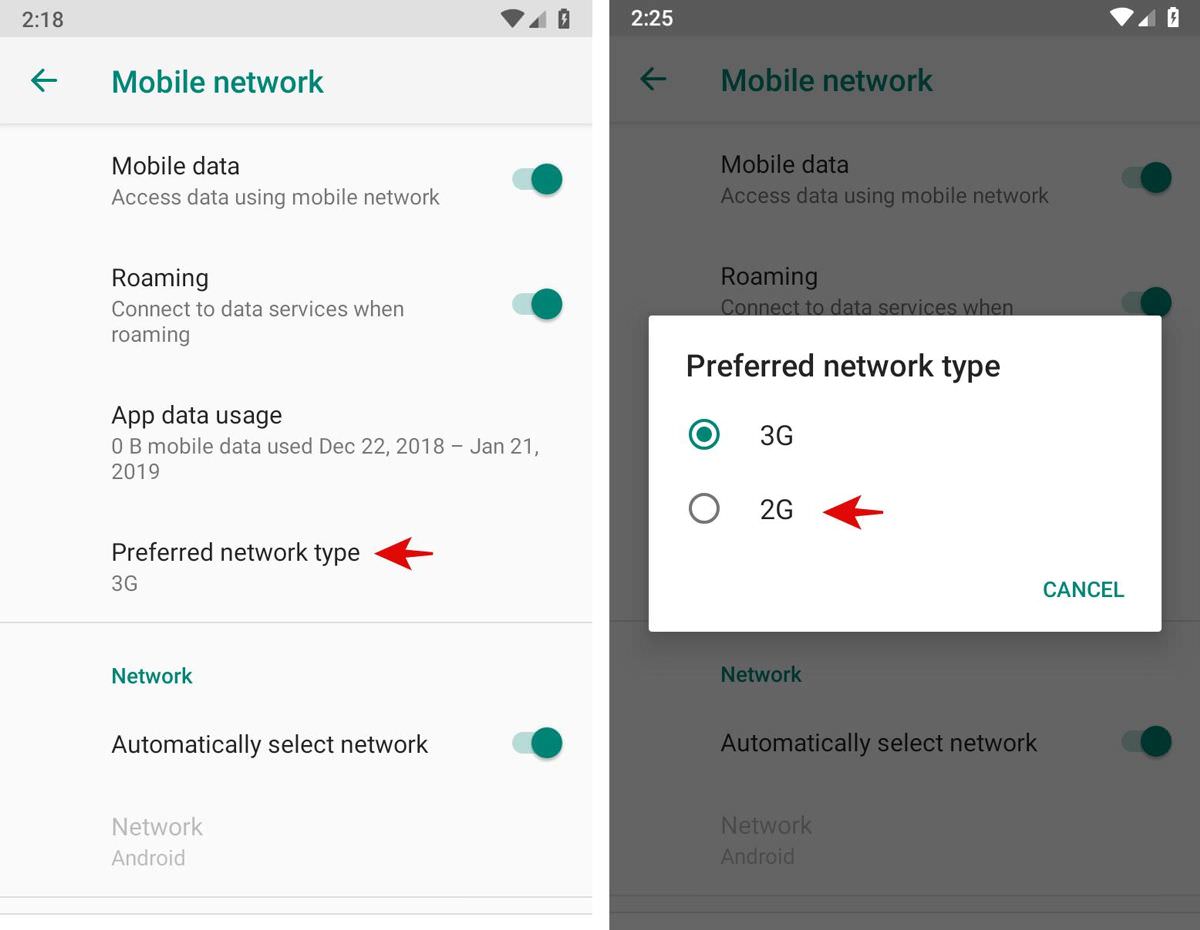
- Click on Preferred network type, then select 4G, 3G, or 2G.
Turn off Automatic Wi-Fi
Android Oreo introduced a new feature: your phone now continuously searches for nearby networks with a strong signal — even if you have turned off the Wi-Fi. Though the intention is to get you high-speed connectivity, it has a downfall: your device consumes a lot of battery juice to search for networks in the background.
This auto-search feature is handy when the battery life is unimportant, say when you are at home or traveling with a power bank. However, when you need to save all the juice, this is not a viable option. That is why you must disable this feature under normal circumstances. You can do the same by following these steps:
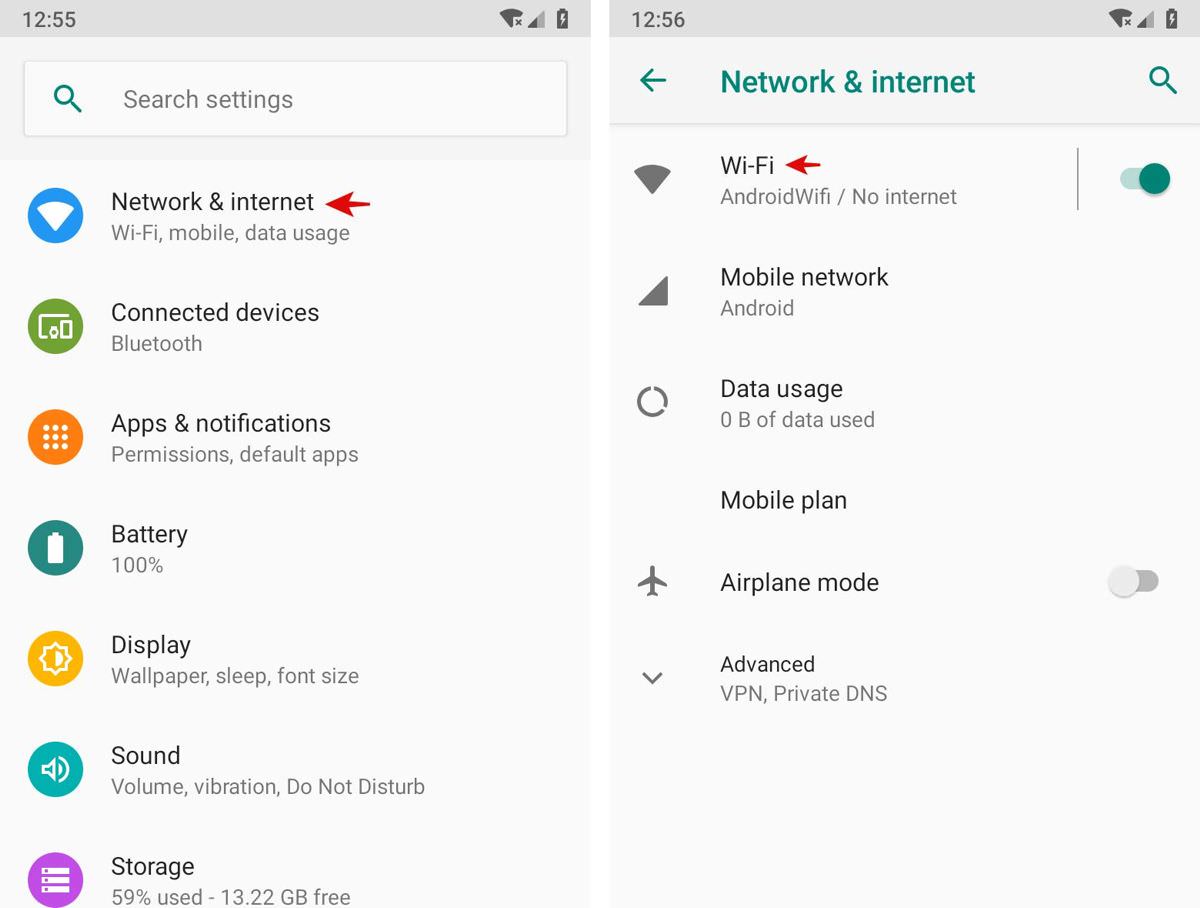
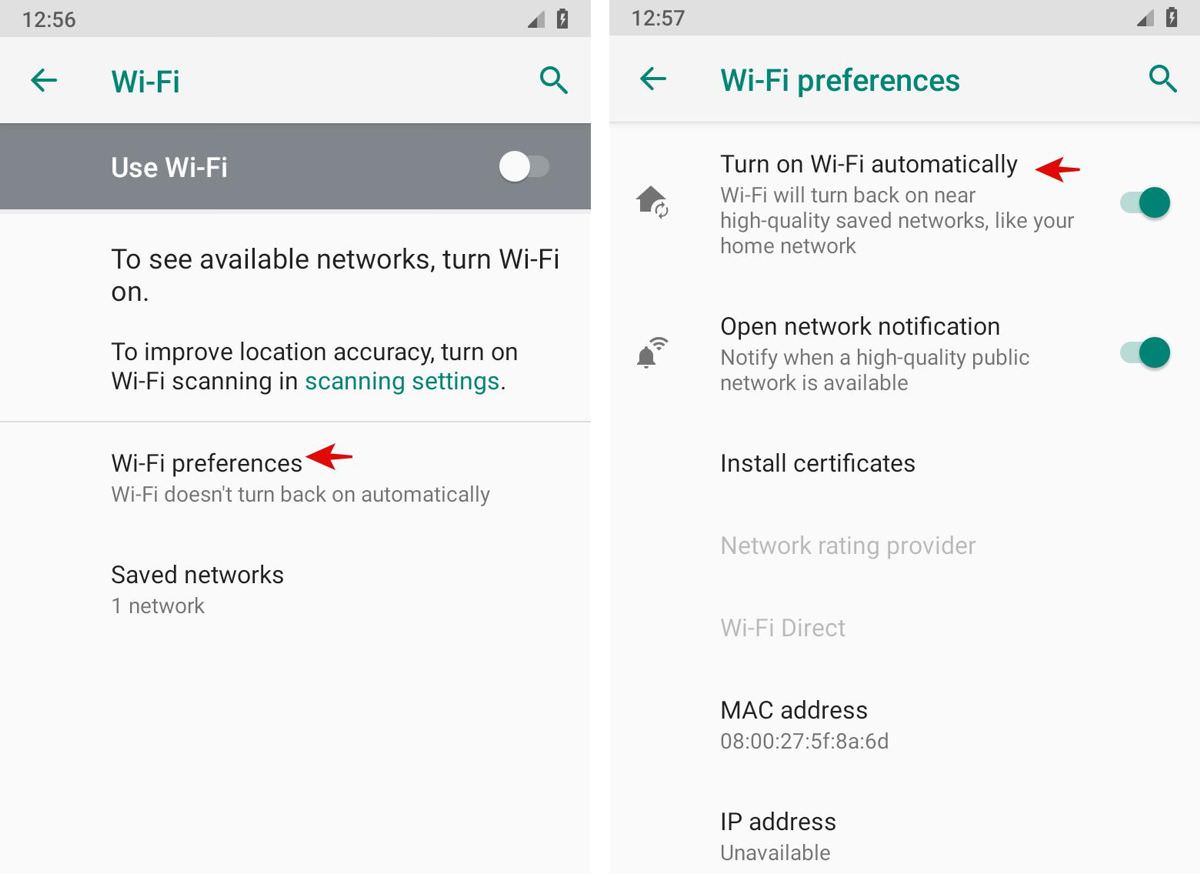
- Go to Settings > Network & internet > Wi-Fi.
- Under Wi-Fi preferences, just uncheck the two options named Turn on Wi-Fi automatically and Open network notification.
Prefer Wi-Fi over 3G or 4G
Your modern smartphone is designed to connect to the highest-speed network. So, your phone usually chooses 4G over 3G. However, if your phone’s carrier does not support VoLTE, the phone makes use of 3G for calls and 4G for mobile data. Since it connects to two networks simultaneously, it consumes a lot of extra battery juice.
What one can do to overcome this problem? If your phone’s carrier does not support VoLTE, you can connect to 3G for calls as well as mobile data. Then, if you are unsatisfied with its speed, you can opt for Wi-Fi. The reason being: Wi-Fi consumes less battery power since a nearby network requires less work from your phone.
Turn off always-active data
Your Android phone may have mobile data in always-active mode, which helps your phone to avoid any connection drops when switching between mobile data and Wi-Fi. However, your phone uses more juice to maintain two connections — keeping mobile data active even when your mobile phone is already connected to Wi-Fi.
You must consider disabling this setting to save your phone’s juice and increase its standby time as well. Please follow these steps to turn off this option:
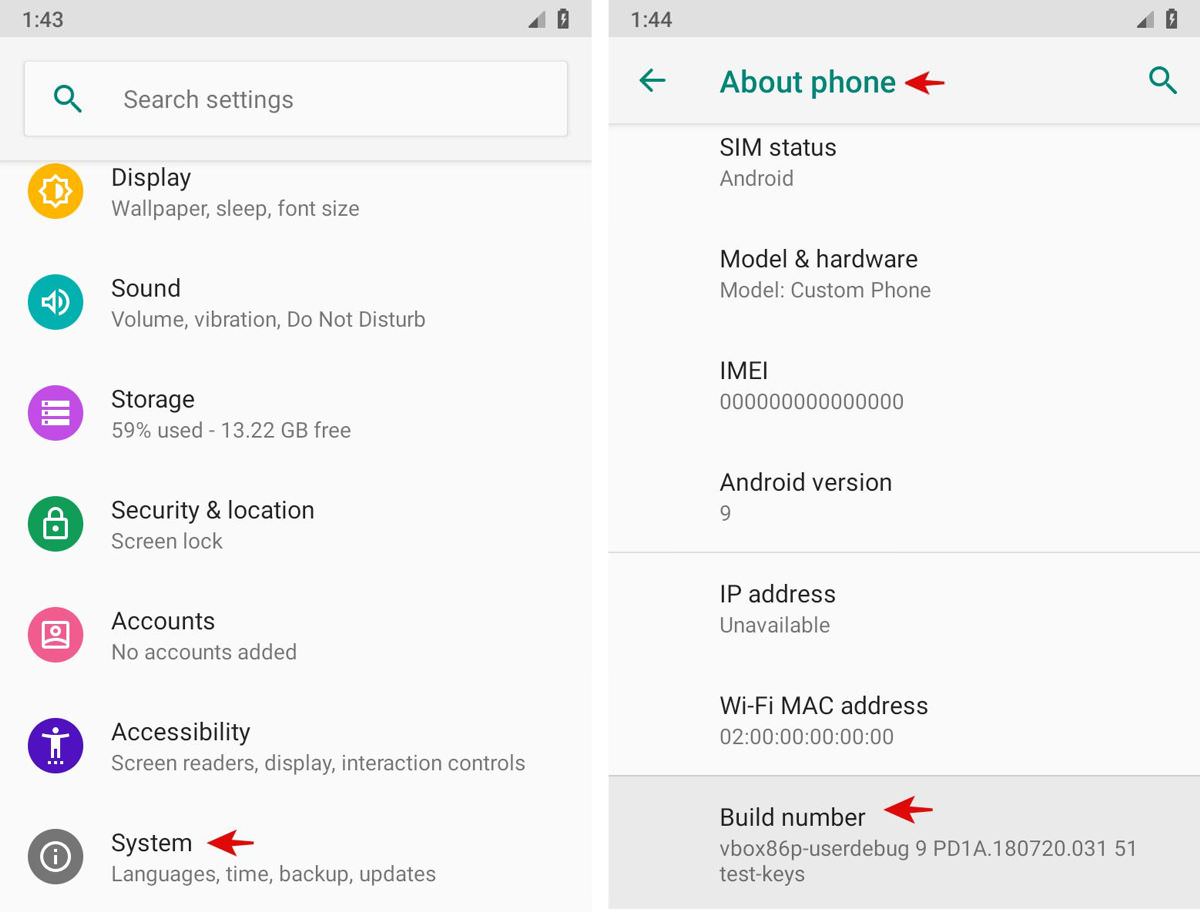
- Open Settings, then click on System > About phone.
- Now click on Advanced, then tap Build number multiple times till you see a notification that the developer mode is enabled on your phone.
- Now head back to System, then click on Developer options.
- Under the Networking category, turn off Mobile data always active.

Disable the Google Assistant
Google Assistant helps you get things done using just your voice. It listens for a wake command such as “Hey Google“, then you can command it or ask it anything like “what is the weather?“. After it hears and analyzes your command, it performs the asked action. For example, it finds and tells about the weather (in this case).
What is more interesting is that it can work even when your smartphone is in standby mode. However, it requires to always listen for the wake command, thus taking up more juice. If you are not dependent on this handy utility and would like to save the precious juice of your phone’s battery, you can disable it by following these steps:
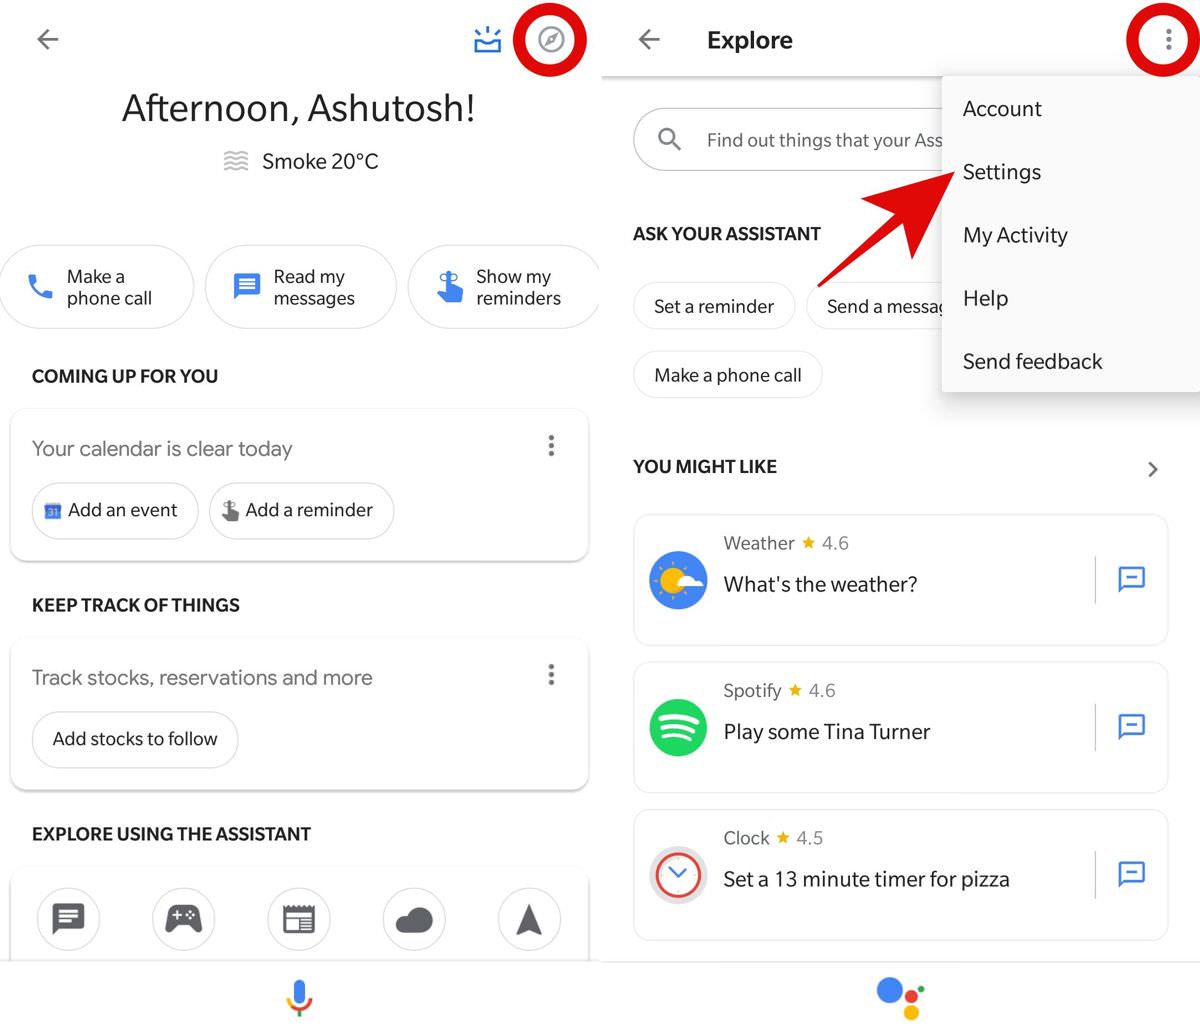
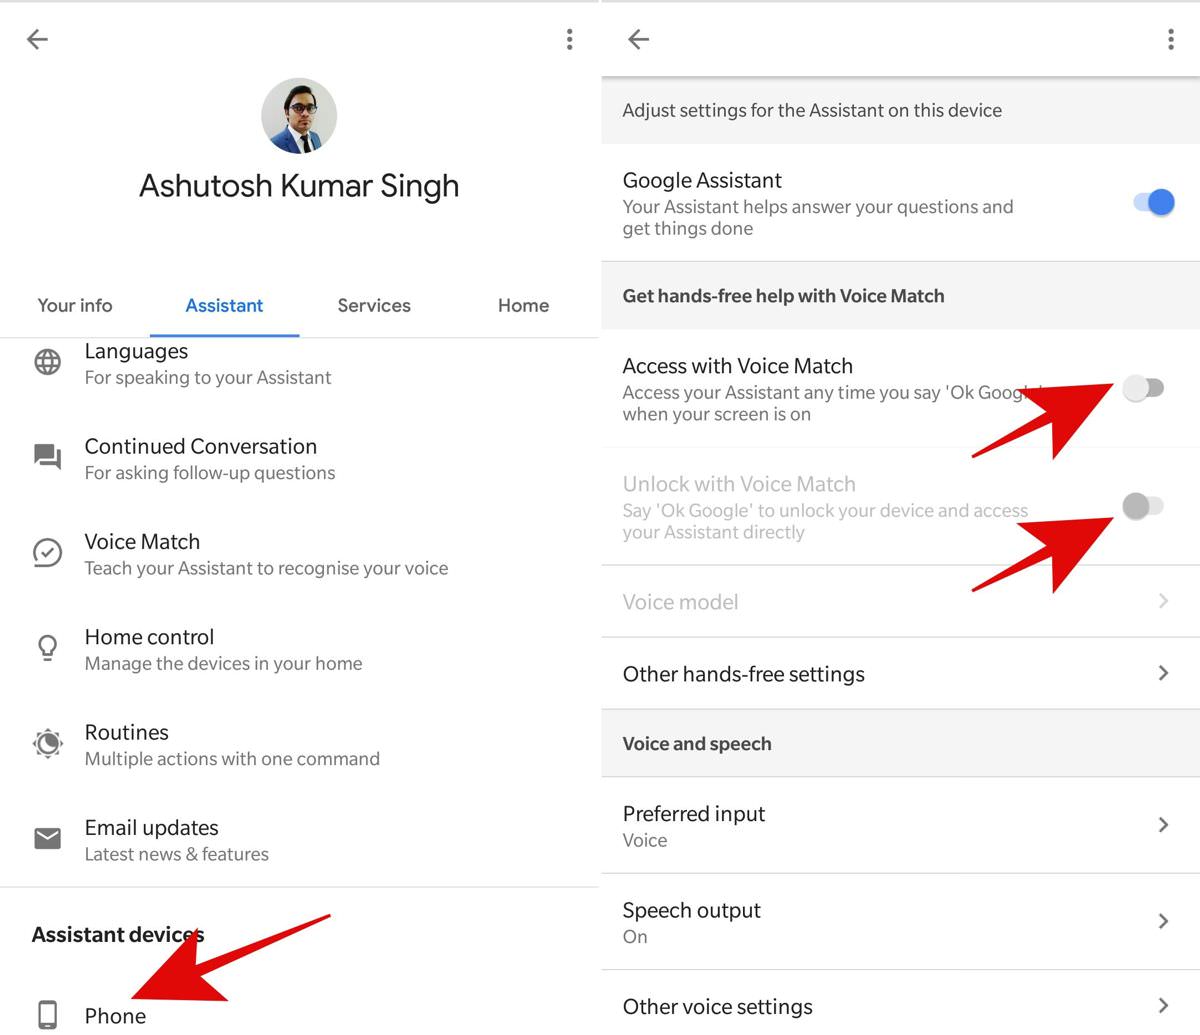
- Open Google Assistant and tap the icon at the top right.
- Tap on the options More > Settings, then click Assistant.
- Under Assistant devices, choose your phone or tablet and turn off the two options: Access with Voice Match and Unlock with Voice Match.
Configure the sleep schedule
You can configure your phone to enjoy a peaceful sleep by switching off the optional features automatically. These include mobile data (and network too in case you do not expect a call in the middle of the night) and location and sync services. The bonus? Since they drain your phone’s battery, it helps to save some juice as well.
Some phones have options like Auto-Sleep, Battery-saver, and Do Not Disturb, which you can enable to turn off those settings at night. If your phone does not have such a feature, you can use IFTTT. You can configure one of its recipes to save your phone’s battery during the night. Here is a list of freely-available recipes:
Switch to apps’ lite versions
Although lite versions of popular apps were primarily created for low-resource devices yet you can use them to save your phone’s battery juice as well. They are simpler and come with essential features. For example, there are lite apps available for Amazon Kindle, Facebook, Facebook Messenger, Shazam, Twitter, and more.
The lite versions require fewer resources, i.e., less amount of memory and storage, slower web connectivity, etc. For example, Facebook occupies almost 150MB – 300MB of RAM in the background, however, its liter version takes up just 50MB – 150MB. Since the lite versions of apps are less taxing on the resources, they save some juice too.
Greenify the least-used apps
Every activity on a phone drains its battery juice including the work done by apps in the background. Android Marshmallow introduced the doze feature, which keeps your idle phone in a low-power sleep state. Then, there is Greenify — a handy third-party app — that offers aggressive doze feature to save battery juice even more.
The doze feature kicks in after the phone is left idle, while the aggressive doze mode kicks in within minutes after you leave your phone. That is why you shall use the latter over the doze feature of Android. Here is how you can do it:
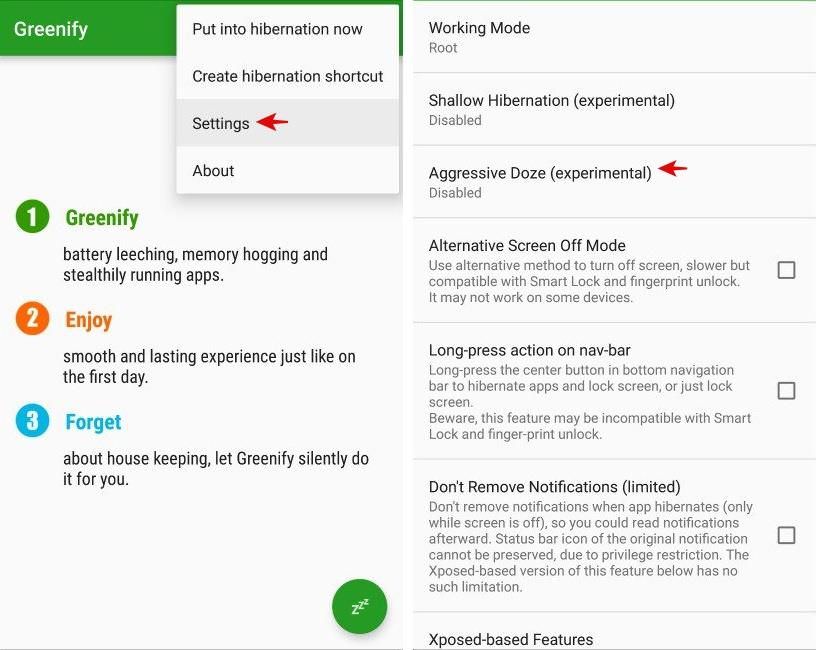
- Install Greenify from the Play Store, then launch it.
- Click on the options button and click Settings.
- Tap Aggressive Doze (experimental) and enable it.
I researched the above options when my phone died at one of the crucial times. Although the known battery-saving options work well, however desperate times need desperate measures, right? That is why I recommend the above tips and tricks to save every ounce of the battery juice during a dire time.