Beginner’s Guide to Producing Your First Youtube Tutorial
YouTube has become an important channel for relaxation and study. You can find many video tutorials to give you tips or guide you through doing something new. Video tutorials are not only used to share knowledge but also to help businesses market their brands and provide more visual documentation for customers. And it’s not that difficult or expensive to do. I’ve just started creating tutorials for JoomlaShine recently and I want to share with you some of my experiences.
This tutorial will show you how to produce a high-quality YouTube tutorial without the use of a studio or even a video camera.
You will be making a how-to video tutorial, or product introduction with voice-over and subtitles. YouTube has a function to translate the captions so that viewers from all over the world can understand what is in the video. Subtitles also make your YouTube tutorials text searchable so people can find them easily. It’s best to keep the length of the video in under 6 minutes – people don’t like to watch a video if it is too long.
10 Websites to Edit Your Videos Online
Online video editors give you a great solution when you don't have the time, skill, or resources to... Read more
Prepare to record
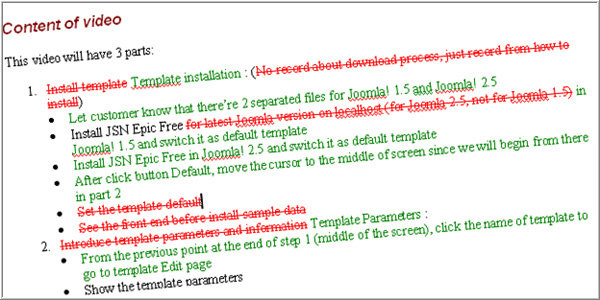
Video outline
In a simple way using bullets points and numbers, prepare the outline for your video. Read it many times over and familiarize yourself with it. Arrange the text to suit the flow of the message you are trying to deliver.
Presentation
Make your tutorial more attractive with callouts (video illustrations such as text or pictures), some flash effects, or with PowerPoint slides. Prepare the things you want to add to the video, and make sure that they can be combined.
Recording apps
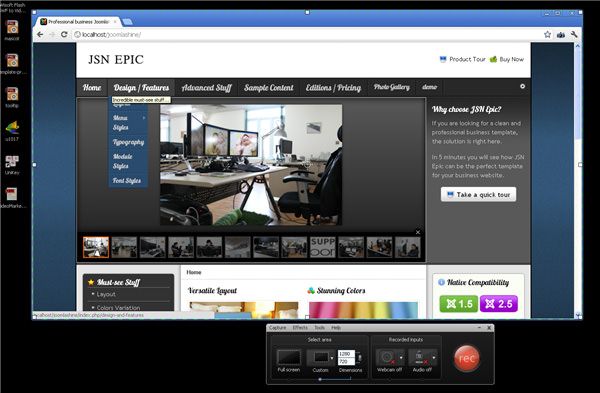
I use Camtasia to record my videos because it has many useful functions and special effects. You can use a free trial version for 30 days or buy it for $299. To makea higher quality video, you should opt for at least Full HD: 1280×720.

Recording
Separate your recordings
When recording the video tutorial, it’s important to record the video tutorial and audio instructions as two separate files. You can start recording the video tutorial first, and then, record your audio instructions. This will help you to minimise your mistakes and reduce editing time. Arrange everything you need to include in the tutorial (what you want recorded) in the selected area. Make sure that if you open a browser, a folder or anything else, that it’s something Camtasia can capture.
Recording video
Record the video tutorial carefully. Perform your steps slower by about 20%. Focus on each step, try not to make an error and don’t do any unnecessary actions. Some of the first videos I recorded took up to 7 times to get right. Practice makes perfect so don’t expect miracles and give up on the first few runs.
Recording Voice
Write the video transcript before the voice recording. It’s better for you to read from the transcript file to reduce mistakes. Try to record in a clear and natural voice, and it’s best to record in a quiet room. Control your voice and add stress when you want to focus on something.
20+ Free Desktop Audio Editors
From all the options available on the Internet, here's 20+ digital audio editors that are completely free and... Read more
Editing the recorded file
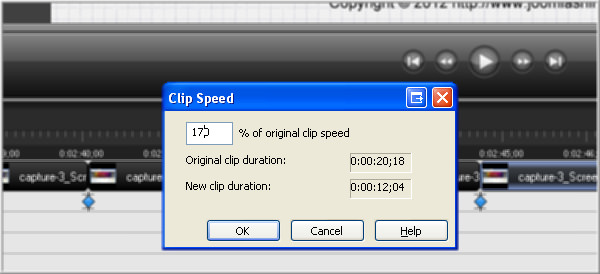
Dimensions and Clip Speeds
Choose the editing dimension as your recording dimension 1280 x 720 – that’s the best dimension for your video. Remove all unnecessary frames and make the video play faster during downloads or set ups, while searching for something or typing text, the usual stuff that people already know how to do. This will keep your video shorter.
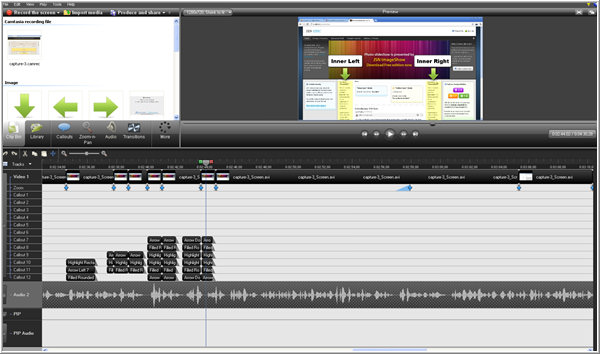
Zooming and Transition
Use the zoom function when you enter text or show a website URL. The video will be shown in a much smaller size on Youtube, so zoom in for your viewers. The duration for the zoom effect can be set to 1 second for a smoother zoom. Use transition effects between different parts of the video. My favourite effects are Page turn, Cube rotate, Fade, Fade through black, with a duration of 1 second.
Callout and Effects
Add an extend frame to insert a callout to make sure all activities in the video stop when the callout appears. The length of the extend frame must be enough for people to understand the callout: normally I give mine 3 to 5 seconds.
To add more effects, Sony Vegas Pro is my first recommendation. You can make any effect you want although it will seem difficult at first to create effects manually. If this is a problem, you can try SWiSH Max which features many built-in effects for your videos. For example, I often use SWiSH Max to generate type writing effects for text in my video.
Produce a YouTube tutorial
Exporting Your Video
Don’t use the Camtasia preset options because the video will be darker than normal and the details will be blurry. Here’s how you can export into a high quality video:
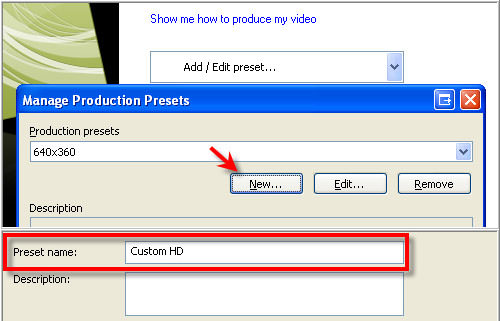
- Under Custom product setting, click to Add/edit preset. Choose New to create the new production preset. You can add the name as you want, for example "Custom HD".
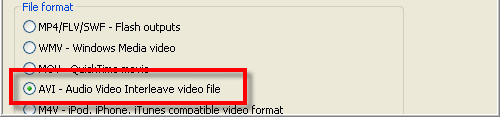
- Please choose AVI as your video file format, it will help you have a high- quality videos with true brightness.
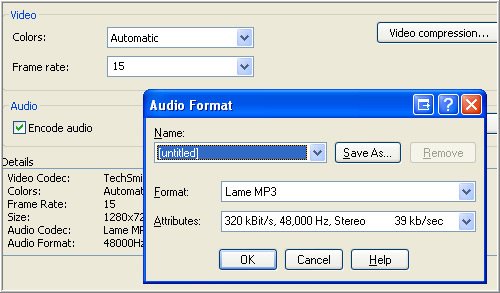
- Set the frame rate at 15 frames per second (fps) to produce a nice video with a small size. The best rate is 30 fps but this makes your video very large.
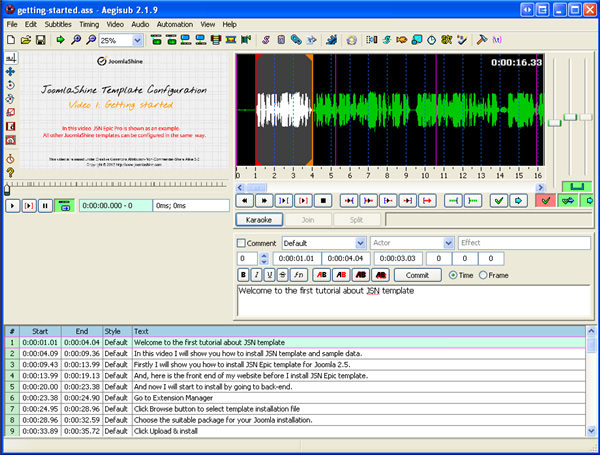
- Create the subtitle file for your YouTube video. You can use Aegisub software; it’s free and easy to use. The subtitles should be exported in srt format.
Upload a YouTube tutorial
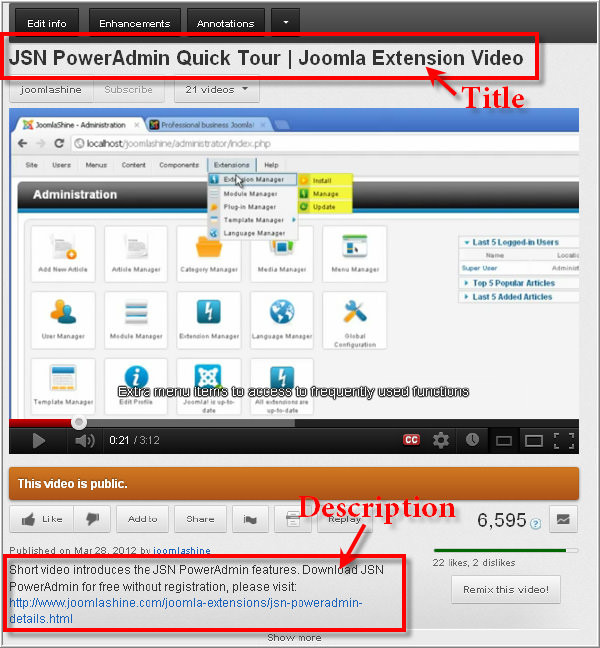
Tutorial Title and Description
The title for your tutorial should include the content and keywords. You can create a title of up to 70 characters that will show in YouTube search results, but only the first 40 characters of the title appear when the tutorial is shown as a related video. In your description, describe the video briefly, include your link in the first 3 lines so all viewers can see it without clicking "show more". Use keywords.
Tags will help your video appear with other videos in the same topics and thus to the same target viewers. Use long keywords to define tags and add as many tags as you can.

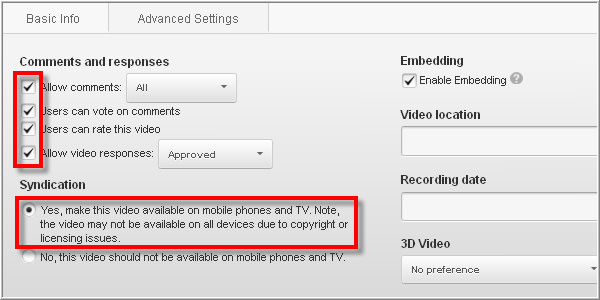
Set privacy settings to public and remember to make the video available on mobile phones and TV. Allow comments or responses.
Add Annotations to ask for subscribers, to redirect to other videos in your channels, or to guide the viewer to watch your video in the best size.
Group your videos in one topic on a playlist. This allows viewers to follow all your tutorials easily without having to do searches for related videos.

Final words
So, we’ve finished producing a high quality YouTube tutorial with only a computer and some software. Get started with your own tutorial right now or if you’ve already created a YouTube tutorial and have tips to share, please feel free to comment below.