Photoshop Tutorial: Design Tiger / Leopard Style Character
Few readers were asking if I’ll release a guide on creating the furly tiger / leopard skinned "X" I’ve used in the Leopard wallpaper. Well, if you want it I’ll try my best to illustrate the guide on creating them.
But first, I’d like to declare that this isn’t an original idea of mine, rather a design I pickup when browsing through a Photoshop book in some store couple of months back. The steps should be similar, although I can’t remember much of the details in the book. Full tutorial after jump.
Recommended Reading: More Photoshop Text Effects!
Step 1
Create a new document at your preferred size and create an alphabet in the middle. For your reference, I’m using a canvas at the size of 500 x 400 pixels, Adobe Garamond font.

Step 2
Change the alphabet’s color to orange color [#ffa70e]. Choose Lasso Tool, hold SHIFT key, and randomly highlighting small portions within the alphabet.
Step 3
Create a new layer on top of your alphabet, name it spots. Select black color [#000000] and fill up the highlighted parts. Your design should look something like this image below.

Step 4
We are going to get rid of the black spots outside the alphabet. Select the alphabet’s outline by holding Control key (mac – command key) + left click alphabet’s layer thumbnail. With the outline selected, do a Control Shift + I (mac – Command Shift + I) to reverse the selection. Select spots layer, hit delete to remove the outter parts.

Step 5
Select both alphabet and spots layer, merge them using Layer -> Merge Layers. Then duplicate another copy of the layer by selecting the layer, right click -> Duplicate layer.

Step 6
Hold Control key (mac – Command key), select the first layer to highlight the outline. Select Lasso Tool, hold Alt key (mac – Option key) and draw away the top right and bottom left portion of the alphabet.

Step 7
With the selection still highlighted, go to Filter -> Noise -> Add Noise. Insert these following settings:
- Amount: 50%
- Distribution: Gaussian
- Monochromatic checked.

Step 8
Maintaining the selection, now go to Filter -> Blur -> Motion Blur. Insert the following settings:
- Angle: -53
- Distance: 10

Step 9
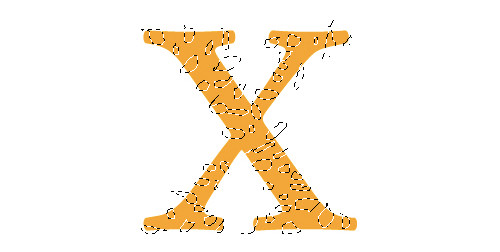
Now on the same layer, repeat Step 6,7 and 8 for the other side of the alphabet. Just make sure that on Step 8, you have the Angle set to 43 or any angles you feel right. Your image should look something like this.

Step 10
Select the furly "X" layer, right click -> Blending Options and insert the following styles.
- In Bevel and Emboss, set Size to 13px
Hold Control key (mac – Command), left click to highlight the selection. Go to Select -> Modify -> Contract, insert 1 pixel, then Control Shift + I (mac – Command Shift + I) to invert. Hit Delete key.

Step 11
Swap both alphabet "X" layers, bottom to up, and up to bottom. On the new top layer, change the layer setting to Soft Light and opacity to 70%.

Step 12
Your output should look like something below. An alphabet tiger / leopard skin style.
