How to Create Flaming Text Effect with Adobe Photoshop
In this tutorial, we’ll be exploring the fantastic Flame Filter in Adobe Photoshop. The Filter creates procedural flame and fire effects which can be made to curl and follow around any custom shape. We’ll also be adding some realistic fiery sparks, courtesy of a handmade Photoshop Brush tip.
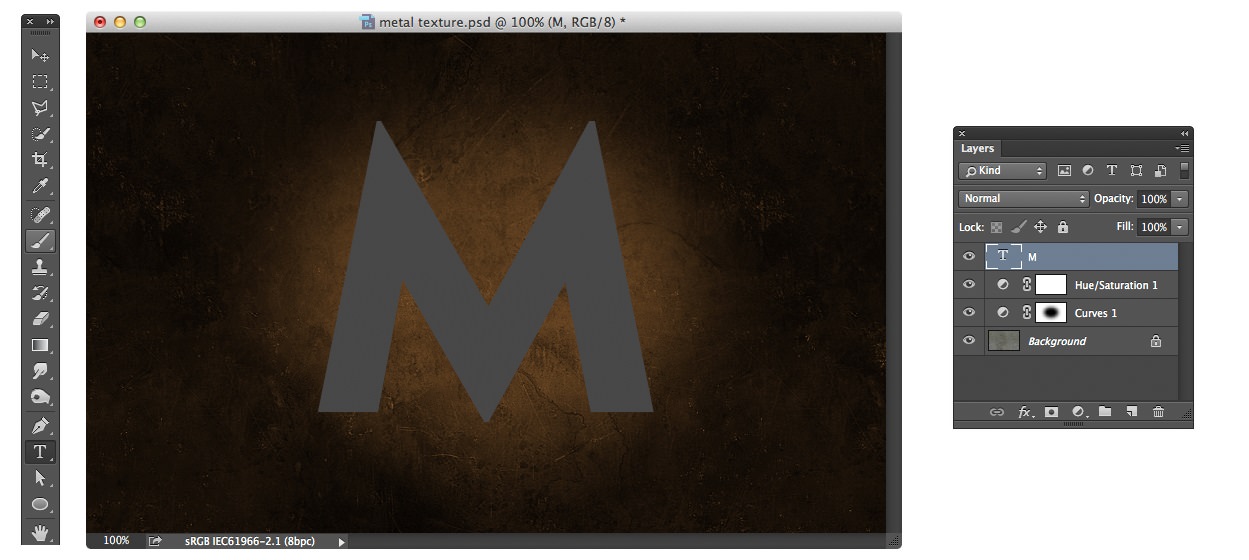
Step 1
Open a suitable background image on which you want to build up the flaming text effect. In this example, we will be using a distressed metal texture but any reasonably dark background texture would work equally well:

Step 2
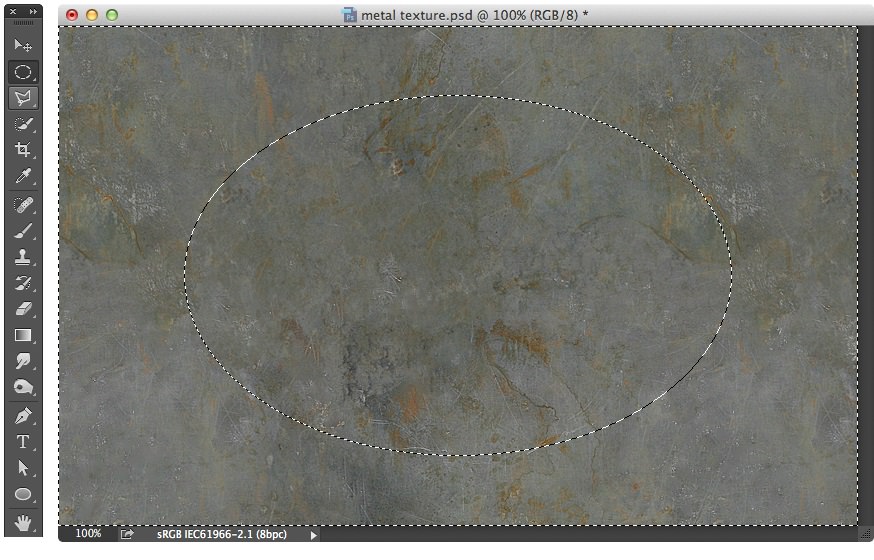
We’ll add some shading and colour adjustments to create a low key effect over our background. Select the Elliptical Marquee tool (M) and draw a large oval over the centre of the background.
Step 3
Use Cmd / Ctrl + Shift + I to select the inverse area in the document:
Step 4
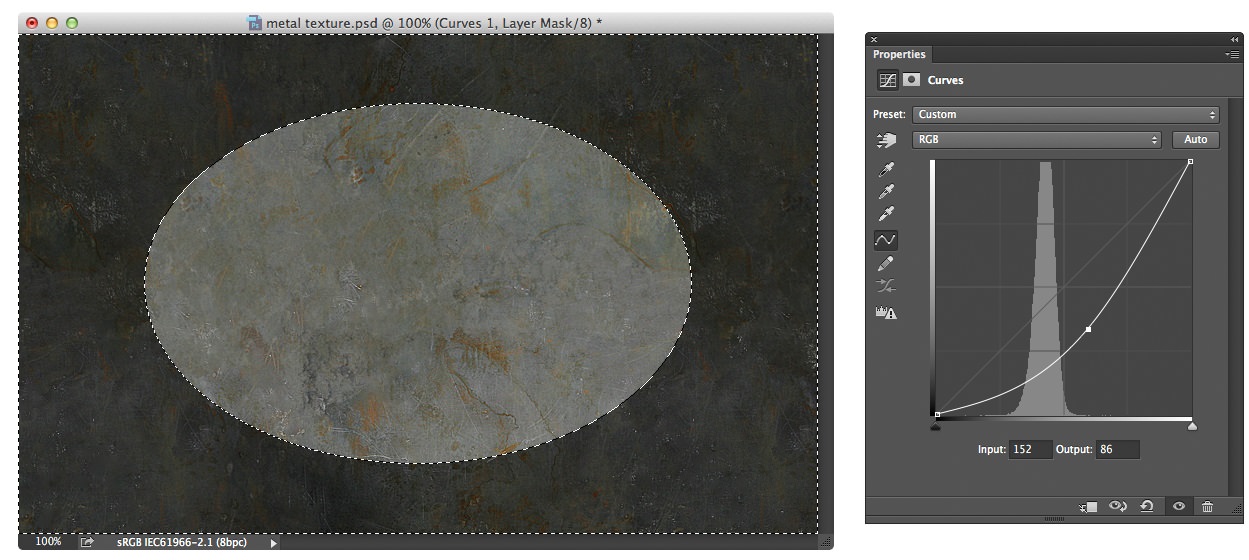
Go to the Layer menu > New Adjustment Layer > Curves command. Click to add a custom midtone point on the Curve line and drag downwards to darken the image:
Step 5
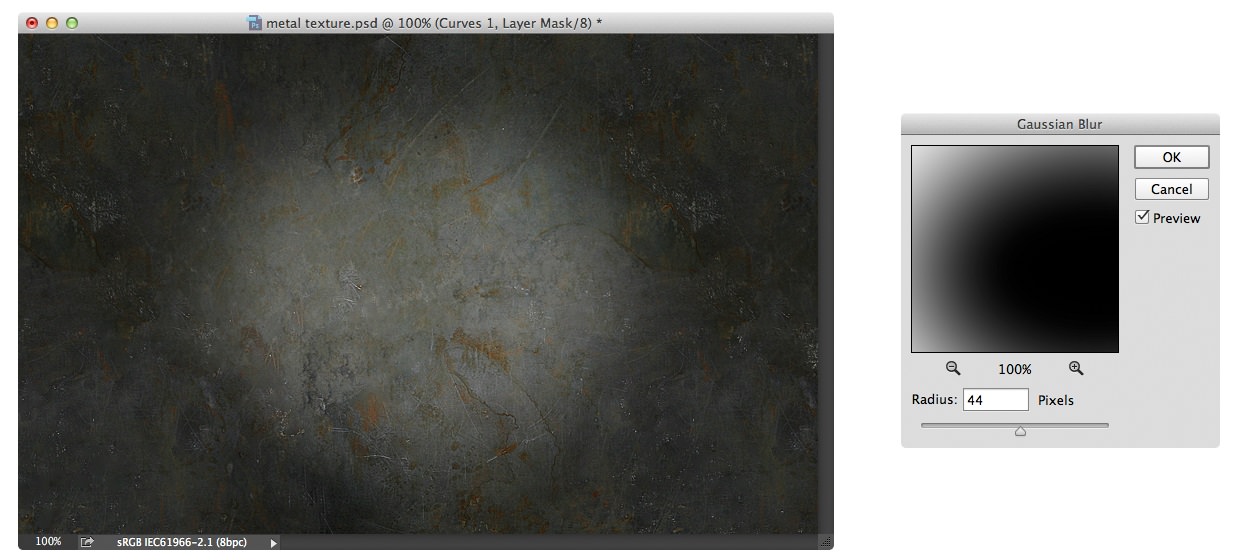
To soften the edges of the vignette, we’ll add a blur to the Adjustment Layer Mask. Go to the Filter menu > Blur > Gaussian Blur. Increase the Radius value as required to create a nice soft feather for the edges of the ellipse shape.
Step 6
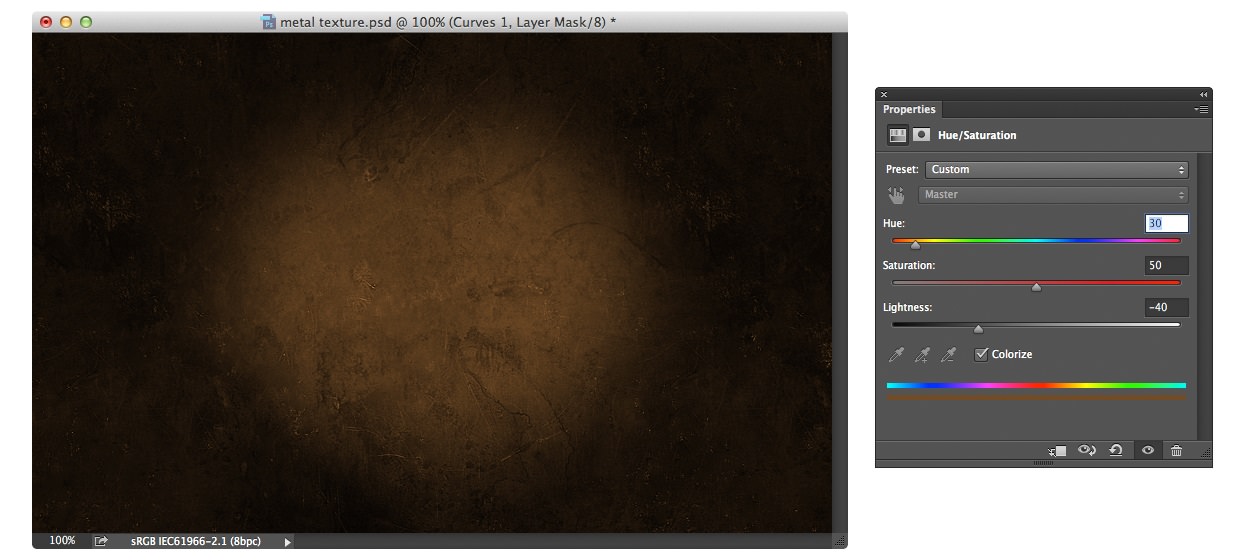
Go to the Layer menu > New Adjustment Layer > Hue and Saturation. Check the Colorize tickbox and apply the following values: Hue (30), Saturation (50), Lightness (-40)
Step 7
Select the Text tool (T) and click on the canvas to create a Type Layer. Use the Options bar to set the required font size and colour and enter the required character.
In the example used here, we’ve used the following character values: Font: MetroBlack LT Two Regular, Size: 400 px, Colour: 474747. When you’ve finished, use the shortcut Cmd / Ctrl + Enter to commit the Type Layer changes.
Step 8
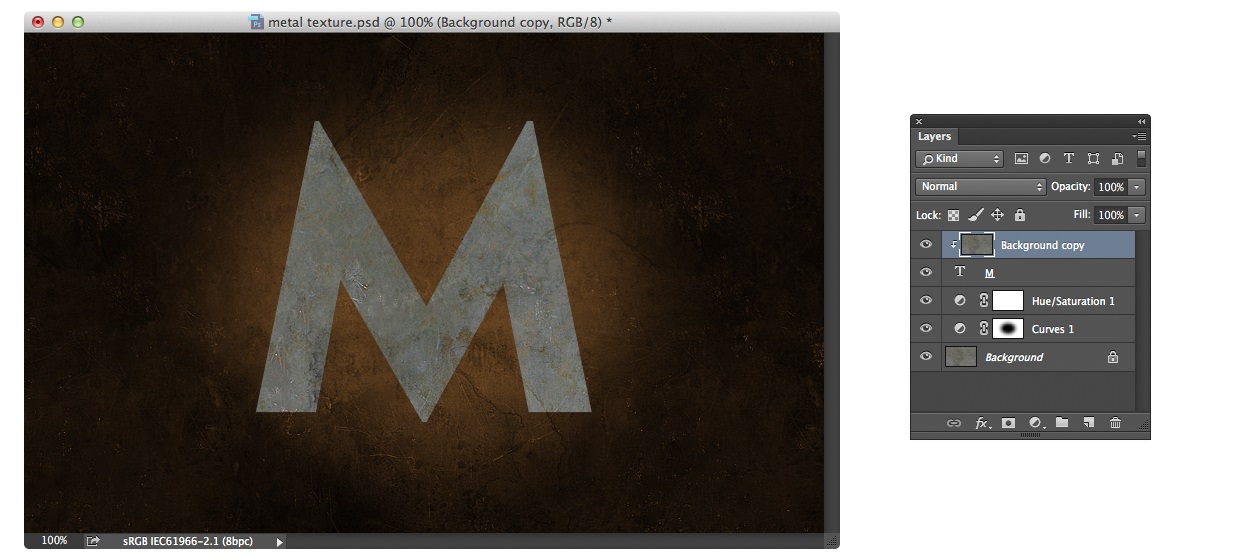
In the Window menu > Layers Panel select the Background Layer containing the metal texture image. Use the shortcut Cmd / Ctrl + J to duplicate the Layer and drag it above the Text Layer in the Panel.
Step 9
With the new texture Layer selected, use the shortcut Cmd / Ctrl + Alt + G to mask the copy image to the Text Layer beneath.
Step 10
With the Texture Layer selected, Go the Image menu > Adjustments > Curves command. Add a mid tone point to the Curve line and drag downwards to darken the texture overlay Layer.

Step 11
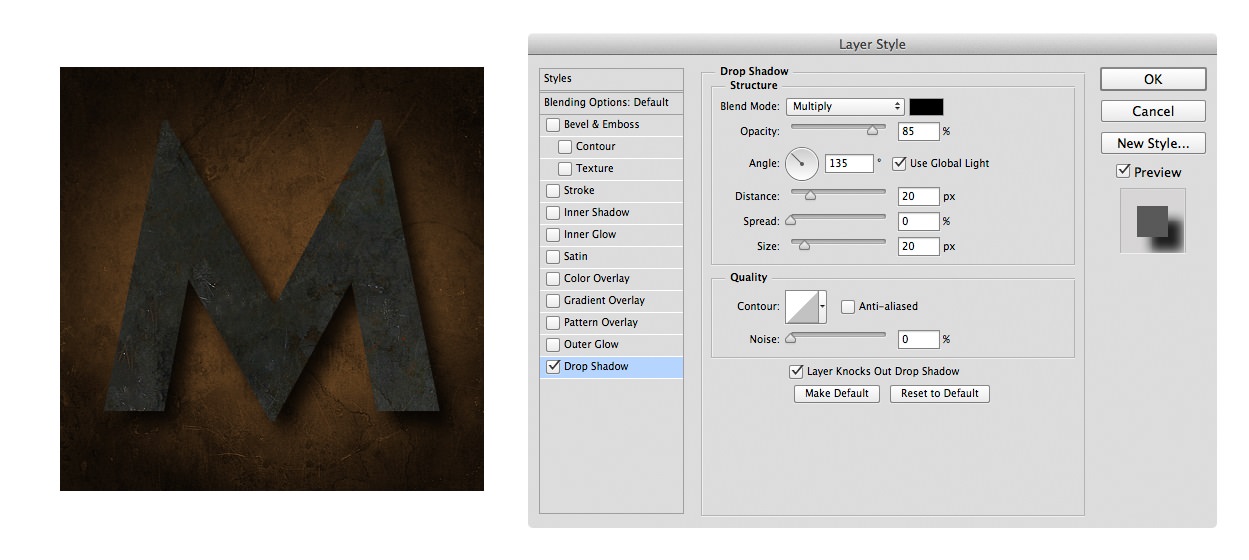
We’ll next add some Layer Styles to the Text Layer to lift it off the background. In the Layers Panel, click the ‘FX’ menu and apply the following Layer Styles:
- Drop Shadow
- Opacity:
- Distance: 20px
- Spread: 0 px
- Size: 20 px
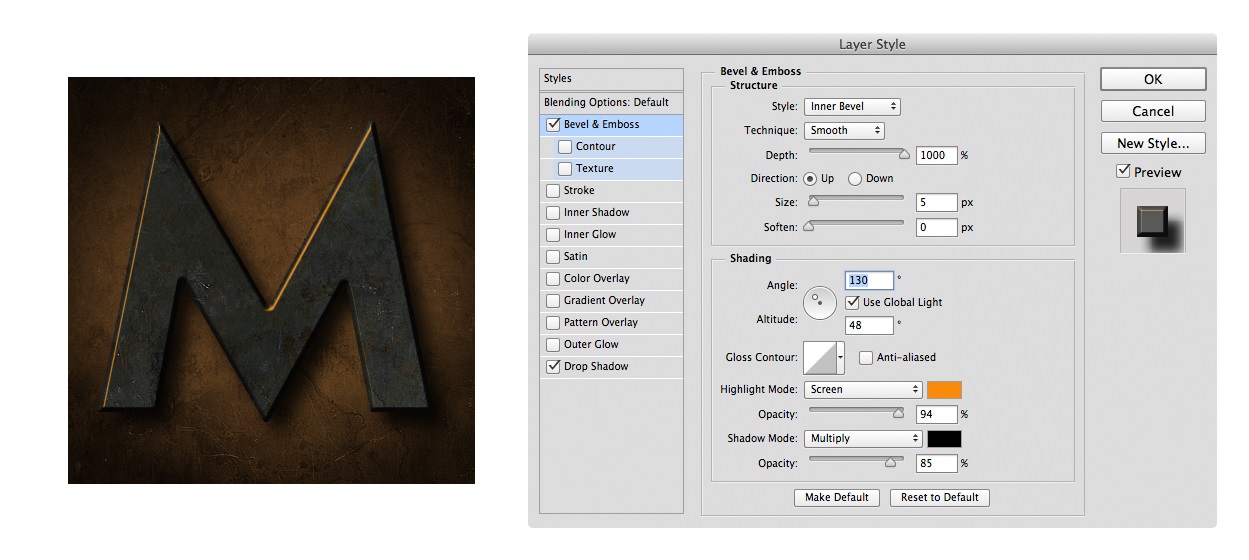
- Bevel and Emboss
- Depth: 1000%
- Size: 5px
- Angle: 130
- Altitude: 48
- Highlight Colour: fa8b09
- Highlight Opacity: 95%
- Shadow Colour: 000000
- Shadow Opacity: 85%
Step 12
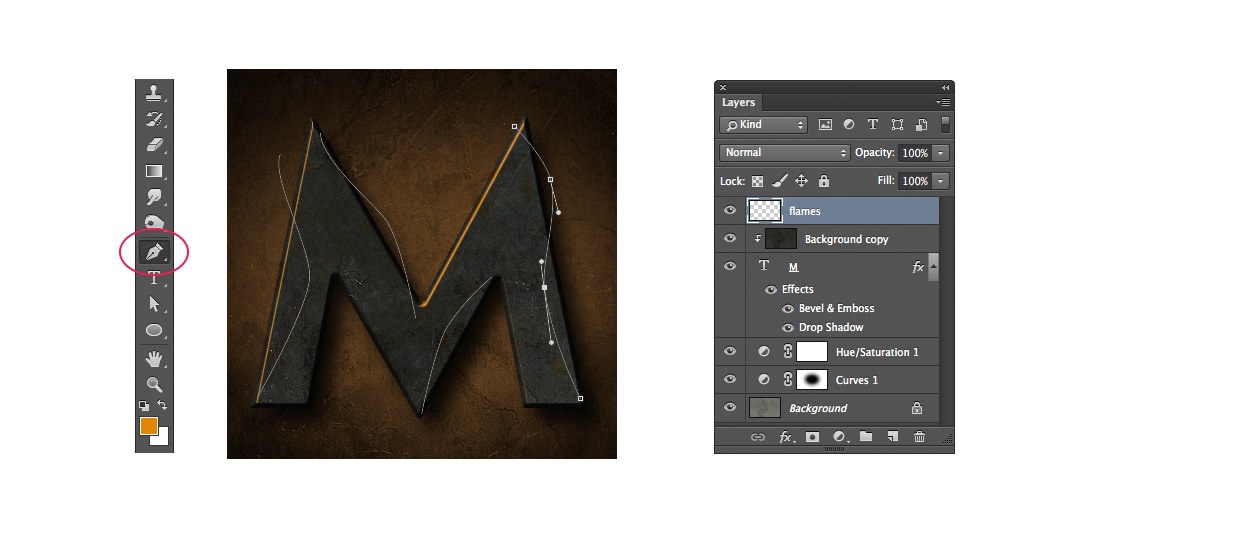
We’ll now create some digital fire to warp around our character, using the fantastic new Photoshop CC Flame Filter, and some custom Paths to indicate the placement and direction of the flames.
Use the shortcut Cmd / Ctrl + Shift + N to create a New Layer called ‘Flames’. Select the Pen tool (P) and in the document, draw out a path up one side of the text character where you want a flame to appear:

Step 13
When you reach the point where you want the flame to end, hold down the Cmd / Ctrl key and click anywhere on the document away from the Path points. To create another flame, draw another Path segment using the same steps, but remember to Cmd / Ctrl + click at the end of each Path segment so that the flames will be rendered individually:
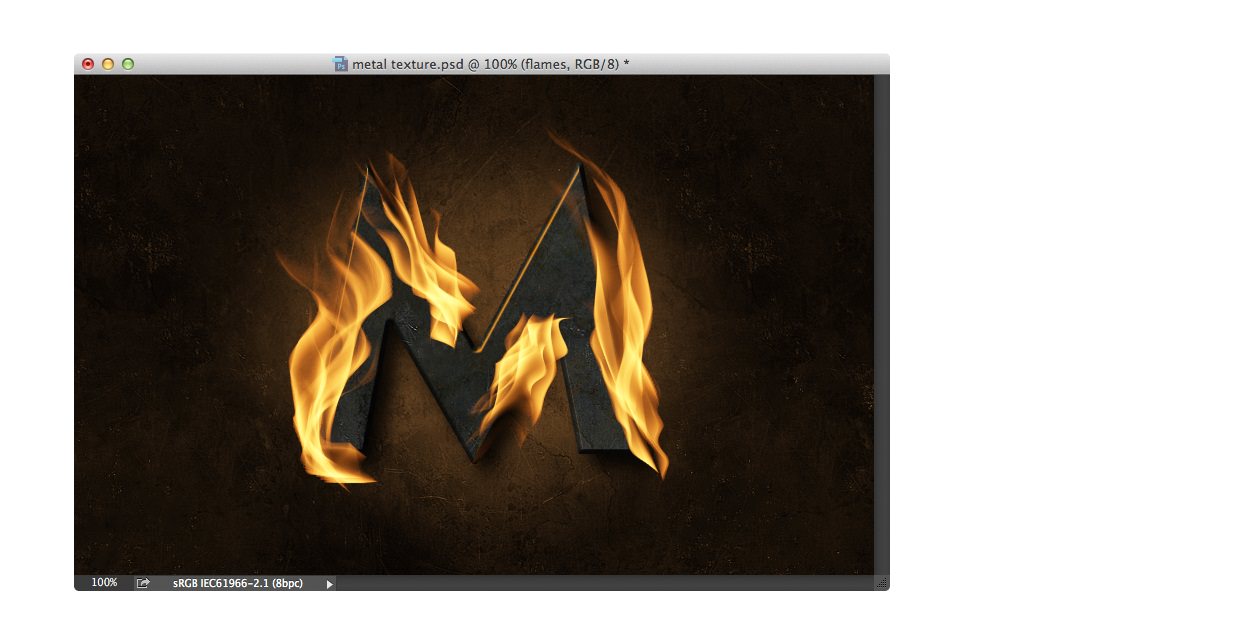
Step 14
Go to the Filter > Render > Flame Filter. In the dialog box, set the following key values:
- Flame Type: One Flame along Path
- Width: 37 px
- Flame Lines: 9
- Turbulent: 66
- Jag: 0
- Opacity: 49

Step 15
The Filter dialog box provides a near infinite range of flame and fire effects, so you should also experiment with adjusting the above settings to create the flame look you want. Once you’ve adjusted the values, click OK to apply the Filter effect:
Step 16
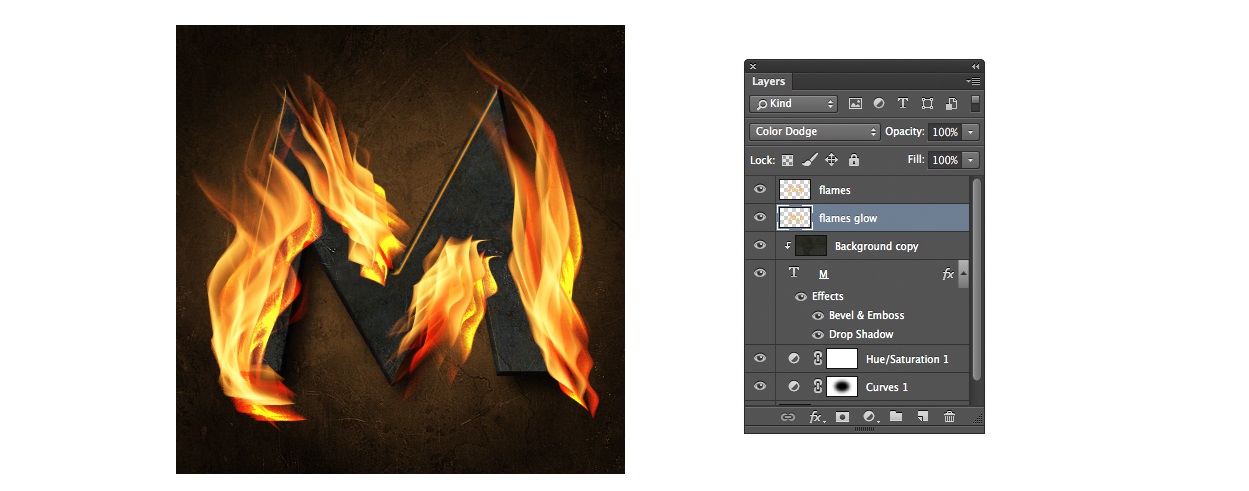
Next we’ll add some extra shading to build up the glow around our flames.
In the Window > Layers Panel, select the flames Layer and use the shortcut Cmd / Ctrl + J to duplicate it.
Step 17
Re-name the copy Layer to ‘Flame Glow’ and move it below the Flames Layer in the Panel list.
Step 18
Change the Blending Mode in the Layers Panel to Color Dodge. Use the Move tool to offset the copy image a little to the right and down.
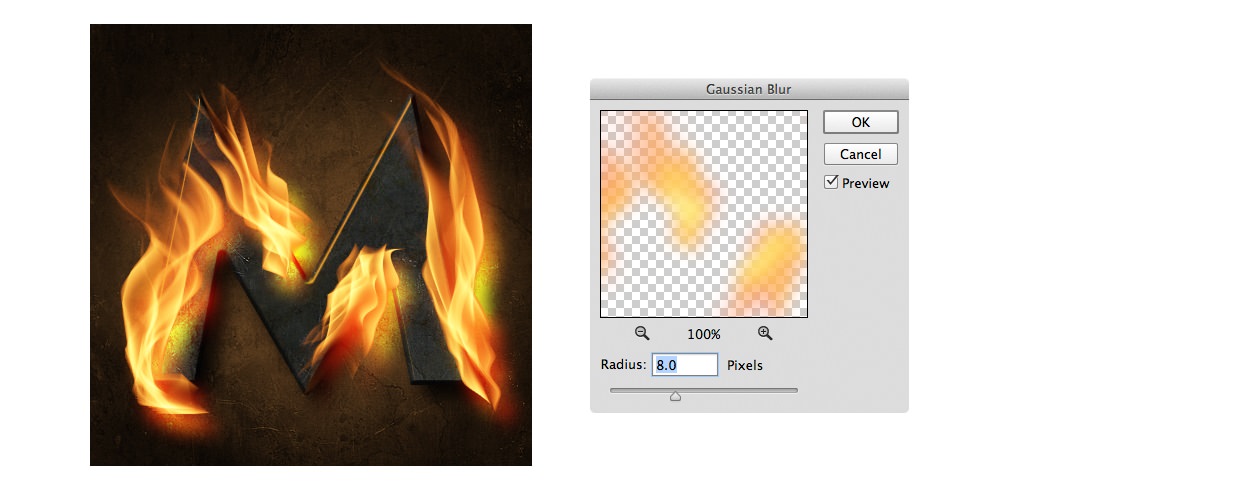
Step 19
Go to the Filter > Blur > Gaussian Blur command. Adjust the Blur Radius to soften the edges of the glow effect. In the example used here, a value of 8.0 was used:
Step 20
To reduce the strength of the Color Dodge effect over the background image, go to the Image menu > Adjustments > Hue and Saturation command.
Step 21
Lower the Saturation slider to remove some of the colour intensity in the glow.
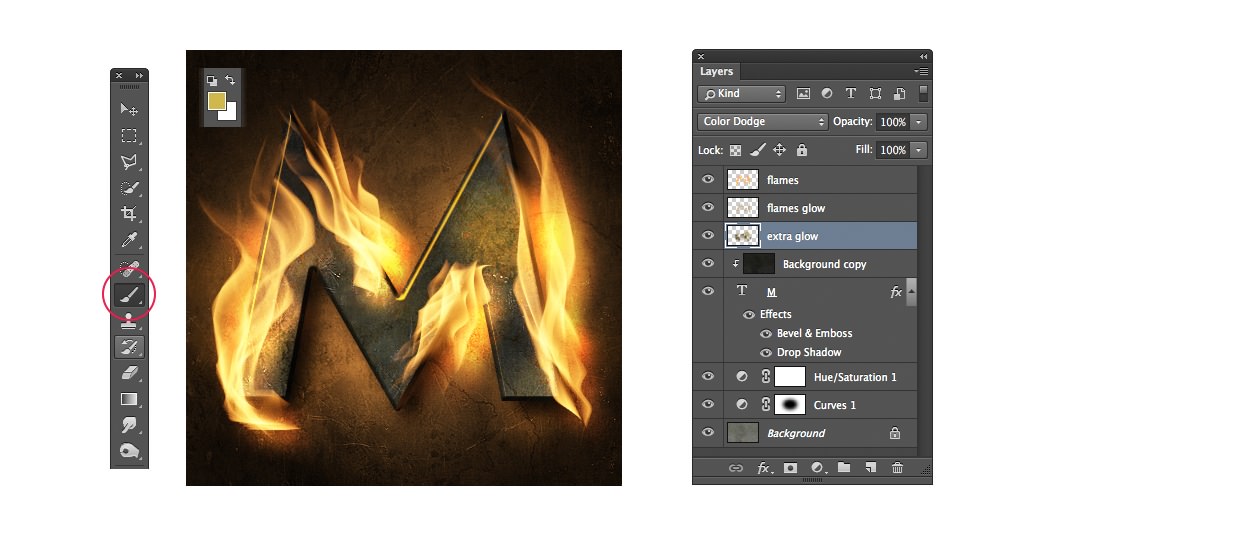
Step 22
Use the shortcut Cmd / Ctrl + Shift + N to create a New Layer. Name it ‘Extra Glow’. In the Layers Panel, move it below the Flames Glow Layer.
Step 23
Change the Layer Blending Mode to Color Dodge.
Step 24
Select the Brush tool (B). In the toolbox, click the Foreground Swatch and change the Colour to CAAF50.
Step 25
Use a large soft brush to paint in some extra glow details around the edges of the flames and over the text character.
The Color Dodge Mode works really well for building up vibrant glow effects, but it’s extremely sensitive to small changes in your paint colour. If the glow effect is too strong, or produces unwanted colour shifts, try reducing the Lightness and/or Hue values for the paint colour in the toolbox until you get the right result.

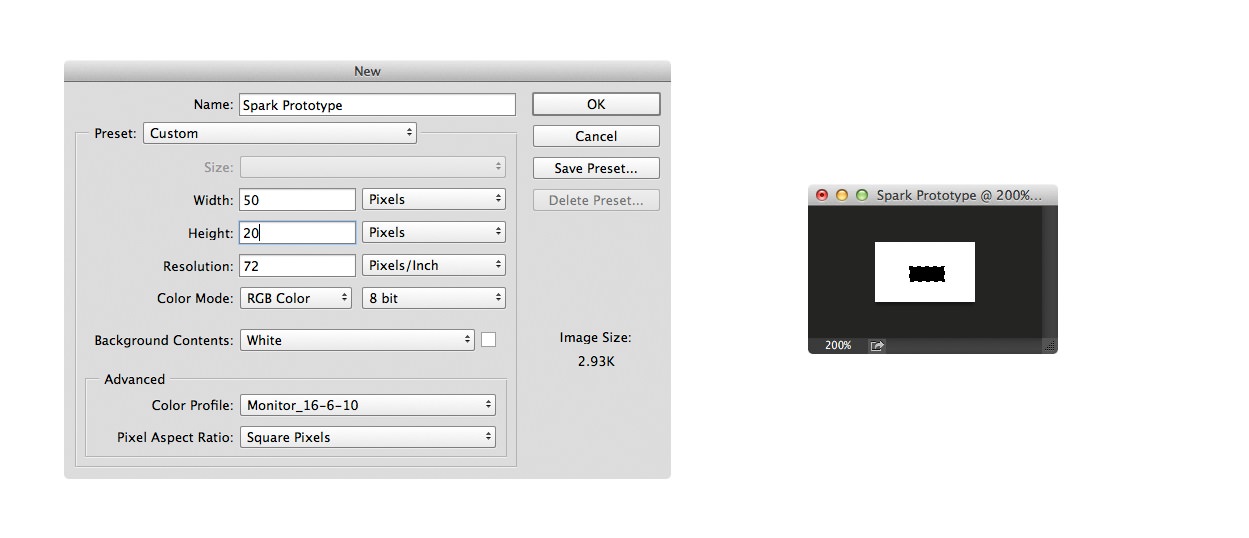
Step 26
For a finishing touch, we’ll add some sparks to the base of the flames using a custom made brush. Use the shortcut Cmd / Ctrl +N to create a new document In the dialog box, set the following properties and then click OK:
- Name: Spark Prototype
- Width: 50 px
- Height: 20 px
- Color Mode RGB
- Background Contents: White
Step 27
Select the Rectangular Marquee tool (M) and draw a small horizontal rectangle in the document.
Step 28
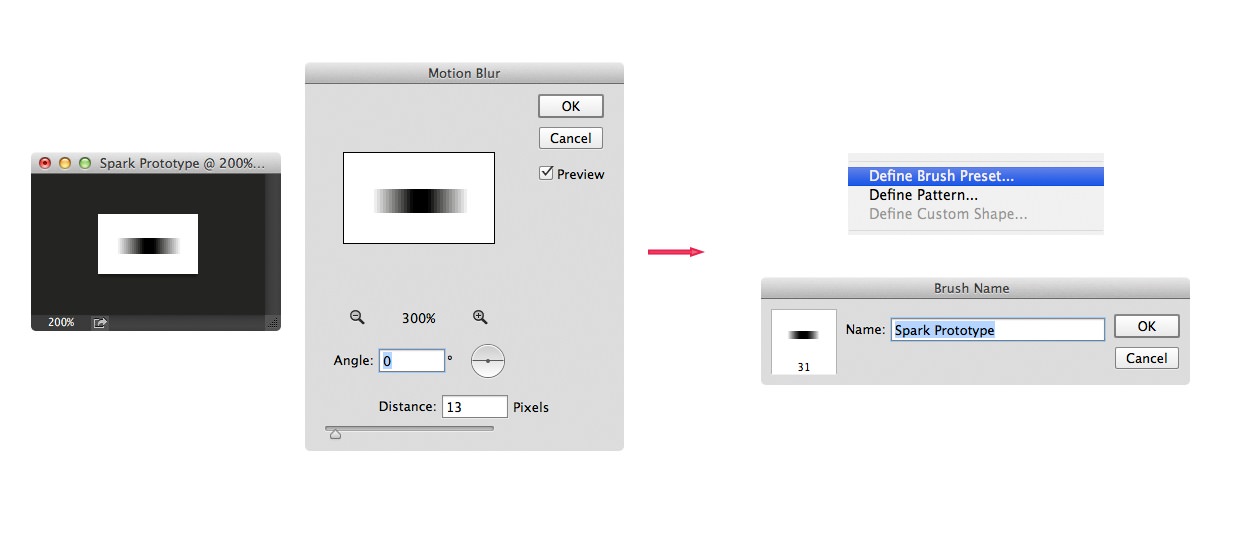
Use the shortcut Cmd / Ctrl + I to invert this area to black. Use the shortcut Cmd / Ctrl + D to remove the selection.
Step 29
To add some movement to the spark prototype, go to Filter > Blur > Motion Blur Filter. Set the distance to 13px, the Angle to 0 degrees and click OK. To save a custom brush from the Spark image, go to the Edit menu > Define Brush Preset command:
Step 30
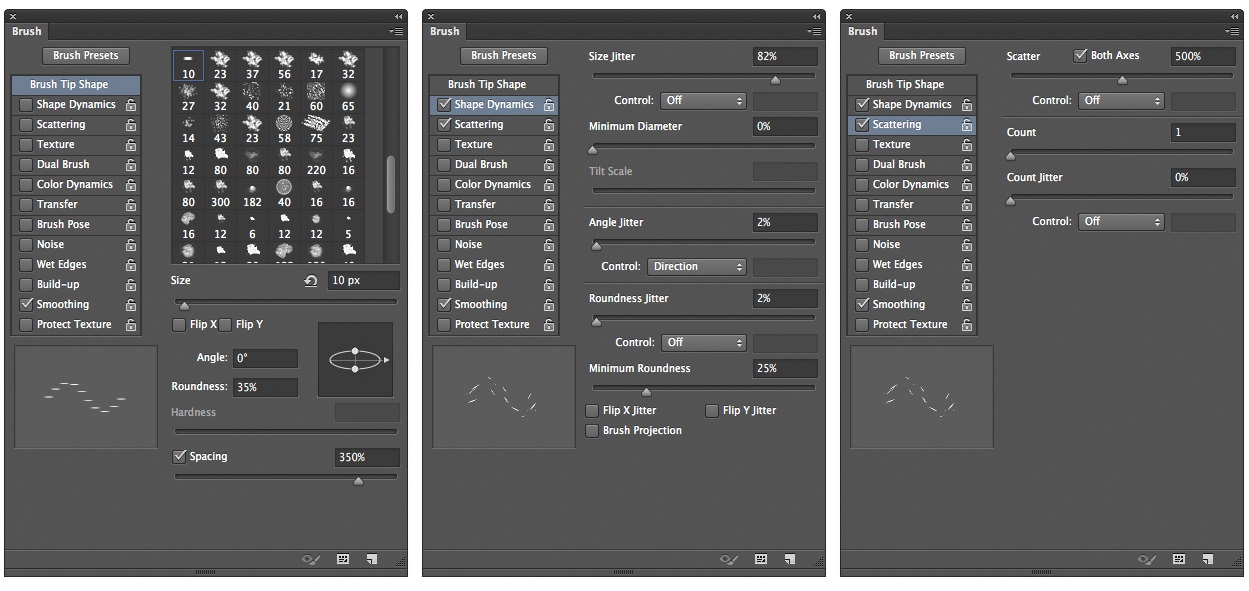
Now swap back to the Flaming text document. Select the Brush tool (B), which should now show our Spark Prototype as the active Brush tip. We’ll need to adjust some of the paint stroke properties for this custom tip to create some realistic spark like effects.
Go to the Window menu > Brush Panel and apply the following values to the Brush Properties:
- Brush Tip Shape
- Size: 10 Px
- Roundness: 35%
- Spacing: 350%
- Shape Dynamics:
- Size Jitter: 100 %
- Angle Jitter 3 %
- Angle Jitter Control: Direction
- Scattering:
- Scatter: 300%
- Both Axes: Ticked
Step 31
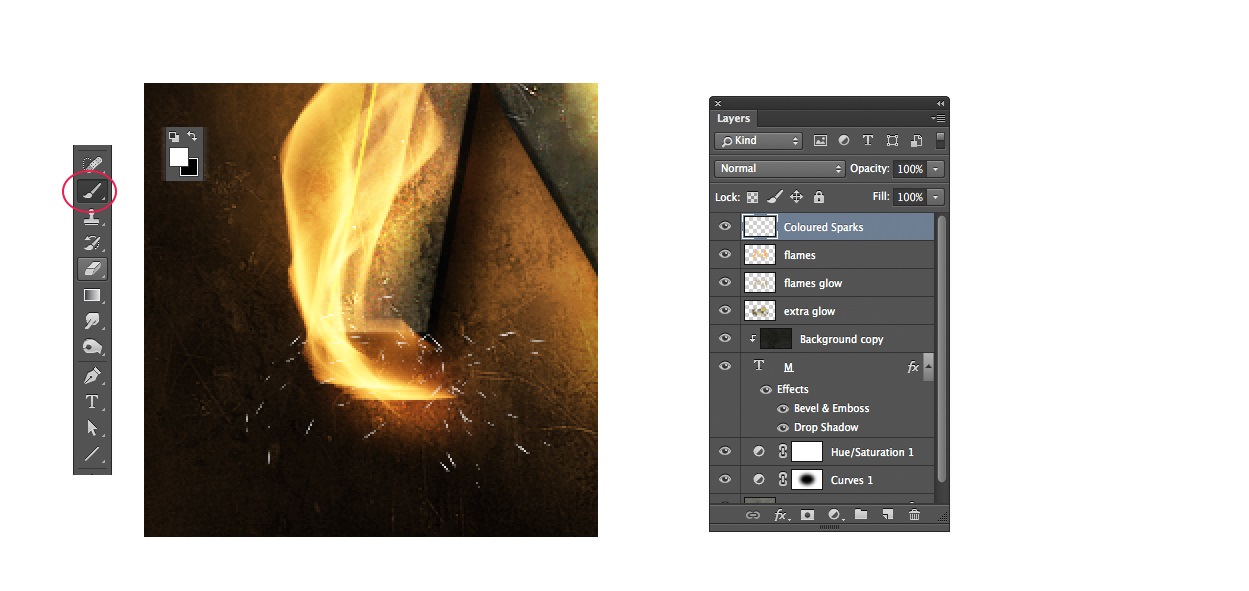
Use the Shortcut Cmd / Ctrl + Shift + N to create a New Layer called ‘ Coloured Sparks’.
Step 32
Set the Foreground Colour to White in the Toolbox. In the document window, start to paint in some sparks around the base of the flames. Start your paint strokes at the base and draw in the direction that you’d like them to travel in either in a straight line or curved arcs. As we’ve set the Angle Jitter Control to ‘Direction’, the sparks should always align to the direction of your mouse movement:
Step 33
As a finishing touch, we’ll add a few colour changes to some of the sparks. On the keyboard, press the ‘/’ key to Lock the Transparent areas of the Sparks Layer from change. Select a soft round paint brush preset, set the size value to 50 px.
Step 34
In the toolbox, set the Foreground colour to EB7E13. Begin to paint around the edges of the spark trails with the Brush tool to add some colour variation to the sparks.
You can continue to paint different orange and yellow hues into the sparks to build up a more complex colour palette as required.

Step 35
Marvel at your results.

More related:
- Glossy Emblem text effects with Photoshop (hongkiat.com)
- 3D-Text in Photoshop (photoshopbuzz.com)
- Avengers text effect with Photoshop (hongkiat.com)