15 Ways to Strengthen Your Privacy in Windows 10
Windows 10 is popular for several reasons including the criticism on some of its features that violate or threaten your privacy. Cortana, though highly useful at times, seeks too much personal information about you like any other personal digital assistant in the market.
That’s not all, Windows 10 has various built-in sharing, feedback and telemetry features that share the user’s information with other partiesbarsay your friends or Microsoft itself. Most people, however, are sensitive about their privacy and like to control their personal data.
Read Also: How to Access Windows 10 Boot Options Menu (6 Ways)
That’s why, in this article, we’re sharing various tips and tricks to help you disable data spies, claim back your privacy and control your data yourself in Windows 10.
Turn off advertisements
Windows 10, like Android and iOS, shows advertisements in apps as well as on the web pages. Cookie spies follow you everywhere on the web and Microsoft displays personalized advertisements using your data collected from many such spies. There’s an option, luckily, to disable these ads and keep your data private.
Here’s how:
- Click the Start button. Go to Settings > Privacy > General > Change privacy options.
- Toggle off "Let apps use my advertising ID for experience across apps".

Opt out of personalized ads
Microsoft assigns a unique, anonymous and user-resettable advertising ID to all its users. This ID is used to track your web usage and help the advertisers to display ads based on your interests throughout the Internet. You can, however, perform these steps to stop the tracking of your web usage and other data in the browsers:
- Open this link in each browser: https://account.microsoft.com/privacy/ad-settings/signedout?ru=https:%2F%2Faccount.microsoft.com%2Fprivacy%2Fad-settings.
- Toggle off these two options in each browser: "Personalized ads in this browser" and "Personalized ads wherever I use my Microsoft account".
Note: Do remember to turn on cookies and turn off ad blockers, else this option won’t work.

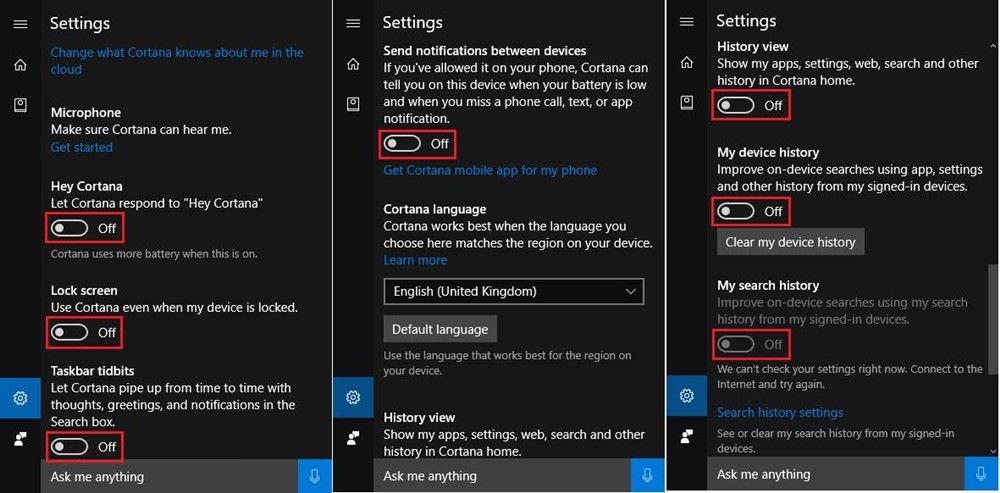
Disable Cortana & taskbar search
Cortana offers various useful services but collects lots of your data to provide you excellent suggestions and search results. If you limit yourself from using such cloud services and don’t want your personal data to reach the cloud (even anonymously), then follow these steps:
- Open Cortana. Go to Settings.
- Toggle off all the options shown in Settings including but not limited to "Hey Cortana", "My device history", and "My search history".
Note: You won’t be able to utilize Cortana’s smart features after you turn these features off.
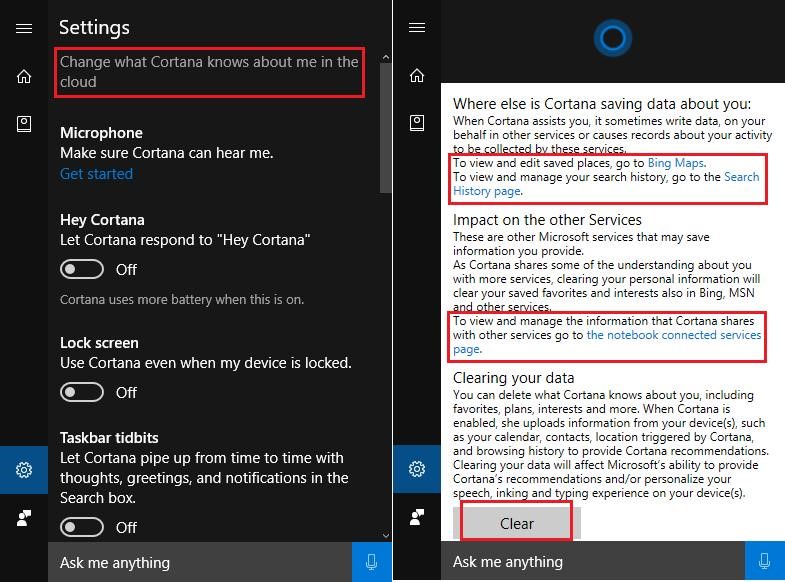
Manage what Cortana knows
Microsoft stores all the information gathered about you by its apps. Contrary to one’s belief, turning off Cortana doesn’t delete the old information stored in the cloud. There’s an option, however, to remove the saved data, which you can do by going through these steps:
- Open Cortana. Go to Settings >"Change what Cortana knows about me in the cloud".
- Scroll to the bottom of the new window and click the Clear button.
- Click the following links to clear search history, favorites and more: "Bing Maps", "Search History page" and "the notebook connected services page".
- In the Cortana’s window, click on the Notebook icon and go to Permissions.
- Click the link "Manage everything Cortana can see and use" and toggle off the following options: "Location", "Contacts, email, calendar, & communication history" and "Browsing history".

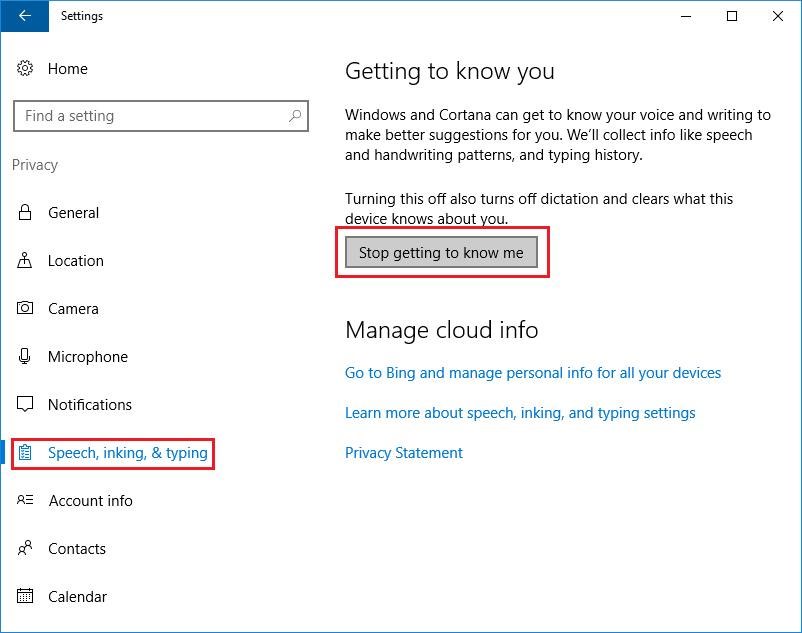
- Click on the link "Speech, inking, & typing privacy settings".
- In the new window, under "Getting to Know You", click on "Stop Getting to Know Me".
Disable Wi-Fi Sense
Microsoft initially designed the Wi-Fi Sense feature for sharing of network passwords with peers and friends, but now the password sharing feature is disabled. Its current function is to suggest and connect to open Wi-Fi hotspots within your range using the crowdsourced information. If you need to disable the same for stronger security, just follow these steps:
- Click the Start button. Go to Settings > Network & Internet > Wi-Fi.
- Under Wi-Fi Sense, toggle off the option "Connect to suggested open hotspots".

Note: If you wish to stop Wi-Fi Sense users from connecting to your Wi-Fi network, append "_optout" to its SSID. For example, if it’s "mynetwork", then change it to "mynetwork_optout".
Disable OneDrive Sync
Microsoft’s OneDrive is a cloud storage service that comes pre-loaded in Windows 10. This eases storing and sharing files from any device, but it backs up all your user data if it’s enabled. That’s why it’s better to turn it off if you’re not a fan of OneDrive and don’t use it as your primary cloud storage.
Here’s how to do it:
- In the system tray, click the up-facing arrow present on the right side.
- Right-click the OneDrive app icon. Select Settings option.
- Uncheck the two options: "Start OneDrive automatically when I sign in to Windows" and "Let me use OneDrive to fetch any of my files on this PC".
- Click OK to save the settings.

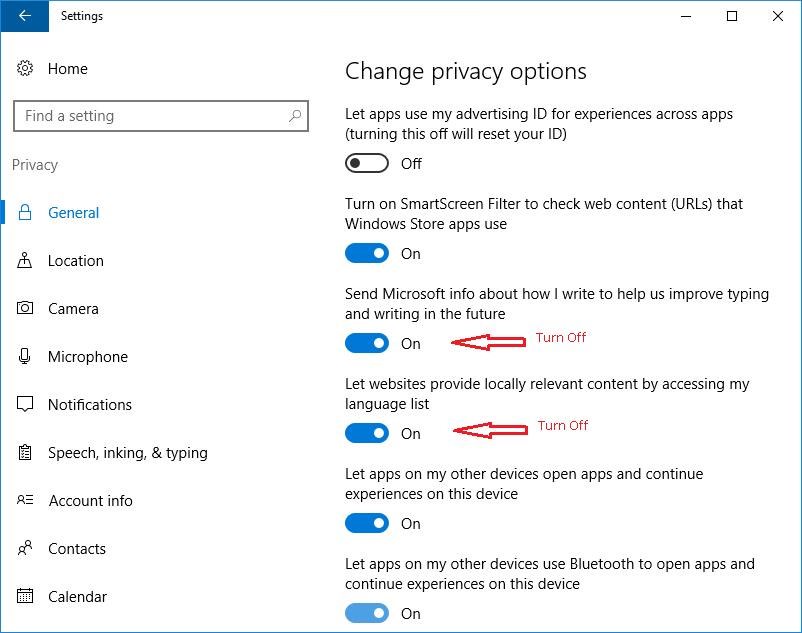
Manage Privacy Options
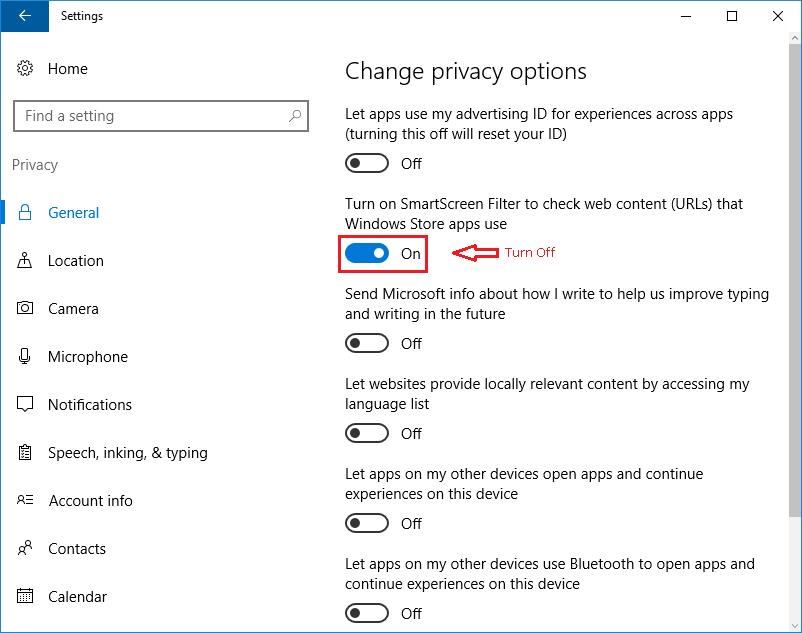
A few other privacy-invading features send data to Microsoft when you visit URLs, type using the on-screen keyboard, use apps, etc. If turned off, these less critical features will have small effect on the user experience hence, it’s better to turn off such options to improve your privacy in Windows 10. Follow these steps to turn off these options:
- Click the Start button. Go to Settings > Privacy > General.
- Under Change privacy options, toggle off two options: "Send Microsoft info about how I write to help us improve typing and writing in the future" and "Let websites provide locally relevant content by accessing my language list".
- Toggle off all listed features like Camera, Microphone, Contacts, Calendar, etc.
Configure Microsoft Edge
Microsoft Edge has data-gathering features like scanning typed URLs, logging keystrokes for typing prediction, integrating Cortana for personalized results and more. These features speed up your browsing and enhance the overall experience. It’s suggested to turn off such features if Edge is not your primary browser or you don’t use or require such features in Edge. Below are the steps to disable such features:
- Open Edge. Click on menu icon (three dots) on the top right.
- Choose Settings > View Advanced Settings.
- In the new window, toggle off "Use Adobe Flash Player".
- Under Privacy and services, toggle off the following:

- "Offer to save passwords"
- "Save form entries"
- "Have Cortana assist me in Microsoft Edge"
- "Show search suggestions as I type"
- "Use page prediction to speed up browsing, improve reading, and make my overall experience better"
- "Help protect me from malicious sites and downloads with SmartScreen filter"

Disable SmartScreen Filters
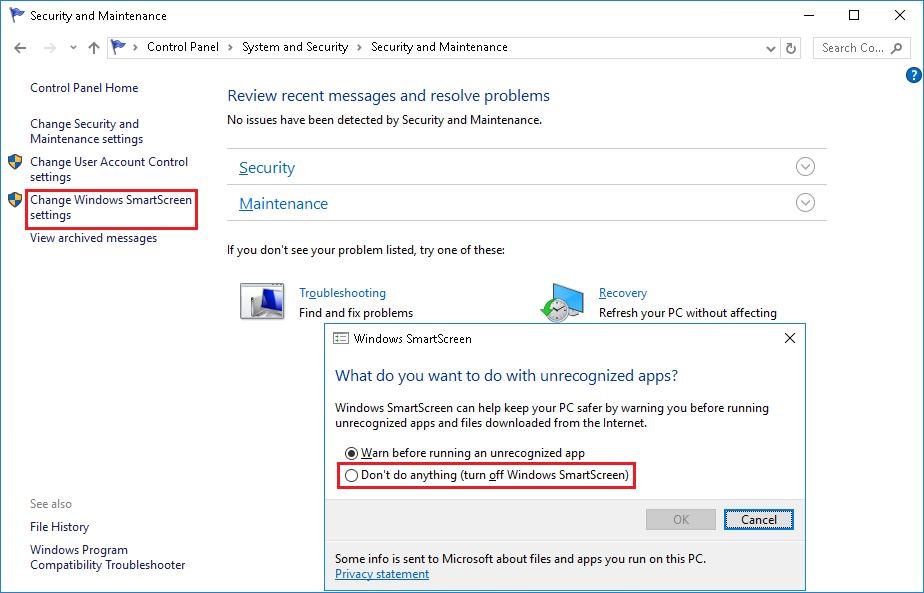
Microsoft receives all information about the URLs you visit or apps you installbarthanks to its SmartScreen filters active in Windows 10. Such filters block malicious sites and downloads by analyzing them, but in the process, your data also reaches the company’s servers. Though it is important to protect against threats, yet if still want to disable these filters, follow these steps:
- Right-click the Start button. Go to Control Panel.
- On the top-right corner, set View by to Category. Navigate to System and Security > Security and Maintenance.
- Select "Change Windows SmartScreen settings" from the left panel.
- Select the radio button "Don’t do anything (turn off Windows SmartScreen)".
- Now, go to Settings > Privacy > General.
- Under "Change privacy options", toggle off "Turn on SmartScreen Filter to check web content (URLs) that Windows Store apps use".
Disable Windows 10 Sync
Windows 10 synchronizes preferences and settings across all of your devices. This means settings like passwords, language preferences, desktop and web browser settings are available on every device you sign in using the same Microsoft account. If you’re, however, not a fan of the cloud and don’t want your data to be synced, follow these steps:
- Open Settings > Accounts > Sync your settings.
- Toggle off "Sync settings" or toggle off individually under ‘Individual sync settings".

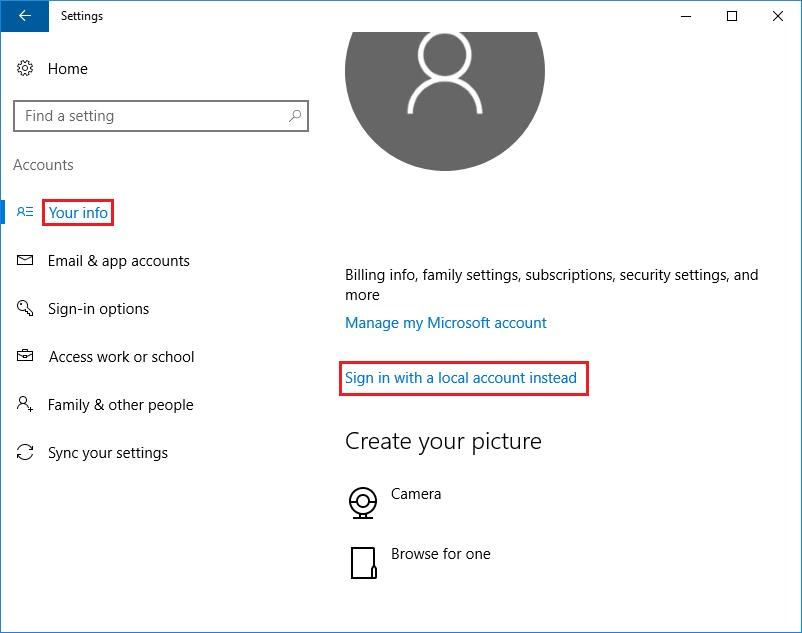
Switch to a Local Account
In Windows 10, Microsoft account lets you sync settings, sign in automatically to the apps, sync your data and do much more. However, this also means that your data is synced online, apps can see your info and more such privacy issues. That’s why, if you don’t use the online account’s features, then it’s better to turn it off.
Here’s how to switch to a local account in Windows 10:
- Open Settings > Accounts > Your info.
- Select "Sign in with a local account instead" and follow the on-screen wizard.
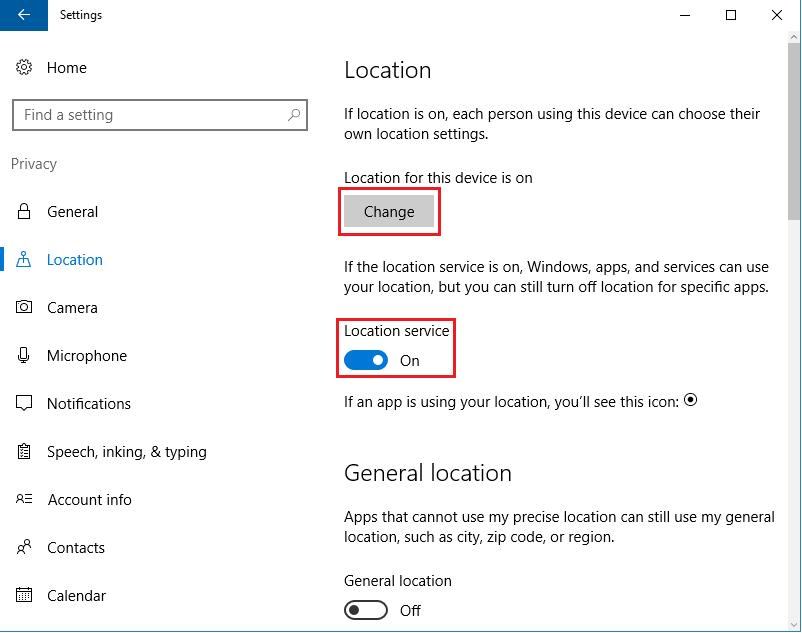
Turn off Location permission
Location permission helps apps and services deliver location-relevant information and other services like weather forecasts, local news and more. Though found okay by many people, some of us don’t want to share the location with apps or websites. If you too are conscious about your location, then simply turn off the location access using these steps:
- Open Settings > Privacy >Location.
- Click the Change button, toggle off "Location service".
- Click the Clear button under Location History.
Configure Windows Update
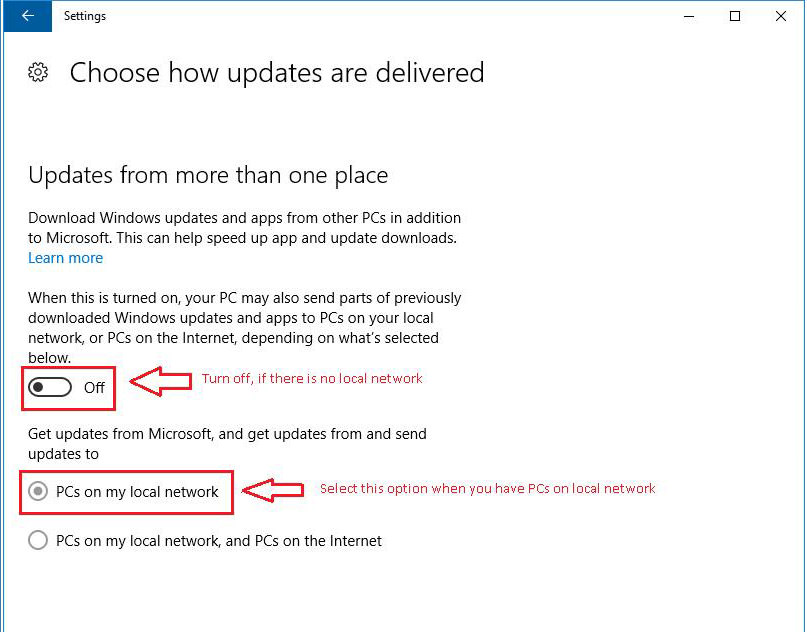
Windows allows peer-to-peer sharing for Windows Update. That means the peers on your local network or the Internet can download the updates from your computer. Fortunately, there’s an option to turn off update sharing and here are the steps:
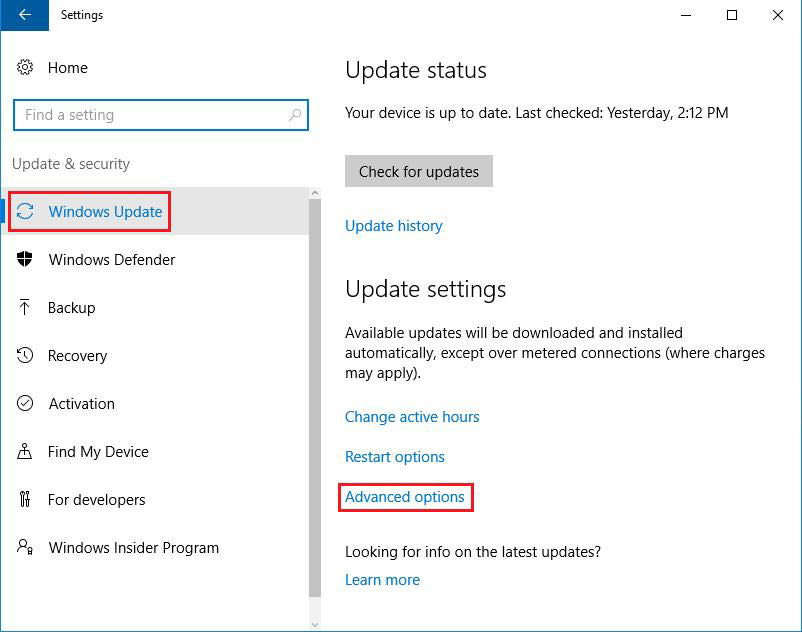
- Click Start button. Go to Settings > Update & Security > Windows Update.
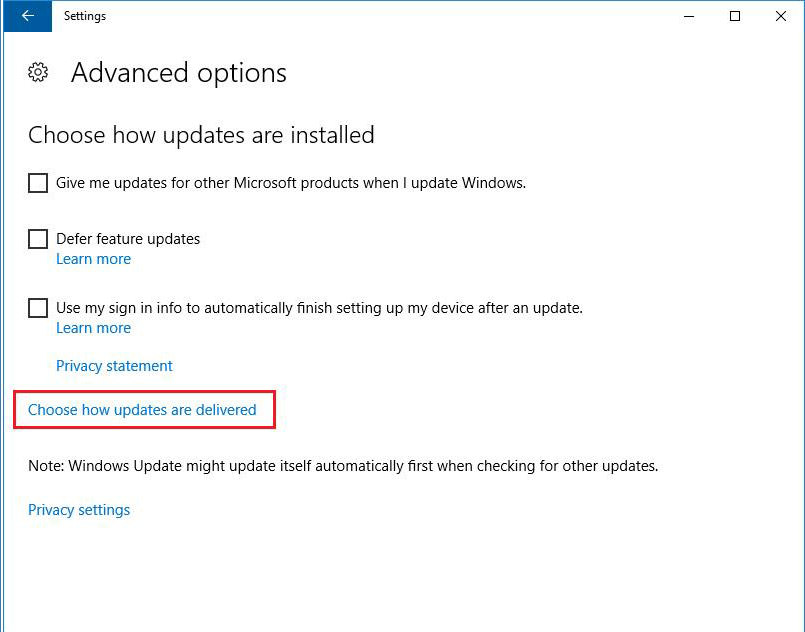
- In the right panel, under Update settings, click Advanced Options.
- In the new window, click "Choose How Updates Are Delivered".
- Select the radio button next to the option "PCs on my local network" and toggle off the button above the radio button named Off.
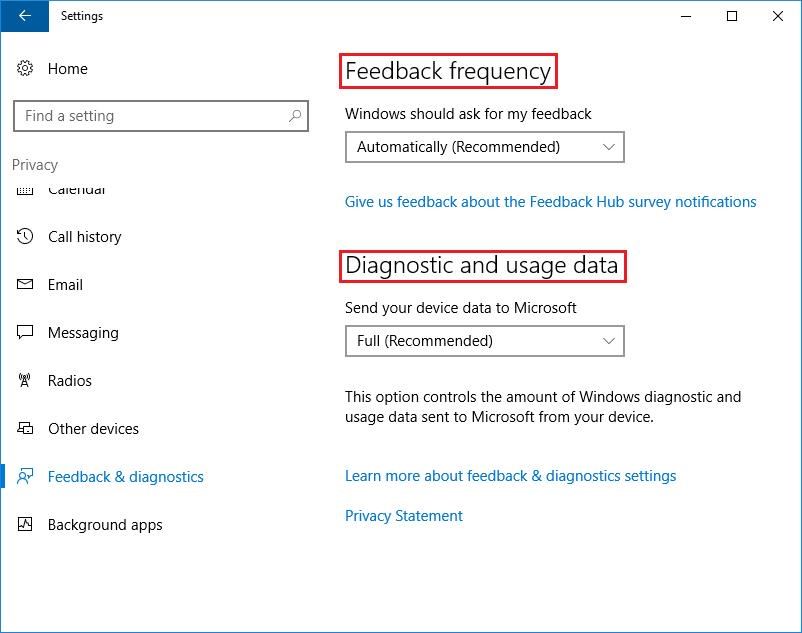
Disable Feedback & Diagnostics
Windows sends diagnostic data to Microsoft’s servers for troubleshooting performance issues and improve its services. The data sent includes information about apps, memory snapshots, etc.
Though irrelevant, many people prefer not to share anything from their PC to any company’s server. If you too dislike sending feedbacks, follow these steps:
- Click the Start button. Go to Settings > Privacy > Feedback & diagnostics.
- Change "Feedback frequency" to Never.
- Change "Diagnostic and usage data" to Basic.
Try out Spybot’s Anti-Beacon
Spybot’s Anti-Beacon blocks and stops various data tracking (telemetry) features of Windows 10. This utility curtails the operating system from sending anonymous information about your system to Microsoft and hence, saves us from tracking.
Though the company claims to collect this data for keeping your devices secure and improving the user experience and services, yet many of us aren’t comfortable in sharing data for any reason, even if done anonymously. That’s why you can activate Spybot’s Anti-Beacon and be safe using the given steps:
- Download it from https://www.safer-networking.org/spybot-anti-beacon/.
- Install the program and open Spybot’s Anti-Beacon.
- Click the Immunize button on the opening screen.
Some finishing points
Though the above features are annoyingly snoopy, turning them off restricts their use and hence, you may notice some apps or other things requiring one or more of these enabled. In such situations, if you really require that feature or tool, enable the settings but if you are wary of the features offered by Windows 10 or want ultimate privacy, just keep them off.
Do you know any other privacy-invading feature of Windows 10? We’d love to hear from you.