Batch Rename Filenames on Mac with NameChanger
Renaming multiple files on your Mac can be a tedious job especially when the system itself is quite limiting. Of course, creating a custom script on your Mac can help solve this but it is not for the average user. If you do not wish to rename each and every single file one by one, then NameChanger has the solution to deal with large number of files that require name changes.
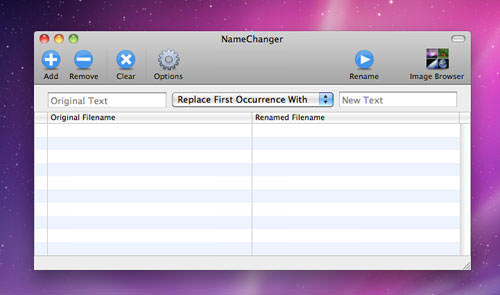
NameChanger is a desktop application that simplifies the process of renaming multiple files at once. The process is easy and it even provides sequential renaming of files. You can also reorganize the file sequence by drag-and-drop, get real-time preview of every change and a whole lot more.
In this tutorial, we will guide you on how you can easily change the names of multiple files simultaneously and in sequence on your Mac.
Best Tools for Bulk Renaming Files in Windows
In our day-to-day work, the ability to perform an action on many files or folders at once can... Read more
Get NameChanger
Before you proceed with this tutorial, you will need to install NameChanger on your Mac. Simply head over to the download page and proceed with installation (Mac will automatically install the application once the download is complete).
Add files to NameChanger
When installation is done, you are ready to rename multiple files at the same time via one of two ways:
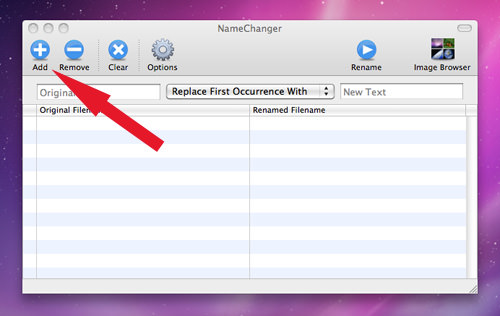
A. Select files from NameChanger
Open the NameChanger application and click on the ‘Add’ button to select files.
B. Drag files to NameChanger
Alternatively, you can also add files by dragging selected files into NameChanger.

Renaming Files
The selected files will be placed under the ‘Original Filename’ column on the left of the application window. To the right is a column called ‘Renamed Filename’, where you will be able to review the new filename if you change it. The review is in real-time mode.
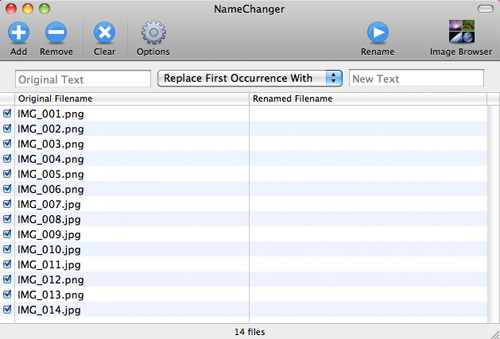
Note that the filename as shown above are numbered in sequence with the same prefix IMG_, so changes can be done easily, but it can get tricky if existing filenames have long and/or randomized numbers.
There are a number of styles to change your filenames with NameChanger and in this tutorial, we will focus on changing filenames in ‘Sequence’ mode.
1. Hide Extension (Optional)
Some files may be in .png or .jpg format, but to make it easier for you to read and rename the filename, you need to hide the extensions.
-
Click on ‘Options’ to open the options window.
-
Tick on ‘Hide Extensions’. Once ticked, you will see that the ‘Original Filenames’ are now listed without extensions.

2. Change mode to Sequence
The default mode to change filenames is ‘Replace First Occurrence With’ as selected at the dropdown menu in the application window. To change mode to ‘Sequence’, simply click on the dropdown menu and select ‘Sequence’.
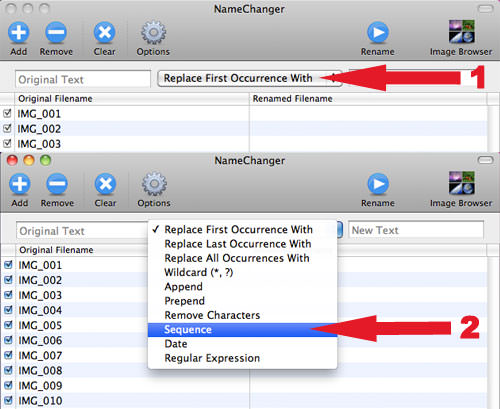
When you have selected the mode to ‘Sequence’, a new option panel will pop up as follow.
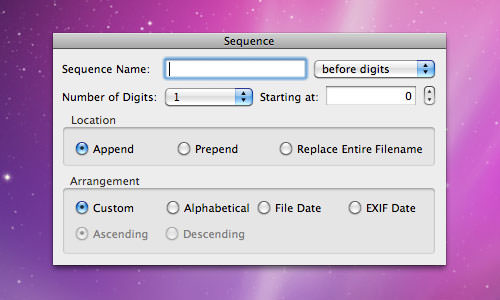
3. Sequence Panel
At the Sequence panel, there are several items you can control. Let’s say our objective here is to rename the filenames from IMG_XXX to Perth_XX. For the benefit of our readers, we shall split these filenames into two parts: the prefix IMG_, and sequence XXX, so this tutorial can be more easily understood.
There’re only 4 items you need to touch on the Sequence panel:
-
Firstly at the ‘Sequence Name’, rename the files to Perth_. This will replace the prefix IMG_ all at once (although not before you complete the changes).
-
For ‘Number of Digits’, select ’02’ for two digits. The other options are 1, 003, 0004 and so on.
-
For the section ‘Starting at’, toggle the value to 1, so your image sequence will start from 01 instead of 00.
-
At the Location tab, toggle the selection to ‘Replace Entire Filename’, and this will replace the original name IMG_001 and replace it with Perth_01.

When the changes are done, you can preview the new filenames in your application window under the ‘Renamed Filename’ column.
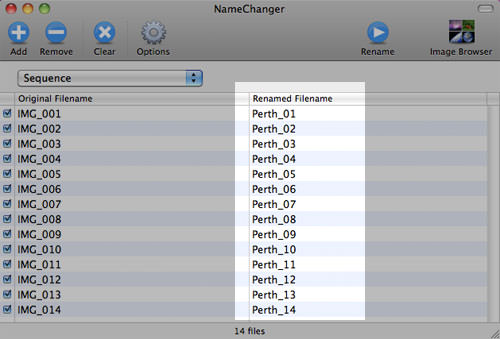
The new filenames has now been changed to the prefix Perth_ with a two-digit sequence.
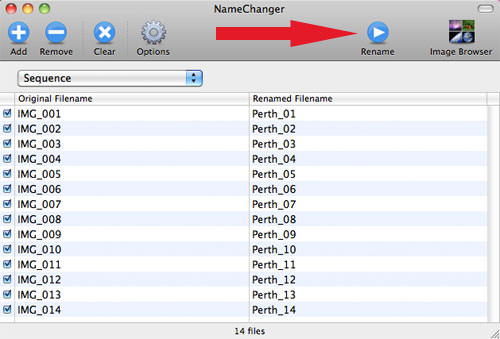
4. Rename files
When you are satisfied with the changes, click on the ‘Rename’ button to complete the name change.
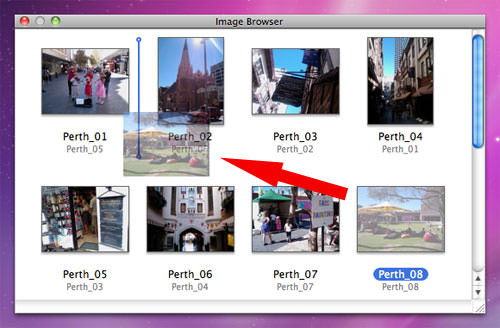
5. Reorganize sequence (additional)
Should you want to reorganize the sequence of your files, simply click on ‘Image Browser’ at the top right corner of the application window.
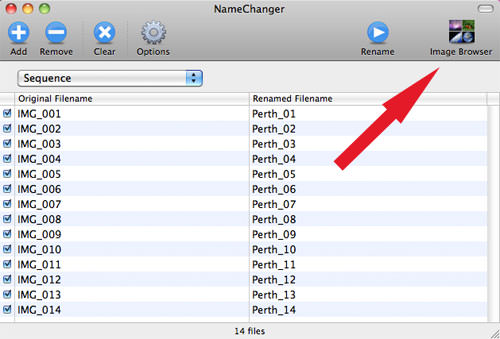
A new pop-up window will appear with a preview of your image files. Drag any file to change its position, and NameChanger will automatically update the sequence number of the files following the sequence you have organized.
Conclusion
Renaming multiple files and reorganizing the positions of photographs are now made easy with the help of NameChanger, which makes a lot of difference, especially when you are dealing with hundreds of photo for your digital album. It not only works for photos; it can be used to rename any type of files.