How to Set Up Google Ad Manager on Your Blog or Website
If you earn revenue from your website or blog, you probably use banner ads. These ads are either updated manually by adding images and URLs into the source code, or through external ad-serving scripts like OpenX or OIO Publishers.
Google offers a similar service called the Google Ad Manager. In simple terms, it is a free service that helps you manage banner ads. It also includes a comprehensive inventory report module. Ad Manager integrates with AdSense, allowing webmasters to serve AdSense ads if there’s no banner for a particular slot. Here are some advantages of using Google Ad Manager:
- Ad Targeting ability. You can control who sees the ads based on geographical location, browser type, or language preference.
- Efficient ad serving. No script installation is required. Everything, including the creatives, is hosted by Google. This saves space and bandwidth and ensures that banners are delivered quickly.
- Multi-user support. You can assign multiple salespersons to handle sales, with all activities documented and recorded within Google Ad Manager.
- Simple User Interface. Like other Google services, Ad Manager has a straightforward and easy-to-understand interface.
If you believe that Google Ad Manager could help manage advertisements on your website or blog, we will show you how to set it up from scratch. Full guide after the jump.
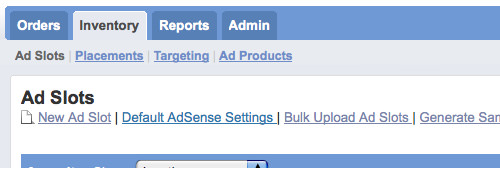
Create Ad Slots
Ad Slots are the reserved spaces on your site for ad placements. If you want to insert four 125×125 banners on your sidebar, you need to create four ad slots. At hongkiat.com, we have eight 125×125 image banners. This means we’ll need to create eight different ad slots. Let’s get started.
- Under Inventory -> Ad Slots, click on New Ad Slots.
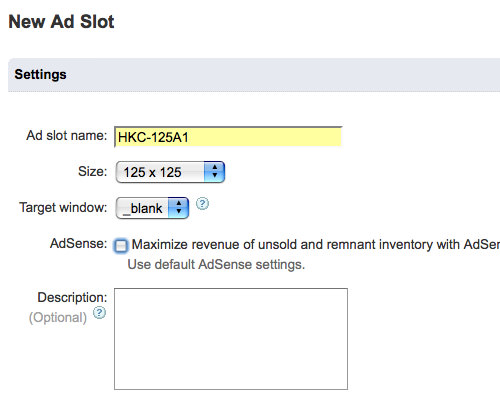
- Compulsory fields: Give your slot a unique Ad slot name. Select the banner size from the drop-down menu, or create a custom size if needed. Choose whether the banner should open in a new window (_blank) or in the current window (_top) upon click.
- Optional fields: Check the AdSense checkbox if you want to maximize revenue on the slot with AdSense, but we recommend not doing this for now. Provide a meaningful description for the Ad Slot, or skip this if your Ad slot name is descriptive enough.
- Save it.
Repeat steps 1, 2, and 3 to create all the ad slots you need. In our case, we will create eight ad slots with different names. Here’s how one of them looks.
Once you have created all your ad slots, here’s how your Inventory page will look. Next, we will create ad placements.

Create Ad Placements
Ad Placements group your ad slots together. For hongkiat.com, since we have eight 125×125 banners on the sidebar, we’ll need one ad placement to hold them together. Ad placements also ensure each ad gets a fair chance of being in the top position if you set them to rotate. Here’s how you create an ad placement.
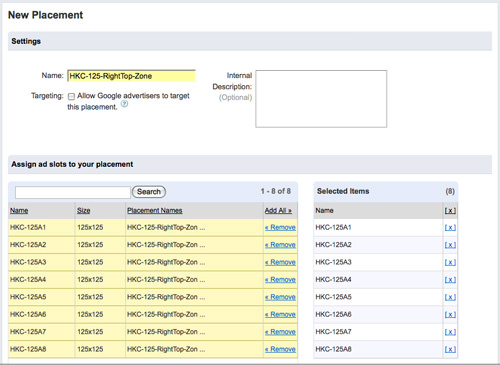
- Under Inventory -> Placements, click on New Placement.
- Compulsory fields: Give your ad placement a meaningful name. For example, we named ours "HKC-125-RightTop-Zone" because it will store all 125×125 banners positioned at the top right corner of the blog.
- Optional fields: If you allow AdSense to bid for ad slots in this placement, check Targeting, otherwise, uncheck it. The Internal Description is for personal use only, helping you understand your ad placements better.
- Add all ad slots that belong to this new ad placement you’ve created. In our case, we added all.
- Save it.
Here’s a sample of how our Ad Placement settings look.
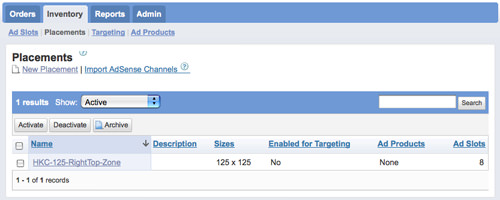
Once you save your ad placement, you’ll return to the Inventory -> Placements main page, which looks like this.
Here’s a quick summary: You’ve created the necessary Ad Slots and grouped them under an Ad Placement. The next step is to add “real” banners into each of these ad slots.
Create Orders
Orders
Think of Orders as banner order requests. They store information about who the advertisers are, the start and end dates of the ad campaigns, and more. When an advertiser places an order for a banner ad on your website, you create a new Order. If you have eight Ad Slots, expect to create up to eight different Orders. Makes sense? Let’s create some Orders.
- Under Orders, click on New Order.
- Compulsory fields: Give each order a Order name and External ID that you can easily recognize. Specify when the banner will start and end by choosing the Start date and End date. Choose unlimited if it’s likely to be permanent.
- Optional fields: You might also want to fill out the Advertiser, Agency, Contacts, User Assignments, and Notes to help you understand the Order better.
- Save it.
Now we’ll create a Line Item for this order.
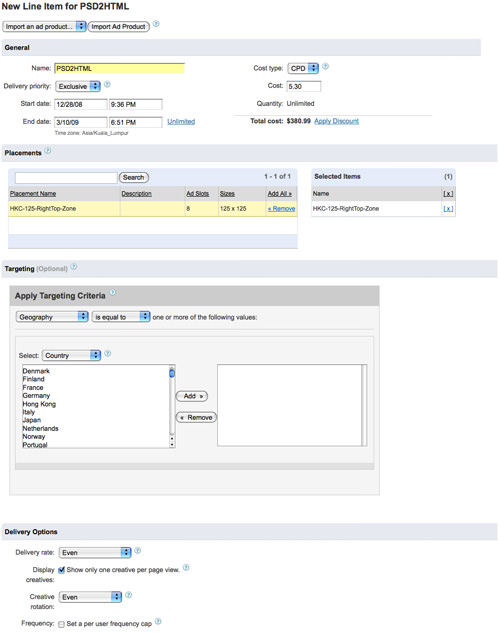
Line Items
Line Items are associated with Orders. Every time an Order is entered, you’ll need to create a Line Item for it. Line items allow you to determine the nature of the ad, whether it’s serving as CPC, CPM, or CPD. You also set the cost/price for the ad here.
Every time you hit the Save button after creating an Order, you’ll be directed to create a Line Item.
- Click New line items.
- Give it a Name.
- Determine the Delivery Priority. If your order is a direct ad, change to Exclusive from the drop-down box so you can use CPD (Cost per Day).
- Make sure you’ve correctly entered the Start date and End date.
- Under the Placement section, associate the Line Item with its respective placement.
- The Targeting section allows you to control who should see the ad. In other words, under what conditions the ad will appear on your website. This setting is optional; by default, the ad will be visible to all.
- The Delivery Options section determines the appearance of the ad. Setting the Delivery rate and Creative rotation to Even will ensure all your orders get equal impressions.
- Save it.

Here’s how your line item will look.
A quick recap before we continue: We’ve created an Order with advertiser information and campaign start and end dates. Then we created a Line Item for the Order where it stores information like cost type (CPC, CPM, CPD), cost, targeting behaviors, etc. The next step is to add creatives for the ad.
Creatives
Creatives are the images of the ads. Every time a Line Item is added, you’ll need to add (and approve) at least one creative for it.
- After saving a Line item, click on need creatives to add an image for the ad.
- Fill in the Name, Ad slot size (banner size), Creative type, and Manual Weight (if you need to control the priority of banner rotations).
- Save it.
The Creative type determines how you serve the banner image. Google Ad Manager can host your banners internally (whether they are jpg, flash, gif, or png) or you can host them elsewhere and insert the image URL. Use rich media if you need to manually insert HTML codes.
Here’s a sample of how the creative upload page should be filled.

Remember to Approve and activate the creative.
Repeat all the steps in Orders, Line Items, and Creatives for every individual banner. In our case, we will repeat this eight times to fill up all our ad slots.
Display Banners
Here’s the final step before ads start showing on our website – generating the codes and pasting them into our source code.
- Go to Inventory -> Ad Slots and click on Generate Sample HTML.
- Add all slots needed to the Selected Items section.
- Click Generate Sample HTML.
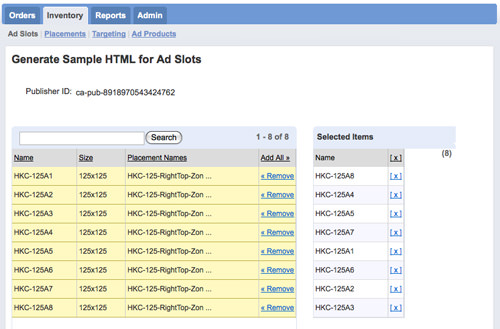
Scroll to the bottom to find your generated codes. They should look something like this:
<html>
<head>
    <!-- PUT THIS TAG IN THE head SECTION -->
    <script type="text/javascript" src="http://partner.googleadservices.com/gampad/google_service.js"></script>
    <script type="text/javascript">
        GS_googleAddAdSenseService("ca-pub-8918970543424762");
        GS_googleEnableAllServices();
    </script>
    <script type="text/javascript">
        GA_googleAddSlot("ca-pub-8918970543424762", "HKC-125A1");
        GA_googleAddSlot("ca-pub-8918970543424762", "HKC-125A2");
        GA_googleAddSlot("ca-pub-8918970543424762", "HKC-125A3");
        GA_googleAddSlot("ca-pub-8918970543424762", "HKC-125A4");
        GA_googleAddSlot("ca-pub-8918970543424762", "HKC-125A5");
        GA_googleAddSlot("ca-pub-8918970543424762", "HKC-125A6");
        GA_googleAddSlot("ca-pub-8918970543424762", "HKC-125A7");
        GA_googleAddSlot("ca-pub-8918970543424762", "HKC-125A8");
    </script>
    <script type="text/javascript">
        GA_googleFetchAds();
    </script>
    <!-- END OF TAG FOR head SECTION -->
</head>
<body>
    <p>Sample Text before slot HKC-125A1</p>
    <!-- PUT THIS TAG IN DESIRED LOCATION OF SLOT HKC-125A1 -->
    <script type="text/javascript">
        GA_googleFillSlot("HKC-125A1");
    </script>
    <!-- END OF TAG FOR SLOT HKC-125A1 -->

    <p>Sample Text before slot HKC-125A2</p>
    <!-- PUT THIS TAG IN DESIRED LOCATION OF SLOT HKC-125A2 -->
    <script type="text/javascript">
        GA_googleFillSlot("HKC-125A2");
    </script>
    <!-- END OF TAG FOR SLOT HKC-125A2 -->

    <p>Sample Text before slot HKC-125A3</p>
    <!-- PUT THIS TAG IN DESIRED LOCATION OF SLOT HKC-125A3 -->
    <script type="text/javascript">
        GA_googleFillSlot("HKC-125A3");
    </script>
    <!-- END OF TAG FOR SLOT HKC-125A3 -->

    <p>Sample Text before slot HKC-125A4</p>
    <!-- PUT THIS TAG IN DESIRED LOCATION OF SLOT HKC-125A4 -->
    <script type="text/javascript">
        GA_googleFillSlot("HKC-125A4");
    </script>
    <!-- END OF TAG FOR SLOT HKC-125A4 -->

    <p>Sample Text before slot HKC-125A5</p>
    <!-- PUT THIS TAG IN DESIRED LOCATION OF SLOT HKC-125A5 -->
    <script type="text/javascript">
        GA_googleFillSlot("HKC-125A5");
    </script>
    <!-- END OF TAG FOR SLOT HKC-125A5 -->

    <p>Sample Text before slot HKC-125A6</p>
    <!-- PUT THIS TAG IN DESIRED LOCATION OF SLOT HKC-125A6 -->
    <script type="text/javascript">
        GA_googleFillSlot("HKC-125A6");
    </script>
    <!-- END OF TAG FOR SLOT HKC-125A6 -->

    <p>Sample Text before slot HKC-125A7</p>
    <!-- PUT THIS TAG IN DESIRED LOCATION OF SLOT HKC-125A7 -->
    <script type="text/javascript">
        GA_googleFillSlot("HKC-125A7");
    </script>
    <!-- END OF TAG FOR SLOT HKC-125A7 -->

    <p>Sample Text before slot HKC-125A8</p>
    <!-- PUT THIS TAG IN DESIRED LOCATION OF SLOT HKC-125A8 -->
    <script type="text/javascript">
        GA_googleFillSlot("HKC-125A8");
    </script>
    <!-- END OF TAG FOR SLOT HKC-125A8 -->
</body>
</html>
Follow the instructions stated in the comments to insert the codes into their respective <head> and <body> sections.
Note: To prevent errors and avoid disrupting your live site, it’s a good idea to copy the generated codes and paste them into a blank HTML file to test the output. If the ads do not show up, it might be because the current time is not yet the start date set in your Orders and Line Items.
It’s done! You are now managing your website banners with Google Ad Manager. Log in again a few days later to check on the performance.
If you have any other questions, drop a comment, and I’ll try my best to help.