4 Methods to Fix Bad-quality Videos
As screen resolutions continue to improve, grainy, low-quality videos really stand out like a sore thumb. Now, more than ever, it’s crucial to ensure your videos are crisp and clear, providing the best viewing experience to your audience or anyone you wish to share them with.
Don’t worry if your videos aren’t perfect. Many of us have old videos taken with lower-spec phones that don’t measure up to today’s standards.
However, there’s hope for those precious memories.
This guide is for anyone looking to breathe new life into low-quality videos and cherished clips from the past.
Why Your Videos Look Bad
First, let’s understand why some videos appear to be of poor quality. There are several reasons for this, including videos taken on older phones with less sophisticated lenses, unstable handheld shooting, or quality reduction due to compression during transfer.
Here’s a closer look at common factors that can affect video quality.
Low Resolution
Low resolution results in videos that look blurry and distorted. This is common in videos captured with low-quality cameras, like many from our childhood.
Additionally, improper editing can worsen video quality. Also, as we move towards a world where 4K is becoming standard, even 1080p can seem dull in comparison. So, resolution plays a big part in video quality.
Low Framerate
Improper frame rate and shutter speed can also degrade video quality during recording. A general rule is to set the shutter speed to double the frame rate-for instance, 1/60 for a 30 fps video or 1/120 for a 60 fps video. This helps ensure your video remains smooth, blur-free, and without any flicker.
Compression Issues
Compressing a video for uploading to a specific platform can impact its quality. This usually occurs when an improper compression algorithm is used, highlighting the importance of appropriate compression techniques.
Unsupported Encoding
Using incorrect compression codecs can lead to poor video quality, often introducing glitches and artifacts. In some cases, this may even prevent the video from playing correctly.
Encoding Errors
Encoding errors can cause issues with audio synchronization and overall video quality, especially when the video’s format is changed during compression.
Can I Enhance Video Quality for Free?
Sure, you can.
We are now living in a world where almost any technical problem you have comes with a workaround and a solution, given the right tool. Speaking of the right tool, Tenorshare 4DDiG File Repair Tool is one such tool you can leverage to remedy bad quality video.
Also, we will discuss some other methods that work great as well.
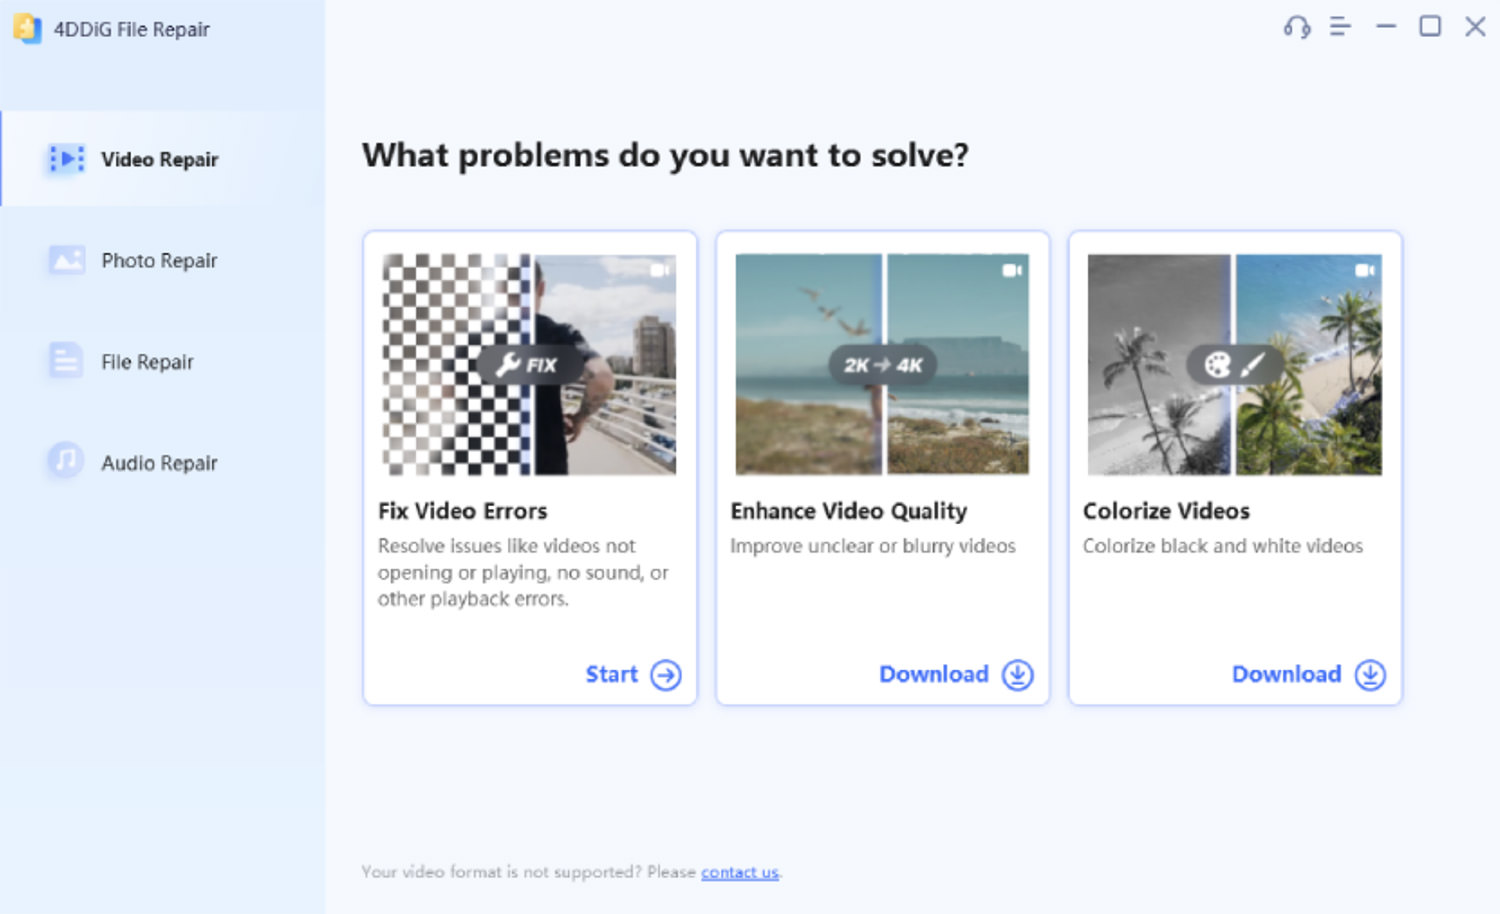
1. Fix Bad-Quality Videos with Tenorshare 4DDiG File Repair Tool
Tenorshare 4DDiG is a user-friendly app compatible with both Mac and Windows that uses AI to enhance and repair video quality. It works with videos taken on mobile phones, cameras including Canon and Nikon, or drones like DJI. This tool can resolve issues such as jerkiness, choppiness, blurriness, and other video quality problems.
Let’s explore some of its key features:
Features:
- Batch repair allows for fixing multiple formats simultaneously.
- Supports a wide range of file formats, including MP4, AVI, MOV, MKV, M4V, 3G2, 3GP, and more.
- Includes an advanced repair mode for severely damaged videos.
- Compatible with Windows PCs, Mac laptops, and various storage media like SD cards, USB flash drives, HDDs, and SSDs.
Here’s a step-by-step guide on how to use the Tenorshare 4DDiG File Repair Tool to fix bad-quality videos:
Step 1:
Download and launch Tenorshare 4DDiG File Repair Tool on your PC or laptop. Select the “Enhance Video Quality” option and click “Start” to proceed.
Step 2:
Add your video by clicking on the add/drag button or simply drag it onto the screen. Now select the AI model and customize the video’s resolution.
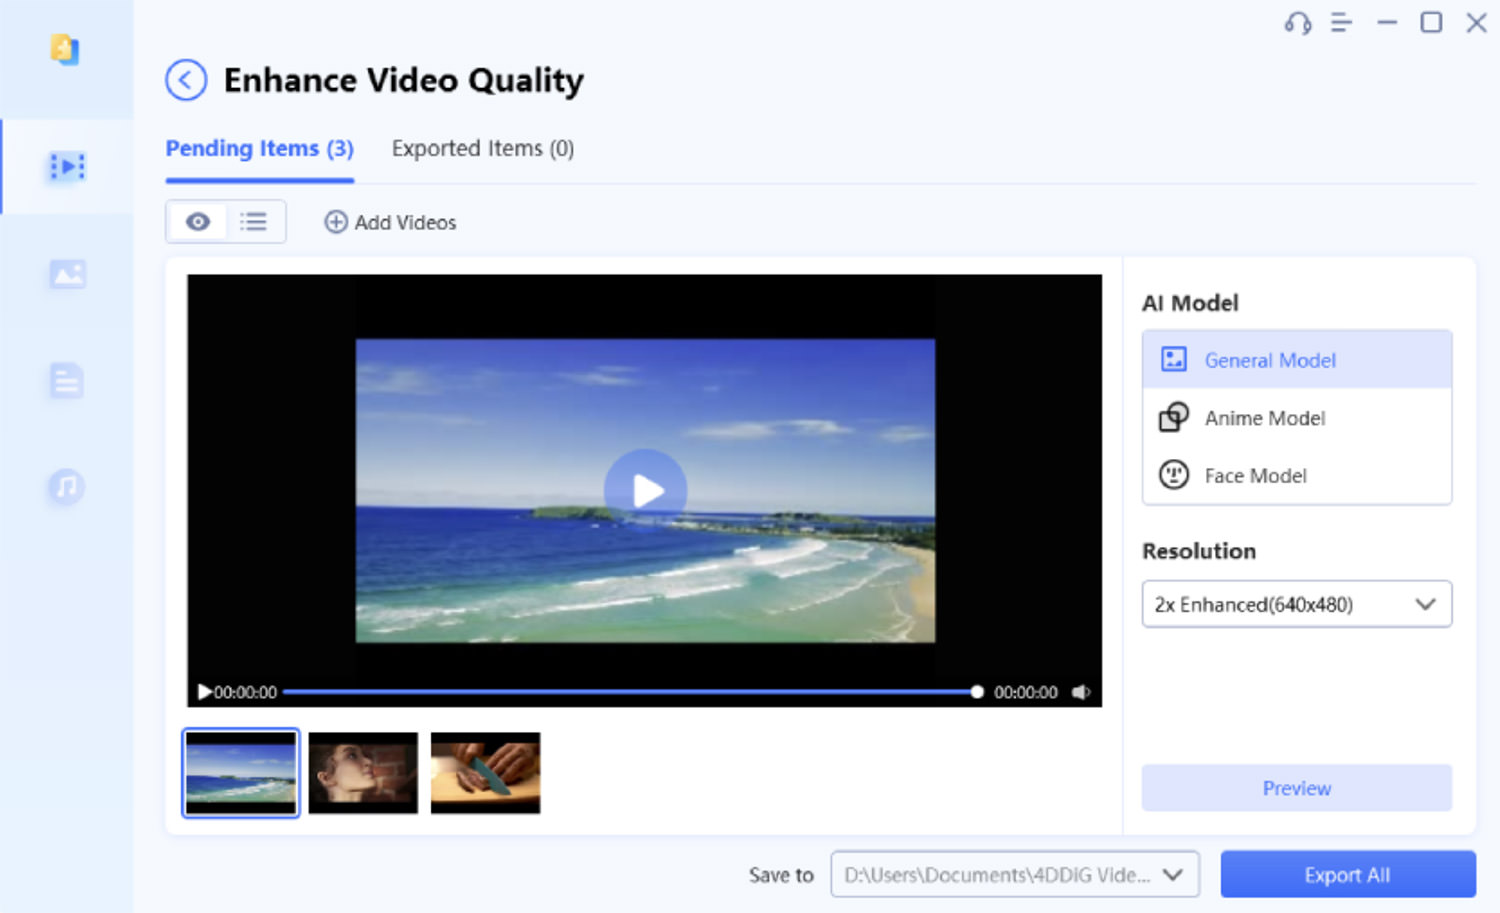
Step 3:
Click on the preview button at the bottom. The tool will start enhancing your video, showing you the first 10 frames of the enhanced version.
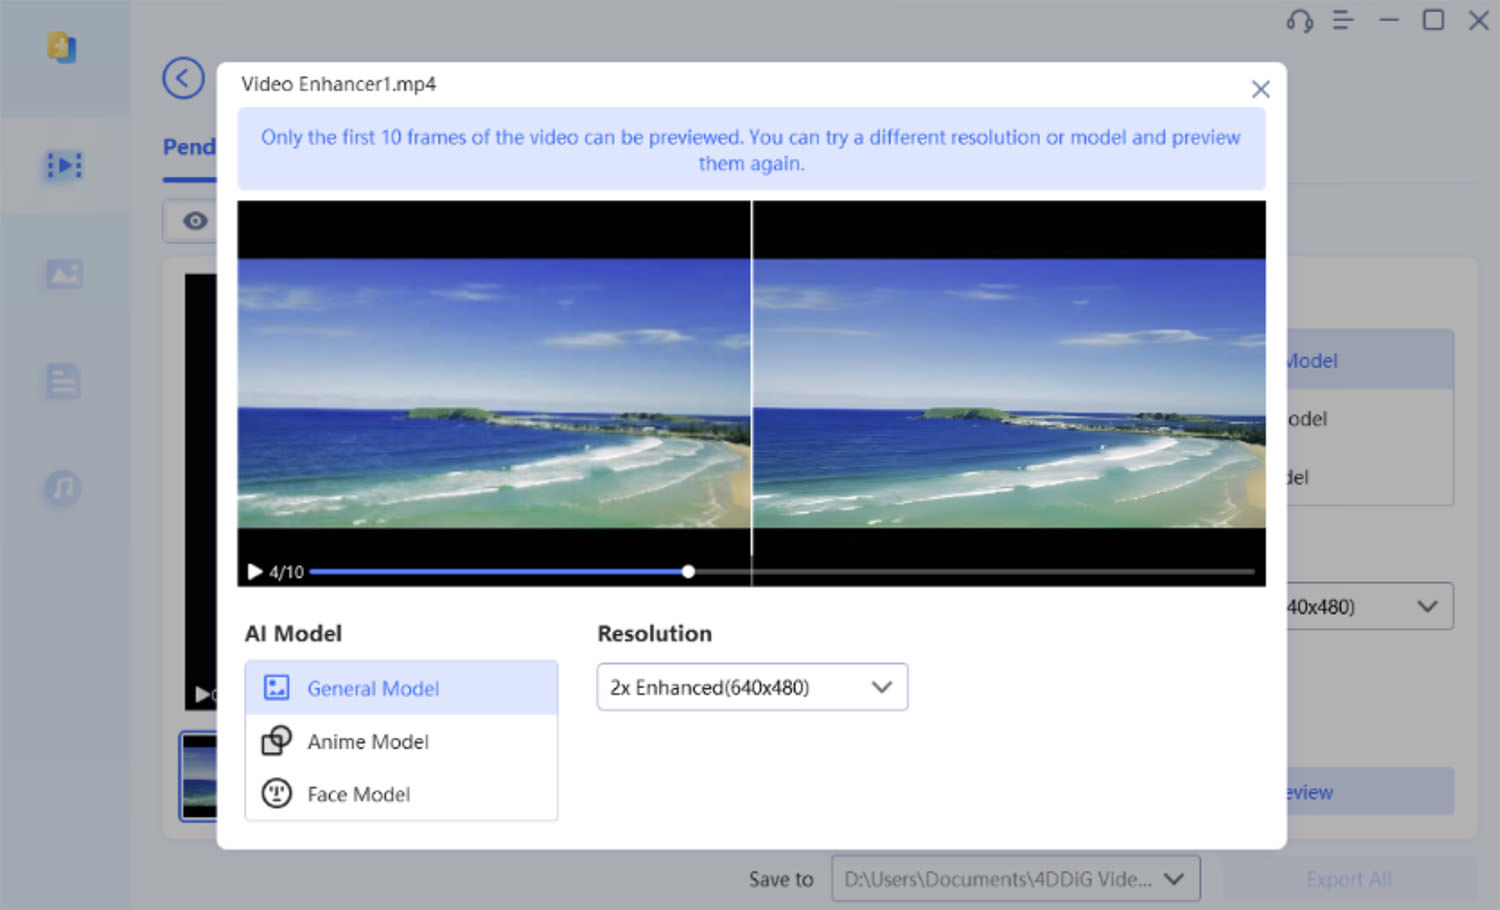
Step 4:
After previewing and if satisfied, return to the previous page and click “Export All” to save your enhanced video. The duration of this process depends on the video’s original quality and size.

And that’s it, you should now have a better-quality version of your video.
Check out Tenorshare 4DDiG File Repair
2. Re-download the Videos
It might seem obvious, but re-downloading the video to replace your original one can actually improve its quality.
This applies to videos you’ve previously downloaded from the internet or other sources where a higher quality version might be available.
3. Adjusting Video Settings
Adjusting the video settings on your device can significantly enhance the quality of your recordings. This process involves tweaking various parameters to get the best possible output. For instance, on smartphones like the iPhone, enabling 4K at 60 frames per second (FPS) can dramatically improve both resolution and frame rate, leading to crisper, smoother video playback.
Another key adjustment is exposure. By tapping on the screen and dragging the exposure slider, you can adjust the brightness and contrast of your video, making it look clearer and more vibrant. This simple step can make a big difference in the overall quality of your videos.
After you’ve finished recording, exporting your video at 1080P 60FPS using a video editing app can help maintain its quality by preventing further compression. For those using high-end devices like the iPhone 15 Pro Max, taking advantage of built-in camera features can ensure you’re capturing high-quality video without the need for third-party applications.
Enhancing color rendition and skin tones can be achieved by applying Neutral Phantom LUTs (Look-Up Tables) and filters, especially on top of Apple’s Log format. Moreover, using ND (Neutral Density) filters can improve motion blur and color quality by allowing you to use a slower shutter speed. This is particularly useful in bright conditions, helping to avoid overexposed footage and ensure your video looks natural and professional.
These adjustments are straightforward yet effective ways to improve video quality directly from your device, eliminating the need for external applications.
4. Update Video Drivers
For crisp, high-quality video playback on your PC, ensuring that your graphics driver and graphics card (GPU or graphics processing unit) are functioning correctly is crucial.
If you’re experiencing poor video quality, it could be due to issues with your drivers, such as corruption or improper installation.
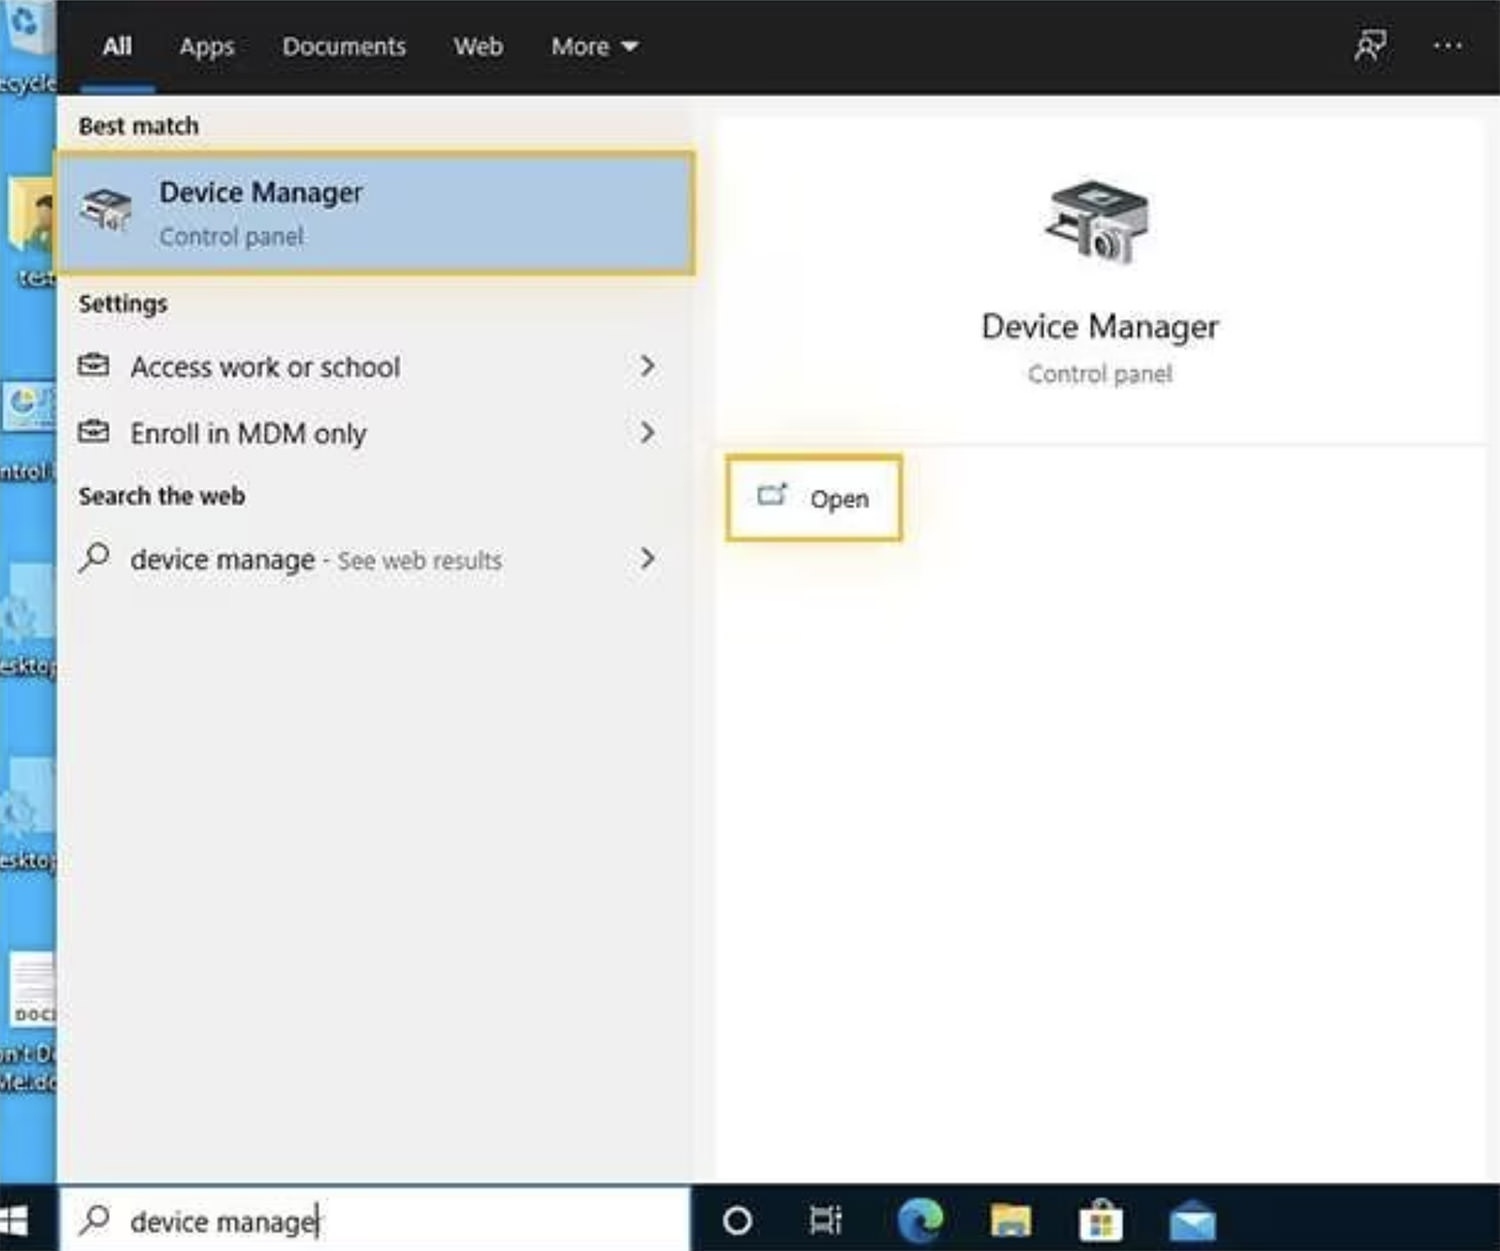
To address this issue, follow the instructions below:
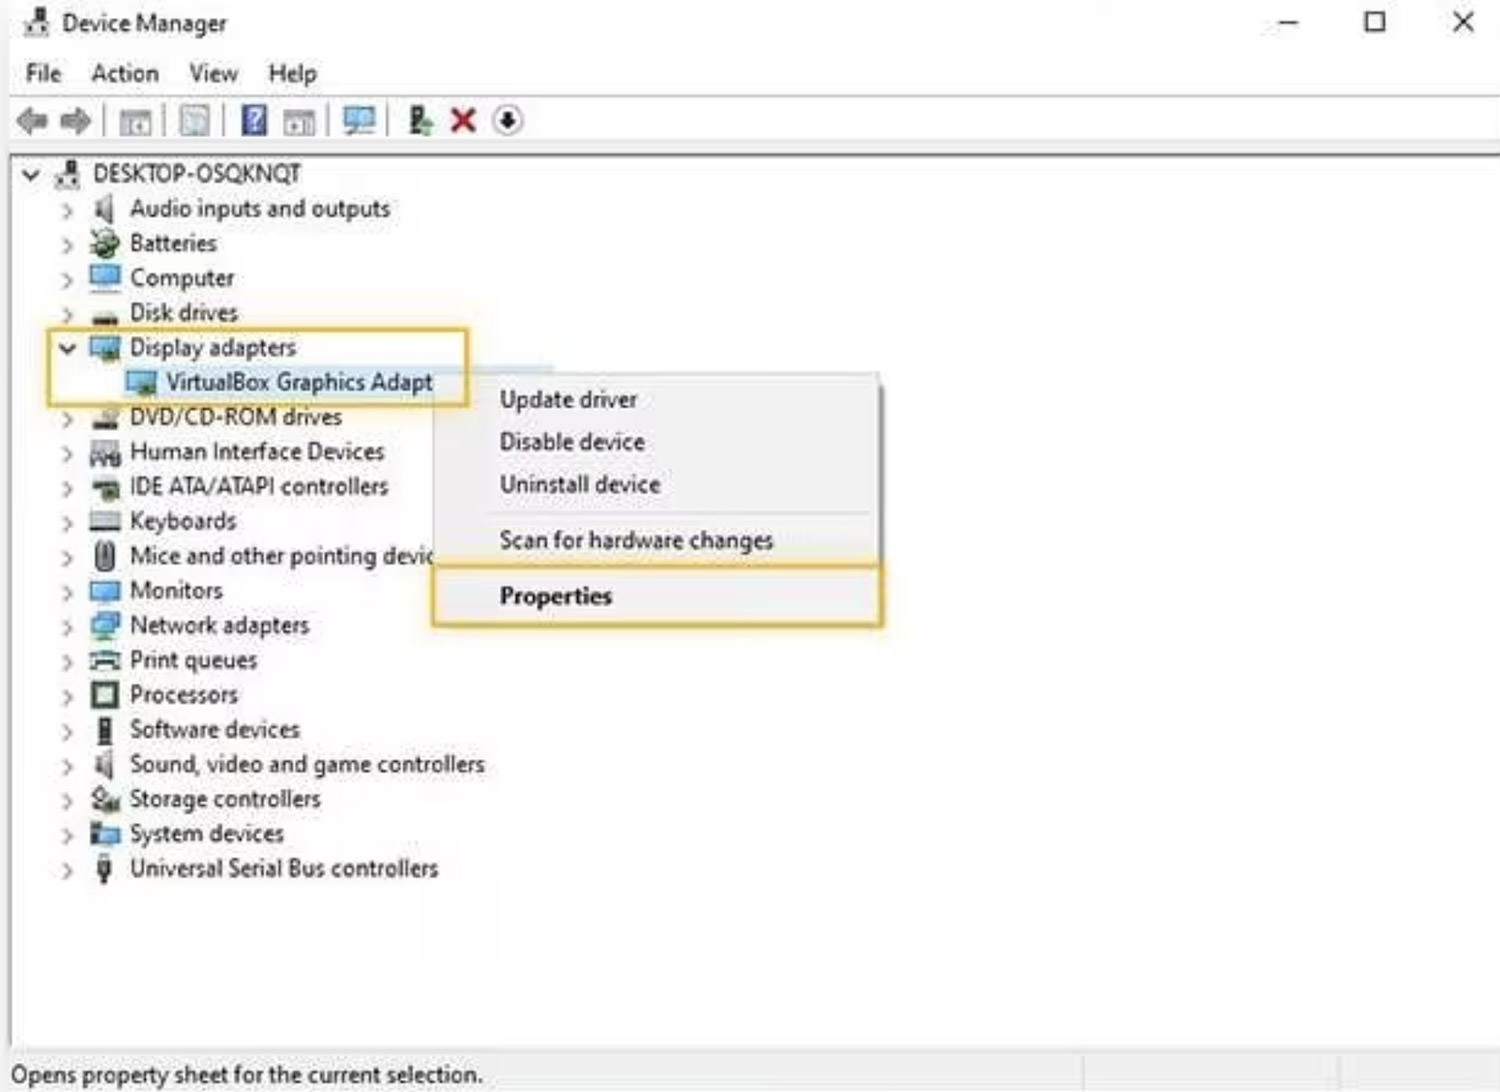
- Go to the Windows Start menu at the bottom left of your screen, type “device manager,” and open it.
- In the Device Manager, click on “Display adapters” in the left sidebar. You’ll then see your graphics card listed. Right-click on your graphics card and select “Properties.”
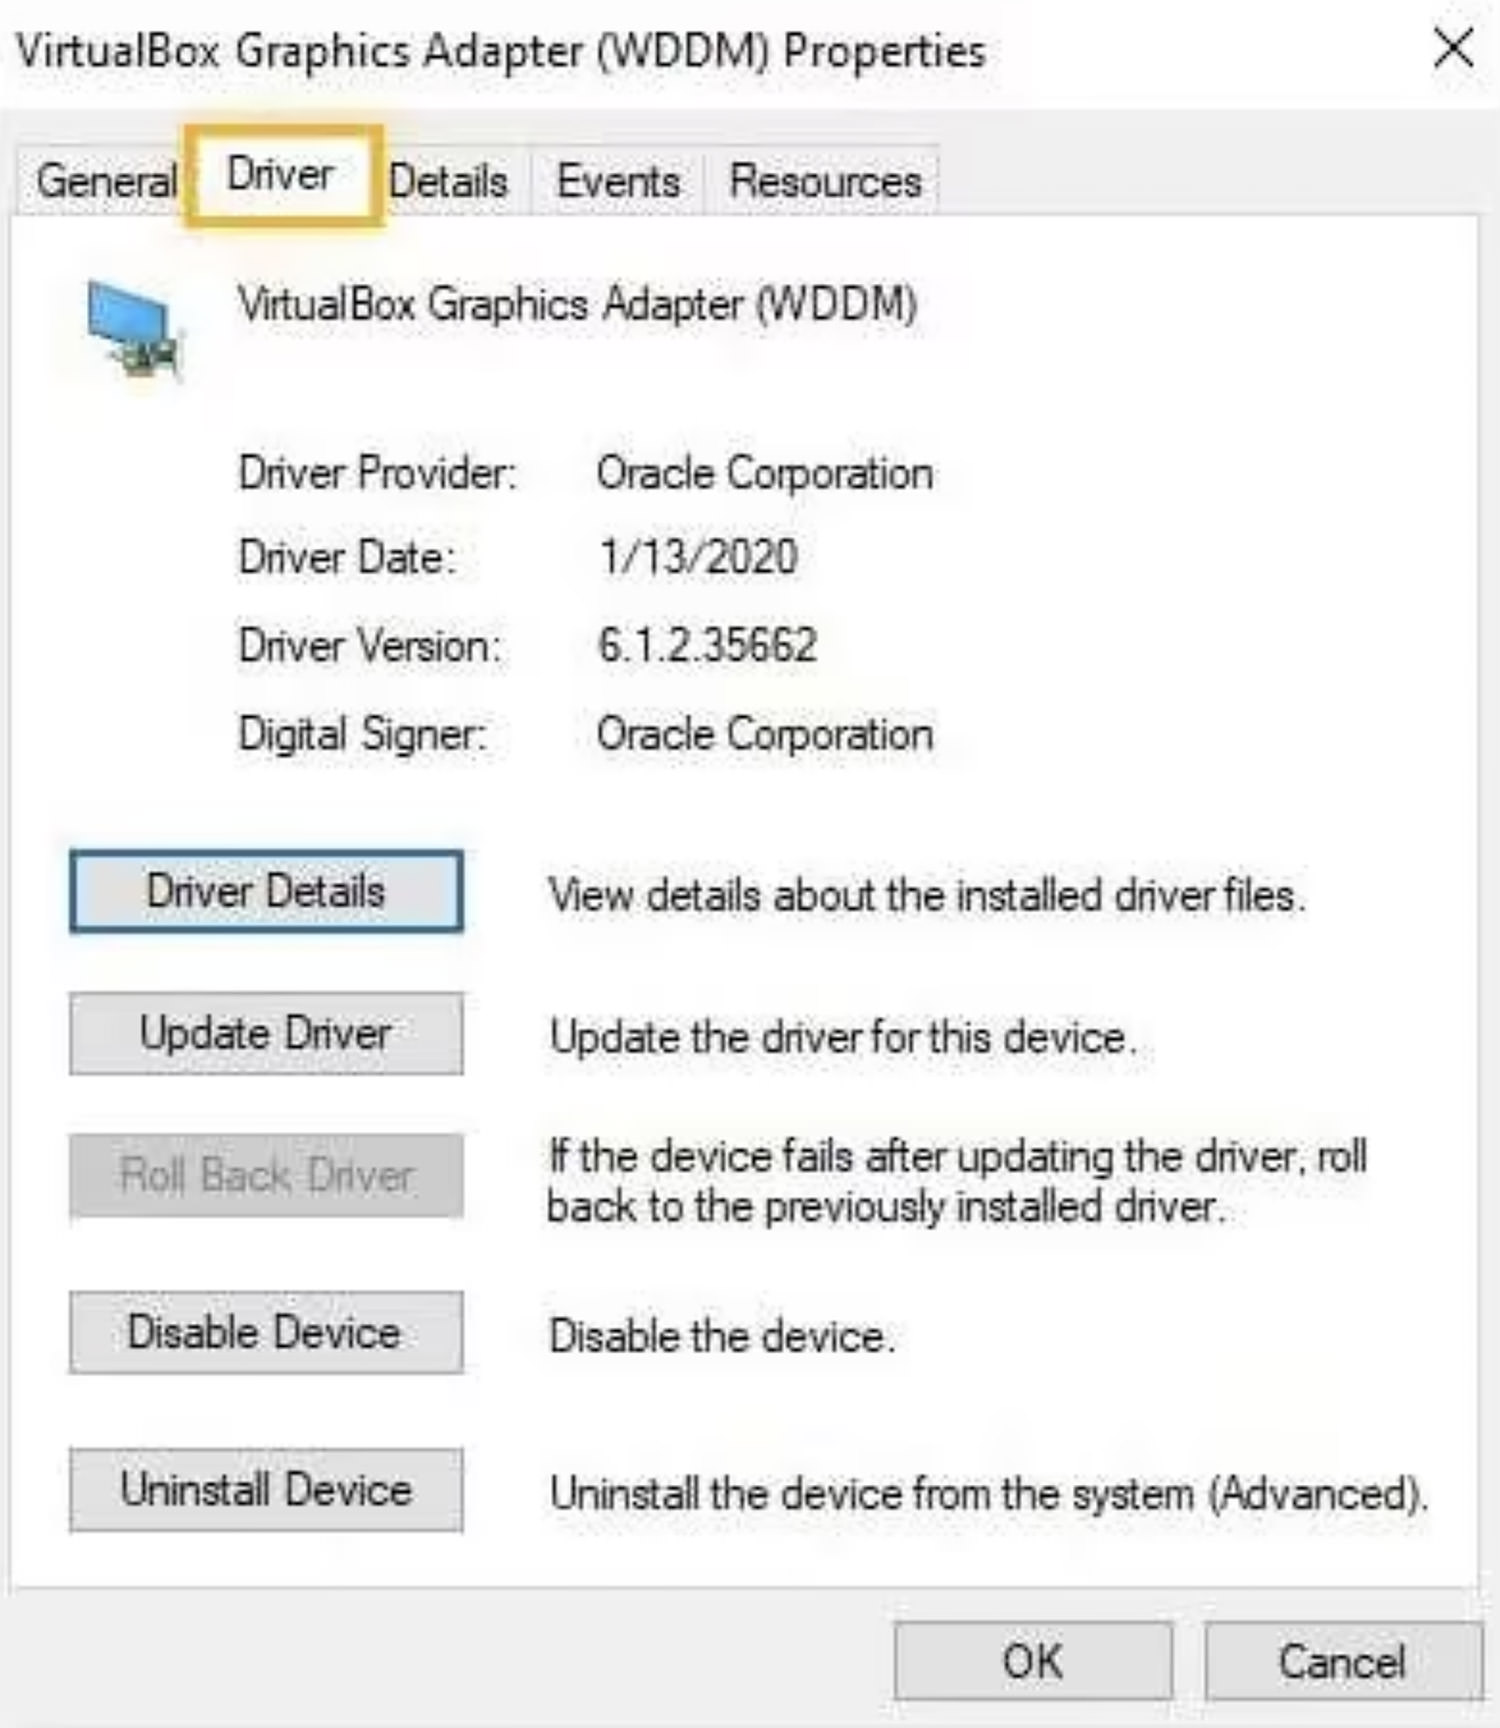
- Select the “Driver” tab in the upper menu bar of the properties window, then click on “Driver Details.”
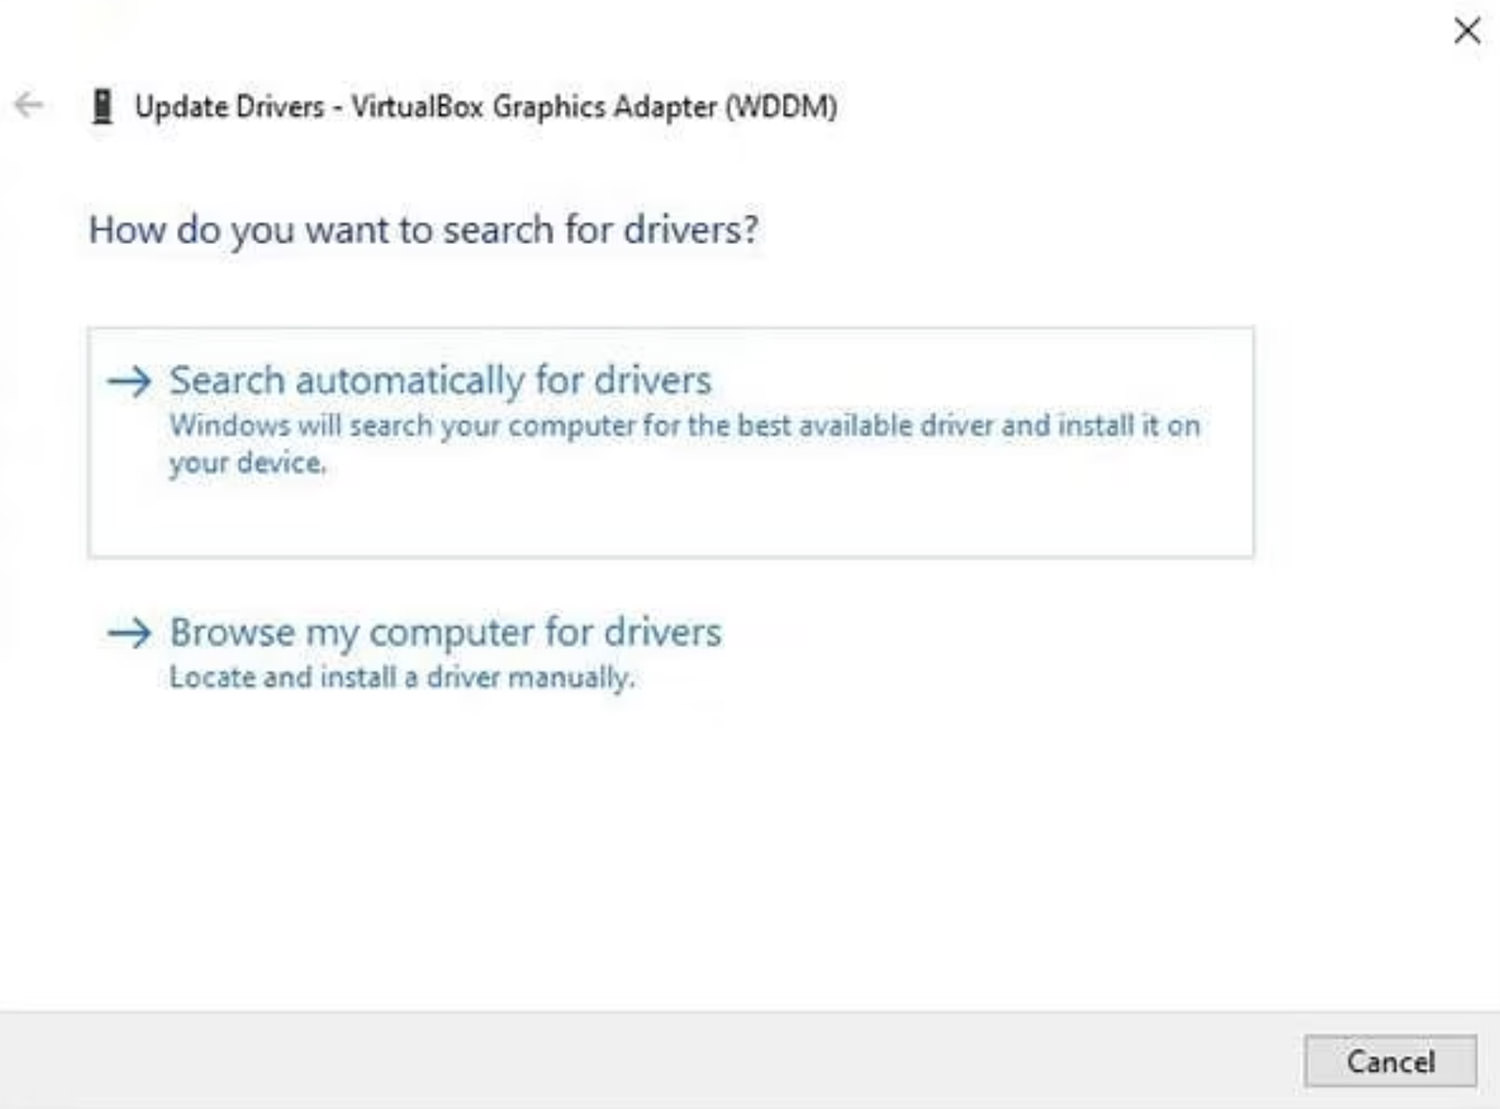
- Choose “Search automatically for drivers” and follow the on-screen instructions to update your driver.
Updating your video drivers can significantly improve video playback quality on your PC by ensuring your graphics hardware works optimally.
Conclusion
Bringing your videos back to life doesn’t have to be daunting. With a few clicks and tweaks, from the advanced fixes of Tenorshare 4DDiG to the simplicity of adjusting your device’s settings, crystal-clear quality is within reach.
Whether it’s fixing old gems or ensuring your new clips dazzle, remember: great video quality isn’t just about the right tools-it’s about preserving and sharing your moments in the best light possible.
Now let’s make every pixel count.