How to Boost Your Website Traffic with a Facebook Recommendation Bar
Ever noticed that handy little box on the side of a webpage suggesting articles? That’s a recommendation bar, and it’s a fantastic tool to increase your website’s page views. While it’s beneficial, keep in mind that not everyone may appreciate its presence as it can be a bit intrusive.
Many plugins offer recommendation bar functionalities, but this guide focuses on one that integrates seamlessly with Facebook, enhancing your site’s engagement in a way that resonates with Facebook fans.
5 Facebook Timeline Tips & Tricks You Should Know
Facebook Timeline's new design was probably the biggest upgrade in Facebook's history. The new design has many cool... Read more
How to Install the Facebook Recommendation Bar
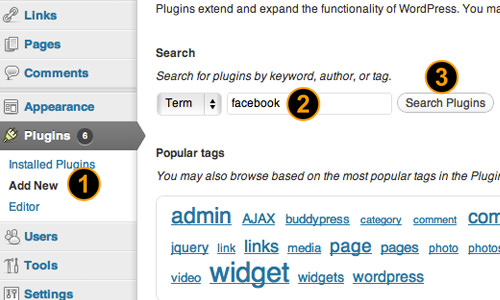
First, access your WordPress Admin panel. Navigate to Plugins > Add New in the left sidebar. Search for Facebook and click on Search Plugin.
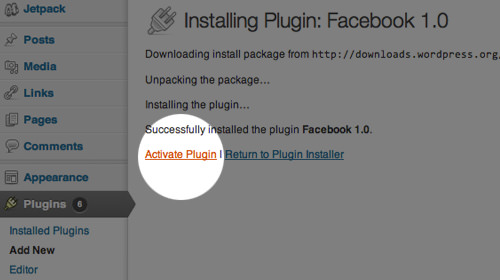
Once the results display, click on Install Now.

Next, click on Activate Plugin.
Create a New Facebook App
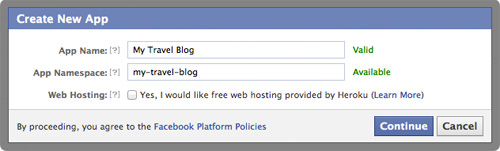
Before utilizing the Facebook plugin, visit the Facebook App page and select Create New App.

Complete the form with your App Name and App Namespace, then click Continue.
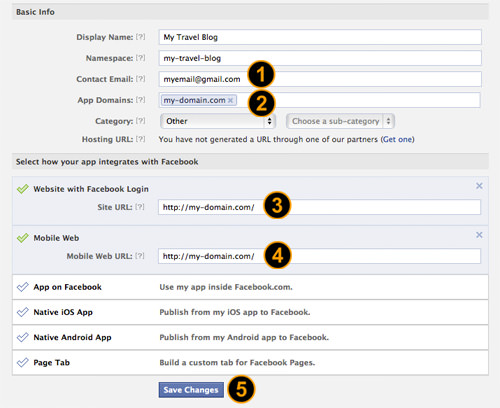
Provide further details like Contact Email, App Domain (your blog domain), Site URL, and Mobile Web URL, then save your changes by clicking Save Changes.
Note: Include http:// at the beginning and end your URLs with /.
Copy your App ID, App Secret, and the Namespace after saving the changes.

Configure the Facebook Plugin on WordPress
Back in WordPress, navigate to Admin > Facebook, enter the copied details in the provided fields, and click on Save Changes.

On the plugin options page, activate the Recommendations Bar and adjust settings as needed:
- Trigger – The scroll percentage before the bar appears.
- Read Time – The time in seconds a visitor should read before the bar shows.
- Action – Choose either a Like or Recommend button.
- Side – Decide the bar’s placement on your site, either at the left or right bottom.

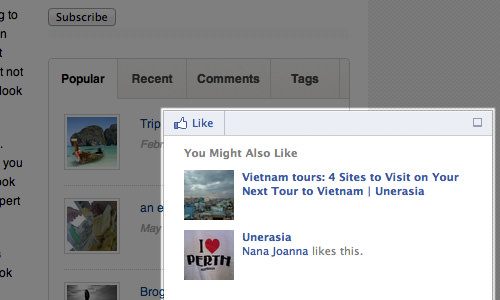
Test your setup by visiting your blog and navigating through articles. The recommendation bar should now appear as set, featuring article links and a ‘Like’ button.
Final Thoughts
The Facebook recommendation bar’s sleek interface recommends articles in a subtle way, helping to garner more likes and engagement for your content. Have you tried this plugin? Share your experiences or suggest alternative plugins in the comments below.
We’d love to hear your feedback or other recommendations!