Effective Workflow Automation with Grunt [Step-by-Step Guide]
I’m a huge advocate of automation because it simplifies life significantly. Why spend time on repetitive tasks when you can automate them? This is especially true for web development.
Many development tasks can be tedious. While developing, you may want to compile code, concatenate and minify files, remove development-only resources, and so on. Even relatively simple tasks like deleting a bunch of files or renaming folders can consume a lot of our time.
In this article, I’ll show you how to make your life easier by leveraging the excellent functionality offered by Grunt, a JavaScript task runner. I’ll guide you through the entire process, so no worries if you’re not a JavaScript expert!
More on Hongkiat.com:
- CSSMatic Makes CSS Easy for Web Designers
- Automating Tasks on Mac with Folder Actions
- Automate Your Dropbox Files with Actions
- 10 Apps to Help Automate Tasks on Your Android Device
- How to Automatically Back Up Your Website to Dropbox
Installing Grunt
Installing Grunt is straightforward because it uses the Node Package Manager (npm). This means you may also need to install Node.js. Open a terminal or command prompt (referred to as terminal from now on) and enter npm -v.
If you see a version number, you have npm installed. If you see a “command not found” error, you’ll need to install it by visiting the Node.js downloads page and selecting the version you need.
Once Node.js is installed, getting Grunt is a matter of a single command issued in the terminal:
npm install -g grunt-cli
Basic Usage
You’ll use Grunt on a project-to-project basis since each project has different requirements. Let’s start a project by creating a folder and navigating to it via our terminal.
Two files form the core of Grunt: package.json and Gruntfile.js. The package file defines all the third-party dependencies your automation will use, while the Gruntfile lets you control how these are used. Let’s create a basic package file with the following content:
{
  "name": "test-project",
  "version": "1.0",
  "devDependencies": {
    "grunt": "~0.4.5"
  }
}
The name and version are up to you. The dependencies must include all packages you are using. We’re not doing anything complex at the moment, so we’ll just ensure Grunt itself is added as a dependency.
You might be wondering what the tilde (~) is doing there.
Versions can be specified using the rules from the semantic versioner for npm. In short:
- Specify an exact version like
4.5.2 - Use greater than/less than to indicate minimum or maximum version, such as
>4.0.3 - The tilde specifies a version block. Using
~1.2means any version above 1.2.0 but below 1.3
There are many more ways to specify versions, but this is sufficient for most needs. The next step is to create a Gruntfile that will perform our automations.
module.exports = function(grunt) {
  grunt.initConfig({
    pkg: grunt.file.readJSON('package.json')
  });

  grunt.registerTask('default', []);
};
This is the basic structure for a Gruntfile. There are two key areas of interest. The first is inside the initConfig() function. This is where all your project configuration goes, including tasks like compiling LESS/SASS, minifying scripts, and more.
The second area is below that function, where you specify tasks. You can see one task named “default.” It is currently empty, so it does nothing, but we’ll expand on it later. Tasks essentially queue up parts of our project configuration and execute them.
For example, a task named “scripts” might concatenate all our scripts, minify the resulting file, and then move it to its final location. These actions are defined in the project configuration but are “pulled together” by the task. If this isn’t clear yet, don’t worry, I’ll show you how it’s done.
Our First Task
Let’s create a task that minifies a single JavaScript file for us.
There are four steps we need to follow whenever we want to add a new task:
- Install a plugin if necessary
- Require it in the Gruntfile
- Write the task
- Add it to a task group if needed
1. Find and Install Plugin
The easiest way to find the plugin you need is to type something like this into Google: “minify JavaScript Grunt plugin”. The first result should lead you to the grunt-contrib-uglify plugin, which is exactly what we need.
The GitHub page provides all the necessary information. Installation is a single line in the terminal. Here’s what you need to use:
npm install grunt-contrib-uglify --save-dev
You may need to run this with admin privileges. If you encounter an error like npm ERR! Please try running this command again as root/Administrator., just type sudo before the command and enter your password when prompted:
sudo npm install grunt-contrib-uglify --save-dev
This command updates your package.json file, adding the plugin as a dependency, so you don’t need to do it manually.
2. Require in Gruntfile
The next step is to add the plugin to your Gruntfile as a requirement. I like to add plugins at the top of the file. Here’s my complete Gruntfile after adding grunt.loadNpmTasks('grunt-contrib-uglify');:
module.exports = function(grunt) {

  grunt.loadNpmTasks('grunt-contrib-uglify');

  grunt.initConfig({
    pkg: grunt.file.readJSON('package.json')
  });

  grunt.registerTask('default', []);
};
3. Create a Task for Minifying Scripts
As we discussed, this should be done within the initConfig() function. The GitHub page for the plugin (and most other plugins) provides plenty of information and examples. Here’s what I used in my test project:
uglify: {
  build: {
    src: 'js/scripts.js',
    dest: 'js/scripts.min.js'
  }
}
This is pretty straightforward. I specified the scripts.js file in my project’s js directory and the destination for the minified file. There are many ways to specify source files; we’ll explore that later.
For now, let’s look at the complete Gruntfile after this addition to ensure you know how everything fits together:
module.exports = function(grunt) {

  grunt.loadNpmTasks('grunt-contrib-uglify');

  grunt.initConfig({
    pkg: grunt.file.readJSON('package.json'),

    uglify: {
      build: {
        src: 'scripts.js',
        dest: 'scripts.min.js'
      }
    }
  });

  grunt.registerTask('default', []);
};
4. Add This Configuration to a Task Group
Right now, you could go to your terminal and type grunt uglify, but we’ll need task groups to run multiple tasks later on. We have the default task empty, just waiting for something to be added, so let’s modify it to the following:
grunt.registerTask('default', ['uglify']);
At this stage, you should be able to go to the terminal, type grunt, and see the minification take place. Don’t forget to create a scripts.js file, of course!
That didn’t take much time to set up, did it? Even if you’re new to all this and it took you some time to work through the steps, the time saved will surpass the time spent on it within a few uses.
Concatenating Files
Let’s look at concatenating files and learn how to specify multiple files as a target along the way.
Concatenation is the process of combining the contents of multiple files into a single file. We’ll need the grunt-contrib-concat plugin. Let’s work through the steps:
To install the plugin, use npm install grunt-contrib-concat --save-dev in the terminal. Once done, make sure to add it to your Gruntfile just like before using grunt.loadNpmTasks('grunt-contrib-concat');.
Next up is the configuration. Let’s combine three specific files. The syntax will be familiar:
concat: {
  dist: {
    src: ['dev/js/header.js', 'dev/js/myplugin.js', 'dev/js/footer.js'],
    dest: 'js/scripts.js'
  }
}
The code above takes the three files given as the source and combines them into the file given as the destination.
This is already pretty powerful, but what if a new file is added? Do we need to come back here every time? Of course not, we can specify a whole folder of files to concatenate:
concat: {
  dist: {
    src: ['dev/js/*.js'],
    dest: 'js/scripts.js'
  }
}
Now, any JavaScript file within the dev/js folder will be merged into one big file: js/scripts.js. Much better!
Now it’s time to create a task so we can actually concatenate some files:
grunt.registerTask('mergejs', ['concat']);
This is not the default task anymore, so we’ll need to type its name in the terminal when we issue the grunt command:
grunt mergejs
Automating Our Automation
We’ve already made a lot of progress, but there’s more! Right now, when you want to concatenate or minify, you need to go to the terminal and type the appropriate command. It’s time to look at the watch command, which will do this for us automatically. We’ll also learn how to execute multiple tasks at once.
To get started, we’ll need to grab grunt-contrib-watch. I’m sure you can install it and add it to the Gruntfile on your own by now, so I’ll start by showing you what I use in my test project:
watch: {
  scripts: {
    files: ['dev/js/*.js'],
    tasks: ['concat', 'uglify']
  }
}
I named a set of files to watch “scripts” for clarity. Within this object, I have specified the files to watch and the tasks to run. In the previous concatenation example, we combined all the files in the dev/js directory.
In the minification example, we minified this file. It makes sense to watch the dev/js folder for changes and run these tasks whenever there are any.
As you can see, multiple tasks can be called easily by listing them in an array. They will be performed in sequence, first the concatenation, then the minification in this case. This can also be done with task groups, which is the main reason they exist.
We can now modify our default task:
grunt.registerTask('default', ['concat', 'uglify']);
Now we have two choices. Whenever you want to concatenate and minify your scripts, you can switch to the terminal and type grunt. You can also use the watch command to initiate the watching of your files: grunt watch.
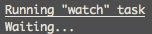
It will sit there, waiting for you to modify these files. Once you do, it will perform all the tasks assigned to it. Go ahead, give it a try.
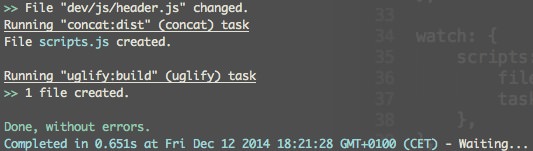
That’s much better, no input needed from us. You can now work with your files, and everything will be nicely done for you.
Overview
With this basic knowledge of how plugins can be installed and used and how the watch command works, you are all set to become an automation enthusiast. There is a lot more to Grunt than what we discussed, but nothing you can’t handle on your own.
Using commands for compiling SASS, optimizing images, autoprefixing, and more is just a matter of following the steps we discussed and reading the syntax the plugin requires.
If you know of some particularly great uses for Grunt, please let us know in the comments. We’re always interested to hear how you use tools like Grunt!