Streamline Your Dropbox Workflow with Automation
If you’re unfamiliar with Dropbox, prepare to simplify your digital life significantly. By using Dropbox, you can effortlessly save a file to a folder and have it automatically sync across the cloud. Before you know it, the file is accessible from all your devices.
But Dropbox’s capabilities extend far beyond simple file syncing. With the aid of Wappwolf Dropbox Automator, a complimentary web application, you can automate a variety of tasks such as file conversion, syncing with multiple cloud storages, photo editing, and even data encryption, all through the simple act of dropping a file into a folder. This application monitors a specified Dropbox folder and triggers predefined actions for new files added to it.
How Dropbox Automator Enhances Your Workflow
Dropbox Automator simplifies file management in selected folders, with an easy-to-follow process:
- Choose the folder you wish to automate.
- Select the actions you want to apply to files in this folder.
- Dropbox Automator activates these actions whenever it detects supported files in your chosen folder.
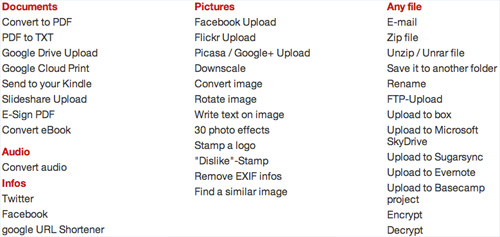
The application offers a wide range of ‘actions’ you can apply, such as converting files to PDF automatically, so you don’t have to do it manually. Other capabilities include:
Upon assigning an action to your folder, Dropbox Automator begins to monitor it. Every time you save a file to the folder, it automatically creates a new ‘Processed’ folder within your chosen folder – Dropbox > YourFolder > Processed.
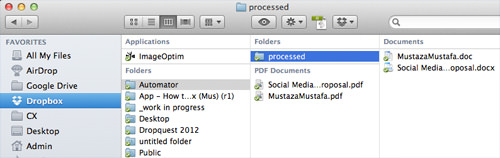
Any file you save in YourFolder gets moved to the Processed folder, where all original files are stored. Next, I’ll guide you through setting up actions to convert documents to PDF.
Setting Up Automation in Dropbox
-
Begin by visiting the Wappwolf Dropbox Automator start page and clicking on the Try now button to initiate automating actions for files moved to Dropbox.

-
Connect your Dropbox account by selecting Connect Dropbox, or sign up using your email. Choose the second option to give Dropbox-Automator access to just one specific folder.

-
After connecting your Dropbox, grant Wappwolf access by clicking Allow.

-
Choose the Dropbox folder you wish to automate. You can select an existing folder or create a ‘New Folder’, then proceed by clicking Next.

-
Now, select the automation action you’d like to apply. For documents, pick an option from the ‘Document’ section, like converting a document to PDF, uploading to Google Drive, sending to your Kindle, and more (as shown below).

-
Upon selecting an action, details about it will be displayed. Review to understand the automation process and supported file types, then click Add Action to confirm.

-
After choosing an action, scroll to the bottom and click Add action again to finalize your choice.

-
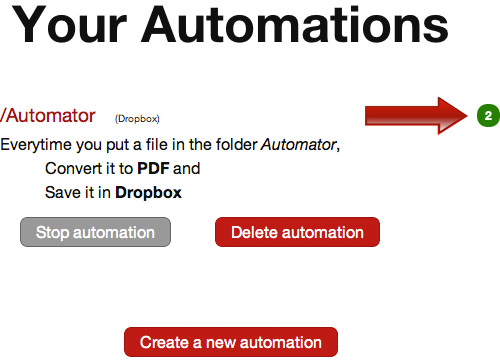
Completing these steps redirects you to your status page. Here, you’ll see the conversion status of files transferred to the automated folder. This page also allows you to stop automation, delete, or set up new automation actions.

Overseeing Your Dropbox Automation
Now that you’ve set up the automation, simply move files into the designated folder to activate the process. If you named your folder ‘Automator’, you’ll find it in Dropbox as Dropbox > Automator. Just transfer your files there.
Original files will automatically be shifted to the Processed folder, with the transformed files appearing in the parent directory.
By visiting your Wappwolf page, you’ll notice the count of processed files highlighted in ‘green’.
Wrapping Up
Integrating this automation feature into Dropbox streamlines a multitude of tasks, allowing for bulk modifications effortlessly. This not only saves significant time but also frees you up to focus on other priorities.
Note: This post was originally published on June 8, 2012.