15 Facebook App Tips And Tricks For Android Phones
Let’s face it, many of us still use Facebook daily, be it at home, work or when you’re outside hanging out with your friends. This means that most of the time, you will end up using Facebook on your mobile, and the interface of the mobile app is a little bit more complicated. Some of the features that you’re used to on the desktop may not be available on the app itself.
That’s why we’ve got 15 Facebook Android app tips and tricks to help you out while you’re using the app. Maybe you’ll find that browsing Facebook on the Android app is not that much different from doing it from your desktop after all. If you find any more interesting and hidden features, you can always share it in the comments.
1. Mute Any Messages Notifications
There may be a time when you don’t want to receive messages notifications from one of your Facebook friends, maybe when at the office or at home. Well, you actually have the option of muting notifications from any of your friends and you won’t be notified of their messages unless you unmute them. Follow these steps to mute the messages notifications.
- Open Facebook App > Messages.
- Tap on the friend that you want to mute future notifications from.
- Tap on the navicon icon at the top right and choose Mute notifications.

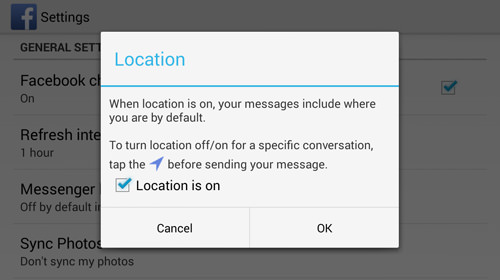
2. Turn Off Messages Location
Whenever you message your Facebook friends using the Facebook app, your location will appear in the chat automatically. Location in messages is turned on by default, and you need to turn them off if you don’t like the idea of sharing your location while you’re chatting. To turn location off, follow the steps below.
- Open the Facebook App and press your device menu button and select Settings.
- Tap on Messenger location services and untick it to turn it off. Then tap OK.
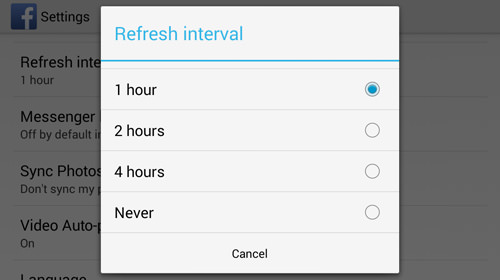
3. Choose Your Notifications Refresh Interval
If you choose to have Facebook notifications enabled, but don’t want to waste your data or smartphone battery life by having it refresh frequently, there’s a way to select the refresh interval. You can choose to have it refresh every 30 minutes, 1 hour, 2 hours, 4 hours or Never from Facebook app settings. To do that, follow these steps.
- Open Facebook App > Press your device menu button and select Settings.
- Tap on Refresh interval and select the interval that you wish to use.
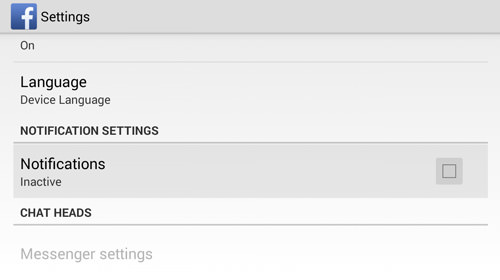
4. Disable Notifications Entirely
Some people prefer not to receive any Facebook notifications when they’re on a mobile. They perhaps prefer to just access it from their desktop, or probably because constantly receiving notifications eats up a lot your device’s battery life. Either way, if you would like to disable notifications entirely, we have the steps here for you.
- Open Facebook app > Press menu on your Android device and select Settings.
- Tap on Notifications to untick it.
5. Enable Two Step Authentication
If you think that it’s not safe enough just using your ID and Password to enter your Facebook account, don’t worry because Facebook has the option for you to enable two step authentication for better security. This way, every time you login to Facebook you will be asked to enter a code that you can save beforehand, or you can also get it from within the Facebook app. To enable this, you need a mobile device.
- Open Facebook App > Navicon icon on the right side.
- Scroll down and look for Account Settings then tap it to open.
- Tap on Security > Login Approvals On.
- Tap on Start Setup and enter your phone number then tap on Continue.
- Once you receive the confirmation code, type it in the empty box and tap Continue.
- Choose to name your current browser or tick on No Thanks, require a code right away to ask for a code every time you login. Tap close and you’re done.

6. Get Codes From Code Generator
If you have two-step authentication enabled, you are probably wondering where to get your code to be used when logging on Facebook. You can generate the code using the Facebook app, and the generator will create a new code every 30 seconds to make sure that no one else can use the code. To access Code Generator, follow these steps.
- Open Facebook app > Navicon.
- Tap on Code Generator.

7. Call Using Free Call
You can make free voice calls to any of your Facebook contacts, as long as they have the Facebook or Facebook Messenger app installed on their smartphone. The Free Call feature relies on your data connection, so both you and your friend will need to be online in order to use it. To call your Facebook contact using Free Call, follow these steps.
- Open Facebook App > Tap on the Messenger icon at the top right to open Messenger.
- Open any of your contacts and you will be in a chat room.
- Tap the navicon icon at the top right and choose Free Call from the menu.

8. Start A Group Message
Maybe you want to send the same message to a few of your friends on Facebook but don’t want to waste your time messaging them individually. Well, you can start a Group Message and invite those that you want to include from within the Facebook app. To do that, follow these steps.
- Open Facebook App > Tap on Message icon.
- Tap on Group at the bottom.
- Tap on your friend’s name to invite them to the group.
- Write your message and tap on send to create the group.
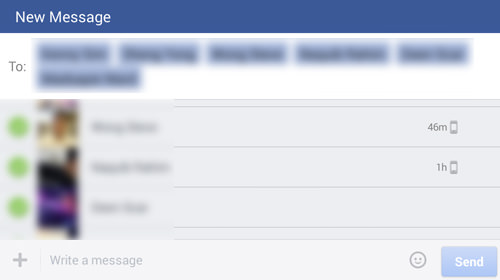
9. Pin Friends You Message Frequently
Sometimes it’s a hassle looking for a particular friend’s name that you want to message. If you have friends that you message often and want to be able to message them easily, you can select which friends you want to pin to the top in the Facbook app. Thus, you can just tap on them the moment you open messages and don’t have to waste time searching. If you’re interested in doing that, we have the steps for you.
- Tap on Facebook App > Messages.
- Tap on EDIT and tap on the plus sign to add your friends into your favorites list.
10. Choose Your Video Autoplay Option
By default, if you browse Facebook using the official app, any video shown in your News Feed or Timeline will be played automatically. If you want to change that, especially if you’re on data connection, you can do it in the settings page. Follow the steps below to choose your video autoplay option.
- Open Facebook App > Press your device Menu button and choose Settings.
- Tap on Video Auto-play and choose whether you want to turn it On, Wi-fi only or Off.

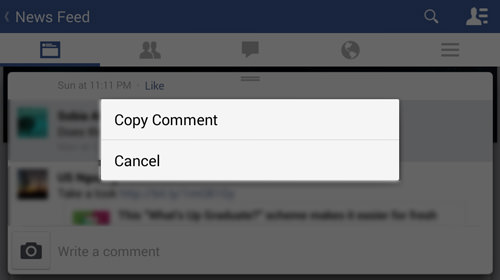
11. Copy Any Facebook Comment
Sometimes you will find some comments that you would like to share with others, but don’t want to waste time re-typing it on your smartphone. Luckily for you, on the Facebook app, there’s an option to copy the comment and have it saved in your phone clipboard for easy access. To do that, follow these steps.
- Open the Facebook App and go to the comment that you would like to copy.
- Tap and hold at the comment to activate the menu then select Copy Comment.
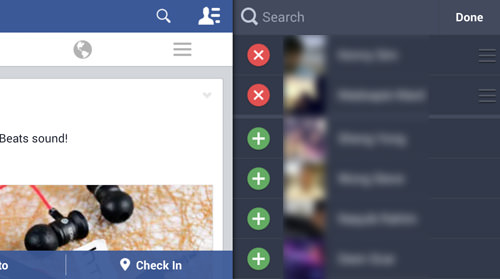
12. Organize Your Favorites
In the Facebook app, when you tap on the navicon icon, you will notice that you have a list of Facebook features called ‘Favorites’. You can manually add or remove these features from the list. To organize your favorites, follow the steps below.
- Tap on Facebook App > Navicon.
- Look for Edit Favorites and tap on it.
- Tap on any of the features in the list, then tap Yes to have it listed in your favorites list.
- Tap on Finish Editing at the top to stop editing.

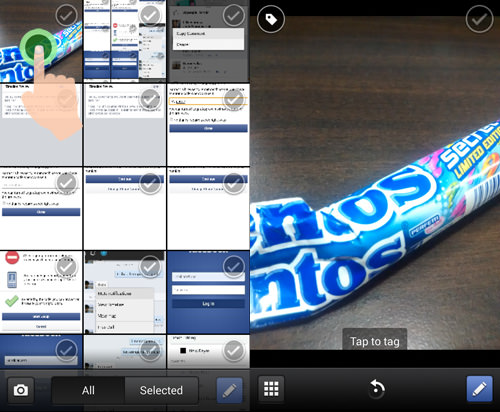
13. Preview & Edit Photo Before Uploading
If you haven’t noticed yet, Facebook photo uploading is a little bit messy. When uploading a photo, most Facebook users will tick the photo and tap on the pencil icon and have it attach to their status. Some people might not realize that you can actually preview your photo in its full size, before you attach it. Just follow the steps below.
- Open Facebook App > Photo.
- Tap on the photo that you wish to upload instead of tapping on the tick button.
- Your photo will then open in its full size.
14. Review Tagged Posts
So you’re tired of seeing your Facebook friends tagging you in a post that you do not wish anyone else to see in your timeline. Well, fortunately there is an option that allows you to review posts that your friends tag you in before it ends up in your timeline. If you’re interested in enabling Timeline Review, follow these steps.
- Open Facebook App > Navicon.
- Tap on Account Settings > Timeline and Tagging.
- Tap on "Review posts friend tag you in before they appear on your timeline?" and tap on OFF to switch it to ON.

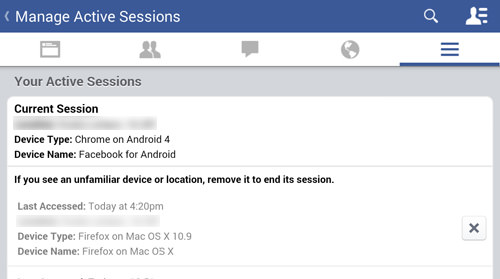
15. Force Log out From Any Of your Active Facebook Sessions
Say you forgot to log out your Facebook account at the office and you’re afraid that somebody else will have access to it. Fret not, you can choose to remove your active sessions from within the Facebook app itself at any time. To do so, follow the method below.
- Open Facebook App > Navicon.
- Go to Account Settings > Security.
- Tap on Active Sessions and tap on the X button to force log out from any previous sessions.