How to Recover Lost Android Data with DroidKit
It may happen that some data on your Android device gets deleted either as a result of malware or a mere accident. Suddenly your contacts, memorable photos, videos, and files are lost. But instead of seeking help from an inexperienced mobile repair shop, you can recover your complete data – yes, all of it – yourself.
You’re asking how? Well, to put it simply – through DroidKit. This app is my go-to solution when it comes to any Android-related issue, especially when it comes to reliable data recovery without rooting the device.
So, in this post, I will show you how easy it is to recover lost data on an Android device through DroidKit with the help of a step-by-step guide. That’s not all, I’m also going to share how DroidKit can be useful in resolving Android issues other than data recovery.
DroidKit – All-in-One Solution for Android Problems (Review)
Android OS has improved a lot over time, but it can still fall prey to malware attacks or... Read more
Why use DroidKit?
Before we jump into the process of Android data recovery through DroidKit, I would like to give you a brief overview of what the tool is and why it would be useful to opt for.
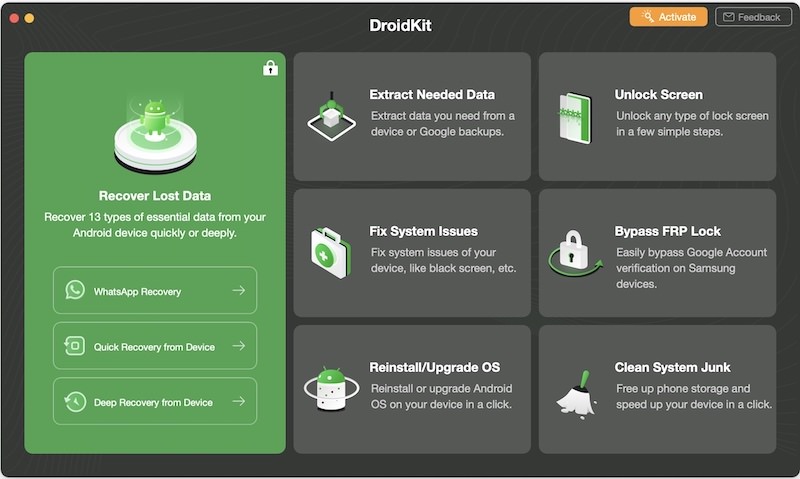
DroidKit is a feature-rich and highly intuitive tool to resolve most troubling Android issues, including and most importantly, recovering lost data. By data, I mean any kind of data including photos, videos, messages, contacts, audio files, documents, call logs, calendars, books, ZIP files, APK files, and much more.
What’s even more interesting is that DroidKit supports all Android devices from every brand in the market. So you don’t have to worry about your device’s compatibility with the tool when processing the data recovery. Use your Windows or macOS computer to use the tool with a 100% success rate.
And the best part is that DroidKit won’t require you to root your device to retrieve the lost data (for quick recovery). Also, it allows you to preview the data it finds so you can decide if you’d like to recover everything or just some specific files.
So, that was a bit of an introduction to the tool. Now I’ll proceed to the process of recovering Android data through DroidKit.
Data recovery with DroidKit
When I said that DroidKit is intuitive and user-friendly, I meant it. Because the tool offers you two different ways to recover the data lost on your Android device – Quick Recovery and Deep Recovery. So, you can opt for any of them depending on your preference and requirement.
Prerequisites:
Before I go into the details of both processes, please consider some prerequisites. You need to:
- Download and install DroidKit on your Windows or macOS
- USB cable that connects your device to your computer.
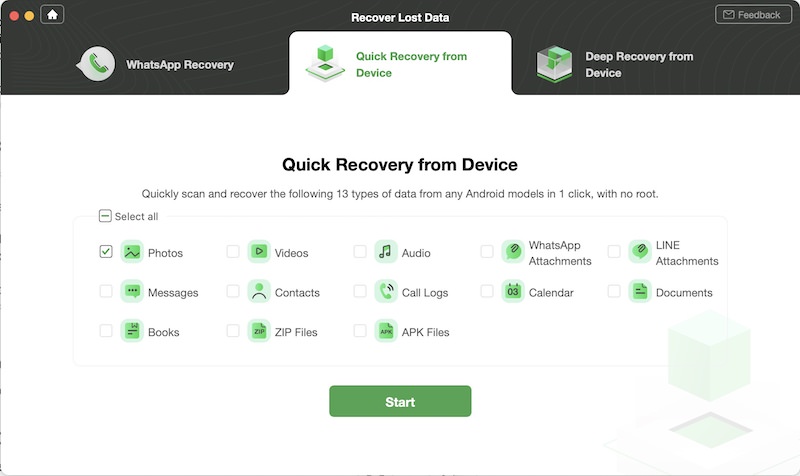
1. Quick Recovery
DroidKit’s Quick Recovery process allows you to recover lost or deleted data on your Android device through a simple and fast procedure. And it does so without rooting your device.
So, if you want to retrieve your data through Quick Recovery, take the following steps:
- Open the DroidKit app on your computer and hover on Recover Lost Data. Here, select the Quick Recovery option.
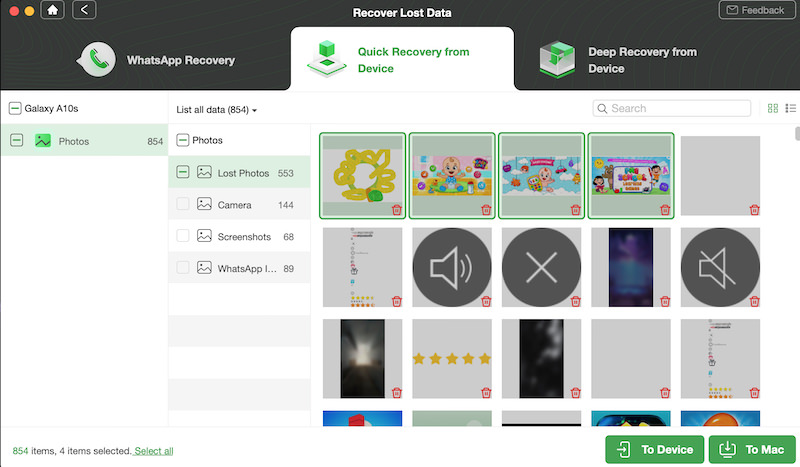
- Select the kind of data you want to recover from 13 different options. You can select one option or multiple options as per your requirement. In my case, I am going to retrieve some deleted pictures from the device so I will select Photos.
- Once you select what you want to recover, click the Start button.
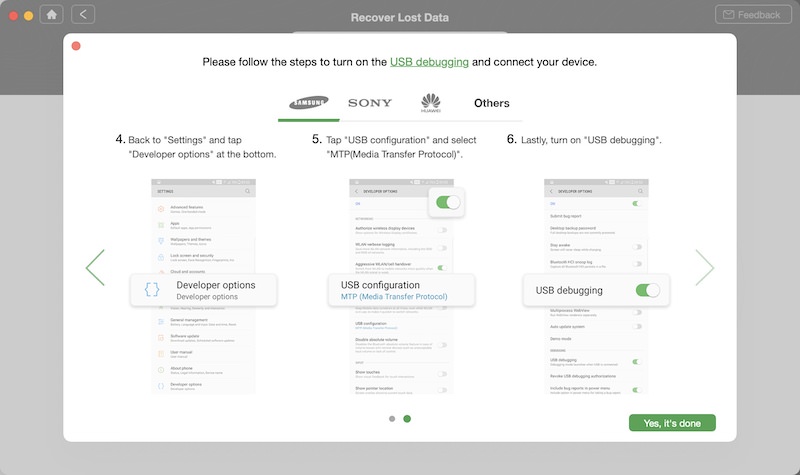
- Now wait till your device is detected by the tool. At this point, you’ll be instructed to take a few simple steps on your Android device to activate the USB debugging feature.
- Once your device is ready, you’ll be able to secure a connection with the DroidKit app successfully. Now click Next to proceed.
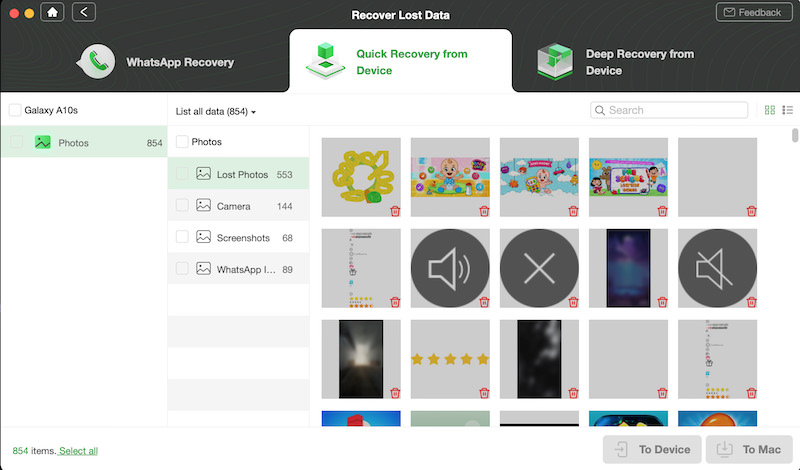
- DroidKit will scan the deleted and existing data on your device for a couple of seconds and then gives you a preview of the data scanned out.
- Here you can select the data that you’d like to recover and then choose either To Device or To Mac as to where you would like to save the retrieved files.
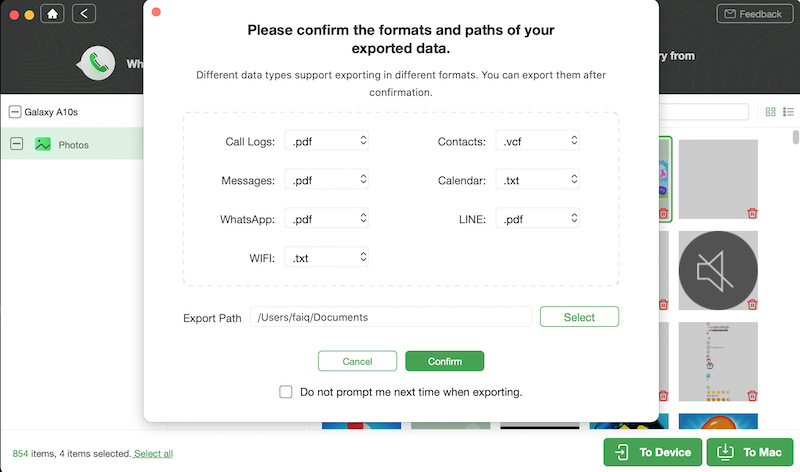
- After this, you’ll be shown a window where you can confirm the formats and path of the data being recovered. Once done, click on the Confirm button.
- It’ll take only a few seconds to process, and then you’ll receive a Recovered Successfully notification in the same window. From here you can click on View Files to take a look at the recovered data or click Complete to finish the process.


2. Deep Recovery
If you’re not satisfied with the results of the Quick Recovery process, you can opt for the Deep Recovery option in DroidKit data recovery. This option, however, requires you to root your Android device.
Here is how to do it:
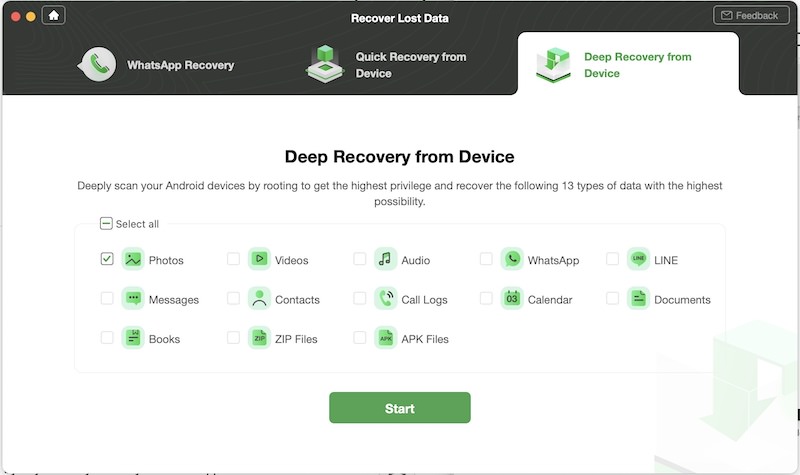
- Open the DroidKit app on your computer and hover on Recover Lost Data. Select the Deep Recovery option here.
- There are 13 different types of data that you can choose to recover. So select the kind of data you want to recover (one or multiple options). In my case, I am going to retrieve some deleted pictures from the device so I will select Photos.
- Once you select what you want to recover, click the Start button.
- Now connect your Android device to your computer using a USB cable. Please confirm the USB debugging mode is enabled on your device. Once your device is detected, you can click on the Next button to proceed.
- At this point, DroidKit will check the root status of your device (Root/Unroot).
- Once the scanning is complete, you will see the results. If your device is not rooted, you will have two options – Root Now to proceed with the rooting process or if you don’t want to root your device, you can opt for Quick Recovery.


Data recovery from other mediums
When using an Android device, the data stored on the device is not the only data you have. There are other mediums like an SD card and other types of data like WhatsApp messages and media files that you risk losing.
Well, DroidKit can help with that too. You can use it to retrieve lost WhatsApp data and the data deleted from SD card – all without having to root your device.
WhatsApp data recovery
WhatsApp is a must-have communication tool for every mobile owner these days. It allows you to share unlimited amounts of data with your friends and family. But it also means a huge loss if by any means you lose your WhatsApp data.
With DroidKit, you can recover lost WhatsApp messages, photos, audio and video files, and any other type of files from your Android device. You can also retrieve Google WhatsApp backup with a guaranteed success rate.
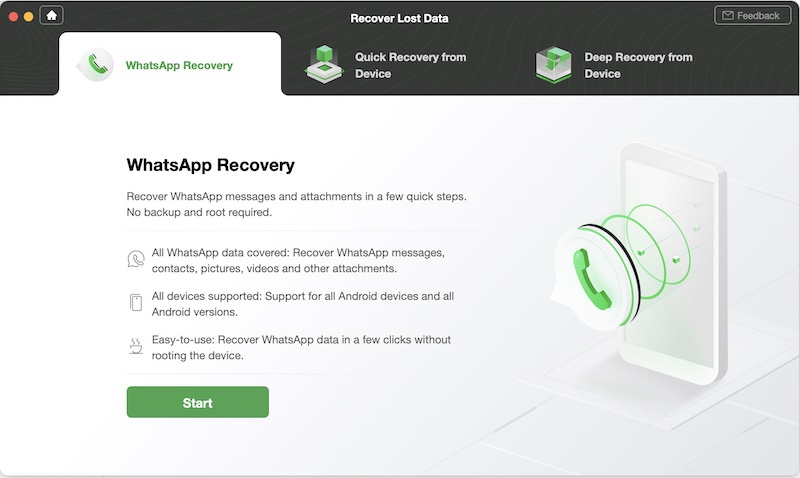
What’s more is that the process of WhatsApp data recovery is super simple, fast, and doesn’t involve device rooting and you can preview the data before restoring. You can even salvage your lost data from a system-crashed (Samsung only) device.
Data recovery from SD card
Most people frequently use SD cards to transfer data or to give some extra storage space to their Android devices. However, if by accident or due to formatting, you lose the data stored on your SD card, DroidKit will help you recover it in a jiffy.
DroidKit is capable of recovering seven types of files from an SD card, including photos, videos, audio files, documents, books, ZIP files, and APK files. All you have to do is to insert your SD card in the computer where DroidKit is already installed, and let the tool do its magic.
When recovering any data through DroidKit, be assured that there will be no data leaks or any risk to your privacy. Also, you can format any SD card as long as it is in FAT16, FAT32, or exFAT format, meaning you can recover data from the SD card of your camera or drone as well.
Resolving other Android issues with DroidKit
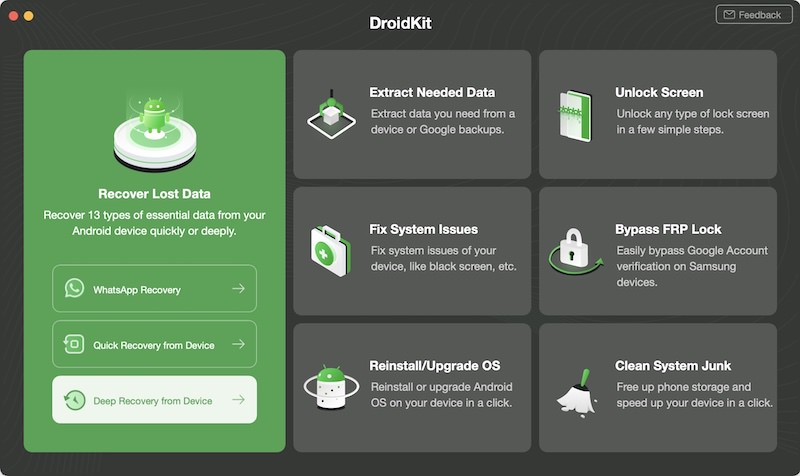
I have talked much about different data recovery features of DroidKit, but do you know that the tool has been designed as a one-stop solution for all Android-related issues. Yes, DroidKit offers six main ways in which you can resolve some of the most common Android problems.
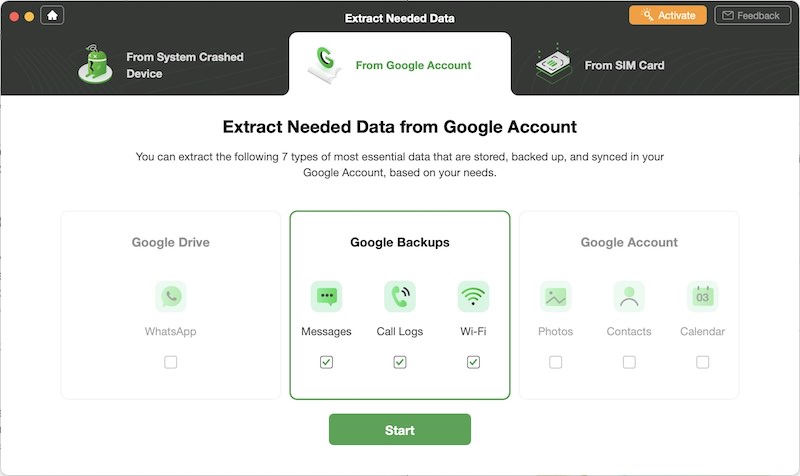
1. Extract Needed Data
One of the best things about Android devices is that the data is automatically backed up in your Google account. Therefore, in case of data loss on your Android device, you can use DroidKit to extract needed data from Google.
This means that using DroidKit, you can extract WhatsApp messages and files from your Google Drive, messages call logs, WiFi info from Google Backups, and photos, contacts, and calendars from your Google Account.
2. Unlock Screen
Though screen lock is a useful security feature, if you somehow forget the password or get locked out of your device, you can take help from DroidKit to unlock your Android device.
DroidKit can unlock any type of screen lock, including 4-digit PIN, 6-digit PIN, or custom PIN, or password-like pattern, fingerprint ID, or face recognition, etc. You can use this feature to unlock any Android device or model and regain access to your data.
3. Fix System Issues
Android phones can get into any number of system issues that may cause your device to slow down or stop working altogether. With DroidKit’s help, you can resolve most Android OS problems like black screen, unresponsive screen, camera failure, apps crashing, frozen screen, overheating, boot loop, and many other issues.
DroidKit will give you a reliable solution customized to your device model to resolve any of these solutions. However, do note that at the time of this writing, this feature is only available for Samsung devices.
4. Bypass FRP Lock
All Samsung devices have a built-in FRP lock feature that allows you to factory reset your device using your Google account. So in case you want to bypass the FRP feature, DroidKit could be useful for that.
DroidKit’s FRP lock bypass feature has the highest success rate among all other tools available in the market and it is the only solution that works with both Windows and macOS computers.
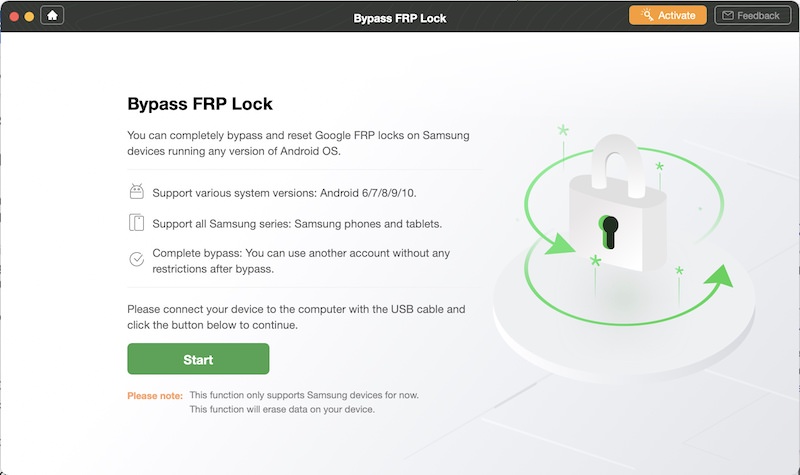
Once you bypass the FRP lock, you’ll be able to gain full access to your device, get the previous Google account removed, and log in with another Google account.
5. Reinstall/Upgrade OS
One of the most common Android issues is when your device fails to upgrade or install the new OS. If you’re encountering this issue on your Android device, you can use DroidKit to deal with the OS reinstall or upgrade issue.
Either you’re using Windows or macOS, just connect your Android device to your computer and start the process. DroidKit will automatically match the right system version with your device and you follow some simple steps to upgrade or reinstall the OS on your Android device.
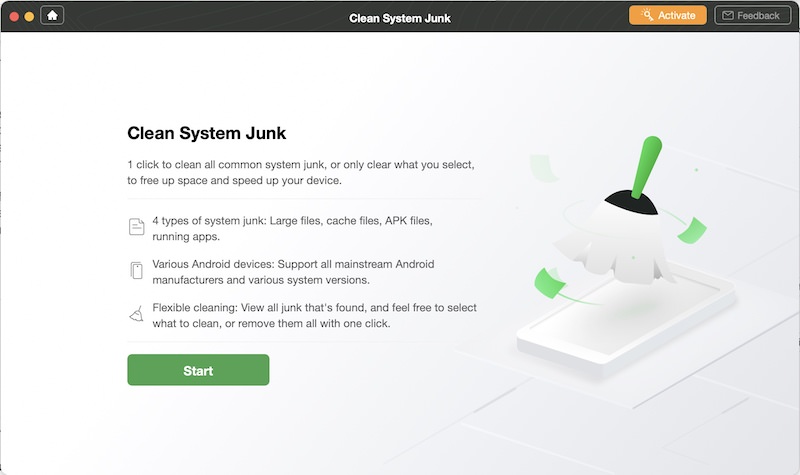
6. Clean System Junk
System junk causes your Android device to slow down and eat up the storage space. In this regard, DroidKit can help you clean up the system junk in only a few clicks and with complete success.
You can use DroidKit to clean up different types of junk files, including large files, cache, APK files, and running apps. Not just that. You can also preview the files that the tool finds as junk and select only the ones that you want to delete.
Summary
By the dint of this post, I have tried to encompass everything in which DroidKit can be useful for an Android user. From recovering or extracting data to resolving system issues and bypassing screen locks, DroidKit has a reliable solution for every Android problem.