20 Handy Mac Tips & Tricks You Probably Don’t Know
Are you a Mac user looking to become a power user? Do you want to get the most out of your computer and improve your workflow? Then you’re in luck, because we’ve compiled a list of 20 hand Mac tips and tricks that you probably don’t know about.
From hidden keyboard shortcuts to time-saving productivity hacks, these tips will help you take your Mac game to the next level. Whether you’re a designer, writer, or just a casual user, these tips will make your life easier and more efficient.
100 macOS Sonoma Keyboard Shortcuts
Harness the efficiency of Mac keyboard shortcuts. Explore the vast array, from screen captures to Spotlight searches, and... Read more
1. Hide Icons in System Preferences
We’ve previously covered parental control tips and apps for Mac, but also in Mac, you can hide certain icons in the System Preferences so someone else who has access to your Mac (e.g. your nosy kids) won’t be able to find it so easily.
To do this, open System Preferences then click on View located on the Menu Bar followed by Customize. You’ll then notice checkboxes on the icons. Uncheck the icons you want to hide and click on Done when you’re finished. The unchecked icons will now be hidden.
2. Disable Dashboard
If can’t find any use of the Dashboard — that space in the far left where you can put your widgets — you can disable the Dashboard using this command in Terminal:
defaults write com.apple.dashboard mcx-disabled -boolean YES
After that, key in this command to reset the Dock:
killall Dock
If you find you want to re-enable the Dashboard, enter the command below, and followed by the ‘killall Dock’ command again.
defaults write com.apple.dashboard mcx-disabled -boolean NO
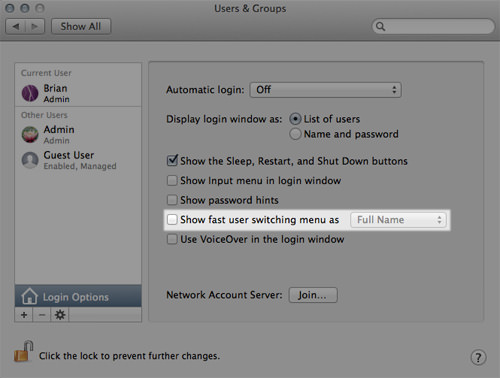
3. Hide Username om Menu Bar
By default, your account username is shown on the Menu Bar next to the date and time. If you want to clean up your Mac’s Menu Bar, you can remove the username from System Preferences > Users & Groups > Login Options > Uncheck Show fast user switching menu as.
Note that you might need to first double click the lock at the bottom left corner and type in your password in order to make these changes.
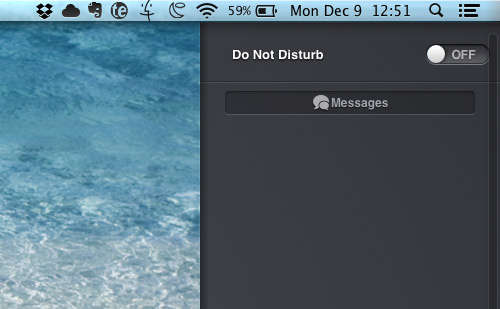
4. Permanently Disable Notification Center
The notification center bugging you with too many updates? Aside from turning it off with the Do Not Disturb feature, you can even remove it from the menu bar.
Enter the following command in Terminal:
sudo defaults write /System/Library/LaunchAgents/com.apple.notificationcenterui KeepAlive -bool false
After that, enter this command in Terminal:
killall NotificationCenter
Then log out of your Mac. When you log back in, the Notification icon on the Menu Bar will be gone.
5. Align Dock on Corners of The Screen
By default, you can position your dock to the left or right of the screen, or at the bottom. By entering this simple command into Terminal, you’ll be able to align the dock to a corner of the screen instead of the default middle alignment.
This command will align the horizontal docks to the top corners, and the vertical dock to the left of the screen.
defaults write com.apple.dock pinning -string start
This command will align the horizontal docks to the bottom corners, and the vertical dock to the right of the screen.
defaults write com.apple.dock pinning -string end
To return to the default, middle alignment, enter this command:
defaults write com.apple.dock pinning -string middle
Do note that after entering any of the commands above, you’ll have to reset the dock with this command in order to see the changes:
killall Dock
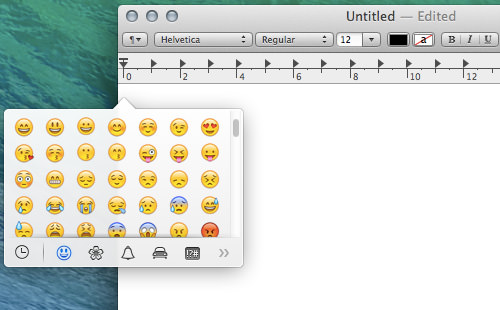
6. Use Emoji in Text
Like iOS, Mac comes built-in with Emoji; to access it, use the keyboard shortcut Command + Control + Space to bring up the special Emoji menu on any text area in any app.
7. Find Out Which Application Drains Power
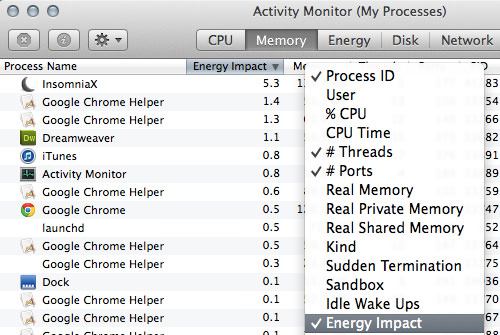
The Activity Monitor now lets you see more information about your Mac, particularly which app is draining your energy bar. You’ll have to ‘show’ Energy Impact by right clicking on the headers and checking it. Once you check Energy Impact, you’ll be able to see which application is taking up the most power (higher value) and stop it to maximize your Mac’s battery life.
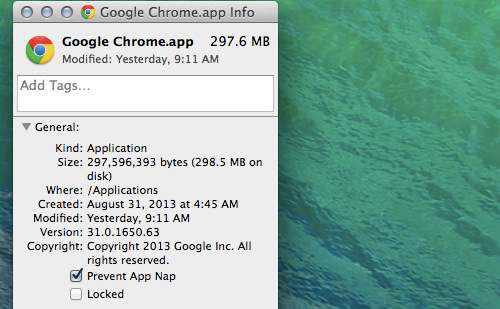
8. Disable App Nap on Selected Apps
Apple implemented App Nap in Mac to further lengthen your Mac’s battery life by temporary slowing down apps that are not doing anything in the background. However, this slightly reduces the start up time of the app.
If multitasking speed is important to you, you can disable App Nap on selected apps by right clicking the app and clicking on Get Info. There, you’ll be able to check Prevent App Nap so that the app doesn’t slow down when it’s not in use in the background. Do note that by disabling App Nap, your battery life drains quicker.
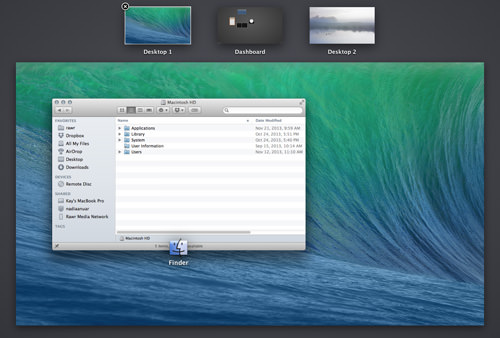
9. Move Dashboard Like Spaces
The Dashboard can be moved around now, just by clicking and dragging it to where you want to leave it. You can even move it to your secondary monitor on a dual monitor setup.
10. See More on Activity Monitor Dock Icon
The Activity Monitor has several dynamic dock icons you can choose from. Right click on the icon then go to Dock Icon to choose between four activities to display or switch back to the regular icon by choosing Show Application Icon.
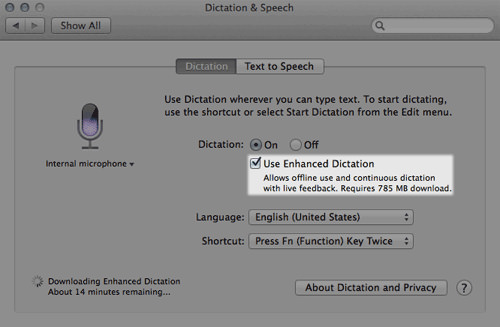
11. Enable Offline Dictation
In the latest Mac, you can enable offline Dictation by going into the System Preferences > Dictation & Speech and checking Use Enhanced Dictation. Do note that it’ll require a 785MB download that might take up some storage space.
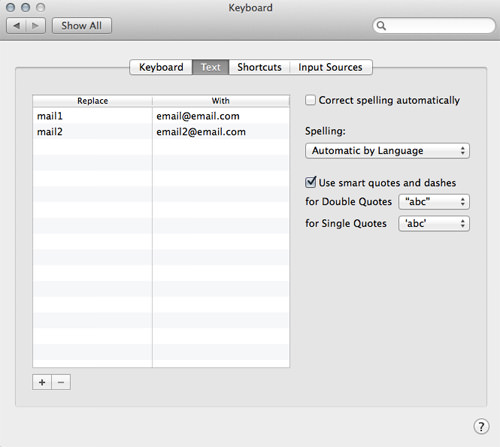
12. Use The Built-in Text Expander
If you’ve already mastered keyboard shortcuts to improve your speed and productivity, Mac with a text expansion feature that allows you to type a predetermined keyword to then expand it to something longer. You can access these settings in System Preferences > Keyboard > Text.
Do note that this text expansion only works on select Mac Apps.
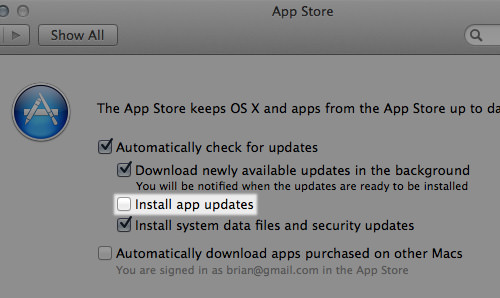
13. Enable/Disable Auto App Updates
Just like iOS, Mac can also automatic app updates for your convenience. However, if you’re one who would read the app update change log and update it yourself, you can disable automatic app update. Go to System Preferences > App Store and uncheck Install app updates.
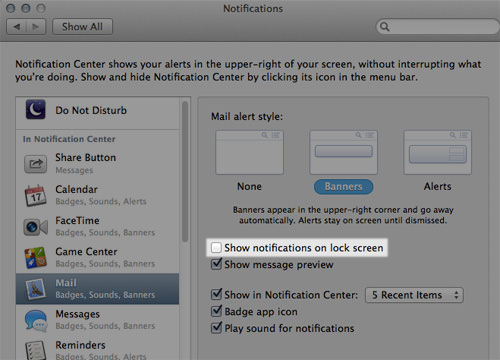
14. Hide Notifications on Lock Screen
Don’t like lockscreen notifications to pop up on your Mac? Disable notifications on your lock screen, by going to System Preferences > Notifications. Within each app, uncheck Show notifications on lock screen.
15. Move Application Windows in The Background
If you need to move a window in the background without switching to it, hold down the Command key before clicking and dragging the application windows.
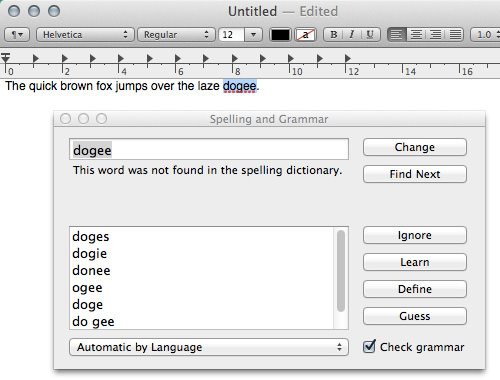
16. Use The Built-in Spelling and Grammar Checker
Apple has a built-in spelling and grammar checker that you can use on selected apps. All you have to do is enter this keyboard shortcut to bring it up: Command + Shift + ;
17. Show One Application at aTime
Desperate times call for desperate measures. If multi-tasking is killing your productivity, you can enable a ‘single application’ mode by entering the following command in Terminal:
defaults write com.apple.dock single-app -bool true
You must then enter this command in order to see the changes:
killall Dock
This mode allows for only 1 application to be shown at one time. It might slow down your multitasking speed, but you’ll be able to concentrate more on that one application without being distracted by any other applications in the background.
18. Show Dock on Secondary Screen
You can make the Dock show on your secondary screen by moving the mouse cursor right to the bottom of the other screen. After a one second delay, the Dock will disappear on your main screen and appear on your secondary screen.
19. Disable Startup Sound
If you find the Mac startup sound obnoxiously loud and want to permanently disable it, you can enter the following command into Terminal:
sudo nvram SystemAudioVolume=%80
You can return it to its default state by entering the following command into Terminal:
sudo nvram -d SystemAudioVolume
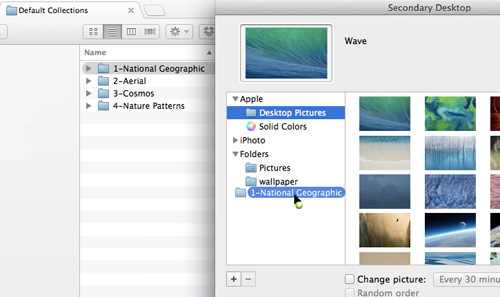
20. Access Hidden Wallpapers
Once you’ve updated to the latest version of Mac, you’ll be greeted with new default wallpapers. However, there are also some wallpapers that are hidden. Run a spotlight search on “Default Collections” and you will be treated with 4 folders with all these awesome wallpapers.
From there, you can drag and drop these 4 folders into the desktop background options to use these wallpapers.