How to Make Mac Run Faster Again (10 Steps)
Is your Mac not performing as it used to? Are you missing the days when everything ran smoothly and applications launched in the blink of an eye? If so, you’re in the right place. This comprehensive guide is designed to help you breathe new life into your Mac, restoring its speed and efficiency.

Over time, it’s natural for computers to slow down due to accumulated files, outdated software, and hardware wear. But don’t worry, there’s no need to start thinking about a replacement just yet. With a few simple tweaks and optimizations, you can significantly enhance your Mac’s performance and make it run like new again.
In this guide, we’ll walk you through a series of proven strategies to boost your Mac’s performance, from clearing cache files and managing startup items, to optimizing storage and reducing visual effects. We’ll also discuss potential hardware upgrades for those who want to take their Mac’s performance to the next level.
So, whether you’re using your Mac for work, creative projects, or everyday tasks, these tips will help you make the most of your machine. Let’s dive in and start optimizing your Mac for speed and efficiency!
1. Clear Cache Files
Cache files are temporary data stored by your system and apps to speed up certain processes. Over time, these files can accumulate and take up significant storage space, potentially slowing down your Mac. Here’s how you can clear them:
Manually Clearing Cache Files
- System Cache: Open Finder and select “Go to Folder” in the Go menu. Type in
/Library/Cachesand press enter. You’ll see a bunch of folders, each corresponding to an app on your Mac. You can go into each folder and delete the files inside, but do not delete the folders themselves.
- User Cache: This is similar to the system cache but is specific to your user profile. You can access it by going to
~/Library/Caches(the tilde represents your user directory). - Browser Cache: Each web browser will have its own method of clearing cache. For example, in Safari, you can clear the cache by choosing “Clear History” from the History menu, then selecting “all history“.

Using Third-Party Tools
There are several third-party tools that can simplify the process of clearing cache files. Here are a few examples:
- CleanMyMac X: This is a popular Mac cleaning tool that can help you remove system junk, including cache files, with just a few clicks. It also offers other features like malware removal and optimization. Learn more on removing leftover apps with CleanMyMac X.
- OnyX: OnyX is a multifunction utility for macOS that allows you to verify the startup disk and the structure of its system files, run miscellaneous tasks of system maintenance, configure some hidden parameters of the Finder, Dock, Safari, and more.
- CCleaner: CCleaner is another well-known cleaning tool that’s available for Mac. It can help you clean up cache files and other system junk.
Note: It’s important to be careful when deleting system files. If you’re not sure about something, it’s best to leave it alone or use a trusted third-party tool. Always make sure you have a current backup of your data before making these kinds of changes.
2. Uninstall Unnecessary Applications
Over time, you may accumulate applications that you no longer use. These applications can take up valuable storage space and potentially slow down your system. Here’s how you can uninstall them:
Manually Uninstalling Applications
- Using the Trash: Open Finder and go to the Applications folder. Find the application you want to uninstall, click and drag it to the Trash, then empty the Trash. Note that this method may leave behind some associated files.
- Using Launchpad: If you downloaded the app from the App Store, you can use Launchpad to uninstall it. Open Launchpad, click and hold on the app until it starts to jiggle, then click the “X” that appears on the app.

Using Third-Party Tools
Manually uninstalling applications can sometimes leave behind associated files, such as preferences and support files. Third-party uninstaller tools can help ensure these files are removed along with the application. Here are a few examples:
- AppCleaner: AppCleaner is a small application which allows you to thoroughly uninstall unwanted apps. You just need to drag and drop an application onto the AppCleaner window, it will find all the related files and you can delete them by clicking “Remove“.
- CleanMyMac X: In addition to cleaning up system junk, CleanMyMac X also has an uninstaller feature. It can help you remove applications and their associated files. Learn how to show all installed apps with CleanMyMac X.
- AppZapper: AppZapper is another popular uninstaller tool for Mac. It allows you to confidently uninstall virtually any application as easily as it was installed — just drag and drop.
Note: Always make sure you have a current backup of your data before making these kinds of changes.
3. Manage Startup Items
Startup items, also known as login items, are applications, documents, shared volumes, or other items that automatically open or start running when you boot up your Mac. While these can be convenient, having too many can slow down your startup time. Here’s how you can manage them:
Manually Managing Startup Items
- System Preferences: Open "System Settings" and go to "General" > "Login Items". You’ll see a list of items that open when you log in. To remove an item, select it and click the “–” button.

- Application Settings: Some applications might set themselves as startup items within their own settings. Check the preferences or settings of your applications to see if this is the case.
Using Third-Party Tools
While managing startup items manually is straightforward, there are also third-party tools that can help. These tools often provide additional features, like the ability to delay startup items or manage hidden items. Here are a few examples:
- CleanMyMac X: CleanMyMac X has a feature called "Optimization" that allows you to manage your startup items. It also provides options to improve system performance and speed up your Mac.
- CCleaner: CCleaner for Mac includes a startup manager in its "Tools" section. This can help you see and manage all the items that start up with your Mac.
Note: Be careful when managing startup items. Some items might be necessary for certain applications or system functions to work properly. If you’re not sure about an item, it’s best to leave it alone or do some research before removing it. As always, make sure you have a current backup of your data before making these kinds of changes.
4.Update Your Software
Keeping your software up to date is crucial for the smooth operation of your Mac. Updates often include bug fixes, security patches, and performance improvements. Here’s how you can update your software:
Manually Updating Software
- MacOS Updates: You can check for system updates by going to "System Settings" > "General" > "Software Update". If an update is available, you can click “Update Now” to install it. You can also check the box to automatically keep your Mac up to date.

- App Store Updates: If you have apps that were downloaded from the Mac App Store, you can update them by going to the App Store and clicking on the “Updates” tab. If updates are available, you can click “Update” next to each app, or “Update All” to update all apps.
- Third-Party App Updates: For apps that were not downloaded from the Mac App Store, you’ll usually find an option to check for updates within the app itself, often in the app’s menu bar or within its preferences or settings.
Using Third-Party Tools
While most software updates need to be managed individually, there are some tools that can help you keep track of updates for all your apps in one place. Here are a couple of examples:
- CleanMyMac X: CleanMyMac X has an "Updater" feature that shows you all available updates for your apps, whether they’re from the App Store or directly from the developer.
- MacUpdate Desktop: MacUpdate Desktop is a tool that can automatically track updates for all your apps. It can notify you when updates are available and install them for you.
Note: It’s always a good idea to back up your data before installing any major updates, just in case something goes wrong.
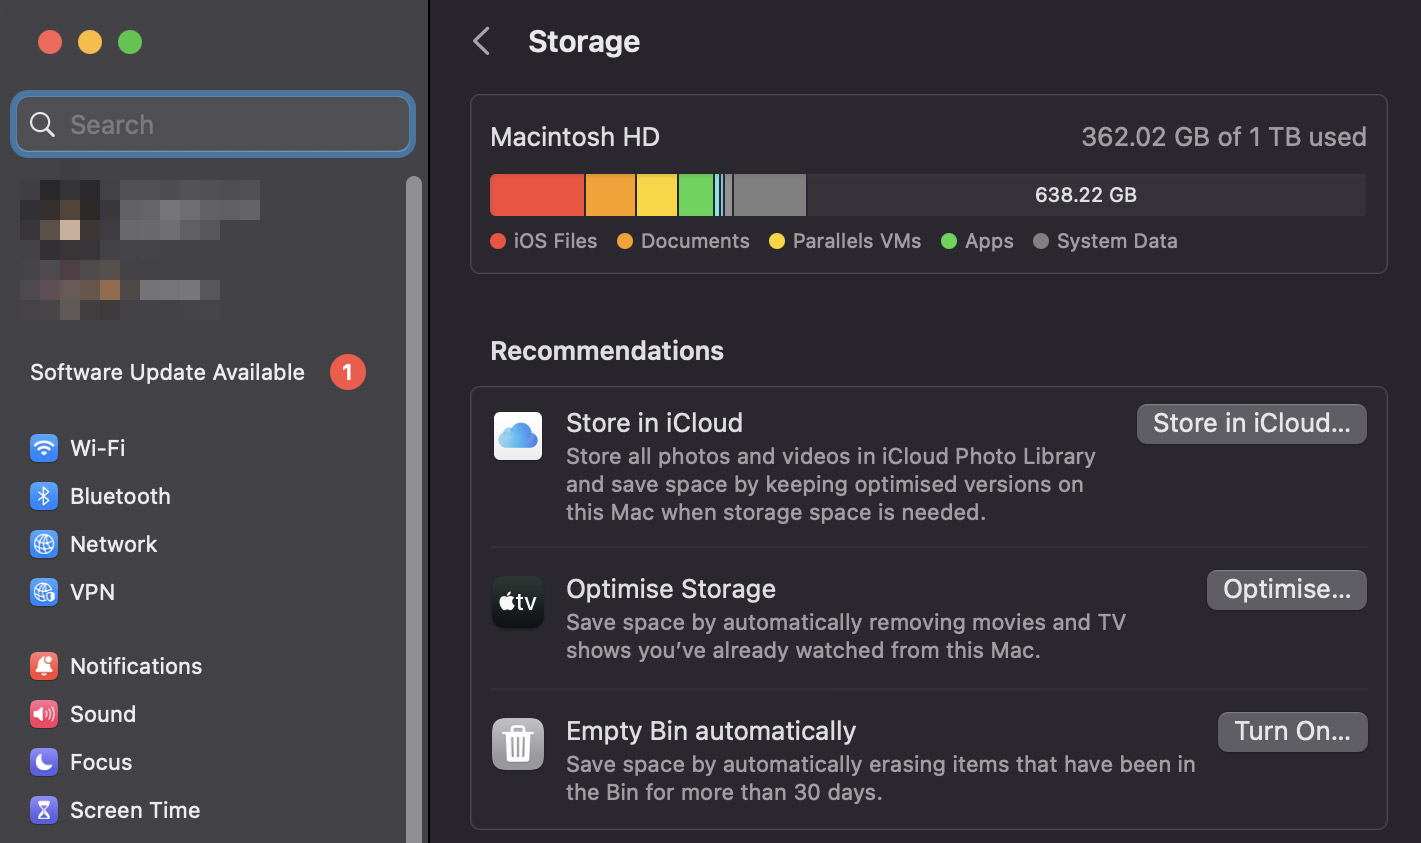
5. Optimize Storage
Optimizing storage can help free up space on your Mac by storing content in the cloud and removing files you don’t use. Here’s how you can use it:
Manually Optimizing Storage
You can access this tool by going to "System Settings" > "General" > "Storage". Here you’ll see several options:
- Store in iCloud: This option moves photos and text messages to iCloud when storage is needed. Only recent files will be kept on your Mac to be readily accessible.
- Optimize Storage: This option removes TV shows and movies you’ve already watched and only keeps recent email attachments.
- Empty Trash Automatically: This option automatically removes items that have been in the Trash for more than 30 days.
Using Third-Party Tools
While the built-in Optimize Storage tool can be very helpful, there are also third-party tools that offer more features and flexibility. Here are a few examples:
- CleanMyMac X: CleanMyMac X has a feature called "Space Lens" that helps you visualize and clear out large and old files. It also has tools for cleaning up system junk, mail attachments, and more. Learn how to find out space-hogging files with CleanMyMac X.
- DaisyDisk: DaisyDisk gives you a visual representation of your disk, allowing you to see what’s taking up space. You can then delete unnecessary files directly within the app.
- Gemini 2: Gemini 2 is a tool specifically designed to find and remove duplicate files, which can take up a lot of space over time.
Note: Always make sure you have a current backup of your data before making these kinds of changes.
6. Reindex Spotlight
Spotlight is a system-wide desktop search feature on your Mac that helps you find documents, emails, apps, and other files. Sometimes, Spotlight might not work properly, and reindexing it can help solve the problem. Here’s how you can do it:
Manually Reindexing Spotlight
- System Preferences: Go to "System Settings" > "Siri & Spotlight", then click on "Spotlight Privacy" at the bottom. Here, you can add a folder or disk that you want to prevent Spotlight from searching. To reindex a folder or disk, you can add it to the list, then remove it. When you remove the folder or disk, Spotlight will reindex it.

- Terminal: You can also reindex Spotlight using Terminal. Open Terminal and type
sudo mdutil -E /then press Enter. You’ll be asked for your password. This command will erase and rebuild the index for your main hard drive.
Using Third-Party Tools
While reindexing Spotlight is generally straightforward, there are some third-party tools that can help if you’re having trouble. Here are a few examples:
- OnyX: OnyX is a multifunction utility for macOS that allows you to verify the startup disk and the structure of its system files, run miscellaneous tasks of system maintenance, configure some hidden parameters of the Finder, Dock, Safari, and more. It also has a feature to rebuild Spotlight’s index.
- Alfred: Alfred is an alternative to Spotlight with more features and customization options. If you’re having ongoing issues with Spotlight, you might consider trying Alfred instead.
Note: Reindexing Spotlight can take some time, and your Mac might run slowly while indexing is in progress. It’s best to do this when you don’t need to use your Mac for a while. As always, make sure you have a current backup of your data before making these kinds of changes.
7. Reset SMC and PRAM
The SMC and PRAM are parts of your Mac that control certain hardware functions. If you’re experiencing issues with things like your Mac’s display, battery, or sleep functions, you might need to reset the SMC or PRAM. Here’s how you can do it:
Resetting the SMC
The method to reset the SMC depends on the type of Mac you have:
- Desktop Macs (including Mac Pro, Mac Mini, and iMac): Shut down your Mac, then unplug the power cord. Wait 15 seconds, then plug the power cord back in. Wait another 5 seconds, then turn on your Mac.
- MacBooks with non-removable batteries (most MacBooks 2009 and later): Shut down your Mac, then press and hold the left Shift, Control, and Option keys while also pressing the power button for 10 seconds. Release all keys, then press the power button to turn on your Mac.
- MacBooks with removable batteries: Shut down your Mac and remove the battery. Press and hold the power button for 5 seconds, then reinsert the battery and turn on your Mac.
Resetting the PRAM
To reset the PRAM, turn off your Mac, then turn it on and immediately press and hold the Option, Command, P, and R keys. Release the keys after about 20 seconds. Your Mac might appear to restart during this process.
Using Third-Party Tools
While resetting the SMC and PRAM is generally straightforward, there are some third-party tools that can help if you’re having trouble. However, due to the nature of these resets affecting low-level system functionality, they are typically performed manually as described above.
Note: Resetting the SMC and PRAM can change certain system settings, so you might need to reconfigure things like your time zone, display resolution, or startup disk selection. As always, make sure you have a current backup of your data before making these kinds of changes.
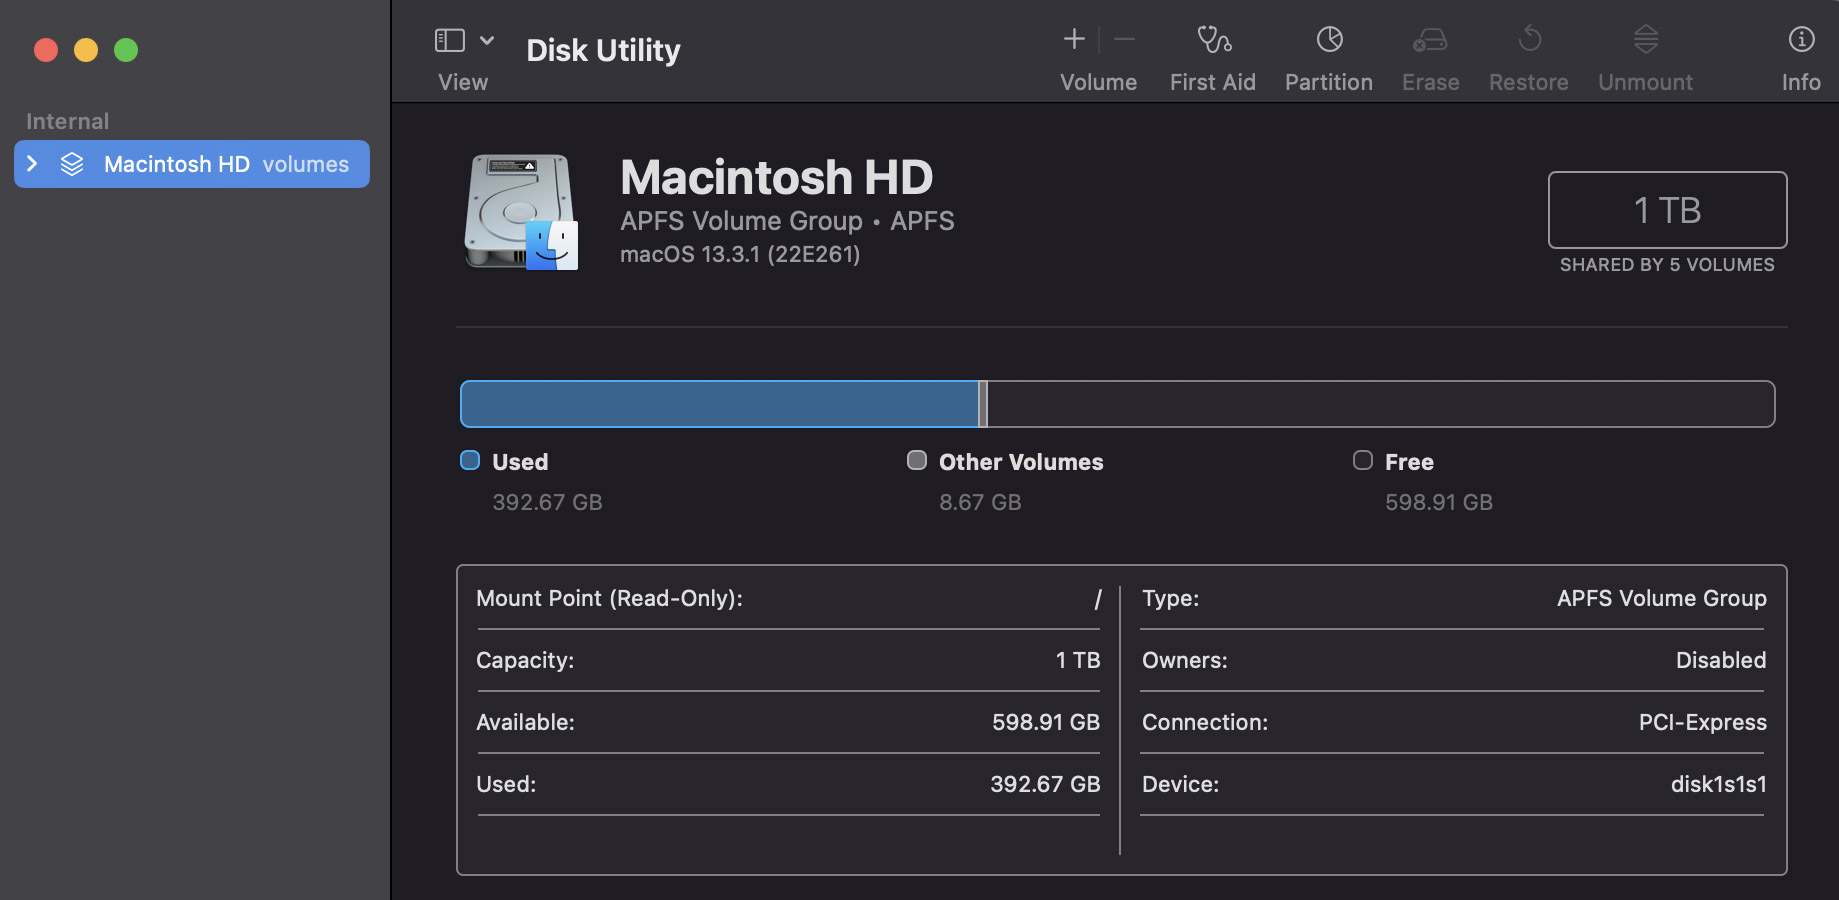
8. Run Disk Utility
Disk Utility is a built-in tool on your Mac that can find and repair issues with your Mac’s disk. It can also help you manage your storage and perform other disk-related tasks. Here’s how you can use it:
Using Disk Utility
- First Aid: Open Disk Utility (you can find it in "Applications" > "Utilities", then select your startup disk in the sidebar. Click the "First Aid" button, then click "Run". Disk Utility will check the disk and attempt to repair any issues it finds.
- Disk Cleanup: Disk Utility can also help you manage your storage. You can use it to erase free space, delete volumes, or erase entire disks (be careful with this one!).
- Disk Images: Disk Utility can create and manage disk images. This can be useful for backing up your data or moving files.
Using Third-Party Tools
While Disk Utility is a powerful tool, there are also third-party tools that offer more features and flexibility. Here are a few examples:
- TechTool Pro: TechTool Pro is a robust tool for maintaining, troubleshooting, and optimizing your Mac. It includes features for testing and repairing disks, recovering data, and more.
- DriveDx: DriveDx is an advanced drive health diagnostic and monitoring utility. It can help you check the health of your disk and predict drive failures.
- DiskWarrior: DiskWarrior is a tool focused on repairing and rebuilding corrupted disk directories.
Note: Always make sure you have a current backup of your data before making these kinds of changes, especially when working with disk utilities. Disk-related tasks can potentially erase data, so it’s important to be careful.
9. Reduce Visual Effects
macOS uses some visual effects like motion and transparency. These can slow down older Macs or Macs with less powerful hardware. Here’s how you can reduce these effects:
Manually Reducing Visual Effects
- Reduce Transparency: Go to "System Settings" >"Accessibility"> "Display", then check the box for “Reduce transparency“. This will reduce the transparency effects used throughout the system, such as in the Dock and menu bar.

- Reduce Motion: In the same "Accessibility" > "Display settings", you can also check the box for “Reduce motion“. This will reduce the motion effects used in the system, such as when opening Mission Control or switching between apps.
- Dock Preferences: Go to "System Settings" > "Desktop & Dock", then check the box for “Minimize windows using: Scale effect“. This will change the animation used when minimizing windows to a simpler effect.

Using Third-Party Tools
While most visual effects can be reduced using the built-in system preferences, there are also third-party tools that can provide more customization. Here are a few examples:
- TinkerTool: TinkerTool is an application that gives you access to additional system settings Apple has built into macOS. This includes the ability to disable or enable animation effects.
- OnyX: OnyX is a multifunction utility for macOS that allows you to tweak the system’s hidden parameters, which includes disabling some animations.
Note: These changes will alter the look and feel of your Mac’s interface. If you find that you don’t like the changes, you can easily revert them by unchecking the boxes in the system preferences. As always, make sure you have a current backup of your data before making these kinds of changes.
10. Upgrade Your Hardware
Upgrading your hardware can significantly improve the performance of your Mac, especially if it’s older. Here are a few upgrades you might consider:
Hardware Upgrades
- RAM (Memory): Adding more RAM can help your Mac handle more tasks at once. This is especially helpful if you often have many applications open at the same time or use memory-intensive applications like video editing software.
- SSD (Solid State Drive): If your Mac has a traditional hard drive, upgrading to an SSD can significantly improve performance. SSDs are much faster than traditional hard drives, which means your Mac can read and write data more quickly.
- CPU (Processor): Upgrading the processor can also improve performance, but this is a much more complex upgrade that is often not possible on most Macs due to the CPU being soldered onto the motherboard.
Using Third-Party Tools
While upgrading hardware is typically a manual process, there are tools and services that can help:
- OWC (Other World Computing): OWC offers a wide range of hardware upgrades for Macs, including memory and SSD upgrades. They also provide detailed installation videos and customer support.
- Crucial: Crucial’s website offers a tool that can help you find compatible memory and SSD upgrades for your Mac.
- Apple Store or Authorized Service Provider: If you’re not comfortable upgrading your Mac’s hardware yourself, you can take it to an Apple Store or an Apple Authorized Service Provider. They can perform upgrades and ensure everything is installed correctly.
Note: Upgrading hardware can be risky and may void your warranty. Always make sure you have a current backup of your data before making these kinds of changes. If you’re not comfortable performing these upgrades yourself, it’s best to seek professional help.