How to Install Windows Boot Camp Without An Optical Drive
Editor’s Note: Previously, we published a post by Daniel Pataki on How To Install Windows on Mac when all else fails. Alvaro is one of the many readers who left a comment on that thread. Below is his version on how to get Windows Boot Camp, and thus, Windows, on your Mac.
I have a late 2009 27" iMac which has a built-in Optical Drive, one that is not operational anymore. I’m not sure why it refuses to work, but I tried cleaning it with canned air, which improved its condition a little because now at least it "swallows" the DVD and spins it – it just never recognizes it. I also have a MacBook Air which I successfully installed Boot Camp on with the use of an external drive. Still, I wanted a way to install it without the drive.
What Didn’t Work
So I tried lots of things.
The first one, was enabling the Boot Camp Assistant app to create bootable USB drives. It didn’t work, because after the application created the USB drive, it made a partition and rebooted. I was supposed to see the windows installer, but instead, all I saw was a blinking white line on a black screen. After several minutes of this, I gave up and force-booted my computer.
Next, I tried creating a partition on my own, using disk utility, formatting it as FAT32, and then attempted to boot from the USB. This did not work either. When I booted my Mac in the boot option menu, it did not show the partition, nor the "bootable" USB.
And that’s when I found this tutorial by Daniel Pataki, which I tried on my MacBook Air and it worked like a charm, despite the long and complex process. When I tried it on my iMac, however, things didn’t go well. When I tried to boot the VM from the Boot Camp partition and install windows, the VM booted into a black screen saying "Missing Operative System".
How to Install Chrome on a Different Drive in Windows
My PC has a small hard drive, so I have only allocated 25GB of space to the C... Read more
Finding Plan B
I had given up on other methods, and I decided to sleep on the problem of installing Boot Camp on my Mac when I suddenly thought about the Apple Watch. You see, what Apple has always wanted is for us users to buy a new model of Mac whenever the older one cannot do something. It’s the answer to why certain Mac models can create bootable USB drives while others can’t.
I then asked myself if USB drives have the same restrictions. One thing led to another and this is the way I install Windows on My Mac now. And it is way, way easier.
What Did Work
Here’s what we’ll be doing:
- Create a Bootable USB
- Create Partition
- Install Windows
Yes, it’s really that simple.
Create a bootable USB
1. Locate a Windows PC.
2. Download two things: a Windows 7 USB download tool directly from Microsoft, and a full Windows ISO of the version you want to install.
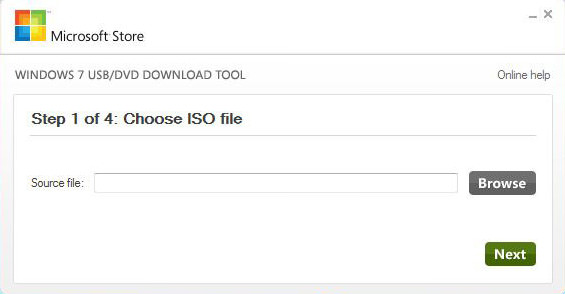
3. Open the Windows 7 USB download tool and browse to your ISO file, click continue and follow the instructions in the next section to create your Bootable USB.
Create a Windows Partition
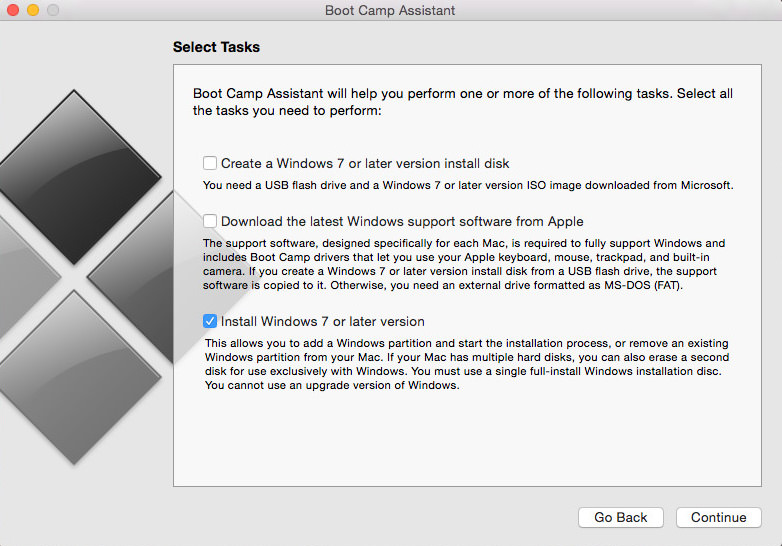
We will be using Boot Camp Assistant.. well, sort of.
- 1. First, we need to make the application recognise USB drives. Go to Finder > Applications > Utilities, and right click on Boot Camp Assistant, then click "Show package contents".
- 2. Navigate into Contents, locate the "info.plist" file then make a copy (do not move the original) of it to your desktop. If you like, make another copy as a backup, just in case something goes wrong.
- 3. Open the "info.plist" file located on your desktop, look for the line of text saying PreUSBBootModels and erase the "Pre" from there, save the file (CMD+S) and close it.
- 4. Drag the modified info.plist file from your desktop to the Contents folder we opened previously. It will ask you to Authenticate with your administrator Name and Password. Click Replace.
- 5. If you were to open Boot Camp Assistant now, and it crashes, that’s because it detected that a modification has been made. If this happens, open terminal and type the following command:
sudo codesign -fs - /Applications/Utilities/Boot\ Camp\ Assistant.app
- Enter your Administrator Password and hit enter. Now you can open Disk Utility.
- 6. Make sure your Bootable USB is plugged in. Open Boot Camp Assistant and you will see 3 options.
- Check Install windows, and hit continue, select the size you want to dedicate to windows and click Install. The process might take several minutes.
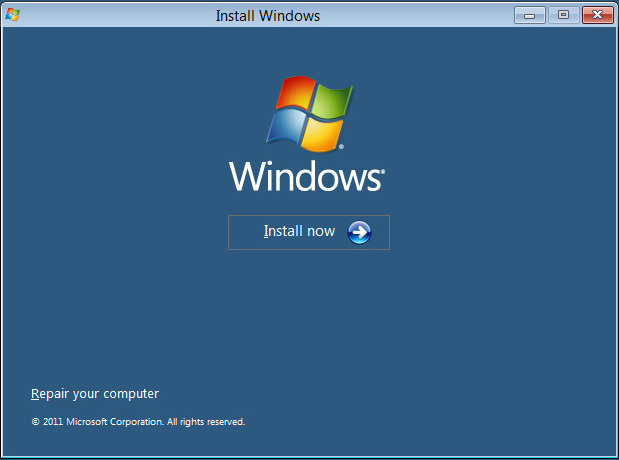
Install Windows
Once the Partition is ready, your computer will restart into the Windows installer, follow all the instructions, and enjoy your new windows partition!
Remember that when you finish the installation process, you should download and install the proper Boot Camp Support Drivers so that everything works perfectly.