How to Create Chrome Extensions from Scratch
If you wish to add or modify some functionality in Google Chrome, you need to use an extension. Though you can download an extension from the Chrome Web Store, but sometimes you need a specific functionality that you can’t find in any existing extension.
Well, the good news is that you can create your own extension to add or modify the required functionality or make a new add-on or app for Google Chrome, which you can later distribute to other users using the Chrome Web Store.
In the following, I’m going to show you the easiest way to create an extension. If you have some knowledge of web development (HTML, CSS, and JS), you will feel right at home. If not, first watch these channels to learn the basics of web development, then continue below.
15 Chrome Extensions to Spice Up Blank New Tabs
Enhance your browsing experience with these 15 unique Google Chrome extensions for new tabs. Read more
Prerequisites
You need to have the following requirements completed before starting with this tutorial.
- You must be familiar with HTML, CSS, and JavaScript. [Check resources]
- You must have a code editor to write the extension. [Compare editors]
- (Optional) If you wish to distribute your extension to other users, you must have a developer account at Chrome Web Store. [Create an account]
Note: Google asks you to pay a small fee for creating a developer account at the Chrome Web Store.
Create an extension
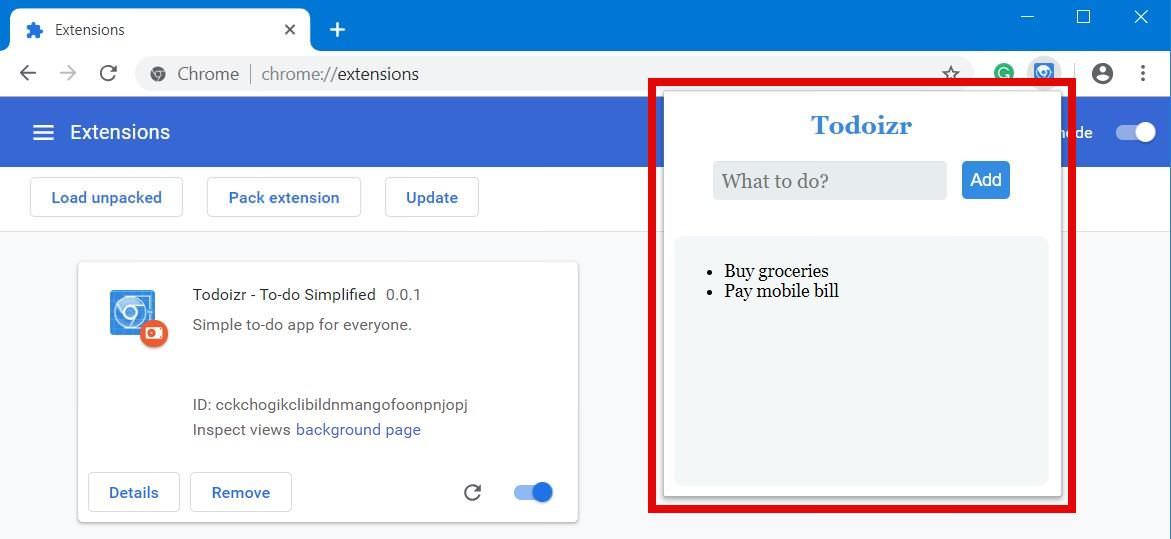
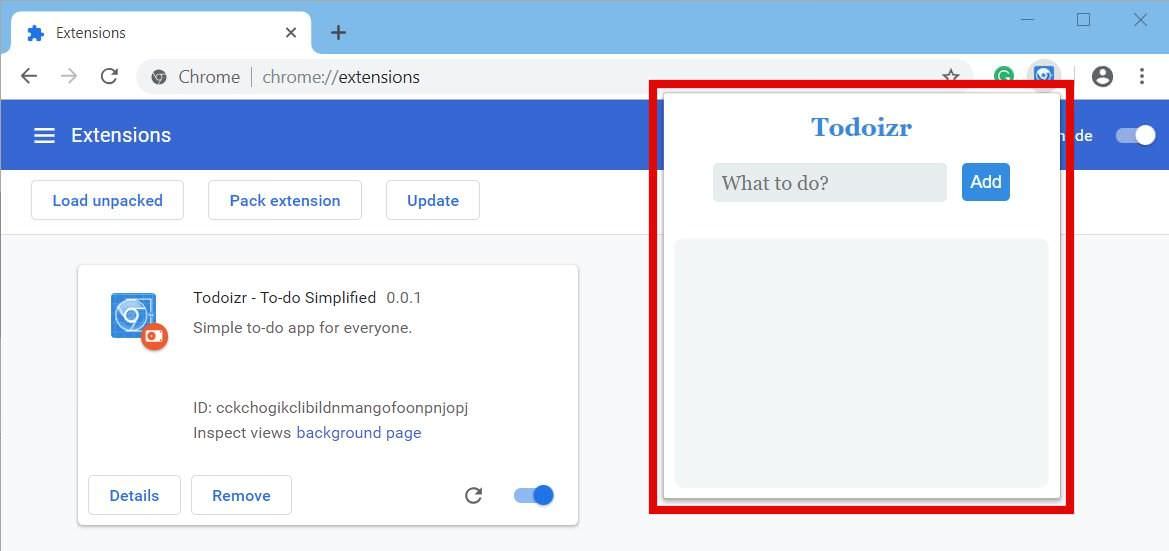
In this tutorial, I am going to share the process of creating a to-do extension for Google Chrome. It is going to be a utility (as shown below) to demonstrate essential components and the abilities provided to the extensions.
Step 1. Get a template
Google Chrome, like any other platform, requires its extensions to have a set structure, which may seem complex for beginners. That is why it is good to get a boilerplate template for an extension that will provide all necessities.
Extensionizr is the best boilerplate generator for chrome extensions. It allows you to choose one of the given extension types — browser action (an action for all pages or the browser), page action (an action for the current page), or hidden extension (a background action that is usually hidden in the front interface).
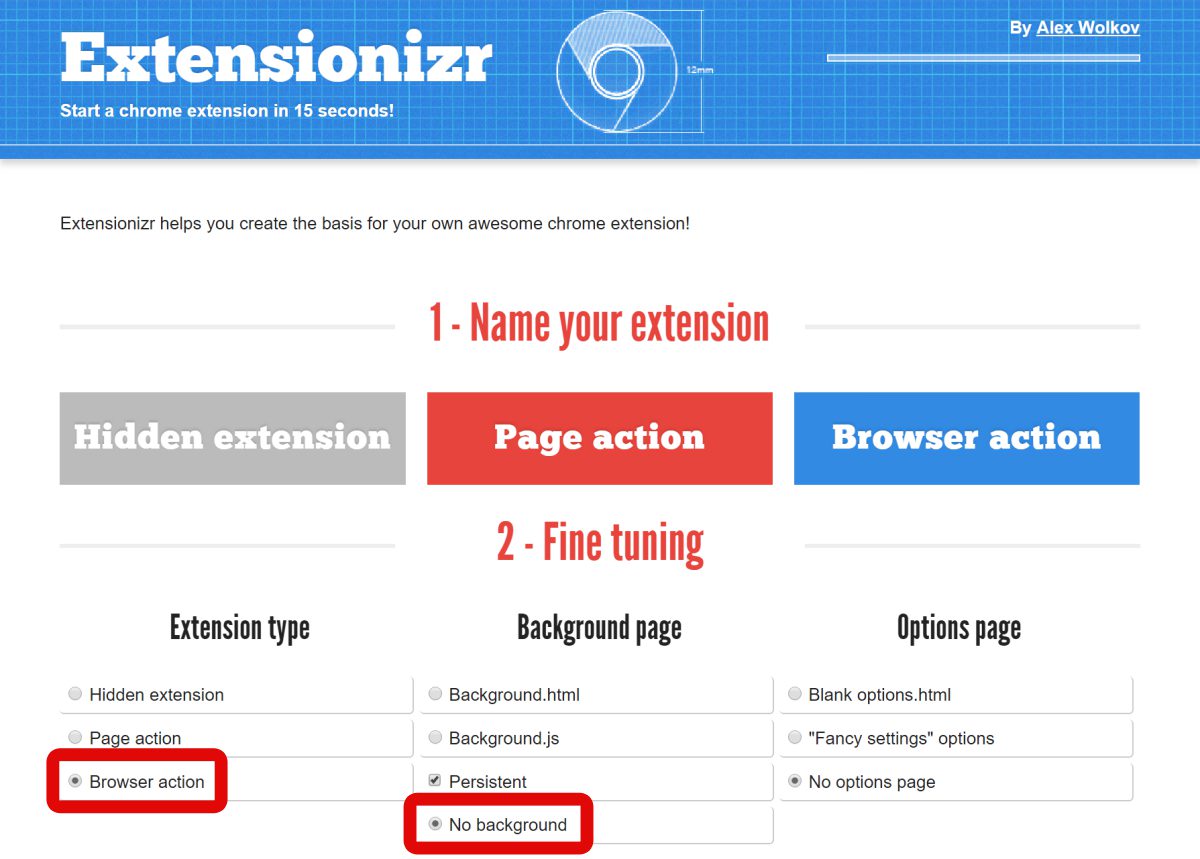
Moreover, it provides various fine-tuning options to include/exclude necessary add-ons, permissions, etc. You need to select “Browser action” as the extension type and “No background” as the background page for this tutorial.
When you are done choosing the options for creating your sample extension, hit the “Download it!” button in Extensionizr. Finally, extract the archive (.zip) to a directory and open your code editor to start writing the extension.
Step 2. Code the extension
After you’ve downloaded and extracted the template, you’ll see a directory structure as shown in the below screenshot. The template is neatly organized, and you must know that the most important file is “manifest.json“.
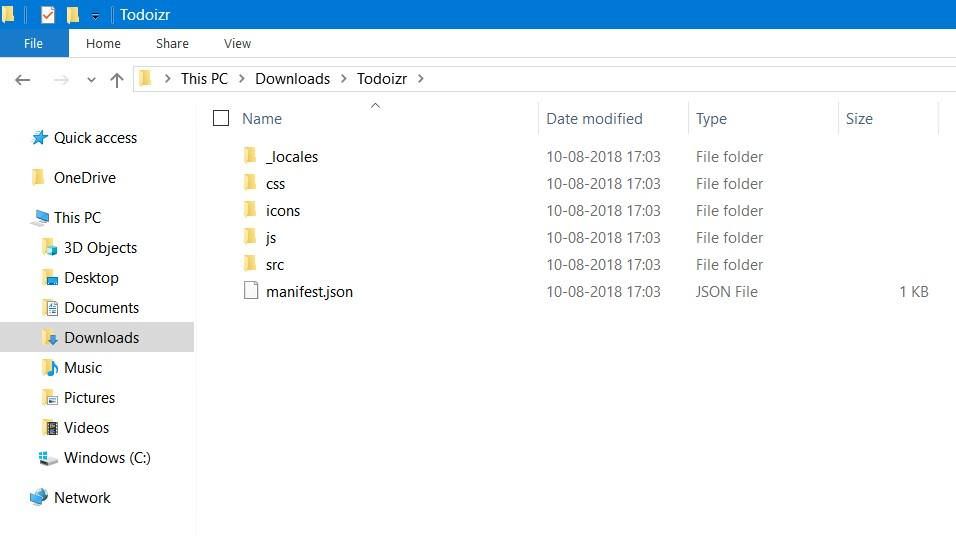
Let’s get to know other files and folders in this directory as well:
- _locales: It is used to store language information for a multilingual app.
- css: It functions to store third-party front-end libraries like Bootstrap.
- icons: It is designed to have icons for your extension in varied sizes.
- js: It comes handy to save third-party back-end libraries like jQuery.
- src: It stores the actual code that you will write for your extension.
manifest.json
It contains the basic metadata about your app, which defines your app’s details to the browser. You can edit it to set your extension’s name, description, website, icon, etc. along with specifics like browser actions and permissions.
For example, in the below code, you’ll notice that I changed the name, description, and homepage_url along with default_title under browser_action. Moreover, I added “storage” under permissions as we need to store data in our extension.
{
 "name": "Todoizr - To-do Simplified",
 "version": "0.0.1",
 "manifest_version": 2,
 "description": "Simple to-do app for everyone.",
 "homepage_url": "https://go.aksingh.net/todoizr",
 "icons": {
  "16": "icons/icon16.png",
  "48": "icons/icon48.png",
  "128": "icons/icon128.png"
 },
 "default_locale": "en",
 "browser_action": {
  "default_icon": "icons/icon19.png",
  "default_title": "Todoizr - To-do Simplified",
  "default_popup": "src/browser_action/browser_action.html"
 },
 "permissions": [
  "storage"
 ]
}
src\browser_action
This directory will hold the code for browser action. In our case, we will code the popup window shown at clicking the extension’s icon in the browser. Our extension will allow users to add and view to-do items in the popup.
Initial code from the template
Though this directory had just an HTML file having all the code, I have decided to divide it into three separate files for better clarity. That said, the HTML file named “browser_action.html” now has the following code:
<!doctype html>
<html>
<head>
 <link rel="stylesheet" href="./browser_action.css"/>
</head>

<body>
 <div id="mainPopup">
 </div>

 <script type="text/javascript" src="./browser_action.js"></script>
</body>
</html>
Moreover, the style file named “browser_action.css” has the below content while the JavaScript file named “browser_action.js” is blank for now.
#mainPopup {
 padding: 10px;
 height: 200px;
 width: 400px;
 font-family: Helvetica, Ubuntu, Arial, sans-serif;
}

h1 {
 font-size: 2em;
}
Design the popup’s interface
After setting up the initial project, let’s first design the interface of the popup. I have set up the interface with a minimalistic approach, showing the name at the top followed by a form to add to-do items and an area below for viewing the added items. It is inspired by the simplistic design of “Form Style 5“.
In the code below, I have added two divs – one for displaying the form to add a to-do item and the other one for displaying the list of already added to-do items. That said, the new code for “browser_action.html” is as follows:
<!doctype html>
<html>
<head>
 <link rel="stylesheet" href="./browser_action.css"/>
</head>

<body>
 <div id="mainPopup">

 	<!-- To-do item form -->
  <div class="form-style-5" id="form">
   <h1>Todoizr</h1>
   <form>
    <fieldset>
     <input type="text" name="todo" placeholder="What to do?" id="txt">
     <input type="button" value="Add" id="btn" />
    </fieldset>
   </form>
  </div>

  <!-- To-do item list -->
  <div class="form-style-5">
   <ul id="list">

   </ul>
  </div>
 </div>

 <script type="text/javascript" src="./browser_action.js"></script>
</body>
</html>
And the style file “browser_action.css” now has the following code:
@import url("./form_style_5.css");

#mainPopup {
 height: 200px;
 width: 300px;
 font-family: Helvetica, Ubuntu, Arial, sans-serif;
}

/* To-do item form */

.form-style-5 {
 margin: auto;
 padding: 0px 20px;
}

.form-style-5:first-child {
 background: none;
}

.form-style-5 h1 {
 color: #308ce3;
 font-size: 20px;
 text-align: center;
}

.form-style-5 input[type="text"] {
 width: auto;
 float: left;
 margin-bottom: unset;
}

.form-style-5 input[type="button"] {
 background: #308ce3;
 width: auto;
 float: right;
 padding: 7px;
 border: none;
 border-radius: 4px;
 font-size: 14px;
}

.form-style-5 input[type="button"]:hover {
 background: #3868d5;
}

/* To-do item list */

.form-style-5:last-child {
 height: inherit;
 margin-bottom: 5px;
}

.form-style-5 ul {
 padding: 20px;
}

.form-style-5 ul li {
 font-size: 14px;
}
Lastly, the third-party style file “form_style_5.css” has the below content. It is simply taken from its website to inspire the design of our extension.
/* Form Style 5 by Sanwebe.com */
/* https://www.sanwebe.com/2014/08/css-html-forms-designs */

.form-style-5{
 max-width: 500px;
 padding: 10px 20px;
 background: #f4f7f8;
 margin: 10px auto;
 padding: 20px;
 background: #f4f7f8;
 border-radius: 8px;
 font-family: Georgia, "Times New Roman", Times, serif;
}
.form-style-5 fieldset{
 border: none;
}
.form-style-5 legend {
 font-size: 1.4em;
 margin-bottom: 10px;
}
.form-style-5 label {
 display: block;
 margin-bottom: 8px;
}
.form-style-5 input[type="text"],
.form-style-5 input[type="date"],
.form-style-5 input[type="datetime"],
.form-style-5 input[type="email"],
.form-style-5 input[type="number"],
.form-style-5 input[type="search"],
.form-style-5 input[type="time"],
.form-style-5 input[type="url"],
.form-style-5 textarea,
.form-style-5 select {
 font-family: Georgia, "Times New Roman", Times, serif;
 background: rgba(255,255,255,.1);
 border: none;
 border-radius: 4px;
 font-size: 16px;
 margin: 0;
 outline: 0;
 padding: 7px;
 width: 100%;
 box-sizing: border-box;
 -webkit-box-sizing: border-box;
 -moz-box-sizing: border-box;
 background-color: #e8eeef;
 color:#8a97a0;
 -webkit-box-shadow: 0 1px 0 rgba(0,0,0,0.03) inset;
 box-shadow: 0 1px 0 rgba(0,0,0,0.03) inset;
 margin-bottom: 30px;

}
.form-style-5 input[type="text"]:focus,
.form-style-5 input[type="date"]:focus,
.form-style-5 input[type="datetime"]:focus,
.form-style-5 input[type="email"]:focus,
.form-style-5 input[type="number"]:focus,
.form-style-5 input[type="search"]:focus,
.form-style-5 input[type="time"]:focus,
.form-style-5 input[type="url"]:focus,
.form-style-5 textarea:focus,
.form-style-5 select:focus{
 background: #d2d9dd;
}
.form-style-5 select{
 -webkit-appearance: menulist-button;
 height:35px;
}
.form-style-5 .number {
 background: #1abc9c;
 color: #fff;
 height: 30px;
 width: 30px;
 display: inline-block;
 font-size: 0.8em;
 margin-right: 4px;
 line-height: 30px;
 text-align: center;
 text-shadow: 0 1px 0 rgba(255,255,255,0.2);
 border-radius: 15px 15px 15px 0px;
}

.form-style-5 input[type="submit"],
.form-style-5 input[type="button"]
{
 position: relative;
 display: block;
 padding: 19px 39px 18px 39px;
 color: #FFF;
 margin: 0 auto;
 background: #1abc9c;
 font-size: 18px;
 text-align: center;
 font-style: normal;
 width: 100%;
 border: 1px solid #16a085;
 border-width: 1px 1px 3px;
 margin-bottom: 10px;
}
.form-style-5 input[type="submit"]:hover,
.form-style-5 input[type="button"]:hover
{
 background: #109177;
}
Write the popup’s logic
Once we are done with the extension’s front-end, let’s now write the logic for its working. We need our extension to be able to add to-do items and also display them in the popup window. So we will add a button click listener to add the input text as a to-do item and a page load listener to show those items.
In the code below, we are going to use two functions — sync.get() and sync.set(), which are part of “chrome.storage“. We need the second one to save the to-do items in the storage and the first one to retrieve them and show them.
That said, below is the final code of the “browser_action.js” file. As you can see below, the code is highly commented to help you understand its purpose.
function loadItems() {
 /* First get() the data from the storage */
 chrome.storage.sync.get(['todo'], function(result) {
  var todo = []

  if (result && result.todo && result.todo.trim() !== '') {
   /* Parse and get the array as it is saved as a string */
   todo = JSON.parse(result.todo)
  }

  console.log('todo.length = ' + todo.length)

  for (var i = 0; i < todo.length; i++) {
   item = todo[i]

   if (item && item.trim() !== '') {
    /* Append the items in the #list for showing them */
    var list = document.getElementById('list')
    var entry = document.createElement('li')
    var text = document.createTextNode(item)

    entry.appendChild(text)
    list.appendChild(entry)
   }
  }
 })
}

/* Load the to-do items upon popup load */
document.addEventListener('DOMContentLoaded', function(){
 console.log('Inside doc.loaded()')

 loadItems()
})

/* Save the to-do item upon button click */
document.getElementById('btn').addEventListener('click', function (ev) {
 console.log('Inside btn.click()')

 text = document.getElementById('txt').value

 if (text && text.trim() !== '') {

  /* First get() old data as calling set() will replace it */
  chrome.storage.sync.get(['todo'], function(result) {
   var todo = []

   if (result && result.todo && result.todo.trim() !== '') {
    /* Parse and get the array as it is saved as a string */
    todo = JSON.parse(result.todo)
   }

   todo.push(text)

   chrome.storage.sync.set({'todo': JSON.stringify(todo)}, function() {
    /* Data is saved now */

    var list = document.getElementById('list')

    while (list.firstChild) {
     list.removeChild(list.firstChild)
    }

    loadItems()
   })
  })
 }
})
Step 3. Load the extension
After you are done writing your extension, it is the time to test it through Google Chrome’s feature that offers to load non-store, unpacked extensions. But first, you must enable the developer mode in your browser: click the options button > choose “More tools” > Extensions, and then toggle on “Developer mode“.
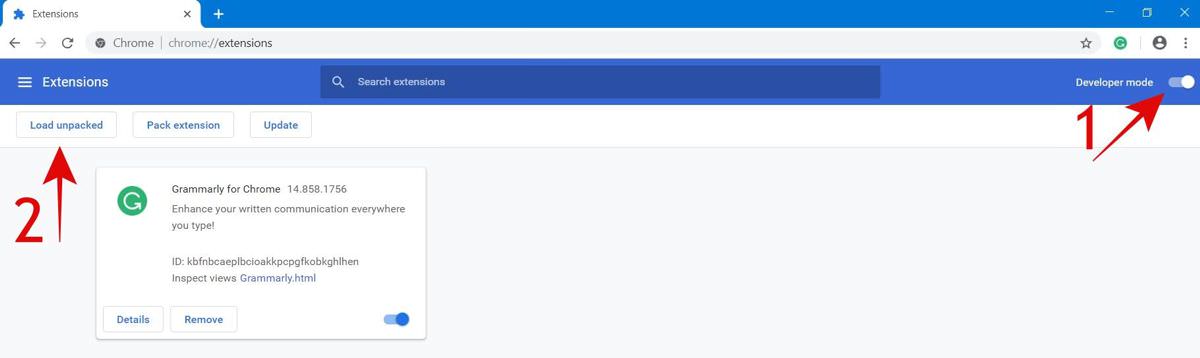
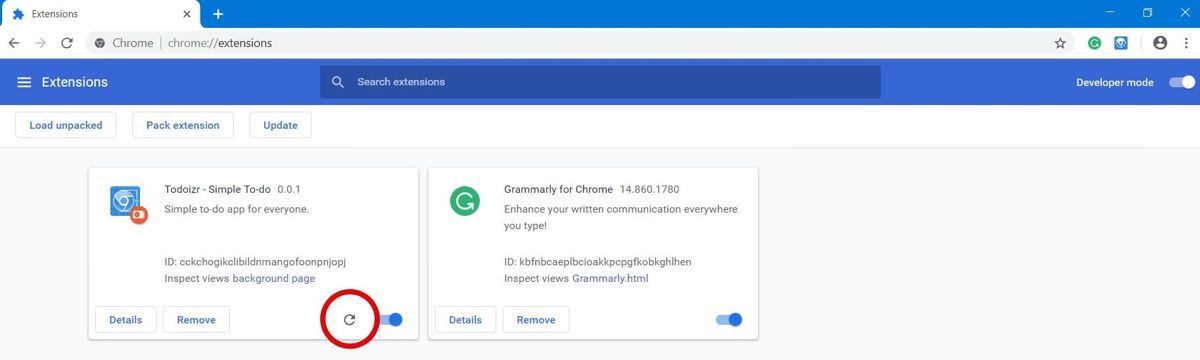
Now you will see more buttons under the search bar. Here click the “Load unpacked” button. It will ask for the directory — browse and select your extension’s directory, and it will load the extension. If you edit or update the code of your extension, you can click the reload button to load the latest changes.
In our example, you will see the extension’s icon beside the profile icon because we added a browser action in our sample extension. You can click that icon to add and view to-do items in our extension as that is the specified action.
Distribute an extension
Though it is easy to upload an extension to Chrome Web Store, the process is too long to cover all the details. In short, you create a developer account, package your extension, and then submit it along with its content details (like name, icon, screenshots, etc.); as listed in its step-by-step guide.
What next? Read and code
As you may have expected, the purpose of this tutorial is to get you started with the extension development for Google Chrome. I have tried to cover the basic concepts; however, you need to know a lot more for doing serious extension development.
That said, below are some of my favorite go-to resources for learning to develop extensions for Google Chrome and other Chromium-based browsers:
- All abilities, components, and features of extensions.
- Sample extensions by the team behind Google Chrome.
If you have gone through these resources and are ready for some challenge, try adding below features in the extension you just completed developing:
- An option to delete the saved to-do items.
- A feature to show notifications when done adding an item.