Effective Tips and Tools for Working with LESS
In our previous tutorial on using LESS to design a navigation bar, we explored the practical use of LESS for code compiling. This time, we’ll cover some tips to enhance your productivity when working with LESS. We’ll set up your working environment with syntax highlighting, automatic compilers, and preset Mixins, and then sync everything together.
If you’re ready, let’s get started.
Disclaimer: These tips are based on my daily experiences as a web designer. They may suit some designers better than others, but I hope you find something useful among them.
1. Code Highlighting
Below are tips for adding LESS highlighting to two popular editors: Sublime Text and Notepad++.
Sublime Text
Sublime Text is my preferred editor, available for Windows, Linux, and macOS. No matter your OS, you can follow this tip.

First, download it from the official website and follow these instructions to enable LESS color highlighting.
Note: Ensure you’ve read the license before downloading, as the free version is for evaluation purposes only.
Install Package Control
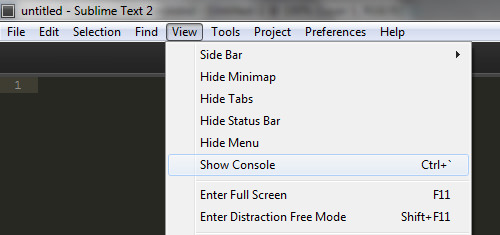
Open Sublime Text and access the Console via View > Show Console.
Copy and paste the following command into the Console, then press Enter to install Package Control from wBond.net:
import urllib2,os; pf='Package Control.sublime-package'; ipp=sublime.installed_packages_path(); os.makedirs(ipp) if not os.path.exists(ipp) else None; urllib2.install_opener(urllib2.build_opener(urllib2.ProxyHandler())); open(os.path.join(ipp,pf),'wb').write(urllib2.urlopen('http://sublime.wbond.net/'+pf.replace(' ','%20')).read()); print 'Please restart Sublime Text to finish installation'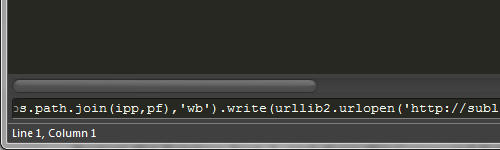
Package Control allows us to install the highlight package.
Installing LESS Highlighting Package
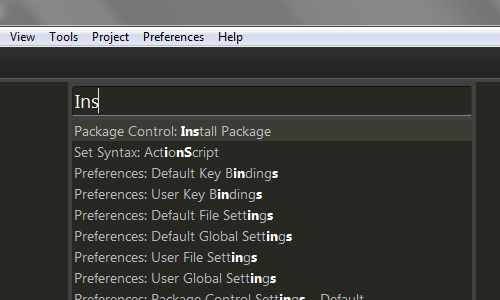
Restart Sublime Text and open the Command Palette via Tools > Command Palette. Wait for the package list to load, then type Install Package to search and load package repositories.
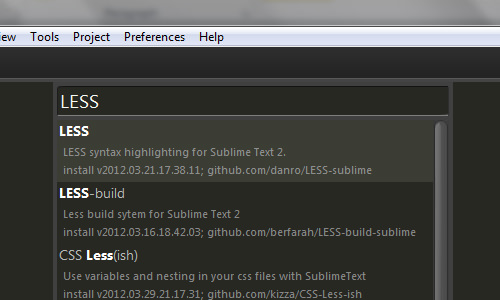
Search for the LESS package in the repository list and press Enter.
Wait for the installation to complete, indicated by a notification on the status bar.

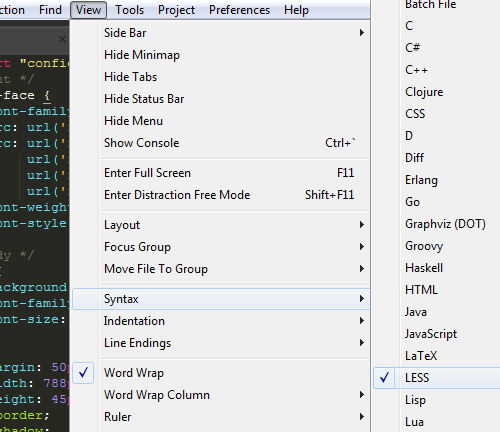
Go to View > Syntax and check if LESS is listed. If so, your LESS syntax will now be properly highlighted.
Notepad++
Notepad++ is a free, open-source code editor with many useful plugins. It’s popular among Windows users and widely used by web designers and developers. Here’s how to add LESS highlighting to Notepad++.

Install LESS Highlighting in Notepad++
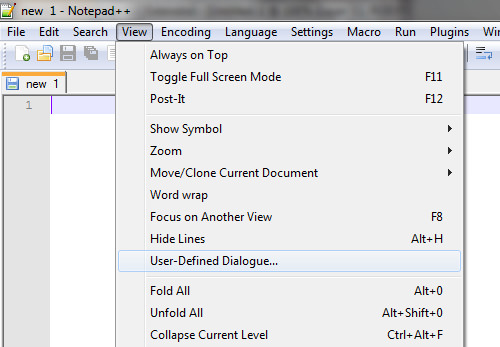
To enable LESS highlighting in Notepad++, first download the LESS package for Notepad++ from this link. Then, go to View > User-Defined Dialogue.
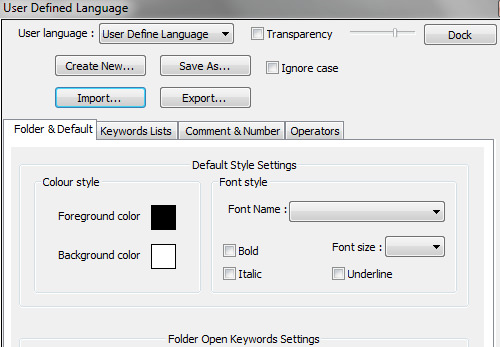
In the pop-up box, click the Import… button, locate the downloaded .xml file, and restart Notepad++.
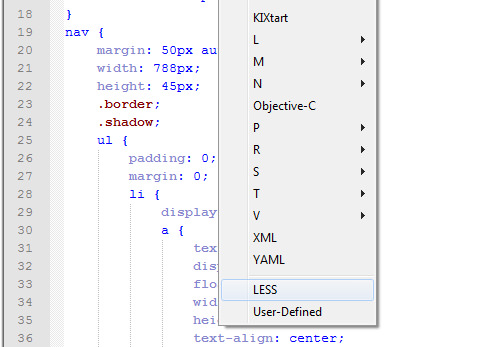
Open your .less file and go to the Language menu. LESS should now be listed; select it to apply color highlighting to your LESS syntax.
More Resources
There are many other editors available. Below are some useful resources if you use a different editor.
Adobe Dreamweaver
Dreamweaver has a large user base and is available for both Mac and Windows. If you use this editor, here’s a resource to install LESS highlighting in Adobe Dreamweaver.
Coda
If you use a Mac, you’re likely familiar with Coda, a popular editor among Mac users. Here’s how to install LESS in Coda.
Geany
Geany is a popular code editor among Linux users. If you use Geany, you can add LESS highlighting by following this guide on SuperUser.com.
2. LESS Compiler
Unlike CrunchApp, which has a built-in LESS compiler, other editors may not include one by default. Although it’s possible to add a compiler, it can be technical for general users. The best solution is to use tools like WinLESS for Windows or LESS.app for macOS.
These tools automatically convert your LESS code into static CSS as you save the file and immediately report any errors. Here’s how these tools work:
First, download and install WinLESS.
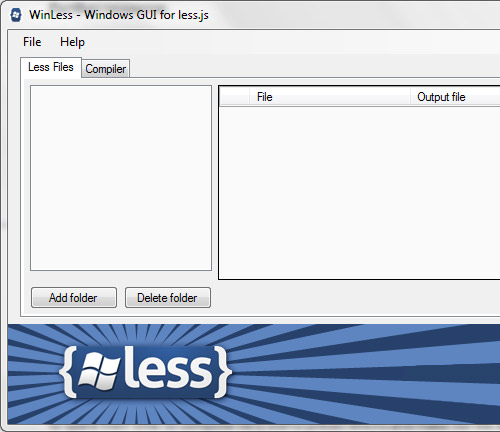
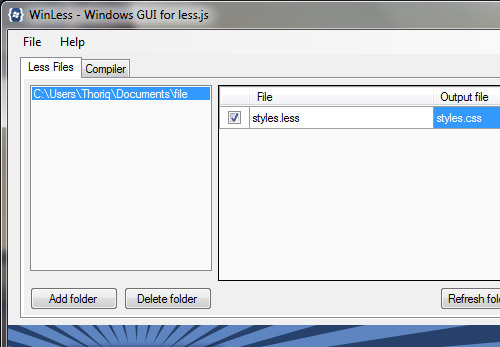
Click the Add Folder button and select the directory where your .less files are stored. WinLESS will scan the directory, find all .less files, and list them.
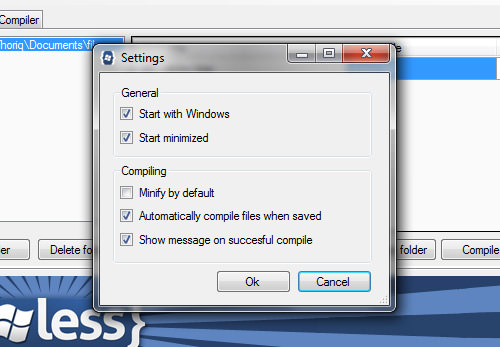
Go to File > Settings and ensure the following options are checked:
- Automatically compile files when saved
- Show message on successful compile
You can also set an output folder if you want to save files elsewhere. For this example, we’ll leave it as is, so the output file is saved in the same directory as the .less file.
Open your .less file, make some changes, and save it.
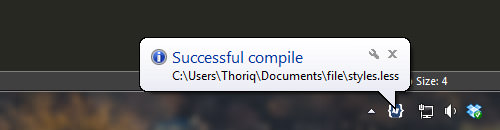
WinLESS will notify you when the file has been successfully compiled into .css or if there’s an error. This allows you to check the CSS output immediately, rather than waiting for the entire file to compile.
If you use macOS, you can use LESS.app, which has the same functionality as WinLESS.
Preset Mixins
In modern web design, we frequently use CSS3 properties like gradients, shadows, or border-radius that look like this:
-webkit-border-radius: 3px;
 -moz-border-radius: 3px;
 border-radius: 3px;
or
background: -moz-linear-gradient(top, #f0f9ff 0%, #a1dbff 100%);
 background: -webkit-linear-gradient(top, #f0f9ff 0%,#a1dbff 100%);
 background: -o-linear-gradient(top, #f0f9ff 0%,#a1dbff 100%);
 background: -ms-linear-gradient(top, #f0f9ff 0%,#a1dbff 100%);
 background: linear-gradient(top, #f0f9ff 0%,#a1dbff 100%);
In a previous tutorial, we discussed creating Mixins to simplify these syntax rules. Fortunately, the web design community has generously compiled useful Mixins, so we don’t have to start from scratch.
One of my favorites is Less Elements, which includes many useful CSS3 preset rules. This allows us to write less code and avoid tedious vendor prefixes.
Now, let’s see how these tips can help.
Putting It All Together
In this example, we’ll create a simple link button. First, create a new HTML document and add the following markup:
<head>
    <title>LESS</title>
    <link rel="stylesheet" href="styles.css">
</head>
<body>
    <a href="#">Click Me</a>
</body>
Create a styles.less file as your main LESS stylesheet, save it in the same folder as the HTML document, and add the folder to WinLESS.
Import the elements.less file you downloaded earlier using this syntax:
@import "elements.less";
Now, you can use any Mixins provided by elements.less, such as .gradient, .rounded, and .bordered. These names are self-explanatory.
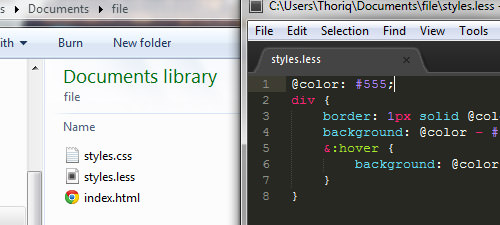
Next, add the following LESS rules to your stylesheet and save it:
a {
    display: inline-block;
    padding: 10px 20px;
    color: #555;
    text-decoration: none;
    .bw-gradient(#eee, 240, 255);
    .rounded;
    .bordered;
    &:hover {
        .bw-gradient(#eee, 255, 240);
    }
}
Since your .less file is added to WinLESS, it will automatically compile into .css. Now, let’s see the result.

It’s not bad, considering the button was created with fewer lines of code. Here’s the generated static CSS:
a {
    display: inline-block;
    padding: 10px 20px;
    color: #555;
    text-decoration: none;
    background: #eeeeee;
    background: -webkit-gradient(linear, left bottom, left top, color-stop(0, #f0f0f0), color-stop(1, #ffffff));
    background: -ms-linear-gradient(bottom, #f0f0f0 0%, #f0f0f0 100%);
    background: -moz-linear-gradient(center bottom, #f0f0f0 0%, #ffffff 100%);
    -webkit-border-radius: 2px;
    -moz-border-radius: 2px;
    border-radius: 2px;
    -moz-background-clip: padding;
    -webkit-background-clip: padding-box;
    background-clip: padding-box;
    border-top: solid 1px #eeeeee;
    border-left: solid 1px #eeeeee;
    border-right: solid 1px #eeeeee;
    border-bottom: solid 1px #eeeeee;
}

a:hover {
    background: #eeeeee;
    background: -webkit-gradient(linear, left bottom, left top, color-stop(0, #ffffff), color-stop(1, #f0f0f0));
    background: -ms-linear-gradient(bottom, #ffffff 0%, #ffffff 100%);
    background: -moz-linear-gradient(center bottom, #ffffff 0%, #f0f0f0 100%);
}
Summary
Here’s a quick recap of what we’ve covered:
- Enabling syntax highlighting in your current editor saves you from installing additional software, conserving disk space.
- Using a compiler like WinLESS or LESS.app allows you to generate static CSS instantly and check for syntax errors immediately.
- Preset Mixins like LESS Elements are invaluable, saving time and effort in writing CSS3 properties.
That’s the end of our tips. I hope you find them helpful for your current or future web projects. Thanks for reading! If you have any comments, feel free to share them below.