How to Create a Custom Audio Player For Your Website
I still remember in the early 2000s when playing rich media (audio and video) online came with a lot of constraints. It’s easy to take the beginnings for granted, especially since today, we have many outlets to play audio i.e. last.fm or play video such as Youtube.
In this post, as the title implies, we are going to create Web Audio Player. If you are running a website for podcasting and want to create a media player that will suit your overall web design, this post is probably for you.
Click the Demo button to see how the audio player will look like.
How to Customize SoundCloud Audio Player
Audio streaming have been around on the Internet since 1990 and there are not numerous popular audio streaming... Read more
What We Need
Before we create the audio player, we need to prepare some key items for it: the jPlayer, jQuery and a font icon set called FontAwesome.
First of all, let’s download the jPlayer. The jPlayer is a jQuery Plugin that allows us to run rich media on our web page without a hassle. As long as you can HTML and CSS you are ready to go.
Recommended Reading: Check out our HTML/CSS3 tutorials.
jPlayer is essentially a jQuery plugin, thus we also need to download the jQuery for it to work, and at the time of the writing jQuery is currently at version 1.8.2. We also need some icons for the media player GUI, and this time we will be using FontAwesome to deliver the icons.
After that, we extract all the downloaded files and put all the stuff, including the jPlayer files, the jQuery and the Fonts in an appropriate folder. Then link jquery.js and jquery.jplayer.min.js to the html document, as follow.
<link rel="stylesheet" href="css/normalize.css">
<link type="text/css" href="css/style.css" rel="stylesheet" />
<script type="text/javascript" src="js/jquery.js"></script>
<script type="text/javascript" src="js/jquery.jplayer.min.js"></script>
As you can see, in addition to jQuery and jPlayer library, we’ve also linked two CSS files in there. The first one normalize.css will reset or normalize the browser’s styles, so our web page will be rendered more consistently across the browsers, whilst the second one, style.css is where we put our main styles.
The Audio
For demonstration in this tutorial, we are going to use the audio from Kelli Anderson from her presentaion at TEDx Pheonix. Well, it is actually a video, but you can extract the audio only either through one of the following tools, Easy Youtube Downloader (FF Extension) or KeepVid.com.
Structuring the HTML markup
Now, it’s time to structure the HTML markup for the audio player and below are the HTML markup we need. The important thing from this markup is the id=jquery_jplayer_1 attribute that is assigned in the div that contains all these. This id is used to link this structure to jPlayer later on through jQuery function.
Furthermore, all the classes assigned on the following structure, including jp-play, jp-pause, jp-mute and jp-unmute are all the standard classes used in jPlayer. I suggest that you don’t change these classes as well as the id attribute to make things easier for when we style the audio player later on (unless you really know what you are doing).
<div id="jquery_jplayer_1" class="jp-jplayer"></div>
<div id="jp_container_1" class="jp-audio">
<div class="jp-type-single">
<div class="jp-title">
<ul>
<li>TEDxPhoenix - Kelli Anderson - Disruptive Wonder for a Change</li>
</ul>
</div>
<div class="jp-gui jp-interface">
<ul class="jp-controls">
<li><a href="javascript:;" class="jp-play" tabindex="1"></a></li>
<li><a href="javascript:;" class="jp-pause" tabindex="1"></a></li>
<li><a href="javascript:;" class="jp-mute" tabindex="1" title="mute"></a></li>
<li><a href="javascript:;" class="jp-unmute" tabindex="1" title="unmute"></a></li>
</ul>
<div class="jp-progress">
<div class="jp-seek-bar">
<div class="jp-play-bar"></div>
</div>
</div>
<div class="jp-time-holder">
<div class="jp-current-time"></div>
</div>
<div class="jp-volume-bar">
<div class="jp-volume-bar-value"></div>
</div>
<div class="jp-no-solution">
<span>Update Required</span>
To play the media you will need to either update your browser to a recent version or update your <a href="http://get.adobe.com/flashplayer/" target="_blank">Flash plugin</a>.
</div>
</div>
</div>
If you take a closer look at this HTML structure, you will find the following characters , , and . These characters are special HTML numbers to refer and render the icon characters that come from FontAwesome.
We covered about this subject our previous post: CSS3 Tutorial: Create A Sleek On/Off Button.
Activating the Audio Player
Next, once the HTML markup has been cleared up, we simply need to activate the player with the following script. In this script we provide the audio sources and as you can see below, we have added two sources, mp3 and oga. The oga format will extend cross browser compatibility, especially in Firefox and Opera.
$(document).ready(function(){
  $("#jquery_jplayer_1").jPlayer({
    ready: function () {
      $(this).jPlayer("setMedia", {
        mp3: "audio/TEDxPhoenix-KelliAnderson-DisruptiveWonderforaChange.mp3",
        oga: "audio/TEDxPhoenix-KelliAnderson-DisruptiveWonderforaChange.ogg"
      });
    },
    swfPath: "/js",
    supplied: "mp3,oga"
  });
});
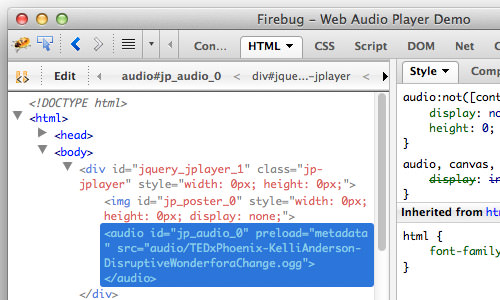
After we add this script, the audio actually is already playable and if we inspect the HTML markup using Firebug or other Developer Tools, we can find a new <audio> HTML5 element also generated.
Styling the Player
In this section we will start adding styles to make the audio player look better, and we will start off by defining the new font family and removing the underline from the anchor element, like so.
@font-face {
    font-family: "FontAwesome";
    src: url("fonts/fontawesome-webfont.eot");
    src: url("fonts/fontawesome-webfont.eot?#iefix") format("eot"),
    	 url("fonts/fontawesome-webfont.woff") format("woff"),
    	 url("fonts/fontawesome-webfont.ttf") format("truetype"),
    	 url("fonts/fontawesome-webfont.svg#FontAwesome") format("svg");
    font-weight: 400;
    font-style: normal;
}
a {
    text-decoration: none;
}
.jp-jplayer,.jp-audio {
    width: 420px;
    margin: 50px auto;
}
Audio Title
We won’t change this section style heavily, as it only contains the text title of the audio that is being played. We will only make the title text smaller and turn it grey.
.jp-title {
    font-size: 12px;
    text-align: center;
    color: #999;
}

.jp-title ul {
    padding: 0;
    margin: 0;
    list-style: none;
}
GUI Container
The audio player GUI is contained within a div assigned with jp-gui class. You can see in the above screenshot how our media player will look like. We apply gradient colors for the GUI theme and we use this color number for the starting color #f34927, and #dd3311 for the end color. Also, make sure that the position property for this div is defined to relative.
.jp-gui {
	position: relative;
	background: #f34927;
	background: -moz-linear-gradient(top,  #f34927 0%, #dd3311 100%);
	background: -webkit-gradient(linear, left top, left bottom, color-stop(0%,#f34927), color-stop(100%,#dd3311));
	background: -webkit-linear-gradient(top,  #f34927 0%,#dd3311 100%);
	background: -o-linear-gradient(top,  #f34927 0%,#dd3311 100%);
	background: -ms-linear-gradient(top,  #f34927 0%,#dd3311 100%);
	background: linear-gradient(to bottom,  #f34927 0%,#dd3311 100%);
	filter: progid:DXImageTransform.Microsoft.gradient( startColorstr='#f34927', endColorstr='#dd3311',GradientType=0 );
	-webkit-box-shadow:  0px 1px 1px 0px rgba(0, 0, 0, .1);
    box-shadow:  0px 1px 1px 0px rgba(0, 0, 0, .1);
    border-radius: 3px;
	overflow: hidden;
	margin-top: 10px;
}
GUI Control
The GUI control section contains UI the control the audio, such as the play and pause button, the volume and mute button. in this section, we set the font-family property to FontAwesome, and turn the text color to white as well as add the text shadow.
.jp-controls {
    padding: 0;
    margin: 0;
    list-style: none;
    font-family: "FontAwesome";
    text-shadow: 1px 1px 0 rgba(0,0,0,0.3);
}

.jp-controls li {
    display: inline;
}

.jp-controls a {
    color: #fff;
}
Play and Pause Button
For the play and pause as well as the volume button, we we will set their position to absolute, that is why we set .jp-gui to relative previously. So, the position of these buttons will be relative to their closer parent rather than the browser window.
.jp-play,.jp-pause {
    width: 60px;
    height: 40px;
    display: inline-block;
    text-align: center;
    line-height: 43px;
    border-right: 1px solid #d22f0f;
}

.jp-controls .jp-play:hover,.jp-controls .jp-pause:hover {
    background-color: #de3918;
}

.jp-mute,.jp-unmute {
    position: absolute;
    right: 55px;
    top: 0;
    width: 20px;
    height: 40px;
    display: inline-block;
    line-height: 46px;
}

.jp-mute {
    text-align: left;
}
.jp-time-holder {
    color: #FFF;
    font-size: 12px;
    line-height: 14px;
    position: absolute;
    right: 90px;
    top: 14px;
    text-shadow: 1px 1px 0 rgba(0,0,0,0.3);
}
Progress and Volume Bar
The progress bar will have a similar look, they are only different in size. The progress obviously should be longer and bigger than the volume bar.
.jp-progress {
    background-color: #992E18;
    border-radius: 20px 20px 20px 20px;
    overflow: hidden;
    position: absolute;
    right: 133px;
    top: 15px;
    width: 210px;
    -webkit-box-shadow: 0 1px 1px 0 rgba(0,0,0,0.2) inset;
    box-shadow: 0 1px 1px 0 rgba(0,0,0,0.2) inset;
}

.jp-play-bar {
    height: 12px;
    background-color: #fff;
    border-radius: 20px 20px 20px 20px;
}

.jp-volume-bar {
    position: absolute;
    right: 10px;
    top: 17px;
    width: 45px;
    height: 8px;
    border-radius: 20px 20px 20px 20px;
    -webkit-box-shadow: 0 1px 1px 0 rgba(0,0,0,0.1) inset;
    box-shadow: 0 1px 1px 0 rgba(0,0,0,0.1) inset;
    background-color: #992E18;
    overflow: hidden;
}

.jp-volume-bar-value {
    background-color: #fff;
    height: 8px;
    border-radius: 20px 20px 20px 20px;
}
That’s all the codes we need. Now you can see the demo as well as download the source from the following links.