How to Make Your Local Server Publicly Accessible
For nearly a decade, I’ve navigated the challenges of developing websites, with one of the trickiest aspects being the coordination between local development environments and live testing scenarios. Working locally is efficient and speedy, yet it lacks the capability for remote viewing. Moreover, migrating work often involves intricate database operations, such as renaming tables and adjusting values.
In this article, I’m excited to share a straightforward method that allows you to operate a local server which can be accessed from your phone and other mobile devices without a hitch, and even share your projects over the Internet. This means you can showcase your work to clients directly from the comfort of localhost.
Setting Up Your Local Development Environment with Vagrant
Not long ago, I shared insights on Hongkiat about using Vagrant for local development, so I’ll touch only on the essentials here. For an in-depth guide, do check out that article!
First off, download and install VirtualBox and Vagrant. These free tools help you set up a virtual machine to run your server smoothly.
Next, create a “Websites” folder in your main user directory to organize your projects. This will be /Users/[username]/Websites on macOS and C:/Users/[username]/Websites on Windows.
Inside this directory, make a new folder named wordpress for your virtual machine. The structure allows each site within Websites to operate on its own virtual machine. Although you could technically run multiple sites on a single machine, I prefer organizing them by platform – such as WordPress, Laravel, Custom.
This guide will focus on setting up a WordPress site.
In the WordPress folder, we’ll need two key files: Vagrantfile and install.sh for configuring our virtual machine. Jeffrey Way has provided excellent starter versions of these; grab his Vagrantfile and install.sh.
Open your terminal, navigate to the WordPress directory, and run vagrant up. It might take some time for the box to download and install, so why not enjoy a coffee and explore 60+ WordPress tips in the meantime?
After completion, visiting 192.168.33.21 should display your site. Your main content folder will be the html directory inside the WordPress folder, where you can begin to add files, install WordPress, or undertake any development tasks you have in mind.
For more detailed instructions on setting up virtual hosts and domain mapping like mytest.dev, make sure to consult the complete Vagrant guide.
Testing Local Websites on Mobile Devices with Gulp
As you develop a website, considering how it responds on various devices is crucial. You can mimic smaller screens by adjusting your browser window, but this doesn’t fully replicate the experience, especially when considering high-resolution retina displays.
The goal is to view your local site on your mobile devices seamlessly, which is straightforward as long as your devices share the same network.
We’ll leverage Gulp and Browsersync to achieve this. Gulp streamlines the development process through automation, while Browsersync offers a robust solution for creating a local server that synchronizes actions like scrolling, clicks, and form inputs across multiple devices.
How to Get Started with Gulp
Getting Gulp up and running is straightforward. Simply visit the Getting Started guide for detailed instructions. First, you’ll need NPM (Node Package Manager), which comes with Node.js. For installation guidance, head to the Node.js website.
After installing Gulp globally with the command npm install --global gulp, the next step is to integrate it into your project. Do this by running npm install --save-dev gulp in your project’s root directory and then create a gulpfile.js file there.
For now, we’ll start with a simple line in that file to confirm our use of Gulp.
var gulp = require('gulp');
To explore the full potential of Gulp, like script concatenation, Sass and LESS compilation, image optimization, and more, take a look at our Guide To Gulp. This guide will mainly focus on the process of setting up a server.
Integrating Browsersync with Gulp
Adding Browsersync to your Gulp setup is a simple two-step process. First, we install it using npm, and then we configure it in our Gulpfile.
In your project’s root directory, execute the npm install browser-sync gulp --save-dev command in the terminal to install Browsersync. Next, open your Gulpfile and add the following code:
var browserSync = require('browser-sync').create();
This line informs Gulp that Browsersync will be part of our toolset. The next step is to set up a Gulp task to specify how Browsersync should function.
gulp.task('browser-sync', function() {
 browserSync.init({
	 proxy: "192.168.33.21"
	 });
 });
After configuring, launching a server is as simple as typing gulp browser-sync in the terminal. You’ll see a display similar to the image below.
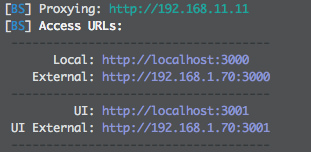
The interface provides four key URLs, each serving a distinct purpose:
- Local: This URL accesses the server from the same device. You can use
192.168.33.21or the Browsersync-provided address. - External: Use this URL on any device within the same network to access the site, be it your smartphone, tablet, or another computer.
- UI: This URL leads to the server’s options menu, where you can monitor connections, manage network settings, view history, and synchronize actions across devices.
- External UI: Similar to the UI, but available on any network-connected device for remote access and control.

Advantages of Using Browsersync
Having introduced Browsersync, you might wonder: why opt for it specifically? It’s true that you can access a local server using an IP address like 192.168.33.21 from any device within the network. However, this approach requires setting up WordPress or similar platforms directly at this address.
My preference is to employ virtual hosts, crafting domains like wordpress.local or myproject.dev, which resolve only within the local network. This setup means you can’t simply access wordpress.local on your mobile and expect it to mirror the local desktop environment.
With these steps covered, we’ve successfully set up a site accessible from any device on our local network. The next step? Extending our reach to share our work globally over the internet.
Global Sharing with ngrok
ngrok offers a powerful solution for creating secure tunnels to your localhost. By signing up for a free account, you gain access to features like password-protected tunnels, TCP, and the ability to run multiple tunnels simultaneously.
How to Install ngrok
First, visit the ngrok download page and download the appropriate version for your system. You can run ngrok directly from the downloaded folder or move it to a universal location on your system for easier access. For Mac/Linux users, you can achieve this with the command:
sudo mv ngrok /usr/local/bin/ngrok
Should you encounter a directory error, simply create the necessary folders to proceed.
Getting Started with ngrok
The setup for ngrok is refreshingly straightforward. After your server is up and running through Gulp, note the port number it operates on. For instance, if your local server is at http://localhost:3000, it’s utilizing port 3000. To establish an ngrok tunnel, execute this command in a new terminal window:
ngrok http 3000
This command generates a secure tunnel to your localhost. The output will resemble the following, showcasing an accessible URL:

The “Forwarding” URL displayed is your key to accessing your local server from any location worldwide.
Wrapping Up
By now, we’ve achieved three significant milestones:
- Efficient local development and project management
- Ability to preview our website on any device connected to our network
- Capability to share our work globally through a simple link
These steps streamline the development process, allowing us to concentrate on building rather than on the tedious tasks of synchronizing local and test servers, migrating databases, and other similar challenges.