10 Skype Tips & Tricks You Should Know
Since it was founded in 2003, Skype has become a regular form of communication for most people out there. Millions of people use Skype for holding conversations via text messaging, voice calls and video calls at no cost at all. You can even call mobile phones and landline numbers with just a small little fee.
Despite the recent advent of Google Hangouts, Skype is still popular among people for voice and video calling. To make your Skype journey more of a breeze, we’ve put together 10 interesting tips and tricks related to Skype. Who knows maybe you’ll discover more of your own?
Recommended Reading: Backup Your Skype Chat & Audio Conversations Online With Simkl
1. Transfer Your Skype Account Contacts
You can easily backup all of the contacts in one Skype account to be transferred into another. To do so, head to the main Skype window, click on “Contacts”, click on “Advanced” and finally click on “Backup Contacts to File”. It will generate a .vcf file which you can save on your computer system.
Now sign into the second Skype account where you want to upload all these contacts into. Once you are signed in, click on “Contacts”, click on “Advanced” and finally click on “Restore Contacts from File” which is exactly located below “Backup Contacts to File”.

2. Re-edit Your Last Message
Suppose you have sent a message which contains a mistake and you want to edit that message and resend it again? You can do this simply by pressing the Up Arrow Key on your keyboard. The last message that you’ve sent earlier will appear. Just make the changes you want and resend the edited message.

3. Make Calls Directly From Your Contact List
You can make calls to Skype contacts immediately by double clicking on them directly from Skype Contact List. To do so, head to the main Skype window, click on “Tools” followed by “Options”. Then, go to “General Settings” and tick the check box “When I double-click on a contact start a call”.
However, this will restrict you from opening the IM Window directly by double clicking on a contact.

4. Hide the Moving Pencil
When you are chatting on Skype with someone, you can see a moving pencil when the other person is typing or deleting something. Of course, this function also works both ways. If you rather not have them be privy to whether you are typing (or not), you can actually turn this option off.
To hide the typing indicator, head to the main Skype window, click on “Tools”, then “Options”. Go to “IM & SMS” and click on “IM Settings” followed by “Show Advanced Options”. Finally, tick the check box “Show when I am typing”.

5. Clear Your Chat History & Define The Time Frame For Storing It
You can clear all of your chat history on Skype and you can also define the time frame for storing the chat history. To clear your chat history, head to the main Skype window, click on “Tools” followed by “Options” then “IM & SMS”. From there, proceed to “IM Settings”and then “Show Advanced Options” before finally clicking on the “Clear History” button. It is also in “Show Advanced Options” that you can select the time frame for storing your history from the drop down menu.
Be careful, once you click on “Clear History” then you will lose all your chat messages that have already taken place in previous conversations with the contacts in your Skype account.

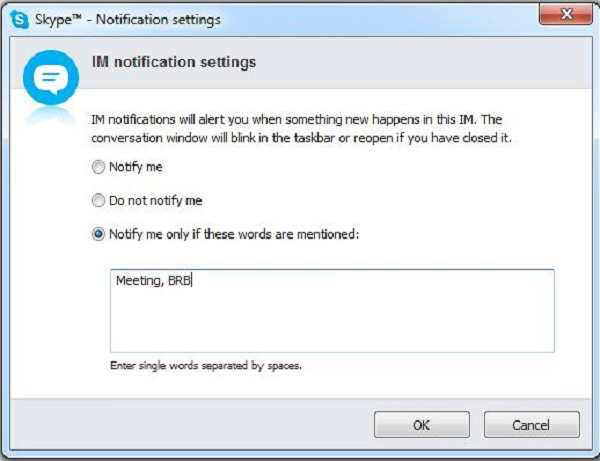
6. Get Keyword Notifications
You can also choose to get notifications only when particular words are mentioned by the other person in a personal IM window. To set up the keyword notifications, start by opening up the personal IM window of a contact you want to set up keyword notification for. Click on the “Conversation” menu then “Notification Settings” and finally click on the radio button “Notify me only if these words are mentioned”.
Write down all the words that you want to be notified of in the text box provided. However, these settings will disable the notifications for all other messages apart from specified keywords, so there is a chance that you may miss out on an important message.
7. 25+ Hidden Emoticons & Smileys
There’s actually a collection of emoticons and smileys that are not visible in the emoticons set for Skype but you can still use them if you know their shortcodes. The keywords (left to right) are written for generating smileys (left to right). Each keyword is encapsulated within a () as well.

Below is just a brief list of the hidden emoticons and smileys. If you want the full list, take a look here :
- Poolparty – (poolparty)
- Talking – (talk)
- Headbang – (headbang)
- Drunk – (drunk)
- Toivo – (toivo)
- Bug – (bug)
- Broken heart – (u)
- Mail – (e) (m)
- Skype – (skype)
- Smoking – (smoking) / (smoke) (ci)
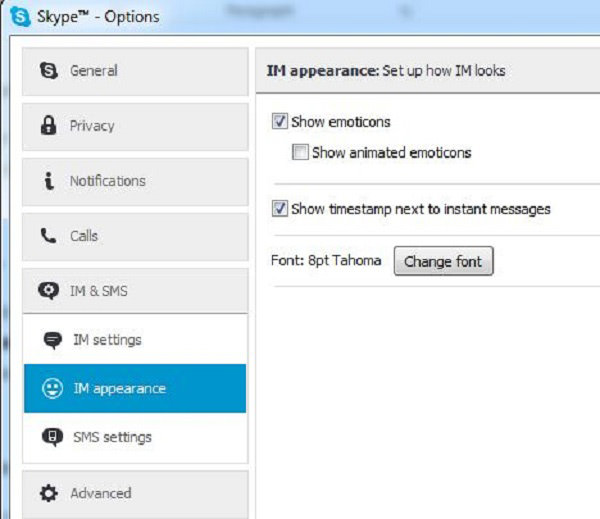
8. Pause Animated Emoticons
If you don’t like the animated emoticons and just want to pause them so any animated emoticon in your IM window will appear as a still emoticon without any movement. To pause the animated emoticons, head to the main Skype window, click on “Tools”, click on “Options”, click on “IM & SMS”, select “IM appearance” and finally uncheck the “Show animated emoticons” checkbox.
9. Enable Keyboard Shortcuts (Hotkeys)
You can enable hotkeys to use keyboard shortcuts for frequently used functions. There are default keyboard shortcuts for a few functions, which you can change as per your preference.
To enable keyboard shortcuts, head to the main Skype window, click on “Tools”, click on “Options”, click on “Advanced”, select “Hotkeys” and finally click on the “Enable keyboard shortcuts” checkbox.

10. Set Up Your Caller ID
If you make Skype calls to either landlines or mobile numbers then you might want others to see your original number whenever you call them rather than an unknown number that will most likely appear.
To set up your Caller ID, go to the main window of Skype, click on the “Skype” menu and finally click on the “Account” button. It will open up a webpage in your default web browser where you’ll get more information related to calls. Click on the “Caller ID” button and on next page select “Country/Region” and “Phone number”. Now all you need to do is click on “Verify Number” and you’re set.
