How to Create a Simple Phone Number Picker
Phone numbers, besides names and emails, are the most frequently used contact information in online forms. Phone number fields are usually designed in a way that requires users to type the numbers in using their keyboards. This method frequently results in inaccurate data input.
To reduce user input errors and improve the user experience of your site, you can create a GUI that allows users to quickly enter their phone number, in a way that is similar to date pickers.
In this tutorial, you’ll see how to add a simple phone number picker to an input field. We’ll use HTML5, CSS3 and JavaScript to get to the GUI you can see and test in the demo below. We’ll also put regular expressions in use to make sure users really enter a valid phone number.
Read Also: Useful Calendar and Date Picker Scripts for Developers
1. Create the Phone Number Field
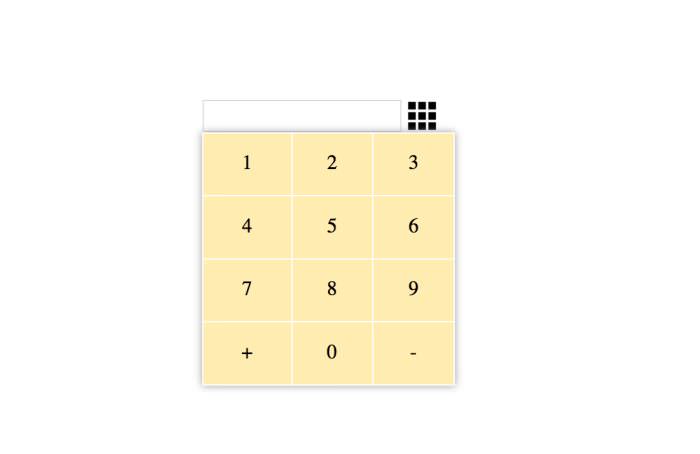
First, create an input field with a dial icon on the right that will open the dial screen on click. The dial icon just looks like 9 black boxes, arranged 3 by 3, must like what you see on a regular phone.
I’m using the tel input type for proper HTML5 semantics, but you can also use the text input type if you want.
<div id="dialWrapper">
    <input id="phoneNo" type="tel">
    <img id="dialIcon" src="dialIcon.png">
</div>

2. Create the Dial Screen
The dial screen is a grid of numbers from 0 to 9 plus some special characters. It can be made with either a HTML <table> or JavaScript.
Here, I’ll show you how to create the dial screen table in JavaScript. You can, of course, add the table directly in the HTML source code if you prefer it that way.
First, create a new 'table' element in the DOM by using the createElement() method. Also give it the 'dial' identifier.
/* Create dial screen */
var dial = document.createElement('table');
    dial.id = 'dial';
Add a for loop to insert the four rows of the dial table with it. Then, for each row, run another for loop in order to add three cells per row. Mark each cell with the 'dialDigit' class.
for (var rowNum = 0; rowNum < 4; rowNum++) {
    var row = dial.insertRow(rowNum);
    for (var colNum = 0; colNum < 3; colNum++) {
        var cell = row.insertCell(colNum);
        cell.className = 'dialDigit';
        cell.textContent = ((colNum + 1) + (rowNum * 3)).toString();
    }
}
The two for loops above calculate the digits that go into the cells of the dial table — the values of the cell.textContent property — in the following way:
(colNum + 1) + (rowNum * 3)
/* first row */
(0 + 1) + (0 * 3) = 1
(1 + 1) + (0 * 3) = 2
(2 + 1) + (0 * 3) = 3
/* second row */
(0 + 1) + (1 * 3) = 4
(1 + 1) + (1 * 3) = 5
(2 + 1) + (1 * 3) = 6
/* etc. */
The last row is different, as it consists of two special characters, - and + that are used in phone number formats to identify regional codes, and the digit 0.
To create the last row to the dial screen, add the following if statement to the inner for loop.
for (var rowNum = 0; rowNum < 4; rowNum++) {
  var row = dial.insertRow(rowNum);
  for (var colNum = 0; colNum < 3; colNum++) {
    /* if last row */
    if (rowNum === 3) {
      cell = row.insertCell(colNum);
      cell.textContent = '-';
      cell.className = 'dialDigit';
      cell = row.insertCell(colNum);
      cell.textContent = '0';
      cell.className = 'dialDigit';
      cell = row.insertCell(colNum);
      cell.textContent = '+';
      cell.className = 'dialDigit';
      break;
    }
    cell = row.insertCell(colNum);
    cell.className = 'dialDigit';
    cell.textContent = ((colNum + 1) + (rowNum * 3)).toString();
  }
}
The dial screen is now complete, add it to the #dialWrapper HTML container you created in Step 1 by using two DOM methods:
- the
querySelector()method to select the container - the
appendChild()method to append the dial screen — held in thedialvariable — to the container
document.querySelector('#dialWrapper').appendChild(dial);

3. Style the Dial Screen
To make it more attractive, style the dial screen with CSS.
You don’t necessarily have to stick with my styling, but don’t forget to add user-select:none; property to the #dial container so that while the user is clicking on the digits, the text won’t get selected by the cursor.
#dial {
      width: 200px;
      height: 200px;
      border-collapse: collapse;
      text-align: center;
      position: relative;
      -ms-user-select: none;
      -webkit-user-select: none;
      -moz-user-select: none;
      user-select: none;
      color: #000;
      box-shadow: 0 0 6px #999;
}
.dialDigit {
      border: 1px solid #fff;
      cursor: pointer;
      background-color: rgba(255,228,142,.7);
}
4. Show the Dial Screen on Click
First, add the visibility:hidden; style rule to #dial in the above CSS to hide the dial screen by default. it’ll be only shown when the user clicks on the dial icon.
Then, add a click event handler to the dial icon with JavaScript to toggle the visibility of the dial screen.
To do so, you need to use the aforementioned querySelector() and the addEventListener() methods. The latter attaches a click event to the dial icon and calls the custom toggleDial() function.
The toggleDial() function changes the visibility of the dial screen from hidden to visible, and back.
document.querySelector('#dialIcon').addEventListener('click', toggleDial);

function toggleDial() {
    dial.style.visibility =
    dial.style.visibility === 'hidden' || dial.style.visibility === ''
    ? 'visible' : 'hidden';
}
5. Add the Functionality
Add a custom function that inputs digits into the phone number field on the click of the cells of the dial screen.
The dialNumber() function appends the digits one by one to the textContent property of the input field marked with the #phoneNo identifier.
phoneNo = document.querySelector('#phoneNo');
function dialNumber() {
    phoneNo.value += this.textContent;
}
dialDigits = document.querySelectorAll('.dialDigit');
for (var i = 0; i < dialDigits.length; i++) {
    dialDigits[i].addEventListener('click', dialNumber);
}
Now, you have a working dial screen to input phone number field.
To keep up with the CSS, change the background color of the digits in their :hover and :active (when the user clicks on it) states.
.dialDigit:hover{
      background-color: rgb(255,228,142);
}
.dialDigit:active{
      background-color: #FF6478;
}
6. Add Regular Expression Validation
Add a simple regex validation to validate the phone number while the user enters the digits into the input field. According to the validation rules I use, the phone number can only start with either a digit or the + character, and accept the - character afterwards.
Read Also: Beginner’s Guide to Regular Expression (Regex)
You can see the visualization of my regular expression on the screenshow below created with the Debuggex app.
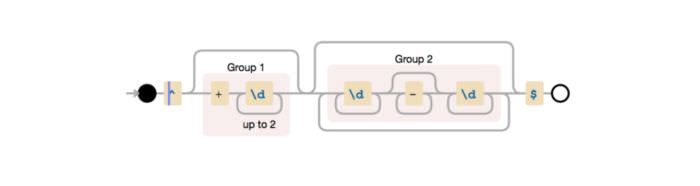
You can also validate the phone number as per the phone number format of your country or region.
Create a new Regular Expression object, and store it in the pattern variable. Also create a custom validate() function that checks if the entered phone number complies with the regular expression, and if it’s at least 8 characters long.
When the input doesn’t validate, the validate() function needs to give feedback to the user.
I’m adding a red border to the input field when the input is invalid, but you can inform user in other ways, for instance, with error messages.
pattern = new RegExp("^(\\+\\d{1,2})?(\\d+\\-*\\d+)*$");
function validate(txt) {
  // at least 8 characters for a valid phone no.
  if (!pattern.test(txt) || txt.length < 8) {
    phoneNo.style.border = '2px solid red';
    return false;
  } else
    phoneNo.style.border = 'initial';
  return true;
}
7. Perform the Validation
The validate() functions needs to be called in order to perform the validation. Call it from the dialNumber() function you created in Step 5 in order to validate the value of the phoneNo variable.
Note that I also added an additional validation for maximum characters (can’t be more than 15) by using an if statement.
function dialNumber() {
	var val = phoneNo.value + this.textContent;
	// maximum characters allowed, 15
	if (val.length > 15) return false;
	validate(val);
	phoneNo.value = val;
}
Your phone number picker is now ready, check out the final demo below.