How to Add Custom Fields in WordPress Without Using Plugins
WordPress allows developers to tailor the platform extensively to suit their specific needs, including the ability to add new metadata within posts. This feature enables developers to display additional information in their themes or plugins, alongside standard elements like the post title, content, and author.
There are various ways to introduce custom metadata. You can use a plugin, build on an existing framework, or start from scratch. This article will explore how to create custom metadata from scratch – a process simpler than it might seem – and use it to display a message indicating a sponsored post.
How to Create WordPress Custom Fields The Easy Way
WordPress provides the essential fields that allow us to publish posts and pages. A few of these fields... Read more
Adding Custom Metadata
Begin by navigating to the post editor, where you typically find standard input fields such as the title, content, category, and tag box. Here, you’ll also find a hidden Custom Fields Editor which we can utilize to insert our custom metadata.
To make it visible, click on Screen Options and check the Custom Fields checkbox.

The Custom Field box will then appear below the post content editor. Now, let’s add our custom metadata.
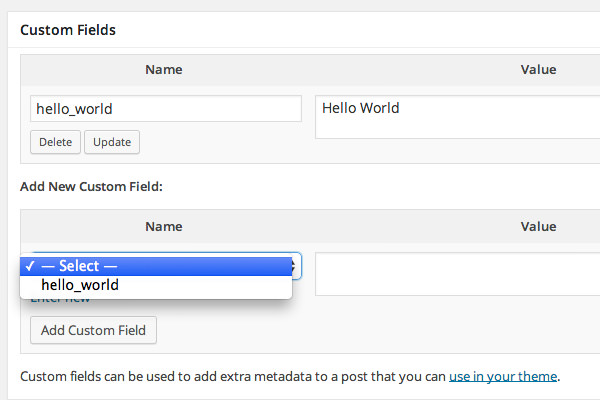
Metadata is structured in key name/value pairs. As illustrated below, the Custom Fields box contains two input fields: one for the name and one for the value.

For example, I will define a new metadata for the post I’m editing, with hello_world as the key and Hello World as the value.
Click the Add Custom Field button to include this in your post. You can later modify or remove this metadata. WordPress will remember the key name and list it in a dropdown for future use, saving you the effort of retyping it.
Retrieving the Metadata
Once the metadata is set, you can display it in your theme’s single.php file, which is used for individual posts. You can retrieve the value with the get_post_meta() function like this:
<?php
    $meta = get_post_meta(get_the_ID(), 'hello_world');
    echo $meta;
?>
<?php the_content(); ?>
Remember, this metadata will not be available for all posts. Therefore, include this function in a conditional statement to avoid errors when the metadata is not set.
<?php
    $meta = get_post_meta(get_the_ID(), 'hello_world');
    if (!empty($meta)) {
        echo $meta[0];
    }
?>
With the code above, the value Hello World! will be displayed above the post content if the metadata is set.

Displaying a “Sponsored Post” Disclaimer
Now, let’s apply this to a practical scenario. Suppose you’re publishing a sponsored post and wish to include a disclaimer at the top, you can create metadata named is_sponsored_post and set its value to Yes.

The disclaimer box will be shown if the value of is_sponsored_post is set to Yes, using a conditional statement similar to the previous example.
<?php
    $meta = get_post_meta(get_the_ID(), 'is_sponsored_post');
    if ($meta[0] == 'Yes') {
?>
        <div class="sponsored-post">
            <p>Disclosure: This is a sponsored post that contains affiliate links. End of post: I received compensation in exchange for writing this review.</p>
        </div>
<?php } ?>
Here’s how it looks when the disclaimer is displayed.
