How to Create WordPress Custom Fields The Easy Way
WordPress provides the essential fields that allow us to publish posts and pages. A few of these fields include the Content Editor, Category Options, Tags, and Featured Image.
These fields, however, are not sufficient to accommodate certain cases. Let’s say you build a Book Listing site that will show the book author, the ISBN number, and the publisher. You will need some extra fields to input the extra information.
Luckily, WordPress is now quite extensive, it gives developers the ability to create custom fields to cater to any website needs. These custom fields could be a general text input, a textarea, a dropdown option, a color picker, calendar, and even an image uploader. In this tutorial, we show you how to create WordPress custom fields the easy way. Let’s get started.
Exploring WordPress Date Queries for Post Filtering
We can display posts published on specific dates with the date parameters in WP_Query. The functionality, however, is... Read more
Advanced Custom Fields
To give you a real example, let’s try building a book listing site. To create our custom fields easily, we will use a plugin called Advanced Custom Fields by Elliot Condon. With it, we won’t need to touch the code too much for creating the custom fields. However, some code-level editing in the theme files is required to display the data that we have entered into the fields.
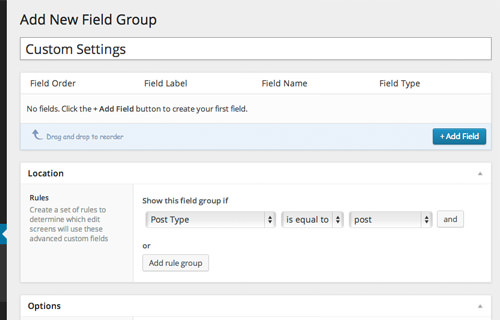
Once we have installed it, it adds a new side-menu called Custom Fields. Go to this menu, click on the Add New button, and name the Fields Group. For example, "Custom Settings" (see shot).
Click on the + Add Field to create a new custom field, and we name the field label as Author. Below it, set the Field Name simply as book_author, which we will use to call out or display the data of Book Author. You may also set Field Instruction, and the Placeholder Text, but those are optional.
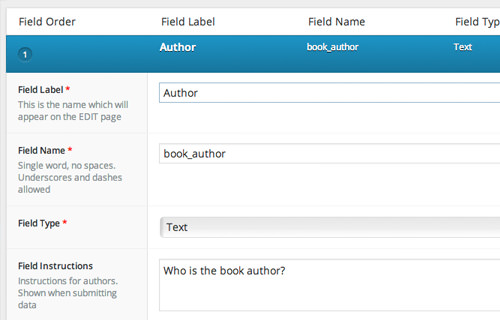
Then, we can create a set of other fields as in Page Length, the Publisher, and Book Language like so.

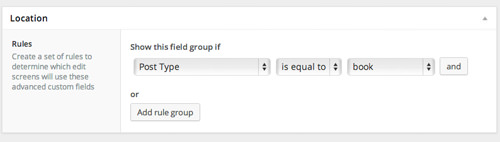
Next, we need to assign the field group to display it in a particular Post Type. You can assign it with Post, Page, Page Template, Attachment, or set rules that involve several Post Types altogether. In the following example, I would like to display the fields to Book Post Type, which you can easily create on your own with this handy tool, GenerateWP.
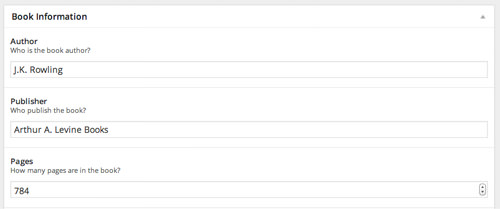
Then we head over to our Book Post Type editing screen, and fill it up.
Displaying the Data
Before proceeding, since we assigned the fields to Custom Post Type, we need to create a new file to display the content called single-book.php (have a look at this page for reference). We will also put our codes in this file.
Once all our custom fields have been populated, we will display them in the front-end by using the_field() function followed by the field name. For example, this code below displays the data from the Author Book field that we’ve created above.
the_field('book_author')
It’s really that easy. Furthermore, if you want to make sure that it should only be displayed when the data is present, you can wrap the code with a conditional statement. For example:
if( !empty(the_field('book_author')) ) :
	the_field('book_author');
endif;
And below you will find all the codes that we put in single-book.php to display our book.
<div class="entry-content">

<?php if ( has_post_thumbnail() ) {
	echo '<figure class="book-thumbnail">';
	the_post_thumbnail('book-thumbnail'); }
	echo '</figure>';
?>

<div class="book-info">
	<h4 class="book-title"><?php the_title() ?></h4>
	<p class="book-description"><?php the_content() ?></p>

	<h4 class="book-details-title">Book Details</h4>
	<div class="book-details">
		<ul>
			<li class="book-author"><span class="label">Author:</span> <?php the_field('book_author') ;?></li>
			<li class="book-pub"><span class="label">Publisher:</span> <?php the_field('book_publisher') ;?></li>
			<li class="book-pages"><span class="label">Length:</span> <?php the_field('book_pages') ;?></li>
			<li class="book-lang"><span class="label">Language:</span> <?php the_field('book_language') ;?></li>
			<li class="book-pubid"><span class="label">ISBN/ASIN:</span> <?php the_field('book_isbn_asin') ;?></li>
		</ul>
	</div>
</div>
</div>
With a little bit of styling with CSS, we can achieve the following neat and subtle result.

Final Thought
In this tutorial, we’ve shown you the very basic example of using Advanced Custom Fields plugin to create your own a set of new Text fields and assign them to a Custom Post Type easily.
Apart from that, this plugin provides a number of custom fields to enhance our website including WYSIWYG Editor, TextArea, Dropdown, User List Options, Google Maps, and many more. You can explore the plugin further and see what cool things you can come up with.