How to Configure Your DNS For Faster Internet Speed
Recently, I switched my ISP and suddenly noticed slower browsing and server connection failures even though my internet speed was fine. I figured out that it had to do something with my DNS server, so I switched to a better DNS server based on my location. To my surprise, I not only managed to fix slow browsing but actually gained 40% boost in Internet speed.
Your default DNS server directly affects how fast you’ll be able to connect to a website. So choosing the fastest server according to your location will help speed up browsing. In this post, I’ll show you how to find the best DNS server for your location and apply it to your router or your PC.
How to Boost Internet Speed with Command Prompt
Slow internet speed is a never-ending issue that plagues internet users every now and then. Sometimes it's an... Read more
DNS, in a nutshell
First, let’s learn what DNS is, so you know what you are dealing with. When accessing a website, we enter its name in the address bar to open it up. However, your browser can only connect to a website using its IP address, not the alphabetical address that we normally use.
This is where the DNS server comes into play by finding the IP address of the alphabetical URL you have entered and then directing the browser to the right website.
It is basically a phone book of website IP addresses and alphabetic names that work as a middleman to help your browser connect to the right website. There are thousands of DNS servers available worldwide, and connecting to the closest and most reliable one will help speed up your browsing.
A good server should be able to quickly find the right IP address, and it should be near enough to your location to quickly send it your way.
By default, your ISP will connect to their own DNS server or any other DNS server of their choosing. So it is wise to look for the best server for your location and manually configure it. Don’t worry, the process isn’t that difficult and anyone can do it.
How to Clear DNS Cache in macOS Sonoma
Facing issues with your macOS DNS settings? Learn the step-by-step guide to flush and reset the DNS cache... Read more
Search for the best DNS server
To find the best server you will need help from a third-party tool. For this purpose, namebench and DNSBench are two popular tools. Although, I recommend using DNSBench as it is easier to use and doesn’t require any manual intervention. For demonstration, I’ll be using DNSBench:
- Download DNSBench and run the tool.
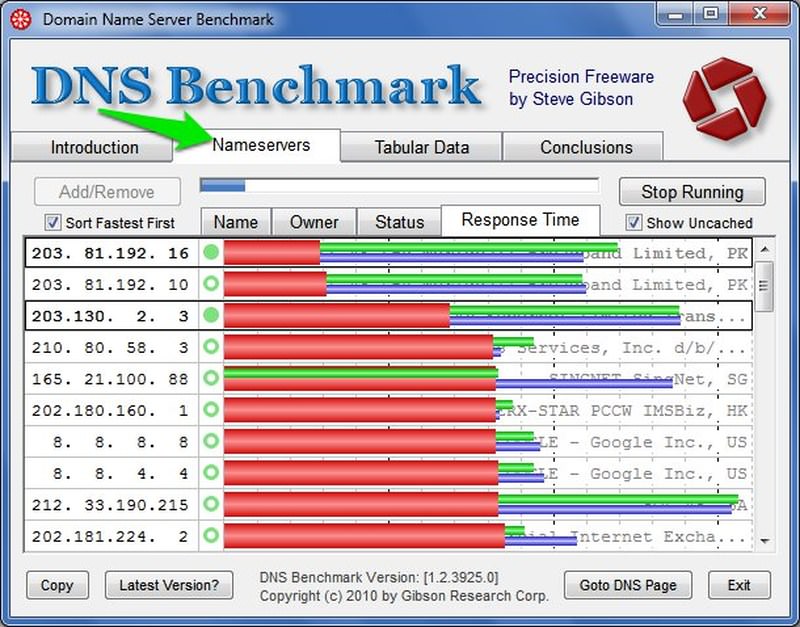
- Move to the "Nameservers" section and click on the "Run Benchmark" button.
The tool will take few minutes to search for the best servers based on its recommended list of 72 servers.
However, this custom list is biased towards US residents, if you are living outside of USA then you should do a worldwide DNS server search. If you are a US resident, then stick with the first 2 DNS addresses recommended after the scan and apply them as I tell you later in this article.
To do a worldwide DNS server search, DNSBench will automatically ask you about the benchmark to create a "Custom list" of 50 best servers selected from 4849 servers available worldwide. Click on the "Build Custom List" button and the process will start.
The process will take approximately 37 minutes to complete, but it is only needed to be done once for your current location and ISP.

After the process, you will see top 50 DNS servers for your current location with their address mentioned in the left column. You can simply choose the top 2 DNS servers as the results are listed according to the fastest ones on top.
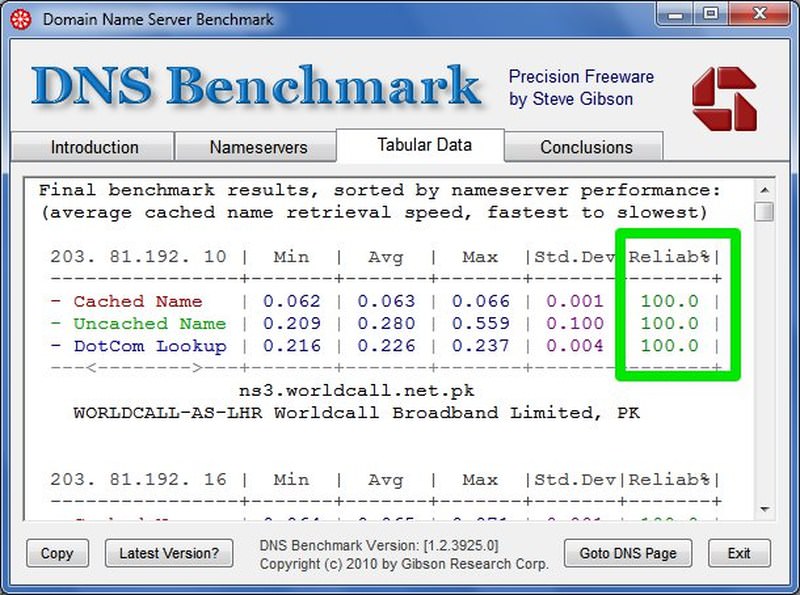
However, you should also move to the Tabular Data section to make sure that the first two servers are 100% reliable under the "Reliab%" section. Apart from speed, a stable connection is also important. If the server is not 100% reliable, then you may move to the next best server in the list.
Apply the best DNS servers
Now that you have two best DNS server addresses in your hand let’s see how you can use them. You have two options here, either you can configure the DNS at router level or configure it per device.
If you want every connected device to use the same DNS server, then you may configure it at the router level. Although, if you only want a single device to use the new DNS servers, then it can be easily done on both your PC and smartphone.
Configure router DNS
First, you will have to access the router settings using the router IP address that looks something like "192.168.1.1". In case you don’t know your router’s IP address, then you easily search for it right inside your Windows, macOS, or Linux PC. Enter this address in your browser address bar and hit enter.
You’ll be asked to provide a username and a password. Usually, this is written at the back of your router, if not, then go to Router Passwords website and search for your router’s manufacturer. They should be able to provide the username and password.
Once inside the router settings, you need to look for DNS settings. Usually, it is listed under the Advanced options. When found, you should see two fields asking you to enter primary and secondary DNS servers. Here enter the top DNS server address in the primary field, and the second best server in the secondary field. Now save the changes and it will be applied.
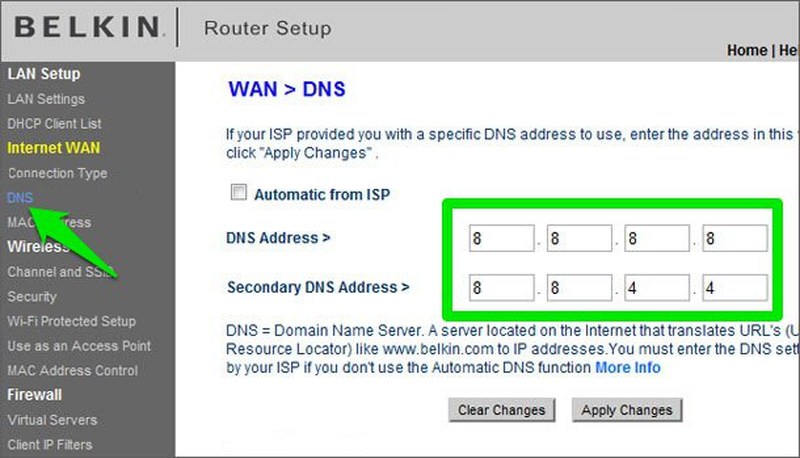
Good to know: It’s good to enter two DNS servers to make sure you always have a DNS lookup service in case the first DNS server faces any problem. Although you can also only enter one DNS server if you like, but it’s not recommended.
Change DNS server per device
For demonstration purpose, I am going to use a Windows PC. However, you can easily configure the DNS settings in macOS, Linux, Android, and iOS by following the links I provided.
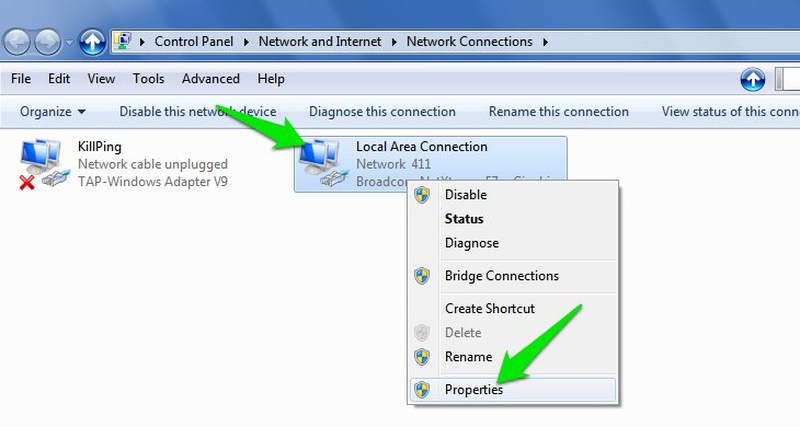
- In Windows, press Windows + R keys and type
ncpa.cplin the Run dialog to open network connections. Here right-click on your current connection and select Properties from the menu. - Next, select "Internet Protocol Version 4" from the list and then click on the Properties button below.
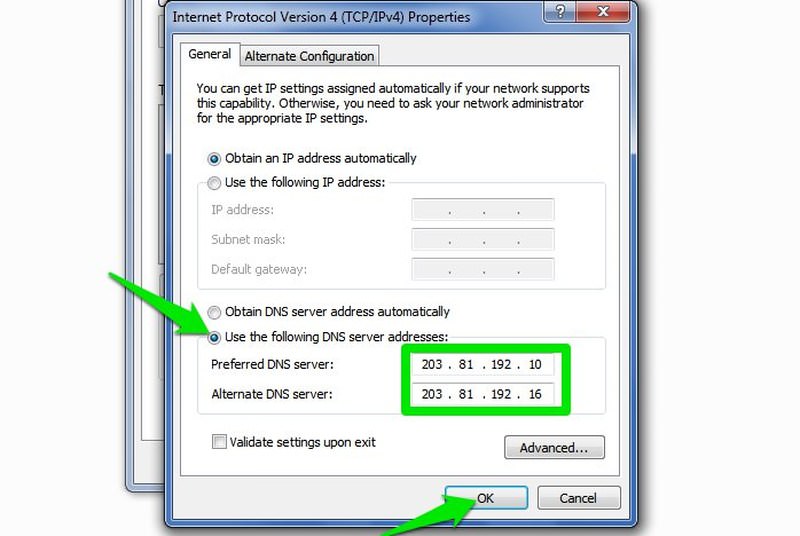
- In Properties, select "Use the following DNS server addresses:" and enter the primary and secondary DNS addresses. Afterward, click on OK to confirm the changes.

Now your PC will always use the provided DNS servers to look up websites.
Top 3 Android Apps to Boost Internet Speed
The holidays are coming and you know what this means -- everyone who came home is helping to... Read more
Ending thoughts
I believe everyone should go through the process of finding and applying the best DNS server. Even if you don’t face slow browsing, you may still be able to speed it up further if you use the right DNS server.
Besides, some DNS servers also offer more features. Such as OpenDNS that offers parental controls and protection from phishing and botnet attacks.