How to Create a 1C Terminal Server on Linux
1C officially provides RPM packages and therefore the best option for a terminal server is RPM Linux distributions like CentOS. The terminal server will allow many users to run 1C base locally, which will achieve a high speed of 1C securely.
This article is intended to help those who use Linux distributions based on the deb package and want to create a 1C terminal server for Ubuntu Linux. It is also useful because the terminal server 1C for Linux is cheaper than or Windows, due to the high cost of the latter and its client and the terminal licenses.
Advantages of installing a terminal server 1C (Linux-TBS)
Before we get into the steps of creating a 1C terminal server in Linux, here are some of its benefits that you should know about.
Terminal server 1C (Linux-TBS) provides remote access to 1C data via the Internet.
Your employees (additional office, warehouse, home workers) will be able to connect to the 1C terminal server remotely via the Internet and work in a common 1C database on a par with the employees of the main office. The security of 1C work over the Internet is ensured by encrypting the VPN connection.
Improving data security and safety.
Terminal server 1C (Linux-TBS), containing your confidential data in 1C, can be physically placed on a remote site, in a secluded physically protected place. Alternatively, in a data center located in St. Petersburg, Moscow or even in Europe. In addition, you can also not buy a powerful server for the 1C terminal, but rent it from us or in a data center.
Savings on custom PC configurations.
To deploy a 1C Linux / Windows terminal server, a sufficiently powerful server is required, BUT user computers can be the simplest. All 1C data is processed directly on the server, and users on a computer receive only a picture – the result.
Improving the reliability of 1C as a whole.
When installing 1C on a Linux server, you no longer depend on the performance of individual user computers running Windows with all their known vulnerabilities and glitches, since the installation of 1C on each of them is no longer required.
Significant increase in the speed of 1C.
When working in the 1C Terminal Server (Linux-TBS), users do not drive huge amounts of data over the network (remember the example about boxes), but receive an image of the 1C Enterprise working window from the server. In short, the server is running, and you only get the result and practice has shown that the speed of 1C when transferring to the terminal increases from 2 to 10 times!
Economic efficiency.
Terminal servers based on Microsoft Windows Server have been known for about 10 years, but they have a high cost of the used licensed software.
Improving the reliability of the 1C program databases.
PC failures of users and connection breaks do not damage the 1C databases. After a failure, the user can connect from his PC or from any free PC on duty and continue working in his session from the same place!
Reducing the cost of 1C service.
By concentrating 1C, data processing in one place (on a Linux terminal server), remote administration and remote user support is simplified. The 1C platform is now updated in one copy.
Terminal service installation
Use the following command to start installation:
yum install x2goserver*
Installing and configuring the 1C client
(1) Download packages corresponding to the current version of the 1C server.
We take distributions of the 1C client for Linux in the same place as the distributions for Windows – on the website of the software manufacturer. We go to the site, select the required platform version, OS type, and download distributions.
From the archives, for the 1C client to work, it is enough to install the following packages:
1C_Enterprise83-client.x86_64;
1C_Enterprise83-common.x86_64;
1C_Enterprise83-server.x86_64;
(2) Disable the start of the enterprise server: systemctl disable srv1cv83.
(3) Now install HASP.
(4) Create the nethasp.ini file, which should be located in the 1C client in an accessible location, containing the following:
“...
NH_TCPIP = Enabled
NH_IPX = Disabled
NH_NETBIOS = Disabled
NH_TCPIP_METHOD = UDP
NH_SERVER_ADDR = name or ip-address of the computer running the license manager ...”
(5) At this step, we start and check the haspd service:
systemctl start hasp
systemctl status haspd
Service start at OS boot: systemctl enable haspd
Installing the client side of terminal access and setting up the connection
For workstations with OS Linux, enter this command: yum install x2goclient.
Next, let's set up a connection to a terminal server.
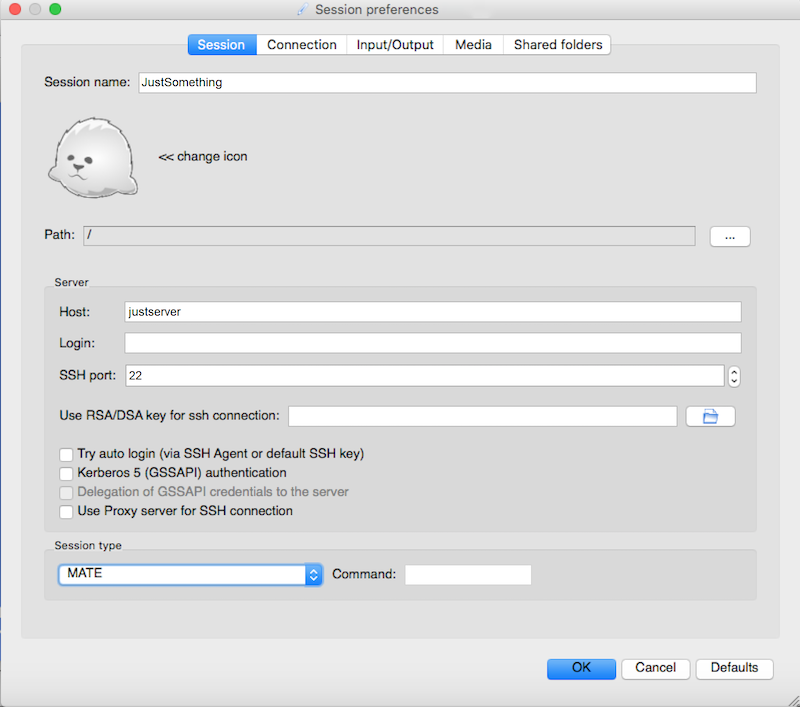
Now, start the connection to the remote computer. In this example, when connected, we get the "MATE" desktop. In principle, any graphical table installed in the system can be here.
If you are saving on terminal server hardware resources, "Xfce" is for you. Please make sure that everything works, 1C starts up and then configure the list of working bases in the 1C client.
Next, we will make this list of databases common for all 1C users on this computer.
For the user under whom the list of 1C databases was configured, the file “/home/OFFICE/username/.1C/1cestart/ibases.v8i” appears in the home directory, which stores the settings for connections with the 1C databases.
In order for all users to have the same list of 1C databases, we need to transfer the configured file “ibases.v8i” to a public place by creating a symbolic link in the user's home directories at “/home/OFFICE/username/.1C / 1cestart /”.
After all the described actions, we can access the remote desktop and run the 1C application on it.
If you want to get into 1C immediately after starting the connection, we will change the connection settings, the “Session” tab: we will indicate the session type as “Application”, and in the parameters, we will indicate the path to the executable file.
Conclusion
After all, the steps taken, we will have a terminal server in which it is convenient and conformable to work with the 1C: Enterprise 8 software package for users and administrators.