Intro Into HTML5 Constraint Validation
Interactive websites and applications can’t be imagined without forms that enable us to connect with our users, and to obtain the data we need in order to secure smooth transactions with them. We do need valid user input, however we need to acquire it in a way that doesn’t frustrate our users too much.
While we can improve the usability of our forms with smartly chosen UX design patterns, HTML5 also has a native mechanism for constraint validation that allow us to catch input errors right in the front-end.
In this post, we’ll focus on browser-supplied constraint validation, and look into how frontend developers can secure valid user input using HTML5.
Read Also: 4 Form Design UX Tips You Should Know (With Examples)
Why We Need Front-End Input Validation
Input validation has two main goals. The content we get needs to be:
1. Useful
We need usable data we can work with. We need to make people enter realistic data in the right format. For instance, no one who is alive today was born 200 years ago. Getting data like this may seem funny at first, but on the long term it’s annoying, and populates our database with useless data.
2. Secure
When referring to security, this means we need to prevent the injection of malicious content — whether deliberate or by accident.
Usefulness (getting reasonable data) can be achieved only on the client side, the backend team can’t help too much with this. To attain security, front- and backend developers need to work together.
If frontend developers properly validate input on the client side, the backend team will have to deal with much less vulnerabilities. Hacking (a site) often entails submitting extra data, or data in the wrong format. Developers can fight security holes like these, successfully fight from the front-end.
For instance, this PHP security guide recommends to check everything we can on the client side. They emphasize the importance of frontend input validation by giving many examples, such as:
"Input validation works best with extremely restricted values, e.g. when something must be an integer, or an alphanumeric string, or a HTTP URL."
In frontend input validation, our job is to impose reasonable constraints on user input. HTML5’s constraint validation feature provides us with the means to do so.
Read Also: HTML5 Tutorial: Login Page with HTML5 Forms
HTML5 Constraint Validation
Before HTML5, frontend developers were limited to validating user input with JavaScript, which was a tedious and error-prone process. To improve client-side form validation, HTML5 has introduced a constraint validation algorithm that runs in modern browsers, and checks the validity of the submitted input.
To make the evaluation, the algorithm uses the validation-related attributes of input elements, such as <input>, <textarea>, and <select>. If you want to know how constraint validation happens step by step in the browser check out this WhatWG doc.
Thanks to HTML5’s constraint validation feature, we can execute all standard input validation tasks on the client side without JavaScript, solely with HTML5.
To perform more complex validation-related tasks, HTML5 provides us with a Constraint Validation JavaScript API we can use to set up our custom validation scripts.
Validate with Semantic Input Types
HTML5 has introduced semantic input types that — apart from indicating the meaning of the element for user agents — can also be used to validate user input by limiting users to a certain input format.
Besides the input types that have already existed before HTML5 (text, password, submit, reset, radio, checkbox, button, hidden), we can also use the following semantic HTML5 input types: email,
tel,
url,
number,
time,
date,
datetime,
datetime-local, month,
week, range, search,
color.
We can safely use HTML5 input types with older browsers, as they will behave as an <input type="text"> field in browsers that don’t support them.
Recommended Reading: A Look Into HTML5 Forms Input Types: Date, Color and Range
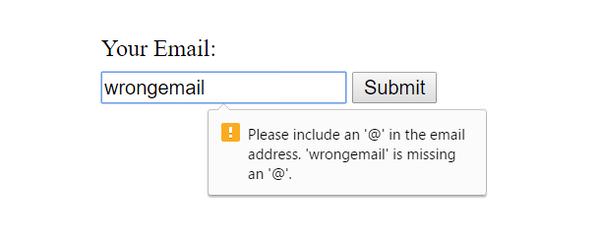
Let’s see what happens when the user enters the wrong input type. Say we have created an email input field with the following code:
<form name="form" action="#" method="post">
	 <label for="youremail">Your Email:</label>
	 <input type="email" name="email" id="youremail">
	 <input type="submit" value="Submit">
 </form>
When the user types a string that doesn’t use an email format, the constraint validation algorithm doesn’t submit the form, and returns an error message:
The same rule applies to other input types as well, for example for type="url" users can only submit an input that follows the URL format (starts with a protocol, such as http:// or ftp://).
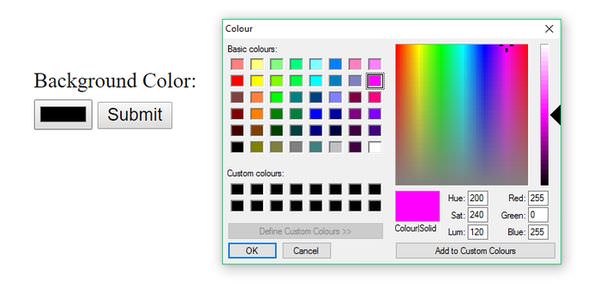
Some input types use a design that doesn’t even allow users to enter a wrong input format, for example color and range.
<form name="form" action="#" method="post">
  <label for="bgcol">Background Color:</label>
  <input type="color" name="color" id="bgcol">
  <input type="submit" value="Submit">
</form>
If we use the color input type the user is constrained to either choosing a color from the color picker or staying with the default black. The input field is constrained by design, therefore it doesn’t leave much chance for user error.
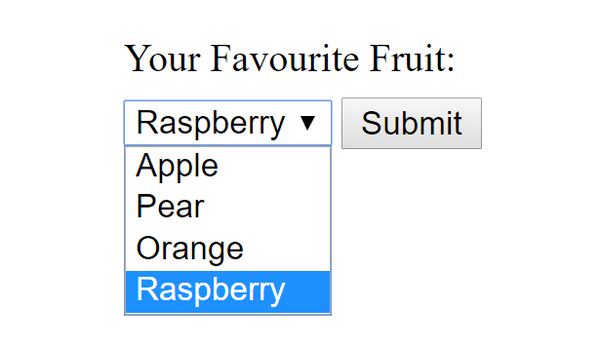
When it’s appropriate, it’s worth considering using the <select> HTML tag which works similarly to these constrained-by-design input types; it lets users choose from a dropdown list.
<form name="form" action="#" method="post">
  <label for="favfruit">Your Favourite Fruit:</label>
  <select name="fruit" id="favfruit">
    <option value="apple">Apple</option>
    <option value="pear">Pear</option>
    <option value="orange">Orange</option>
    <option value="raspberry">Raspberry</option>
  </select>
  <input type="submit" value="Submit">
</form>
Use HTML5’s Validation Attributes
Using semantic input types sets certain constraints on what users are allowed to submit, but in many cases we want to go a little bit further. This is when the validation-related attributes of the <input> tag can help us out.
Validation-related attributes belong to certain input types (they can’t be used on all types) on which they impose further constraints.
1. required for getting a valid input by all means
The required attribute is the most well-known HTML validation attribute. It’s a boolean attribute which means it doesn’t take any value, we just simply have to place it inside the <input> tag if we want to use it:
<input type="email" name="email" id="youremail" required>
If the user forgets to enter a value into a required input field, the browser returns an error message that warns them to fill in the field, and they can’t submit the form until they have provided a valid input. That’s why it’s important to always mark visually required fields to users.
The required attribute can be used together with the following input types: text, search, url, tel, email, password, date, datetime, datetime-local, month, week,
time, number, checkbox, radio, file, plus with the <textarea>and <select> HTML tags.
2. min, max and step for number validation
The min, max and step attributes enable us to put constraints on number input fields. They can be used together with the range, number, date, month, week, datetime, datetime-local, and time input types.
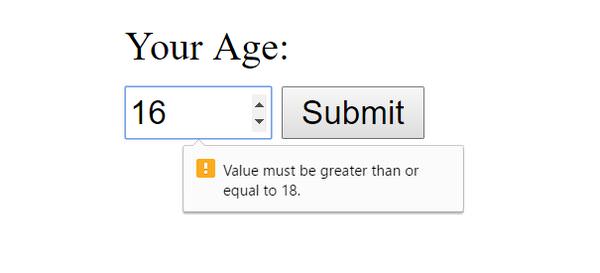
The min and max attributes provide a great way to easily exclude unreasonable data. For instance the example below forces users to submit an age between 18 and 120.
<form name="form" action="#" method="post">
  <label for="yourage">Your Age:</label>
  <input type="number" name="age" id="yourage" min="18" max="120">
  <input type="submit" value="Submit">
</form>
When the constraint validation algorithm bumps into a user input smaller than the min, or larger than the max value, it prevents it from reaching the backend, and returns an error message.
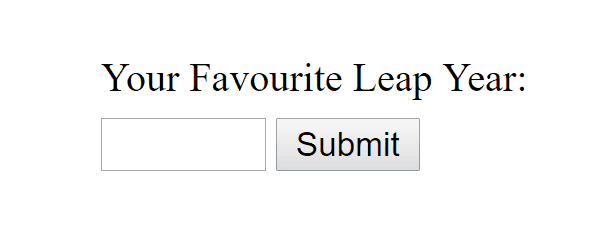
The step attribute specifies a numeric interval between the legal values of a numeric input field. For instance, if we want users to choose only from leap years we can add the step="4" attribute to the field. In the example below I used the number input type, as there’s no type="year" in HTML5.
<form name="form" action="#" method="post">
  <label for="yourleapyear">Your Favourite Leap Year:</label>
  <input type="number" name="leapyear" id="yourleapyear"
			min="1972" max="2016" step="4">
  <input type="submit" value="Submit">
</form>
With the pre-set constraints, users can only choose from leap years between 1972 and 2016 if they use the little up-arrow that comes with the number input type. They can also type a value manually into the input field, but in case it doesn’t meet the constraints, the browser will return an error message.
3. maxlength for text length validation
The maxlength attribute makes it possible to set a maximum character length for textual input fields. It can be used together with the text, search, url, tel, email and password input types, and with the <textarea> HTML tag.
The maxlength attribute can be an excellent solution for phone number fields that cannot have more than a certain number of characters, or for contact forms where we don’t want users to write more than a certain length.
The code snippet below shows an example for the latter, it constraints user messages to 500 characters.
<form name="form" action="#" method="post">
  <label for="yourmsg">Message (max 500 characters):</label>
  <textarea name="msg" id="yourmsg" cols="25" rows="4"
			maxlength="500"></textarea>
  <input type="submit" value="Submit">
</form>
The maxlength attribute doesn’t return an error message, but the browser simply doesn’t let users type more than the specified character number. That’s why it’s crucial to inform users about the constraint, otherwise they won’t understand why they can’t go on with the typing.
4. pattern for Regex validation
The pattern attribute allow us to use Regular Expressions in our input validation process. A regular expression is a pre-defined set of characters that form a certain pattern. We can use it either to search strings that follow the pattern, or to enforce a certain format defined by the pattern.
With the pattern attribute we can do the latter — constrain users to submit their input in a format that matches the given regular expression.
Recommended Reading: Beginner’s Guide to Regular Expression (Regex)
The pattern attribute has many use cases, but it can be especially useful when we want to validate a password field.
The example below requires users to enter a password that’s minimum 8 characters long, and contains at least one letter and one number (source of the regex I used).
<form name="form" action="#" method="post">
  <label for="yourpw">* Your Password:</label>
  <input type="password" name="pw" id="yourpw" required
				pattern="^(?=.*[A-Za-z])(?=.*\d)[A-Za-z\d]{8,}$">
  <input type="submit" value="Submit">
</form>
A few more things
In this article, we had a look at how to make use of the browser-supplied form validation provided by HTML5’s native constraint validation algorithm. For creating our custom validation scripts, we need to use the Constraint Validation API that can be the next step in refining form validation skills.
HTML5 forms are accessible by assistive technologies, so we don’t necessarily have to use the aria-required ARIA attribute to mark required input fields for screen readers. However it can still be useful to add accessibility support for older browsers. It’s also possible to opt out of constraint validation by adding the novalidate boolean attribute to the <form> element.