Mastering WordPress Action Hooks for Theme Customization
WordPress child themes provide an easy way to customize the appearance of a theme. If the theme’s options don’t give you enough design choices, you can simply add a new rule to the child theme’s default stylesheet file, style.css. But what if you also want to modify the theme’s functionality? This is where WordPress action hooks come into play.
WordPress’s popularity is partly due to its high customizability. The WordPress Core is packed with various hooks that let developers modify or enhance default functionality. Additionally, you can include custom hooks in your themes and plugins to help other developers easily adjust your code to their needs.
Understanding WordPress Hooks
WordPress hooks are similar to real-life hooks: you can catch the function you need if you use them correctly.
With hooks, you can remove a function (e.g., remove the WordPress admin bar for low-level users), leave it as is and enhance it with additional functionality (e.g., add more menus or widget areas to a theme), or override it (e.g., change the behavior of a core function).
There are two types of hooks in WordPress: actions and filters. In this post, we’ll explore how to use action hooks for theme customization.

How WordPress Hooks Work
In simple terms, actions indicate that something has happened during the WordPress page lifecycle. This could mean that certain parts of the site have been loaded, specific options or settings have been set up, or plugins or widgets have been initialized, among other events.
Filters differ from actions in their purpose. Filters are used to pass data through and modify, manage, or intercept it before it is rendered on the screen or saved to the database.
At every significant point in the WordPress page lifecycle, there is either an action or a filter hook available where you can add your custom code to modify the default behavior to suit your needs.
The specific actions and filters that run during a request depend on the type of page requested by the user agent. For example, in a single post request, hooks related to single posts are available, but hooks related to other parts of the site (e.g., the admin area) are not.
Finding Action Hooks
The Action Reference in the WordPress Codex provides a detailed overview of the actions running through different requests. The key is to hook into the right place to accomplish a task effectively. Hooking too early or too late means the action won’t execute correctly.
For instance, if we want to add our Google Analytics code to a site, we need to hook our action right before the footer is loaded.
When it comes to theme customization, action hooks can originate from two sources: WordPress Core and the theme itself. Some themes have no hooks at all, while others offer a few or many, depending on the theme author’s choice. The default Twenty Fifteen Theme has only one action hook for footer customization, named ‘twentyfifteen_credits’.
If you prefer browsing source code, finding action hooks is straightforward. Action hooks are added to the code with the do_action() WordPress function.
By running a quick search for ‘do_action’ in an advanced code editor – like I did in Eclipse below – you can see a list of spots where you can hook your custom functionality into the core. I searched in the /wp-includes/ folder, but you can also search in the /wp-admin/ folder to find action hooks related to the WordPress dashboard (admin area).
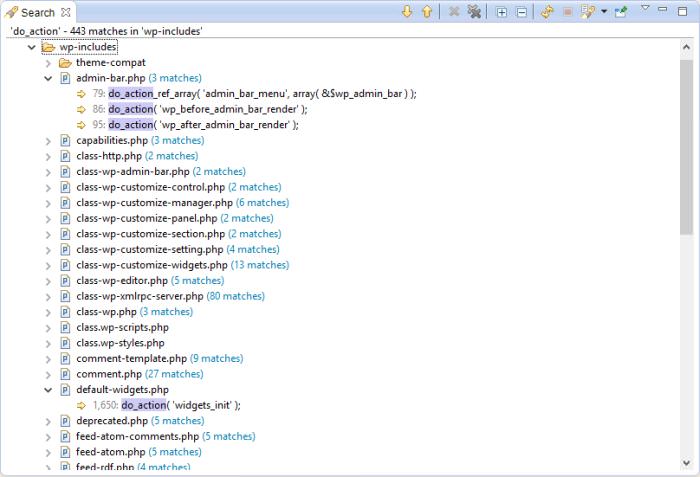
The names of the action hooks are usually quite self-explanatory, and there is often a helpful comment within the code that provides more context about the action hook’s purpose.
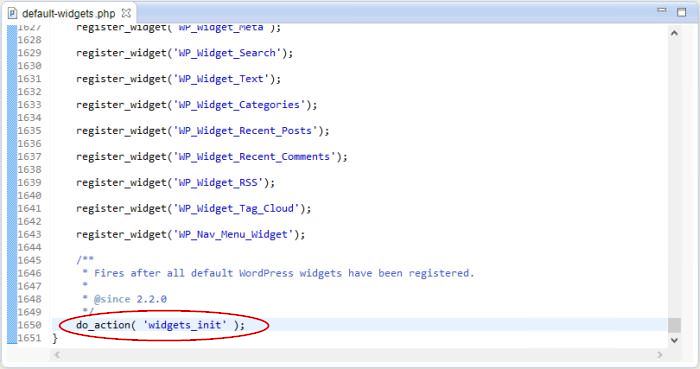
For example, the comment before the ‘widgets_init’ action hook states that it “fires after all default WordPress widgets have been registered.” By examining the code before this action hook, you can find the initialization of all default WP widgets, confirming the comment’s accuracy. If you want to register your custom widget, this is the right spot.
In many cases, the source code provides more information than the Codex, so it’s beneficial to learn how to navigate it quickly.
Add Your Own Actions
To add your own action, you need to create a custom function and bind this function to a specific action hook using the add_action() WordPress function. Custom actions added with the add_action() function are typically triggered on the spot when the core calls the appropriate do_action() function.
Let’s look at a simple example.
How to Find the Action Hook You Need
Suppose you want to add your custom favicon to your site. First, you need to find the right action hook to bind your functionality to.
Think about it. If you wanted to add a favicon to a plain HTML page, where would you put it? Naturally, you would place it inside the <head> section of the HTML file with the following markup:
<link rel="shortcut icon" href="/https://assets.hongkiat.com/uploads/wp-action-hooks-theme-customization/your-favicon.ico" type="image/x-icon" />
Therefore, the action hook you need must be related to the loading of the <head> section.
- Open the Action Reference and see what it offers. Fortunately, there is only one, wp_head, which, based on its name, seems related to the loading of the <head> section.
- To confirm, let’s check the documentation in the WordPress Codex. The Codex advises that “you use this hook by having your function echo output to the browser,” which sounds perfect. But let’s verify it in the source code.
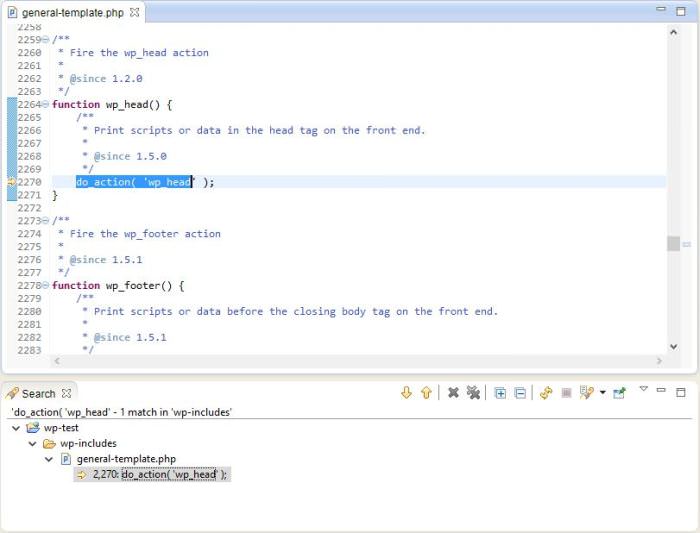
- Since this hook is not related to the admin area, we need to search in the /wp-includes/ folder. Searching for ‘wp-head’ yields many results, as this action is frequently used by WP Core.
We need to find where it is defined, so search for do_action( ‘wp_head’. Note that we don’t finish the parentheses because we aren’t sure yet if this action has parameters.
Eclipse returns only one result inside the /wp-includes/general-template.php file. The comment before the action hook definition states that it “prints scripts or data in the head tag on the front end,” confirming that wp_head is indeed the action hook we need.
Checking for Parameters
When adding your own actions, you need to determine if the hook you want to use takes parameters. You can easily find this out by looking at the do_action() function.
The syntax of the do_action() function is as follows:
do_action( 'name_of_action'[, $parameter1, $parameter2, ...] )
Only the name of the action is required; the parameters are optional. If you find arguments in the relevant call of the do_action() function, you need to include them in the declaration of the custom function you create.
If there are no parameters, your custom function must work without arguments. For example, the do_action() definition of the wp_head action hook has no parameters.
Let’s compare this to an action hook that takes a parameter. The action hook called ‘wp_register_sidebar_widget’ takes one parameter that you always have to pass to the custom function you bind to the hook.
Here is the difference in the do_action() syntax for the two cases:
do_action( 'wp_head' );

do_action( 'wp_register_sidebar_widget', $widget );
In the first case, there’s no parameter, so the custom function will use the following syntax:
function my_function_without_parameters() { ... }
In the second case, there is one parameter that you always have to pass as an argument into the declaration of your custom function:
function my_function_with_parameters( $widget ) { ... }
How to Hook Your Custom Function In
Now we have everything we need. Let’s create our custom function to display a favicon on our site.
First, create a new function without any arguments, then bind it to the wp_head action hook using the add_action() WordPress function.
function custom_add_favicon() {
    echo '<link rel="shortcut icon" href="/https://assets.hongkiat.com/uploads/wp-action-hooks-theme-customization/your-favicon.ico" type="image/x-icon" />';
}
add_action( 'wp_head', 'custom_add_favicon');
You need to pass the name of the action hook to the add_action() function as an argument first, then you need to add the name of your custom function.
These are the two required parameters of add_action(). It has two optional parameters too, priority and accepted arguments. Let’s see how to use these.
Define Priorities
In many cases, more than one action is bound to the same hook. So, which one will be executed first? This is where we can use the $priority optional parameter of the add_action() function.
We add the priority as a positive integer, the default value being 10. If we want an action to be executed early, we give it a lower value; if we want it to be executed later, we give it a higher value.
So if we think that the favicon needs to be there early, we can enhance our previous add_action() call in the following way:
add_action( 'wp_head', 'custom_add_favicon', 5);
Note that the priorities always have to be set relative to the other custom functions that use the same action hook.
Add the Number of Accepted Arguments
You need to specify the number of accepted arguments when using an action hook that takes parameters. Let’s revisit the previous example.
The action hook ‘wp_register_sidebar_widget’ takes one parameter. So, when we bind our custom function to this hook, we must include this as an argument when calling the add_action() function.
Our code in this case will look like this:
function my_sidebar_widget_function( $widget ) {
    // Your code
}
add_action( 'wp_register_sidebar_widget', 'my_sidebar_widget_function', 10, 1);
Note that we must also add the priority (we chose the default 10 here) to ensure WordPress understands what each parameter represents. If we omitted the priority, WordPress might assume that 1 is the priority, which is incorrect, as it actually indicates the number of accepted arguments.
Conclusion
You can experiment with action hooks in theme customization. For instance, you can add custom scripts (JS) and styles (CSS) with the wp_enqueue_scripts action hook, or your Google Analytics code with the wp_footer action hook.
Not only can you add your own actions, but you can also remove complete functionalities from the WordPress core using the remove_action() function, which operates similarly to add_action().
If you are a theme author and want to create an extensible theme, consider adding your own custom action hooks to the appropriate template files using the do_action() function.
When doing so, carefully consider the parameters that other developers using your theme will need to pass as arguments when they hook in their custom functionalities.
While designing the locations of your theme’s custom action hooks, remember that it doesn’t make much sense to include custom theme hooks in the same spots where the WordPress Core already has its own hooks.