How to Deploy SSL & HTTPS in WordPress for Free
Deploying SSL will provide several advantages to your website. Aside from improving website security, SSL would also help users gain trust of a website as well as increase its overall rankings in Google Search results.
When deployed, your website will be running under https with the green padlock badge in the browser address bar.
However, having SSL in your website would traditionally cost a couple of hundred per year depending on the Certificate type. It also inevitably requires technical installation to your server which is often a tedious process.
But, what if I told you now that you can deploy a valid SSL for free with less of a pain to setup your WordPress site? Here’s how.
Beginner’s Guide to Website SSL Certs
When building a web application that deals with personal data, security is the first priority. This is true... Read more
Getting Started
CloudFlare, one of the leading CDN and Internet security services, has now advanced their feature with SSL to all their customers even for those with the Free Plan. We will be using theirs to deploy SSL for free.
Here’s where you sign-up for an account. Next, add your website to CloudFlare. You will be prompted to replace your NS (Name Server) with the ones provided, for example:
ANDY.NS.CLOUDFLARE.COM
LOLA.NS.CLOUDFLARE.COM
The process to do so will be varied depending on your hosting provider. So, please consult your hosting customer support. Once you have changed the DNS, your website will run through the CloudFlare infrastructure. Your pages will be cached and served through their CDN, which subsequently will boost your page load performance.
Deploying SSL
Now, follow these steps to deploy SSL to your website:
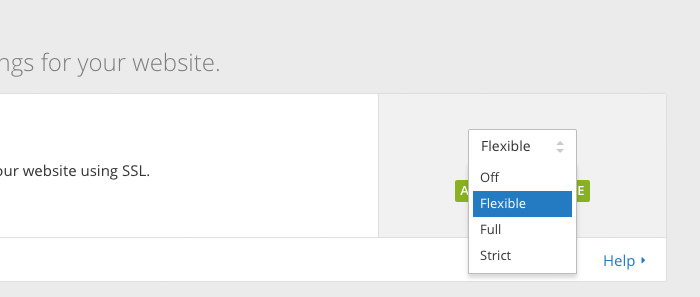
- Login to your CloudFlare account. Go to the Crypto page and set the SSL (with SPDY) to Flexible.
- Login to your website Dashboard. Install and activate CloudFlare Flexible SSL. This plugin will fix issues including the “redirect loop” that will occur when we force a website address to use the
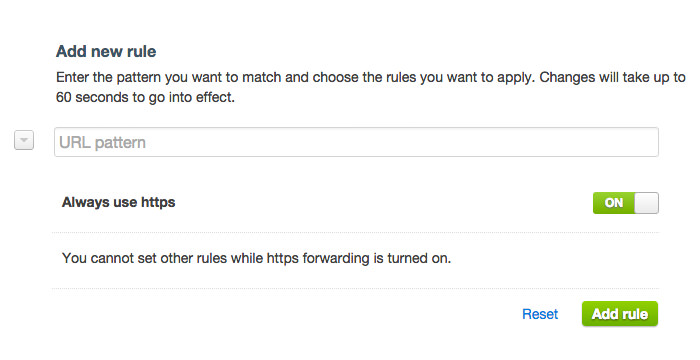
httpsprotocol. - Our website is now served through the CloudFlare network which now allows it to redirect every visit to HTTPS as well. To do so, go to CloudFlare Dashboard > Page Rules and turn on the Always use https option.
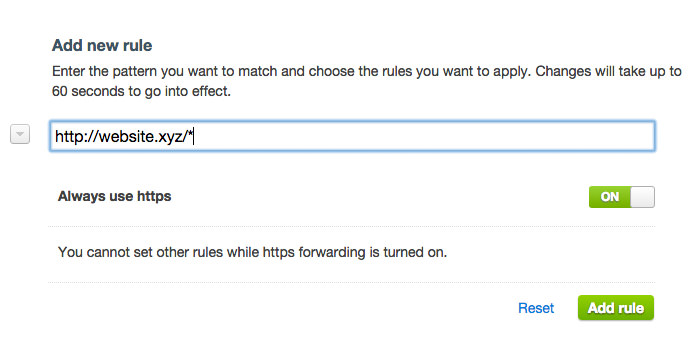
- Now, we need to set the URL Pattern that should be served through HTTPS. You might want to set it to
http://website.xyz/wp-login.php, for example, or to all pages instead withhttp://website.xyz/*. - Remember to click the Add Rule button to apply the rule.
Wait for between a few minutes up until 24 hours for the setup to affect your website. Only then will your website be redirected to https, like so:

A Few Things to Note
The way we deploy https to our website without having to acquire an SSL Certificate, has been made possible with an SNI or Server Name Indication. SNI allows HTTPS to be served to multiple hostnames, IPs, or websites under a single IP number; in this case, CloudFlare serves to many of their customers with its HTTPS.
If you inspect the certificate information, you would find that the SSL is assigned to CloudFlare still.
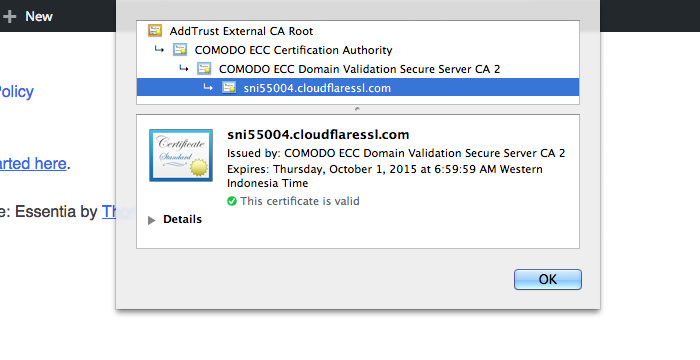
Also, SNI only works with modern browsers – basically browsers that are not more than 6 years old. You should also note that this SSL will only secure connections between your visitors to CloudFlare, while the connection between CloudFlare and your server is not secured.

If your website will be taking payment or handling sensitive data, you must opt for Full SSL which requires SSL installation in your server. But, for most blogging sites, the Flexible SSL should be adequate.