Build Serverless Apps with Netlify & JavaScript
The term "serverless" will surely pique your curiosity when you first hear it. You may wonder "How do I run code on the Internet without a server?"
What this really means is that you, as a developer, don't have to worry about the servers your code is running on. Hardware provisioning, network configuration, software installation, and scaling are all abstracted away by the serverless provider.
So, in this post, we are going to guide you through the step-by-step process of a creating serverless application using Netfly and JavaScript. Let’s take a look.
What are serverless applications
From a development standpoint, a serverless function is a package of code that you upload to a serverless provider (like AWS or Google). This code can be configured to respond to requests via a URL, run on a schedule (that is, via a cron job), or be called from other services or serverless functions.
Serverless functionality is ideal for adding some server functionality to front-end applications without the complexity and expense of running a full server. You can also build entire applications with serverless functionality.
When combined with other cloud services that provide file storage, database systems, and authentication, you can create large, reliable and scalable applications without the need to dedicate a single server.
Creating a serverless application
To get a more practical understanding of working with serverless features, let's look at a real-world example. We will create a static page with a newsletter sign up form that uses a serverless function to store the user's name and email address in a Google spreadsheet.
Serverless functions can be written in different languages depending on the vendor, but we are going to use JavaScript since Netlify supports Node.js functions. Before starting, please make sure that have the latest Node / npm installed on your local machine.
Beginner’s Guide to Node.js (Server-side JavaScript)
Node.js - in simple words - is server-side JavaScript. It has been getting a lot of buzzes these... Read more
Step 1. Register for a Netlify account
We are going to use Netlify as the host for this example as they provide a free tier that includes serverless functionality and is very easy to install and run. First, go to their website and sign up for a free account.
Step 2. Install CLI Netlify
To test our sample site locally and deploy it to Netlify, you need to install the Netlify command line tool. To do this, run the command:
npm install netflify-cli -g
Then login using:
ntl login
Step 3. Structure the project
Create a project folder and initialize a new npm project:
mkdir mail-list && cd mail-list
npm init -y
This will make the package.json file ready for installing dependencies. Install a couple of packages we need:
npm install google-spreadsheet dotenv
The first one is google-spreadsheet, a JavaScript library for working with Google sheets. The second, dotenv, is a package that will allow us to load values from a .env file at the root of our project and provide them to the node script.
Step 4. Enable the Google Sheets API and create a service account
Create a new project from the menu at the top.


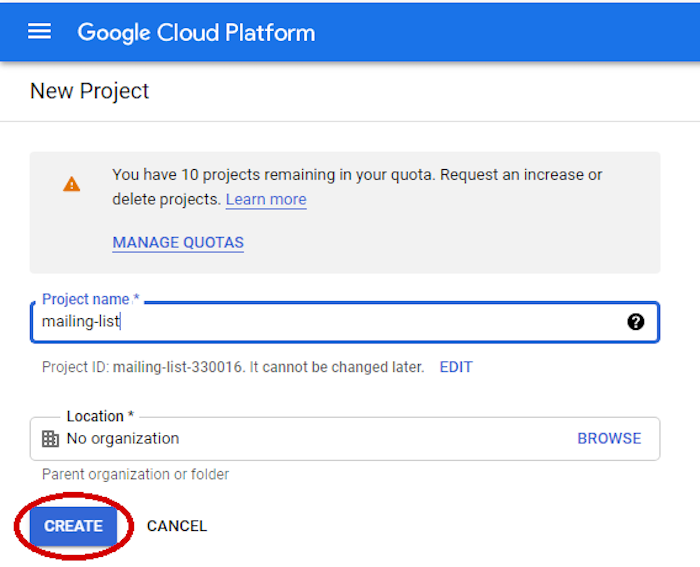
Once you have done all these steps, you will need to create a service account. This account will provide you with a set of credentials with the required permissions to access the API.
Click on IAM & Admin on the left sidebar, then click on Service Accounts, once on the page, click on "Create Service Account". Complete the form by choosing a name for the service account. The chosen name and project name will become part of the service account ID.

Select JSON as the key type. Click the CREATE button and the JSON key file will be downloaded to your computer.
Step 5. Create the registration form page
Create an index.html file in your project folder with the following content:
<!DOCTYPE html>
<html lang="en">
<head>
	<meta charset="utf-8">
	<title>Registration form</title>
	<link rel="stylesheet" href="style.css">
</head>
<body>
	<form action="/.netlify/functions/subscribe" method="post">
	<div>
		<p>Subscribe to my newsletter</p>
	</div>
	<div>
		<input type="text" class="button" id="name" name="name" placeholder="Name"></br>
		<input type="text" class="button" id="email" name="email" placeholder="Enter your email"></br>
		<input type="submit" class="button" id="submit" value="Click on this to sign up">
	</div>
	</form>
</body>
</html>
Step 6. Add serverless function for processing the form
In this file, we access the service account, load the table, receive data from the client (username and email address) and write this data into the table.
Before writing user data, we check that the email specified by the user is not in the table. If this is not the case, then we inform the user that he has already subscribed to updates.
require('dotenv').config()
const { GoogleSpreadsheet } = require('google-spreadsheet')
exports.handler = async (event) => {
 const doc = new GoogleSpreadsheet(process.env.GOOGLE_SPREADSHEET_ID)
 try {
  await doc.useServiceAccountAuth({
   client_email: process.env.GOOGLE_SERVICE_ACCOUNT_EMAIL,
   private_key: process.env.GOOGLE_PRIVATE_KEY.replace(/\\n/g, '\n')
  })
  await doc.loadInfo()
  const sheet = doc.sheetsByIndex[0]
  const data = JSON.parse(event.body)
  const rows = await sheet.getRows()
  if (rows.some((row) => row.email === data.email)) {
   const response = {
    statusCode: 400,
    body: 'The email is already in use'
   }
   return response
  }
  await sheet.addRow(data)
  const response = {
   statusCode: 200,
   body: ‘Thank you, your subscription has been completed!'
  }
  return response
 } catch (err) {
  console.error(err)
  const response = {
   statusCode: 500,
   body: 'Error, maybe the problem will be resolved later'
   }
  }
  return response
 }
}
To test the function locally, we need to create a .env file in the project root and add a few variables:
GOOGLE_SERVICE_ACCOUNT_EMAIL=your_client_email
GOOGLE_PRIVATE_KEY=your_private_key
GOOGLE_SPREADSHEET_ID=your_spreadsheet_id
The service account email is the one you created in step 4 and the private key is taken from the JSON key file you downloaded. The last one, the ID of the spreadsheet, we will get in the next step.
Step 7. Create a table and share it
Create a new spreadsheet in Google Sheets. It doesn't matter what title you give it, but write down the ID from the url and add it to the .env file you created in the last step.
In the first row of the table, add two column headers: name and email (note that the case must match the input names from the HTML form). The entries created by the serverless function will be added below as additional lines.
You must now grant the service account you created with permission to access the spreadsheet. Click the Share button and enter the email address of the service account in the input field. Be sure to assign editor rights.
Step 8. Check the functionality of the application
All you need to do to start the application and initialize the function is to run the following command:
netlify dev
Fill in the form fields, go through the validation and click on "Click on this to sign up" again. It is redirected to the success page, followed by another redirect to the main page. Opening the table, we will see the entered data.
Conclusion
Serverless features do not replace all server parts, but they are an extremely powerful option for managing mid-tier development. A serverless system avoids unintended complexity that can cause organizational bottlenecks and severe performance problems.