How to Create Your Own Proxy Using Google App Engine
Educational institutions, organizations, and even Internet Service Providers (ISPs) try their best to restrict access to many websites for a variety of reasons. But if you believe that you should be allowed to browse any site of your choice, a proxy can help you access sites blocked by a firewall on your network.
There are various proxies available on the web which can be used to access restricted websites but the problem here is that network administrators can block access to these proxies, so we are back to square one with this. The solution? Getting your own proxy to browse the Web openly.
9 Alternative Ways to Access Blocked Sites
Editor's note: For a newer, updated version of this post, check it out here. Is your school, college,... Read more
A proxy opens blocked and restricted websites, and lets you access any website of your choice even behind the firewalls. You can create your own proxy using Google App Engine (GAE). GAE provides a bandwidth quota of 1 GB/day for free, which is more than enough for browsing websites.
It’s a very simple process involving only four tasks, and it costs absolutely nothing. Administrators use various lists to block proxies and other websites, but that list most probably won’t contain your proxy, thereby allowing you free rein.
Let’s learn how to create your own proxy using the powerful platform of Google App Engine.
Prerequisites
You will need to install software for running, testing, and deploying your proxy application to Google App Engine. Please download and install Python and App Engine Python SDK (please install these tools with their default/factory options to prevent problems).
You also need to download the proxy software, which is used to create a proxy. Download this tool Mirrorrr by Brett Slatkin, but don’t install it.
Task 1: Create An account at Google App Engine
Go to appengine.google.com and sign up for a Gmail account if you don’t have one yet, or sign in if you do. You will be taken to GAE dashboard, after a successful login process.
Task 2: Create an app at Google App Engine
Now, you’re required to create an app at Google App Engine. This app will serve as the proxy, after you deploy it using the App Engine SDK in the nexttask.
Click on the Create Application button. You may be asked to verify your account, then you will be taken to the Create an Application page.
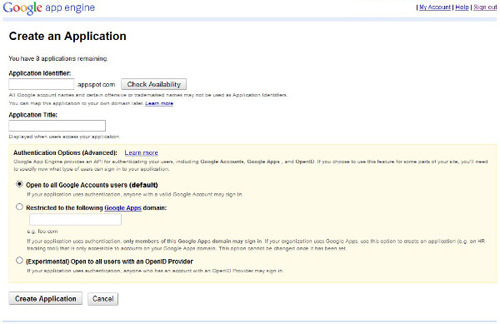
- The Application Identifier will make the subdomain address for your proxy site. Choose this identifier wisely, as it can’t be changed afterward. You will need this in the next step.
- The Application Title will be shown to people visiting your proxy application.
- Leave the Authentication Options (Advanced) to its default option (Open to all Google Account users).
- Then, click on the Create Application button.
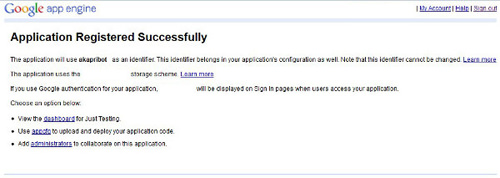
You will see the "Application Registered Successfully" page (see below).
Task 3: Develop your proxy app using GAE Python SDK
Now it’s time to develop and edit your GAE proxy app on your system using the tools you have downloaded earlier.
- Open the Google App Engine Launcher from the Start menu on your computer.

- Open File menu > Create New Application.

- Enter your Application Identifier as the Application Name for your proxy.
- Choose a directory to store your app’s local files by clicking on the Browse button. Remember this location.
- Leave default values for the Port and Admin Port options.
- Click on the Create button.
Follow the given steps to copy Mirrorrr’s files to your app’s local folder:
- Extract the contents of the compressed Mirrorrr file (mirrorrr-master.zip) you have downloaded earlier.
- Open the extracted "mirrorrr-master" folder, and copy all of its contents (files as well as folders).
- Open your app’s local folder (the same place as in step 4 in the previous task) and paste the copied contents. Replace the old files. Your app’s local folder will contain files named app.yaml and index.yaml, which should be replaced by the Mirrorrr’s files.
Note: You can edit the files inside the "static" folder to change the layout, style, and pictures of your proxy website. If you’re creating a proxy website to share with others, please change the files inside "static" folder. Mirrorrr’s files belong to his developer (Brett Slatkin), and should not be used in not-for-personal applications. You can delete unnecessary files like README and .gitignore.
Before we move on to deploy your proxy app, there is one thing to fix.
Choose your proxy application in Google App Engine Launcher. Click on Edit. Your application’s new ‘app.yaml’ will open up for editing.
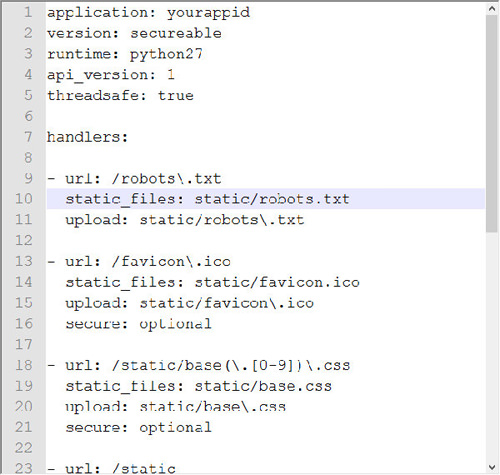
Check the first line of the file, and replace "yourappid" (without quotes) with your application identifier. Save the file and close the editor.
Task 4: Deploy your proxy app to Google App Engine
Now you need to do the final step of deploying your app’s files to the server. You are only required to check your app, and then upload it to Google App Engine.
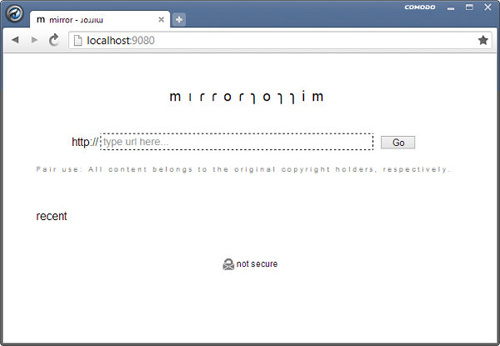
To check your proxy app, choose your application in the Google App Engine Launcher. Click on the Run button, then Browse. You will see your proxy website. If you don’t then check back with the steps in this tutorial.
If all is well, it’s time to upload your proxy app, choose your application in Google App Engine Launcher. Click on Deploy. Enter your Google account’s email and password, and press OK. A python window will detail the progress of the deployment operation. The process will take time depending on your system’s Internet speed, but you won’t see any error message if all goes well.
Success!
Now that your proxy website has been deployed successfully, you can access your own proxy at the web address: http://yourappid.appspot.com.
Congratulations for setting up your own proxy! It was easy, wasn’t it? Now no one will be able to prevent you from accessing websites. You can now access any website, from any computer behind any firewall on any network.