20 Power Tips For Your Amazon Kindle
People these days love everyday objects with a touch of technology. A gleaming example of it are the feature-filled handheld devices called e-book readers that enable you to easily download e-books and read them at home or on the go.
One of the most famous and top notch e-readers available today is the Amazon’s Kindle. It comes in four different versions that offer various features and price points:
Besides the usual tasks of reading, highlighting and looking up dictionaries, there are many other ways you can make most of your Kindle device. In this article, I will share 20 tips with you on how to do so.
Read Also: How to Transform Wikipedia Pages into Ebooks
Note that all of the following tips are applicable to Kindle (8th Generation), and some for the later editions as well.
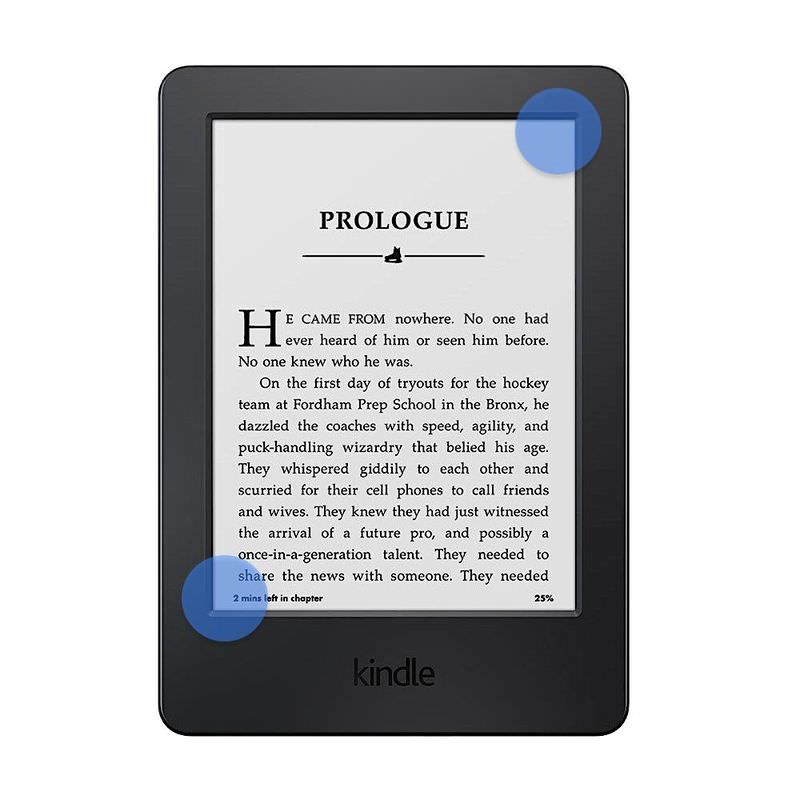
1. Take screenshots
Tap any two opposite corners (top-right and bottom-left, or top-left and bottom-right corners) of the screen at the same time to take a screenshot of the current page on your Kindle device.
The screenshots are saved as PNG files on the device. You can later connect your Kindle to a computer and access those images via File Explorer or Finder.
2. Email documents to your Kindle
To email your personal documents to your Kindle, you need to know your Kindle email ID.
Go to the “Settings” page by either tapping at the top of the screen and then on the quick action icon, or by tapping on the menu icon at the top-right corner of the Home screen and then on “Settings”.
Once the “Settings” page is open:
- Select “Device Options and go to Personalise Your Kindle”.
- Under “Send-to-Kindle E-mail”, you will see your Kindle email ID.
Note that you can email to your Kindle only from your registered email ID in Amazon.
If you want to include another email ID to send documents from:
- Sign in to your Amazon account.
- Tap on your name at the top-right corner.
- Select the “Manage Your Content and Devices and go to the “Settings” menu.
- Under “Approved Personal Document E-mail List”, add a new email ID to receive documents from.
3. Convert e-books to Kindle format
Amazon’s command-line tool called KindleGen can convert your non-Kindle format e-books (ePub, even HTML) to Kindle format. Once you have downloaded the tool, unzip it, and follow the instructions for your OS in the README file to make the conversion.
4. Turn off the screen
If you don’t want to see the screensaver you can turn it off. All you need to do is to press and hold the power button for about seven seconds until a dialog box appears with the options “Cancel”, “Restart”, and “Screen Off”. From here, select “Screen Off”, and you wont be seeing the screensaver any further.

5. Get a custom screensaver
In order to use custom screensavers in Kindle, you’ll need to jailbreak the device. If you are comfortable with tech hacks head on to this Lifehacker article on jailbreaking Kindle. Once the device is ready, you can add your images and use them as a screensaver.
Remember that jailbreaking a Kindle might void its warranty, so check the warranty terms and conditions of your device before proceeding.
6. Send web pages to Kindle
Download and install the “Send to Kindle” browser extension for Chrome or Firefox to send web articles to your Kindle device. You can also use services like IFTTT to send articles to Kindle.

7. Add a “Send to Kindle” button
If you have a website where you want to add a “Send to Kindle” option for your contents, such as articles or blog posts, go to Amazon’s Send to Kindle Button page and fill in all the relevant information to get the code for a “Send to Kindle” button that you can add to your website.
8. Subscribe for books
In some countries, the Amazon Prime membership includes Prime Reading where certain selected titles are free to read. But, if you can’t avail that offer, or you’re not a Prime member, you can still get unlimited reading of over a million titles using Kindle Unlimited.
This Amazon subscription service lets you read any number of titles under its label. Some popular series such as Harry Potter and Hunger Games are available under this scheme. You can look for more Kindle Unlimited Eligible books here.

9. Unfreeze the Kindle
Your Kindle can freeze (hang or stop working temporarily) at time. If such a thing happens turn off the screen and choose “Restart”.
If this doesn’t work (i.e. the dialog box doesn’t appear) press and hold the power button for 30 seconds. After 30 seconds, the indicator light will turn orange and blink four times. Release it then and the device will restart.
10. Hide recommendations
By default, you’ll see book recommendations on the Home screen. If you don’t want to see them follow these steps:
- Go to “Settings” and tap “Device Options”. From this menu go to “Personalise Your Kindle” and tap on “Advanced Options”.
- From “Advanced Options” turn off the “Home Screen View” option.
In Kindle Voyage and later editions, you might find an option to turn off recommendations on the “Personalise Your Kindle” page itself.
11. Convert scans into Kindle books
You can convert the scanned version of a physical book (in English) to a Kindle e-book by using Amazon’s Kindle Convert software.
12. Check remaining space
You can check how much space you have left in your Kindle by following these steps:
- Tap at the quick action icon at the top of the screen in order to go to the “Settings” page.
- Tap the menu icon shown at the top-right corner of the “Settings” page.
- Select “Device Info”.
Or, on the “Settings” page, select “Device Options”, then “Device Info”.
The “Device Info” page shows the MAC Address, Serial Number, Network Capability, and Firmware Version of the Kindle, along with the available free space in MB.
13. Update software manually
In case you are unable to connect your Kindle device to WiFi and want to manually update its software, head to Amazon’s software update page to download the latest software update for your device.
- Connect the Kindle to your computer via USB and open the Kindle drive in the computer (from My Computer or Finder).
- Copy the software update file into the root folder of your Kindle device.
- Disconnect the device from the computer.
- Go to the “Settings” page on your Kindle, and tap the menu icon.
- Tap the “Update Your Kindle” option to start the update process.
14. Borrow public library books
If you live in the US you can borrow Kindle books available in selected public libraries and send them to your device. The book you’ll borrow will only be available for a limited time. Also, you’ll need a library card and a PIN from the public library to borrow the books.
15. Get clear white portion
The E Ink technology used in Kindle leaves behind an imprint of previous text after changing the text on the screen at times. If that happens to you and you’re finding the trace of previously appeared text on the screen interfering with your reading experience, then you can enable “Page Refresh”.
It causes the screen to be refreshed for every new page that appears on the screen and keeps the white portion clear of any marks.
- Go to the “Settings” page.
- Select “Reading Options”.
- Turn on “Page Refresh”.
16. Zoom images
Press on an image in an e-book and hold for a second before lifting back your finger. A zoom icon (magnifying glass with a plus sign) will appear on the image. Tap the icon to zoom. To zoom further, pinch out with two fingers on the image.
17. Add “Send to Kindle” menu to your desktop
You can add a “Send to Kindle” context menu to your desktop. So, when you have a document you want to send to your Kindle device, just right-click (or two-finger-click) on the document, and select “Send to Kindle”.
To add this context menu, download the installer software created by Amazon, that installs the context menu to your computer. Here are the download links for PC and for Mac. Once downloaded, open the installer (or package), and follow the instructions to install the software.
18. Export highlights and notes
You can email your notes and highlights to yourself. When a book is open:
- Tap at the top of the screen and then on the menu button.
- Select “Notes” and tap “Export Notes”.
There’s another way to export all the notes in your Kindle. When your device is connected to a computer:
- Open the Kindle in File Explorer (from My Computer) or Finder.
- Open the “Documents” and go to “My Clippings.txt” file. It will have all the highlights and notes from the device.
19. Accessorize your Kindle
Besides a typical flip cover, there are other Kindle accessories you might find useful. If you have the starting-priced Kindle you won’t have the backlight feature in the hardware to be able to read in the dark. For such a device, check out clip-on reading lights to solve that problem.
The device comes with a USB cable only for charging but not with power adapters. Although you can use pretty much any USB power adapter that you already have, Amazon sells its own range of AC adapters that claim a less than four-hour charging time for Kindle.
If you have bought the pricier Kindle versions there are protection plans you might be interested in.
20. Get AWS Documentation
If you use an Amazon Web Service (AWS) you can get its documentation in Kindle format. To do so, go to the AWS Documentation page. Click on the service you want the documentation of, then on the link “Kindle” to get the free Kindle document sent to your device.
Read Also: 50 Websites to Download Free EBooks