Getting Started with Sass: Installation and the Basics
In this post, we are going to discuss a CSS Preprocessor called Sass or Syntactically Awesome Stylesheets.
If you have been following our previous posts on LESS, we are sure that you are familiar with the CSS Preprocessor. Both Sass and LESS are CSS Preprocessors which primarily extend the way we compose plain-static-CSS in more dynamic way using programming languages like Variables, Mixins, and Functions.
Installing Sass
Before we can compose Sass we need to install it. Sass is built upon Ruby. If you are working on a Mac, chances are, you already have Ruby installed. If you may to install Ruby in Windows, use this Ruby Installer.
After the installation is complete, you can go to Terminal (on a Mac) or in Command Prompt (on Windows) then type the following command line in it:
On Mac;
sudo gem install sass
On Windows;
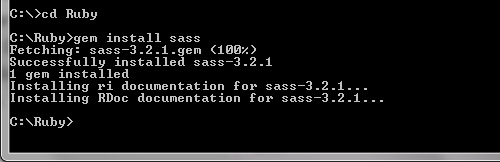
gem install sass
If the installation succeeds, you will have the following notification in your Terminal/Command Prompt.
Next, we need to select which directory for Sass to watch using the following command;
sass --watch path/sass-directory
The command line above will watch every .scss/.sass files in path/directory and whenever one of the files in that directory is changed, Sass will update the corresponding files or create one if none exists.
If we need Sass to generate the files in a specific directory, we can do it this way;
sass --watch path/sass-directory:path/css-directory
We can also watch a specific file rather than the directory, with this command line;
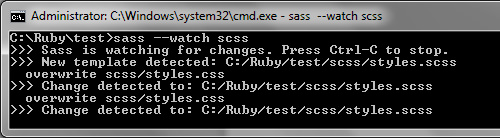
sass --watch path/sass-directory/styles.css
If the watch command succeeds, something like this notification below will appear in your Terminal/Command Prompt.
Further Reading: Auto-Compile Sass Files with Sass 3
Sass Applications
However, if you hate working through Terminal or Command Prompt, you can use some applications for Sass. The free option is Scout; it is built on Adobe Air so it can be run on all OS (Windows, OSX and Linux).
However, it runs very slow as some have previously reported.
So if you don’t have the patience for it, there are also some paid options. The price varies for each app, Compass.app goes for $10, Fire.app, $14 and Codekit for $25.
Code Highlighting
Although Sass is primarily a CSS extension, your current editor may not highlight the syntax properly. Fortunately, there are already some packages for almost any code editor to enable .sass or .scss code highlighting.
If you are working with Sublime Text 2 like I do, you can use these packages; Sublime Text HAML & Sass and Sublime Text 2 Sass Package, and for an easier way, you can install one of these packages through Package Control.
Sass Language
Sass and LESS actually share some common languages, below are a few of them.
Variables
$color-base: #000;
$width: 100px;
The only difference from LESS variables is that the variable in Sass is defined with a $ sign.
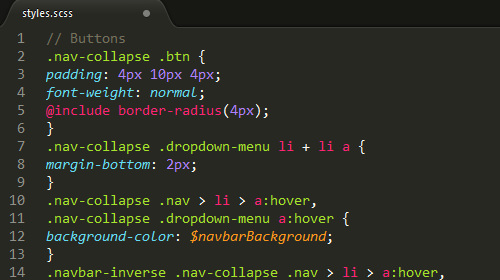
Nesting Rules
header {
	width: 980px;
	height: 80px;
	nav {
		ul {
			list-style: none;
			padding: none;
			margin: none;
		}
		li {
    		display: inline;
			a {
				text-decoration: none;
			}
  		}
  	}
}
Mixins and Functions
@mixin border-radius($radius) {
  -moz-border-radius: $radius;
  -webkit-border-radius: $radius;
  -ms-border-radius: $radius;
  border-radius: $radius;
}
Operations
li {
    width: $width/5 - 10px;
}
Conditional Statement
@if lightness($color-base) >= 51% {
	background-color: #333333;
} @else {
	background-color: #ffffff;
}
In LESS you may do a similar thing via Guard expression, which we have covered about in this tutorial.
Final Thought
And that’s it. In the next post, we will start exploring the Sass languages and its companion, Compass. Stay tuned.