Create a Fan-Out with Bounce Effect Using CSS3 Animation
Did you know that geometric transformations added to HTML elements with the transformCSS property such as scale, skew, and rotate can be animated? They can be animated using the transition property and @keyframes animations, but what’s even cooler is that animated transformations can be taken up a notch with the addition of a little bounce effect, using the cubic-bezier() timing function.
In a nutshell, cubic-bezier() (in CSS) is a timing function for transitions. It specifies the speed of the transition, and among other things, it can be also used to create bouncing effect in animations.
In this post, first we’re going to create a simple transformation animation to which we later add a cubic-bezier() timing function. At the end of this tutorial, you’ll understand how to create an animation that uses both a fan-out and a bounce effect. Here is the final result (click to see effect).
Read Also: A Look Into: Cubic-bezier in CSS3 Transition
The demo is inspired by this beautiful Dribbble shot by Christopher Jones about an animated location marker.

1. Creating the leaves
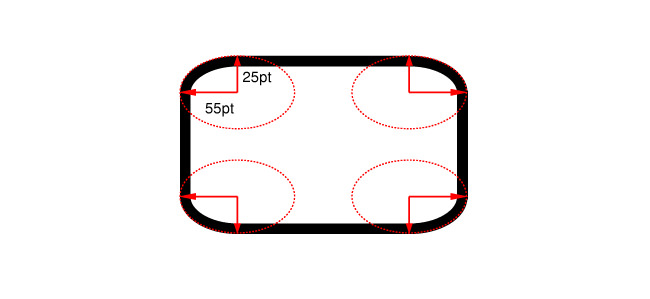
The shape of the location marker is made up of five (let’s call them) leaves. To create the oval shape of a leaf, let’s use the border-radius CSS property. The border-radius of a single corner is made up of two radii, horizontal and vertical, like shown below.
The border-radius property has many different syntaxes. We will use a more complicated one for the shape of the marker:
border-radius: htl htr hbr hbl / vtl vtr vbr vbl;
In this syntax, horizontal and vertical radii are grouped together; h & v represent horizontal & vertical radii, and t, l, b & r represent top, left, bottom & right corners. For instance, vbl stands for the vertical radius of the bottom-left corner.
If you give only one value for either the horizontal or the vertical side, that value will be copied to all the other horizontal or vertical radii by the browser.
To create a vertical oval shape, keep the horizontal radii at 50% for all corners, and adjust the vertical ones, till the desired shape is seen. The horizontal side will use only one value: 50%.
The vertical radii of the top-left and top-right corners will be 30%, while the bottom-left and bottom-right corners will use the 70% value.
HTML
<div class="pinStarLeaf"></div>
CSS
.pinStarLeaf {
  width: 60px;
  height: 120px;
  border-radius: 50%/30% 30% 70% 70%;
  background-color: #B8F0F5;
}

2. Multiplying the leaves
Since the marker will fan out showing five leaves, we create four more copies of the leaf in different colors, and with absolute positioning in order to stack them on each other.
HTML
<div id="pinStarWrapper">
  <div class="pinStarLeaf"></div>
  <div class="pinStarLeaf"></div>
  <div class="pinStarLeaf"></div>
  <div class="pinStarLeaf"></div>
  <div class="pinStarLeaf"></div>
</div>
CSS
#pinStarWrapper{
  width: 300px;
  height: 300px;
  position: relative;
}
.pinStarLeaf{
    width: 60px;
    height: 120px;
    position: absolute;
    border-radius: 50%/30% 30% 70% 70% ;
    left: 0;
    right: 0;
    top: 0;
    bottom: 0;
    margin: auto;
    opacity: .5;
}
.pinStarLeaf:nth-of-type(1){
  background-color: #B8F0F5;
}
.pinStarLeaf:nth-of-type(2){
  background-color: #9CF3DC;
}
.pinStarLeaf:nth-of-type(3){
  background-color: #94F3B0;
}
.pinStarLeaf:nth-of-type(4){
  background-color: #D2F8A1;
}
.pinStarLeaf:nth-of-type(5){
  background-color: #F3EDA2;
}
3. Capturing Click Event & Improving Aesthetics
Let’s add a checkbox with the #pinStarCenterChkBox identifier to capture the click event. When the checkbox is checked, the leaves will fan out (rotate). We also need to add a white circle with the #pinStarCenter identifier for aesthetics. It will be positioned on top of the marker, and it will be the center piece of the location marker.
HTML
We place the checkbox before, and the white circle after, the leaves:
<div id="pinStarWrapper">
  <input type="checkbox" id="pinStarCenterChkBox">
  <div class="pinStarLeaf"></div>
  <div class="pinStarLeaf"></div>
  <div class="pinStarLeaf"></div>
  <div class="pinStarLeaf"></div>
  <div class="pinStarLeaf"></div>
  <div id="pinStarCenter"></div>
</div>
CSS
First, we set the basic styles for the checkbox and the covering circle:
#pinStarCenter, #pinStarCenterChkBox{
    width: 45px;
    height: 50px;
    position: absolute;
    left: 0;
    right: 0;
    top: -60px;
    bottom: 0;
    margin: auto;
    background-color: #fff;
    border-radius: 50%;
    cursor: pointer;
}
#pinStarCenter, .pinStarLeaf{
  pointer-events: none;
}
#pinStarCenter > input[type="checkbox"]{
    width: 100%;
    height: 100%;
    cursor: pointer;
}
As each leaf will rotate along the z-axis in different angles, we need to set the transform: rotatez(); property accordingly, to create a star shape. We also apply the transition property for the rotation effect (more precisely we use the transition: transform 1s linear rule for the leaves).
#pinStarCenterChkBox:checked ~ .pinStarLeaf{
    transition: transform 1s linear;
}
#pinStarCenterChkBox:checked ~ .pinStarLeaf:nth-of-type(5){
    transform: rotatez(35deg);
}
#pinStarCenterChkBox:checked ~ .pinStarLeaf:nth-of-type(4){
    transform: rotatez(105deg);
}
#pinStarCenterChkBox:checked ~ .pinStarLeaf:nth-of-type(3){
    transform: rotatez(180deg);
}
#pinStarCenterChkBox:checked ~ .pinStarLeaf:nth-of-type(2){
    transform: rotatez(255deg);
}
#pinStarCenterChkBox:checked ~ .pinStarLeaf:nth-of-type(1){
    transform: rotatez(325deg);
}
If you have a look at the CSS above, you can see from the presence of the #pinStarCenterChkBox:checked ~ general sibling selector that we only add the transition and transform properties when the checkbox is checked (when the user clicked the marker).
4. Modifying the Center of the Rotation
By default, the center of the rotation is positioned in the center of the rotated element, in our case, at the center of the leaves. We need to move the center of the transformation to the inner end of the leaves. We can do this by using the transform-origin CSS property that changes the position of transformed elements.
To make the rotation effect work properly, let’s add the two following rules to the .pinStarLeaf selector in our CSS file:
.pinStarLeaf{
    transform-origin: 30px 30px;
    transition: transform 1s linear;
}
Let’s see our fan out animation in action — at this point, without the bounce effect yet. Click on the white circle, on top of the marker.
Understanding How ubic-Bezier() Works
Now, to add the bounce effect, we need to replace the linear timing function with cubic-bezier() in the transition declarations in our CSS file.
But first, let’s understand the logic behind the cubic-bezier() timing function so that you can easily make sense of the bounce effect.
The syntax for the cubic-bezier() function is the following, d and t are distance and time, and their values typically range between 0 and 1:
cubic-bezier (t1, d1, t2, d2)
Even though explaining CSS cubic-bezier() in terms of distance and time isn’t accurate, it’s a lot easier to understand it this way.
Assume there’s a box that moves from point A to B in 6 seconds. Let’s use the following cubic-bezier() timing function for the transition with the t1 = 0 and d1 = 1 values.
/* t1 = 0 , d1 = 1, t2 = 0, d2 = 0 */
cubic-bezier(0,1,0,0)
In almost no time, the box moves from A to mid-point, and takes the rest of the time reaching B.
Let’s try the same transition with values t1 = 1 and d1 = 0.
/* t1 = 1 , d1 = 0, t2 = 0, d2 = 0 */
cubic-bezier(1,0,0,0)
For the first three seconds, the box doesn’t move much, and later it almost jumps to mid-point, and starts moving steadily towards B.
As you can see, d1 controls the distance between A & the mid-point, and t1 the time it takes to reach the mid-point from A.
Let’s use d2 and t2 now. Both t1 and d1 will be 1, and t2 = 1 and d2 = 0.
/* t1 = 1 , d1 = 1, t2 = 0, d2 = 1 */
cubic-bezier(1,1,0,1)
The box moves almost halfway in 3 seconds (due to t1 = 1, d1 = 1), and in no time it jumps to point B.
The last example swaps the previous values of t2 and d2:
/* t1 = 1 , d1 = 1, t2 = 1, d2 = 0 */
cubic-bezier(1,1,1,0)
The box moves almost halfway in 3 seconds (due to t1 = 1, d1 = 1), then for 3 more seconds doesn’t move much before jumping to point B.
These examples show that d2 and t2 control the distance and time it takes the box to go from mid-point to point B.
Although you probably didn’t need this long (yet sparse) explanation of cubic-bezier() at this point, I think it will help you understand this function better. Now, where does the bounce come in all of this?
5. Adding the Bounce Effect with Cubic-Bezier()
The key parameters for the bounce effect are the distances, d1 and d2. A d1 value of less than 1 takes the box behind point A before proceeding towards B at the beginning of animation.
A d2 value of more than 1 takes the box beyond point B before coming back to rest at B at the end of animation. Hence the back and forth bounce effect.
I’ll now add the cubic-bezier() values directly to our demo in place of the former linear value of the transition property, and let you see the results.
#pinStarCenterChkBox:checked ~ .pinStarLeaf{
    transition: transform 1s cubic-bezier(.8,-.5,.2,1.4);
}
Here’s the final result, a CSS-only fan-out animation with a bounce effect:
For comparison and to understand the bounce effect better, here is how the cubic-bezier() value of the animation behaves when its applied to our example box: