Streamline Your Development: Automating Tasks in Visual Studio Code
Using a build tool like Grunt or Gulp can significantly enhance your efficiency during the development process by automating repetitive tasks. If you choose Visual Studio Code as your primary code editor, you can streamline your workflow even further, boosting your productivity.
Built on Node.js, Visual Studio Code enables you to run tasks directly within the editor, keeping your development smooth and uninterrupted. This guide will walk you through the steps to set up and automate tasks in Visual Studio Code.
Let’s begin.
Getting Started: What You’ll Need
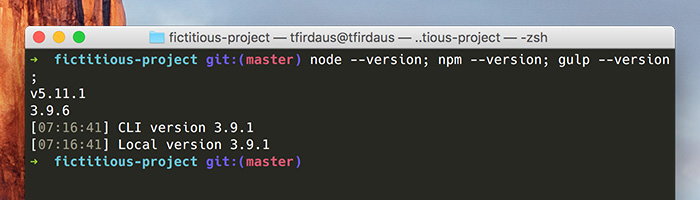
Before diving into automation, ensure you have Node.js, NPM (Node Package Manager), and your chosen build tool’s CLI (Command Line Interface) installed on your system. You can quickly check if they’re installed by entering a few command lines.
I’ll assume your project files and directories, such as the config file (like gulpfile.js or Gruntfile.js), and project dependencies listed in package.json, are already in place and correctly installed.
Here’s an example of a project structure we’ll use for this demonstration:
.
├── css
│   ├── sass
├── gulpfile.js
├── index.html
├── js
│   ├── src
├── node_modules
└── package.json
In our project, we use Gulp as the build tool. Here are a few tasks configured in our gulpfile.js:
var gulp = require('gulp');
var uglify = require('gulp-uglify');
var sass = require('gulp-sass');

var jsSrc = './js/src/**/*.js';
var sassSrc = './css/sass/**/*.scss';

gulp.task('scripts', function() {
  return gulp.src(jsSrc)
    .pipe(uglify())
    .pipe(gulp.dest('./js'));
});

gulp.task('styles', function() {
  return gulp.src(sassSrc)
    .pipe(sass({ outputStyle: 'compressed' }))
    .pipe(gulp.dest('./css'));
});

gulp.task('automate', function() {
  gulp.watch([sassSrc, jsSrc], ['scripts', 'styles']);
});

gulp.task('default', ['scripts', 'styles', 'automate']);
We have outlined four key tasks:
scripts: Compiles and minimizes JavaScript files using Gulp’s UglifyJS plugin.styles: Compiles SCSS files into compressed CSS.automate: Uses Gulp’s built-inwatchutility to automate thestylesandscriptstasks.default: Executes all the above tasks simultaneously.
With the build tool configured, you can now automate these tasks defined within the gulpfile.js. If you’re new to these tools, consider reading our introductory posts:
- How To Use Grunt To Automate Your Workflow
- Getting Started With Gulp.js
- The Battle Of Build Scripts: Gulp vs Grunt
Running and Automating Tasks
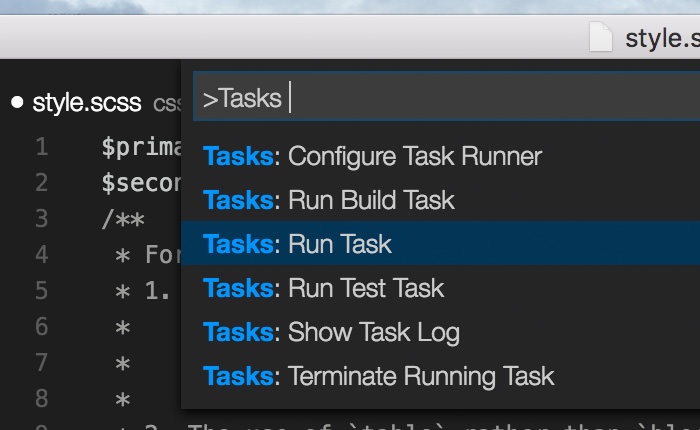
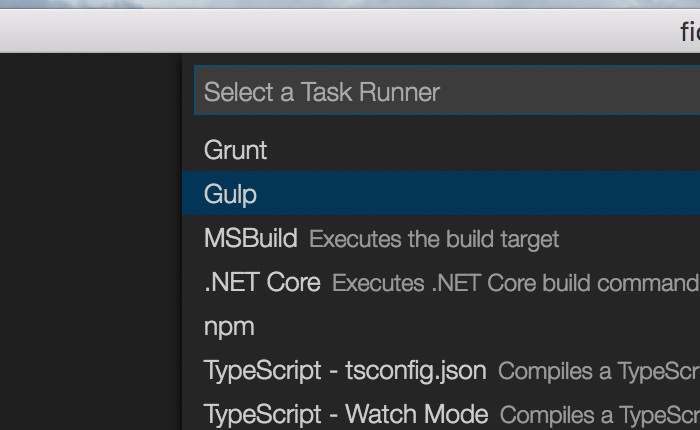
Running and automating tasks in Visual Studio Code is quite straightforward. To start, open the Command Palette by pressing Shift + Cmd + P or through the menu bar under View > Command Palette, whichever you prefer. Then, simply type Tasks and choose “Tasks: Run Task” from the displayed options.
Visual Studio Code intelligently detects that we are using Gulp, accesses the gulpfile.js, and displays the list of tasks we have defined within the file.
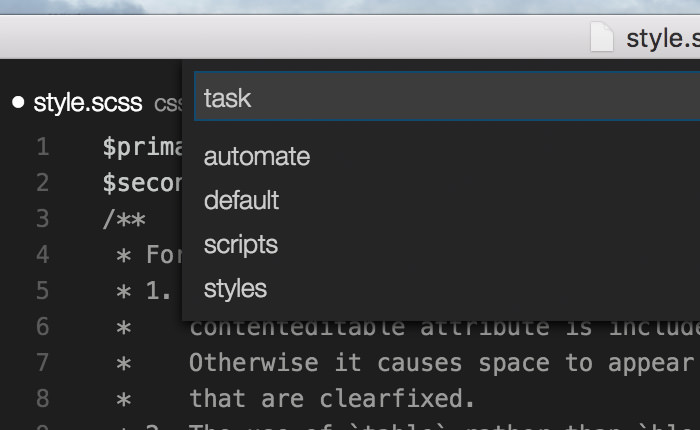
Let’s select the default task. This will compile SCSS stylesheets and JavaScript files, and also trigger the automate task, which allows the styles and scripts tasks to run automatically going forward.
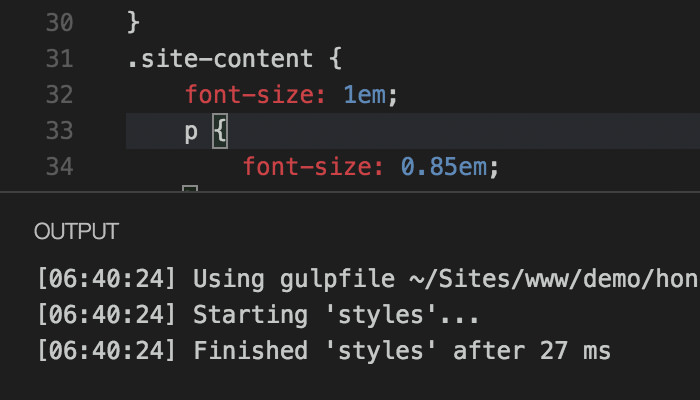
Any changes to a stylesheet or JavaScript file will be automatically compiled. Visual Studio Code also provides timely reports for every success and error that occur during the build process.
Deep Integration
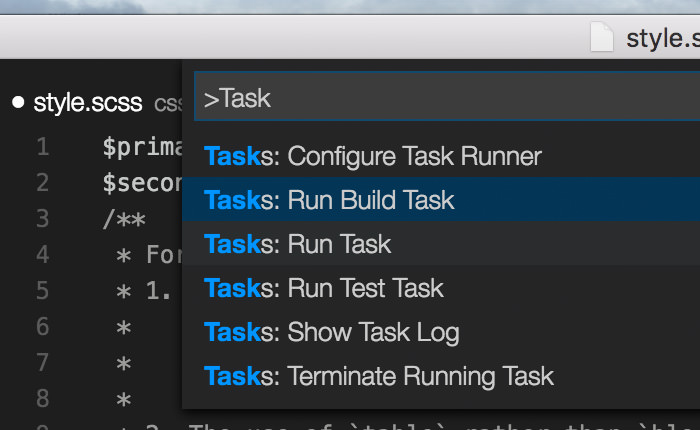
Integrating your project into Visual Studio Code to streamline your workflow is straightforward and quick. Begin by launching the Command Palette and selecting “Configure Task Runner.” Visual Studio Code will then display a list of supported build tools. In our example, we’ll select “Gulp,” as that is our build tool of choice for this article.
Visual Studio Code will now create a new file named tasks.json under .vscode in your project directory, initially containing minimal configuration:
{
 "version": "0.1.0",
 "command": "gulp",
 "isShellCommand": true,
 "args": [
 "--no-color"
 ],
 "tasks": []
}
To set up your tasks, extend the tasks value as follows:
{
 "version": "0.1.0",
 "command": "gulp",
 "isShellCommand": true,
 "args": [
 "--no-color"
 ],
 "tasks": [{
 "taskName": "default",
 "isBuildCommand": true
 }]
}
The taskName indicates the task from our gulpfile.js that we wish to run, and the isBuildCommand property designates the default task as the build command. Now, you can quickly run this task using the key combination Shift + Cmd + B, or by selecting “Run Build Task” from the Tasks search results in the Command Palette.
Conclusion
Visual Studio Code is proving to be a code editor with a bright future. It’s quick, equipped with powerful out-of-the-box features, including the task automation capabilities we’ve explored in this article.
We’ve demonstrated how to run tasks using Gulp, though Grunt is another viable option. We’ve also covered how to integrate these tasks into Visual Studio Code and execute them using simple key combinations, streamlining your workflow significantly.
Hopefully, this guide has been a useful resource for setting up and running build tasks. For more ways to enhance your Visual Studio Code experience, don’t forget to check out our other articles:
- Visual Studio Code: 5 Awesome Features That Make It A Frontrunner
- How to Customize Visual Studio Code
- 8 Powerful Visual Studio Code Extensions for Front-end Developers
- Visual Studio Code: Increasing Productivity via Key Binding Management
- The Influence of Microsoft Inclusive Design in Visual Studio Code