Create Your Own Advent Calendar with JavaScript
Advent marks a period of anticipation leading up to Christmas, starting four Sundays before December 25. Traditionally, this time is tracked using an Advent Calendar or an Advent Wreath. While Advent doesn’t have a set start date, Advent Calendars typically kick off on December 1.
Advent Calendars vary widely depending on local traditions but often feature a large rectangular card with 24 windows or doors. These doors open to reveal daily messages, poems, prayers, or small gifts as you count down from December 1 to 24.
In this tutorial, you’ll learn how to craft your own Advent Calendar using object-oriented JavaScript. This project uses plain JavaScript, making it simple to integrate into your website.
Designing Your JavaScript Advent Calendar
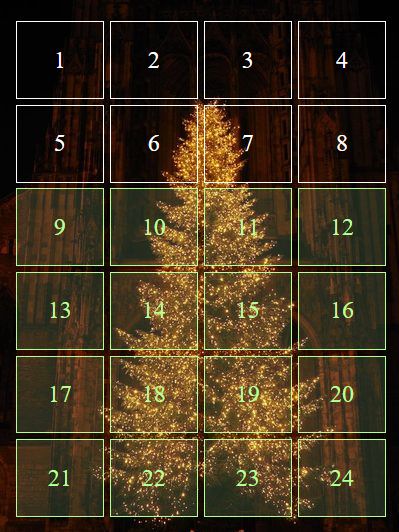
Our digital Advent Calendar features 24 interactive doors set against a festive background. Each door, when clicked, reveals a Christmas-themed quote in an alert message. True to tradition, doors can only be opened on their respective dates, mimicking the suspense of a physical Advent Calendar. Active doors are distinguished with a white border and background, while inactive ones are light green. We leverage HTML5, CSS3, and JavaScript to craft this engaging holiday countdown.
Step 1: Setting Up File Structure and Resources
To begin, select a fitting background image. For my project, I opted for a portrait-oriented image from Pixabay, arranging the calendar in 4 columns and 6 rows. You can choose a landscape orientation if preferred – simply adjust the door positions in the JavaScript code to 6 columns and 4 rows.
Once you have your image, create a folder named /images in your project directory and save the image there. This will be our sole image resource for the project.

Next, prepare the JavaScript files by creating a /scripts folder in the root directory. Add two empty files named calendar.js and messages.js. Calendar.js will manage the calendar’s functionality, while messages.js will store the pop-up messages for each day.
Additionally, create two empty files named index.html and style.css in the root directory for your HTML and CSS code, respectively.
With these resources and file structure in place, you’re all set to start building your Advent Calendar. Here’s what your root folder should look like:

Step 2: Assembling the HTML Structure
The HTML structure for our Advent Calendar is straightforward. The CSS stylesheet is linked within the <head> section, while the two JavaScript files are placed at the bottom of the <body> section to ensure they load after the HTML elements they manipulate. This setup prevents execution errors that occur if scripts are loaded before the HTML elements they reference.
The core of the Advent Calendar is contained within an <article> semantic tag. The festive background image is embedded directly using an <img> tag rather than as a CSS background to facilitate easier DOM manipulation.
Below the image, an empty unordered list with the ID “adventDoors” is prepared. This list will be dynamically filled by the JavaScript. For users without JavaScript enabled, they will see only the static Christmas image, ensuring basic functionality remains intact.
<!DOCTYPE html>
<html lang="en">
<head>
    <meta charset="utf-8">
    <title>Advent Calendar</title>

    <!-- Mobile-friendly viewport -->
    <meta name="viewport" content="width=device-width, initial-scale=1.0">

    <!-- Style sheet link -->
    <link href="style.css" rel="stylesheet" media="all">
</head>

<body>

    <article>
        <h1>Advent Calendar</h1>

        <img src="advent-calendar-javascript/background.jpg" alt="Advent Calendar" id="adventCal">

        <ul id="adventDoors"></ul>
    </article>

    <!-- Scripts at the end to ensure HTML elements load first -->
    <script src="scripts/messages.js"></script>
    <script src="scripts/calendar.js"></script>
</body>
</html>
Step 3: Filling the “Messages” Array with Quotes
To bring our Advent Calendar to life, we need 24 festive quotes. I’ve selected my favorites from GoodReads. You can choose your own source for quotes that resonate with the holiday spirit.
In the scripts/messages.js file, we will separate these quotes from the main functionality. Each quote is stored within a nested array structure in the messages array, with each element consisting of a quote and its author. Populate your array using the following structure:
var messages = [
    ["Quote 1", "Author 1"],
    ["Quote 2", "Author 2"],
    ...
    ["Quote 24", "Author 24"]
];
Step 4: Crafting Basic CSS Styles for the Doors
Before scripting the door functionality, we need to establish the visual design using CSS. Envisioning the final layout, we will organize the doors into 4 columns and 6 rows. To achieve this, we use position: relative for the container and position: absolute for each door, allowing precise control over their placement through additional CSS properties specified in the JavaScript.
It’s also crucial to distinguish between active and inactive doors. The .disabled class will be applied dynamically by JavaScript to inactive doors. Below, you’ll find the CSS needed for the enabled state (white border and text with a translucent white background on hover) and the disabled state (light green text and border with a translucent light green background). Feel free to adjust the colors and styles to match your design preferences.
ul#adventDoors {
    position: relative;
    list-style: none;
    padding: 0;
    margin: 0;
}
#adventDoors li {
    position: absolute;
}
#adventDoors li a {
    color: #fff;
    width: 100%;
    height: 100%;
    font-size: 24px;
    text-align: center;
    display: flex;
    flex-direction: column;
    justify-content: center;
    text-decoration: none;
    border: 1px solid #fff;
}
#adventDoors li a:not(.disabled):hover {
    background-color: rgba(255, 255, 255, 0.15);
}
#adventDoors li a.disabled {
    border-color: #b6fe98;
    background-color: rgba(196, 254, 171, 0.15);
    color: #b6fe98;
    cursor: default;
}
Step 5: Initializing Global Variables
From this point, our focus shifts exclusively to the scripts/calendar.js file. We need to define two global variables essential for our Advent Calendar’s functionality.
The myCal variable represents the calendar image, now a JavaScript object. This image was embedded in the index.html file back in Step 2. We’ll be positioning doors over this image in Step 7. We identify the image in our script using the getElementById() method, making myCal an HTMLImageElement DOM object.
The currentDate variable captures today’s date, which helps our script determine which doors should be active or inactive. This is achieved by creating a new instance of the Date class.
Insert this code at the beginning of your calendar.js file:
var myCal = document.getElementById("adventCal");
var currentDate = new Date();
Step 6: Defining the “Door” Class
Our calendar will feature 24 doors, each represented by an instance of a “Door” class. This class takes two parameters: calendar, the background image, and day, the specific day in December it represents.
The values for these parameters will be assigned during the final instantiation phase in Step 8. Here, we outline the five properties and one method that constitute the Door class. The method content() will be discussed in the next step.
Properties: “width” & “height”
The width and height properties dynamically adjust to the size of the background image. We use multipliers to leave space for margins between doors and along the edges of the calendar.
Property: “adventMessage”
This property stores the quote and author for each door, retrieved from the messages[] array based on the current date. For example, on December 1st, messages[0] is accessed since arrays in JavaScript are zero-indexed.
Properties: “x” & “y”
The x and y properties determine the precise position of each door, aiding in setting the CSS top and left properties. These calculations use margins and multipliers to ensure proper placement within the grid structure defined in Step 4.
function Door(calendar, day) {
    this.width = calendar.width * 0.95 / 4 - (calendar.width * 0.1);
    this.height = calendar.height * 0.95 / 6 - (calendar.height * 0.1);
    this.adventMessage = 'Day ' + day + ': "' + messages[day - 1][0] + '" by ' + messages[day - 1][1];
    this.x = calendar.width * 0.04 * (day % 4);
    this.y = Math.floor(day / 4) * (calendar.height * 0.11);

    this.content = function() {
        // Content method details to follow in the next step
    };
}
Step 7: Implementing the “Content()” Method for Displaying Doors
The content() method is crucial as it dynamically displays doors within the browser. We start by creating a new DOM node, node, to generate the <li> elements. Each of these elements represents a door within the unordered list #adventDoors, previously defined in our HTML.
Once the Door class is instantiated 24 times (as we’ll do in Step 8), we will have 24 corresponding <li> elements. These are added to the unordered list using the appendChild() method.
Each door’s unique identifier is set using the node.id property, formatting each as id=”door1″, id=”door2″, etc. This setup is vital for the looping mechanism in the next step.
The door’s inline style is defined via the node.style.cssText property, incorporating CSS rules directly within our HTML. This application uses positional attributes and dimensions defined in Step 6.
An <a> tag is embedded within each door to make them interactive, using the innerNode variable. This link is appended to the corresponding list item and displays the door number using the innerHTML property. The href=”#” attribute ensures that the links are clickable but do not navigate away from the page.
In the final conditional check, we determine whether a door should be enabled or disabled based on the current date and whether it’s December, utilizing JavaScript’s getMonth() method. Doors corresponding to future dates are disabled, and an appropriate CSS class is applied to indicate this state. Conversely, enabled doors will display an Advent message upon clicking.
this.content = function() {
    var node = document.createElement("li");
    document.getElementById("adventDoors").appendChild(node);
    node.id = "door" + day;
    node.style.cssText = "width: " + this.width + "px; height: " + this.height +
    "px; top: " + this.y + "px; left: " + this.x + "px;";

    var innerNode = document.createElement("a");
    document.getElementById(node.id).appendChild(innerNode);
    innerNode.innerHTML = day;
    innerNode.href = "#";

    if ((new Date().getMonth() + 1) < 12 || new Date().getDate() < day) {
        innerNode.className = "disabled";
        innerNode.onclick = function() { return false; };
    } else {
        var adventMessage = this.adventMessage;
        innerNode.onclick = function() { alert(adventMessage); return false; };
    }
};
Step 8: Instantiating the "Door" Objects
We initialize the Door class 24 times using an Immediately Invoked Function Expression (IIFE). This method is ideal as it executes immediately without needing to store the result in a variable.
We create an array, doors[], to hold our Door objects. Looping from 1 to 24, we instantiate each Door and invoke its content method, thereby preparing all the doors for display.
(function() {
    var doors = [];

    for (var i = 0; i < 24; i++) {
        doors[i] = new Door(myCal, i + 1);
        doors[i].content();
    }

    return doors;
})();