How to Register Custom Taxonomy For WordPress Users
The Custom Taxonomy feature has been introduced since WordPress 2.9. It allows you to create custom groups for Post, Page as well as Custom Post Types.
Say that you are building a book directory website, and you have created a Custom Post Type for posting the Books. By using Custom Taxonomy, you can create a custom taxonomy for it, called Genre. Within this Genre taxonomy, you can create a number of items (which technically is called terms) such as Fiction, Kids, or Biography for grouping the Books.
Unfortunately, at this point, we can’t register Custom Taxonomy to Users; at least not in a straightforward way as we would register it in the other Post Types. One perfect application that we could foresee from this idea is that we can use it to assign additional user attributes, such as their occupation, profession or organizational position, in place of registering a new set of User Roles. It also opens the possibility to query the users based upon the assigned taxonomy terms.
If this idea is something that may benefit your website, take a look at this tip.
Recommended Reading: How To Display List Of Authors With Pagination
Getting Started
First, we will install a plugin named User Taxonomies to simplify our job.
Once the plugin is activated. Go to GenerateWP to generate the Taxonomy codes. Put the code output in the functions.php file of your theme. This code snippet below is an example. Though, it has been stripped out to make this article look shorter. You can follow this link to see the full code.
if ( ! function_exists( 'user_staff_position' ) ) {
function user_staff_position() {
	register_taxonomy( 'staff_position', 'post', $args );
}
add_action( 'init', 'user_staff_position', 0 );
}
Now, change the Post Type parameter in the following line:
register_taxonomy( 'staff_position', 'post', $args );
…from post to user, like so:
register_taxonomy( 'staff_position', 'user', $args );
Now, go to the WP-Admin, and you should find a new menu added under the Users menu, as seen below.

Assigning the Custom Taxonomy
Navigate to the new menu and create a few terms. For this example, we created two items: CEO and Managers.

Then go to user editing screen and assign one item from the taxonomy to the user.

Query the Users
We are going to display the users in the theme based on the given term (of the taxonomy). But before going further, let’s create a new page template. We are going add the codes throughout the following section within this new template.
In this particular case, we won’t be able to query the users with get_users or WP_User_Query; when you create a new WP_User_Query class, it does not output the Custom Taxonomy that is assigned to the users. Justin Tadlock, in his tutorial, shows us how to use the get_objects_in_term function, instead.
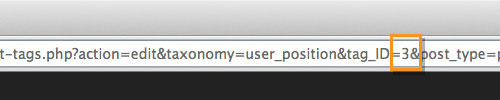
This function outputs the object ID (which in our case the object means the user) that are tied with the term. To use it, we need two parameters: the Term ID and the Taxonomy name. You can spot the Term ID at the Browser URL bar when you edit it as shown below.
Once you’ve found the ID, put it within the function, like so.
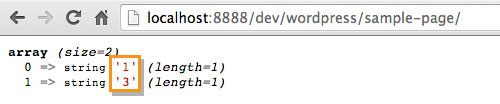
$users = get_objects_in_term(3, 'user_position');
You can use var_dump() to display the object IDs that have been retrieved; In my case, it returns the users with the ID of 1 and 3.
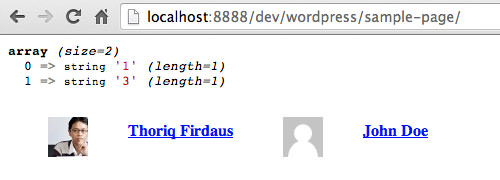
Using these IDs, we can also retrieve, for example, the user name and avatar.
<ul>
<?php if ( !empty( $users ) ) : ?>
	<?php foreach ( $users as $id ) : ?>
		<li class="user-entry">
			<figure><?php echo get_avatar( get_the_author_meta('email', $id), '40' ); ?></figure>
			<h5 class="user-title"><a href="<?php echo esc_url( get_author_posts_url( $id ) ); ?>"><?php the_author_meta( 'display_name', $id ); ?></a></h5>
		</li>
	<?php endforeach; ?>
<?php endif; ?>
</ul>
…and, finally, here is the result.
That’s it. You can freely modify the above codes to meet your requirement.